- Over 60% of homeowners attempt at least one DIY plumbing repair annually, yet the U.S. faces a 500,000+ plumber shortage in 2026, making basic skills more valuable than ever.
- Simple DIY fixes like toilet flappers, faucet aerators, and P-traps save $150-300 per repair compared to professional rates averaging $339 per visit.
- 4 tools under $50 handle 80% of common home plumbing repairs: a cup plunger, flange plunger, 25-ft drain snake, and adjustable wrench.
- Wrong pipe materials cause code violations that can fail home inspections and complicate real estate sales.
- Never pour chemical drain cleaners down metal pipes: they corrode galvanised steel and copper joints, turning a $50 clog into a $2,000 pipe replacement.
With 500,000+ plumber openings unfilled in 2026 and professional service averaging $339 per visit, knowing which repairs you can safely handle yourself is one of the most practical skills a homeowner can develop. The cost gap between a simple DIY fix and a service call grows wider every year.
This guide covers everything you need to get started:
- A skill-level breakdown of what is safe to DIY
- Essential tools for under $150
- Step-by-step overviews of the 10 most common plumbing repairs, each with a link to a full tutorial
- Safety rules before starting any job
- The costly mistakes most DIYers make
- When to call a professional
The goal isn't to replace a licensed plumber. It's to give you the knowledge to handle 80% of common household problems yourself and recognise the 20% that require professional help. Michael R. Jennings, a Licensed Master Plumber with 18 years and 2,400+ jobs in Dallas, TX, contributes expert guidance throughout this guide.
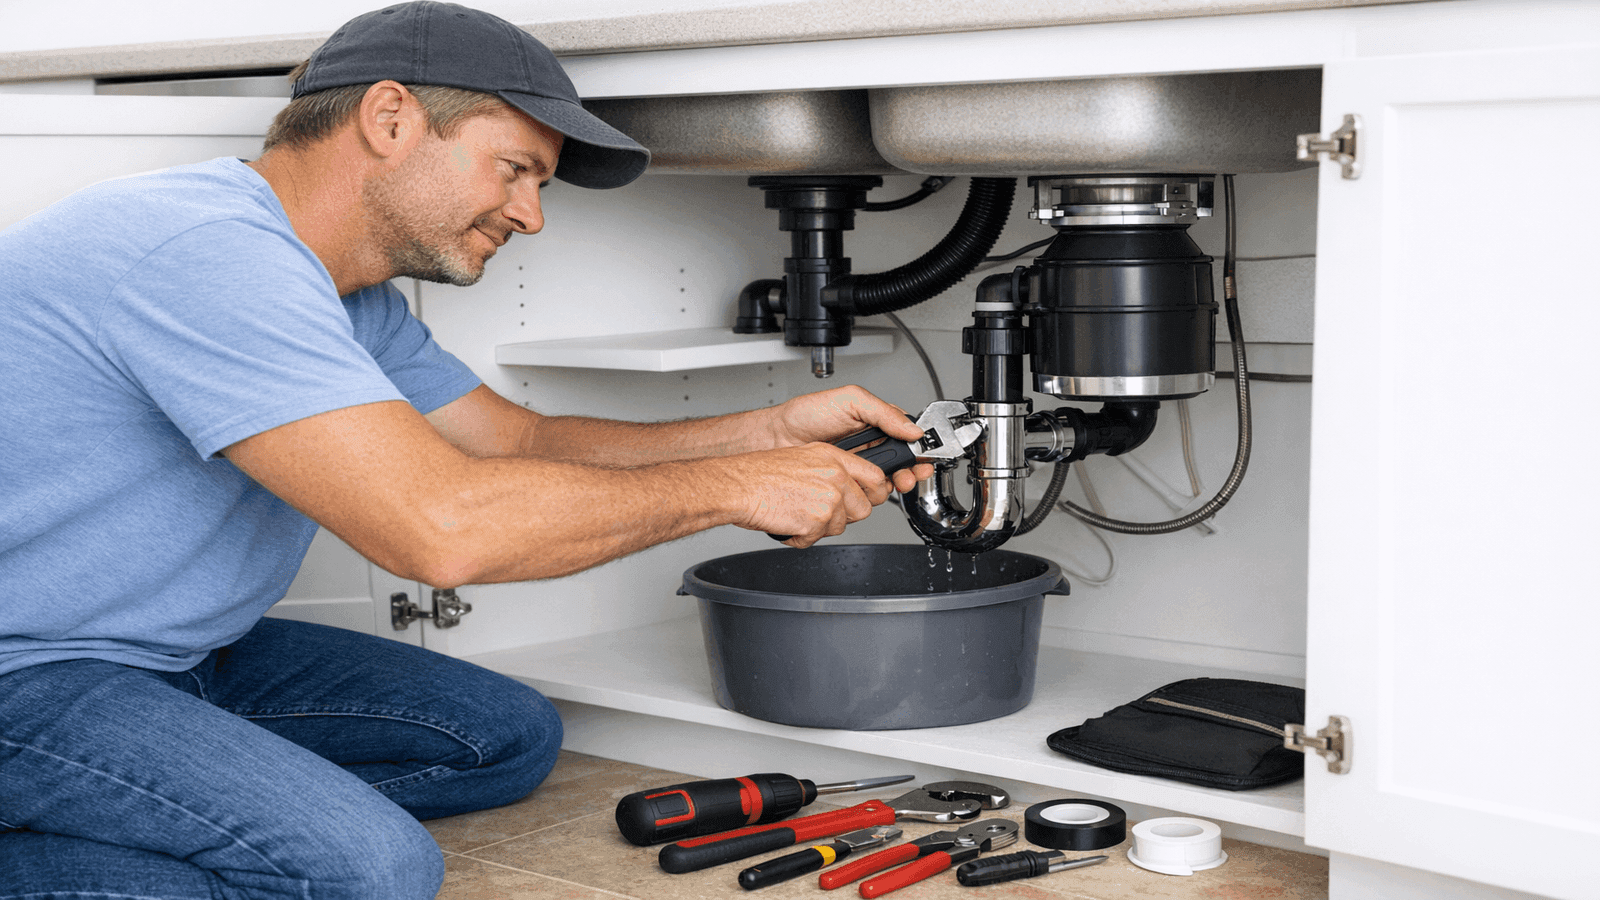
Photo: Homeowner performing DIY under-sink plumbing repair with proper tools and bucket

Get quotes from top-rated pros.
What Can You Realistically DIY?
Before picking up a wrench, it helps to understand the full range of what you're dealing with. Plumbing repairs span everything from a 10-minute toilet flapper swap to a full-house copper repipe that takes a licensed crew two days. Most homeowners can confidently handle repairs in the beginner and intermediate categories without prior experience.
| Skill Level | Example Tasks | Tools Needed | Time |
| Beginner | Unclog toilet, fix running toilet, swap flapper | Plunger, adjustable wrench | 15-45 min |
| Intermediate | Fix leaky faucet, replace P-trap, snake a drain | Basin wrench, drain snake, channel locks | 30-90 min |
| Advanced | Solder copper pipes, install shutoff valve | Torch, tubing cutter, pipe cutter | 1-3 hrs |
The beginner category covers repairs where a mistake is recoverable. You might get wet, or you might need to make a second trip to the hardware store, but you won't cause lasting damage. Intermediate repairs require more care around matching parts and working in tighter spaces. Advanced repairs have a meaningful failure cost if done incorrectly, so they're only worth attempting if you're willing to spend time learning the technique first.
Certain jobs should always go to a licensed plumber: gas line work of any kind, main sewer line replacement, whole-house repiping, and any work requiring permits behind walls. These aren't arbitrary rules. Mistakes in these categories cause structural water damage, failed inspections, or safety hazards that affect more than just the fixture you're working on.
There's also an insurance consideration worth knowing before you start. Most homeowner policies will not cover water damage caused by unlicensed DIY repairs. If a pipe fails because of improper installation you performed, you could be responsible for the full cost of the water damage out of pocket. Before starting any repair beyond basic fixture replacement, check your policy's language or call your insurer.
I get calls every week from homeowners who turned a $15 fix into a $1,500 problem by skipping one step. The difference between a successful DIY repair and a disaster is almost always preparation: shutting off the right valve, having the correct part in hand, and knowing when to stop.
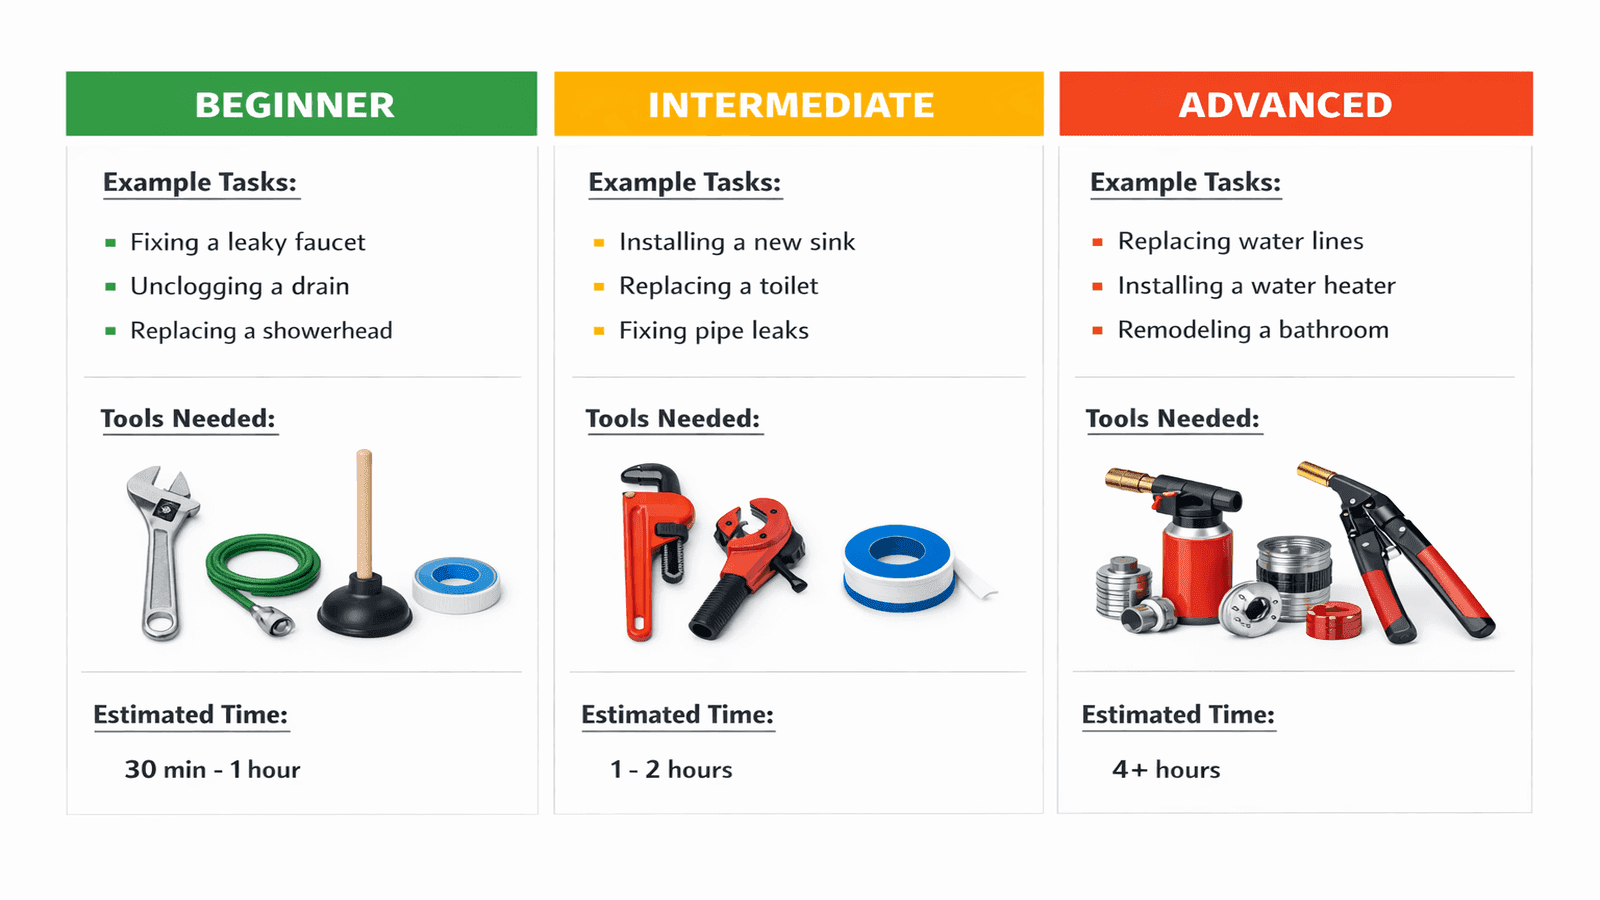
Photo: DIY plumbing skill level chart showing beginner, intermediate, and advanced task categories with tools and time estimates
Get quotes from top-rated pros.
Your DIY Plumbing Toolkit
You don't need a truck full of tools to handle most home plumbing repairs. A starter kit of 10 items covers the vast majority of what you'll encounter as a homeowner, from clogged drains to leaking fittings to toilet repairs.
You don't need a truck full of tools to handle most home plumbing repairs. A starter kit of 10 items covers the vast majority of what you'll encounter as a homeowner, from clogged drains to leaking fittings to toilet repairs.
| Tool | Purpose | Price |
| Cup plunger | Sink and tub clogs | $8-15 |
| Flange plunger | Toilet clogs | $12-20 |
| 25-ft hand drain snake | Deep drain clogs | $25-50 |
| Adjustable wrench | Supply lines, shutoff nuts | $15-25 |
| Channel-lock pliers | Grip pipe fittings | $20-35 |
| Basin wrench | Under-sink faucet nuts | $20-40 |
| Plumber's tape (PTFE) | Thread seal on fittings | $3-5 |
| Tubing cutter | Clean copper pipe cuts | $15-30 |
| Rubber gloves and eye protection | Safety | $10-20 |
| Bucket and old towels | Catch residual water | $5-10 |
The total for this kit runs under $150, which pays for itself on the first avoided service call. Do not buy the cheapest pliers and wrenches available. Low-quality tools strip fittings, round off nuts, and create new leaks in the process of trying to fix old ones. Mid-range tools from Channellock, Ridgid, or a reputable hardware store house brand hold up far better than bargain-bin options.
A few items on this list deserve specific attention. The flange plunger (the one with a rubber flap inside the cup) is designed only for toilets. A flat cup plunger on a toilet won't create enough seal in the trap to clear the clog. Keep both types: one for sinks and tubs, one for toilets.
The basin wrench looks odd and gets used for only one job, but that job is otherwise nearly impossible without it: reaching the mounting nuts under a sink that are set back 6-8 inches from the front edge. If you ever replace a faucet, you'll be grateful you have one.
Plumber's tape (PTFE tape) costs almost nothing and should be wrapped clockwise onto any threaded fitting before assembly. It fills microscopic gaps in threads and prevents slow seeps that only show up weeks later. Two or three wraps on any threaded joint before tightening is a standard practice on every professional repair.
Get quotes from top-rated pros.
The single tool that saves homeowners the most money is a $30 flange plunger. Every home should have one before they need it. I've taken emergency calls at midnight for toilet clogs that a proper plunger would have solved in 90 seconds. Buy the right tool now, not at 11 PM when you're panicking.
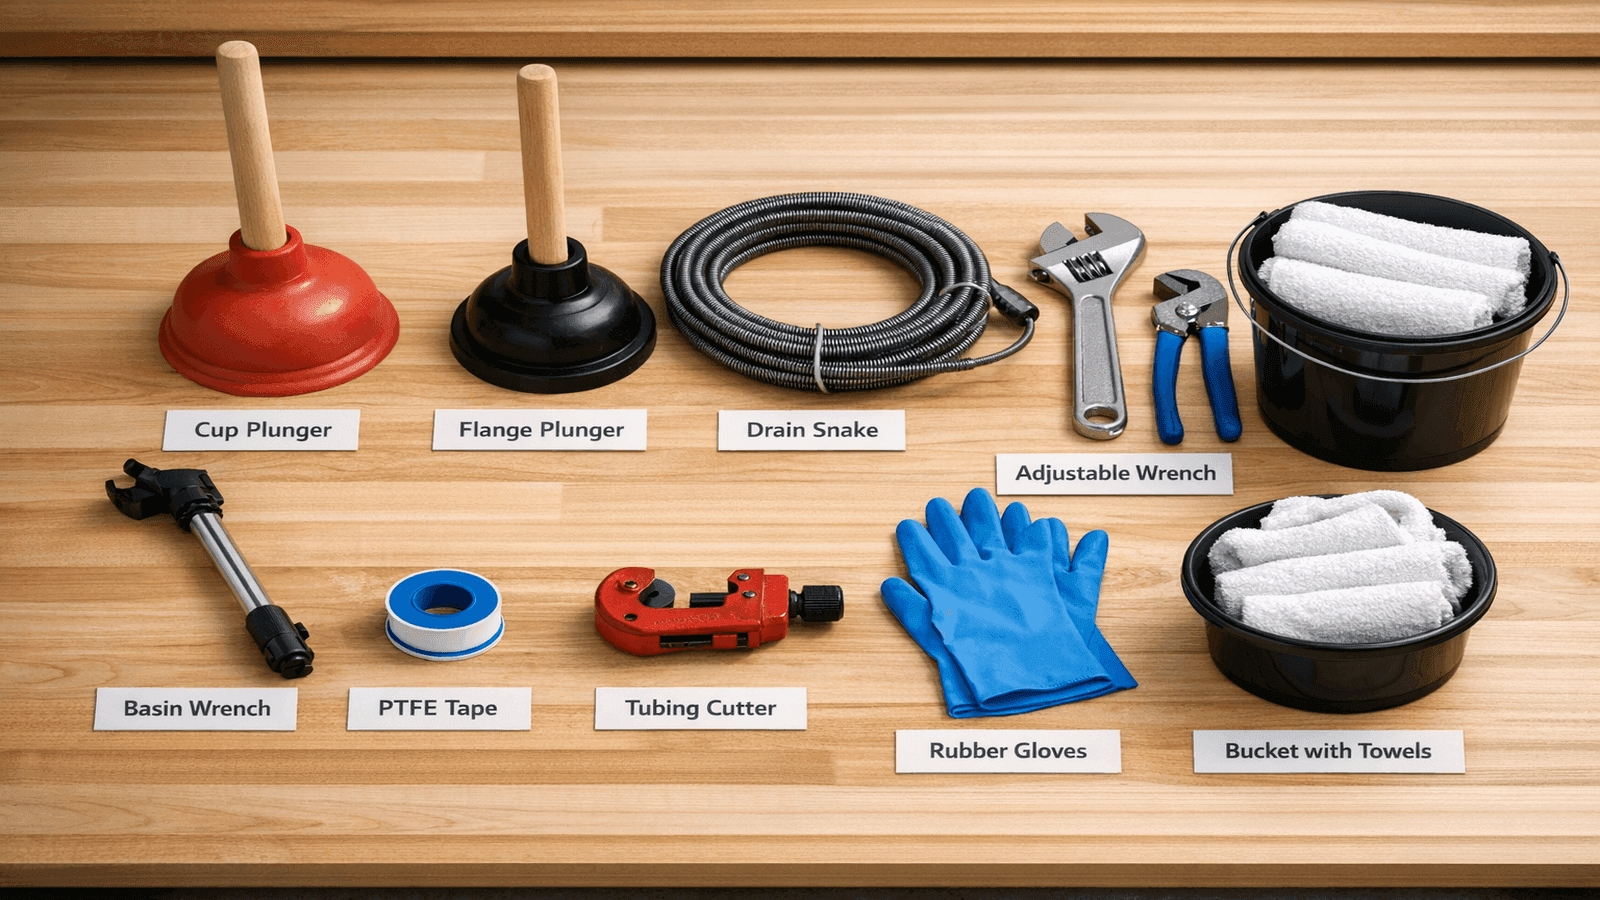
Photo: Organized DIY plumbing starter toolkit showing 10 essential tools labeled on a workbench
Toilet Repairs
Toilet problems account for nearly a third of all plumbing service calls in the U.S. The encouraging part: most of them are beginner-friendly fixes that take under 30 minutes and cost less than $20 in parts. The three most common issues each have their own dedicated guide below.
Understanding how a toilet works makes every repair faster. The tank holds about 1.6 gallons of water and releases it when you flush via the flapper at the bottom. The fill valve then refills the tank to the correct water level, controlled by a float. Most toilet problems trace back to one of these three components: the flapper, the fill valve, or the float height.
Fix a Running Toilet
A running toilet wastes more than 200 gallons of water per day. At average U.S. water and sewer rates, that adds $150-300 to your annual water bill from a problem that might only be audible as a faint hissing sound from the bathroom.
In about 80% of running toilet cases, a worn flapper is the only cause. The flapper is the rubber seal at the bottom of the tank. Over time, it degrades, cracks, or warps and no longer forms a complete seal. Water slowly trickles into the bowl, the fill valve detects the low water level and refills, and the cycle repeats constantly. Replacing the flapper takes 10 minutes and costs $5-15.
If a new flapper doesn't stop the running, the fill valve or the chain length connecting the flapper to the flush handle are the next places to check. All three are beginner-level repairs requiring only an adjustable wrench or sometimes just your hands.
Full step-by-step guide: Fix Running Toilet
How to Unclog a Toilet
A clogged toilet is the most common plumbing emergency in residential homes. Most clogs sit in the trap (the curved section directly inside the toilet base) or just beyond it and clear with the right tool and technique.
Five methods work in order of escalating effort: a flange plunger, hot water mixed with dish soap, a drain snake, enzyme-based cleaner, and calling a professional for clogs that don't respond to any of the above. Start with the plunger every single time. A proper 15-second plunge with a correctly seated flange plunger clears the majority of toilet clogs in under a minute.
This is a beginner-level repair that costs nothing if you already own the right plunger. The key is using a flange plunger (not a flat cup plunger) and fully submerging it in water before applying pressure.
Full step-by-step guide: How to Unclog a Toilet
Replace a Toilet Fill Valve
When the flapper isn't the problem but the toilet still runs, or when the refill cycle sounds weak, noisy, or unusually slow, the fill valve is typically the cause. Fill valves wear out after years of constant cycling and are inexpensive and straightforward to replace.
Universal fill valves fit most toilet brands and cost $10-20 at any hardware or plumbing supply store. The repair involves shutting off the supply line behind the toilet, flushing to drain the tank, disconnecting the supply hose, unthreading the old fill valve, and installing the new one. Adjusting the float height correctly is the one step that requires a bit of attention: set it too high and the toilet runs; set it too low and you get a weak flush.
This is a beginner-to-intermediate repair that takes about 30 minutes on a first attempt and under 15 minutes once you've done it before.
Full step-by-step guide: Replace Toilet Fill Valve
Toilet repairs account for about 30% of the calls I get, and I'd say 80% of them are a $10 flapper. The homeowner ran the toilet for 6 months wasting 200 gallons a day before calling me. That's $150-300 in water bills for a part that takes 10 minutes to replace. Check the flapper first, every time.
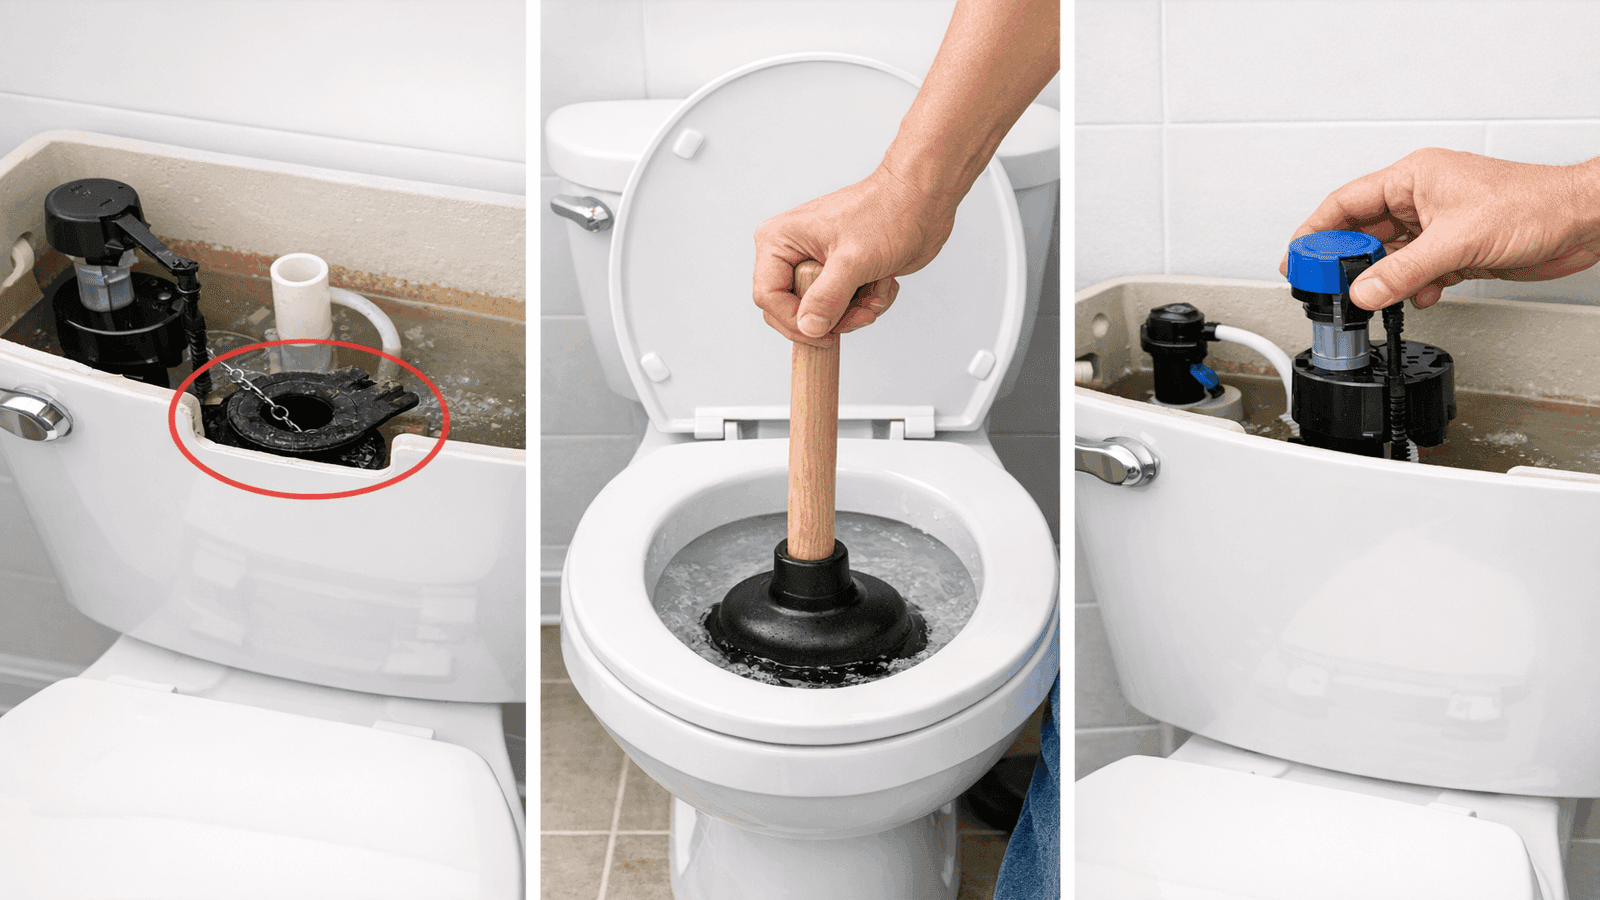
Photo: Three toilet repair scenarios shown side by side: running toilet flapper diagnosis, clog clearing with plunger, and fill valve replacement
Faucet and Drain Repairs
A single dripping faucet wastes more than 3,000 gallons of water per year according to the EPA. Clogged drains are the second most common service call plumbers receive. Both categories are fixable without professional help in the majority of cases, though the correct approach depends on your faucet type and where the clog is located.
Fix a Leaky Faucet
Leaky faucets come in four types, and each requires a different repair method. Getting the type wrong before buying parts means a wasted trip to the store and potentially a second disassembly of the faucet:
- Ball faucets (single handle that rotates over a rounded cap) use springs, seats, and a ball mechanism.
- Cartridge faucets (single or double handle) use a replaceable cartridge; the most DIY-friendly type.
- Ceramic disc faucets (single lever over a wide cylindrical body) have a ceramic cylinder that rarely wears out but can be cleaned or replaced when it does.
- Compression faucets (two separate handles that require tightening to stop the flow) are the oldest design and use rubber washers.
Identifying your faucet type before purchasing parts takes 30 seconds and saves significant frustration. The repair is intermediate-level, taking 30-60 minutes depending on type. Parts run $10-50. The full guide includes a visual identification section and step-by-step instructions for all four types.
Full step-by-step guide: Fix Leaky Faucet
Get quotes from top-rated pros.
Unclog a Shower Drain
Nearly all shower drain clogs share the same root cause: hair and soap scum accumulating 3-6 inches inside the pipe. You don't need chemicals or heavy equipment for this. Six methods address the problem from simplest to most intensive: a hook tool, a baking soda and vinegar treatment, a plunger, a hand snake, an enzyme-based cleaner for ongoing maintenance, and professional hydro-jetting for clogs that resist everything else.
Start with the hook tool: a $3 plastic device with small barbs designed to grab and pull hair clumps out of the drain. Most shower clogs clear with this alone in under a minute. If the hook tool doesn't reach, a plunger or hand snake handles deeper blockages.
This is a beginner-level repair that takes 15-30 minutes with basic tools. The only time professional service is clearly needed is when multiple drains are slow simultaneously, which indicates a main line issue rather than a fixture clog.
Full step-by-step guide: Unclog Shower Drain
How to Snake a Drain
When a plunger doesn't clear a clog, a drain snake reaches 15-25 feet into the pipe to physically break up or retrieve what's blocking it. The tool selection matters more than most people realize: using the wrong type of snake can damage fixtures or not reach the clog.
A hand snake (also called a drum auger or top snake) works for sinks, tubs, and floor drains. It's the right choice for clogs beyond plunger reach in standard household drains. A drum auger is a larger, more powerful version for main line work. A toilet auger (closet auger) is specifically designed for toilet traps and has a protective rubber sleeve that prevents it from scratching the porcelain bowl; regular snakes will scratch the bowl if used in a toilet.
This repair is intermediate-level, taking 20-45 minutes for a typical drain clog. A basic hand snake costs $25-50 and handles the majority of household situations where a plunger alone hasn't worked.
Full step-by-step guide: How to Snake a Drain
Nine out of ten shower drain clogs are hair sitting 3-4 inches inside the pipe. You don't need chemicals or a snake. A $3 plastic hair-catcher tool from any hardware store pulls the whole clog out in under 60 seconds. Chemical cleaners just push the hair deeper and coat the pipe walls. Use the hook, not the bottle.
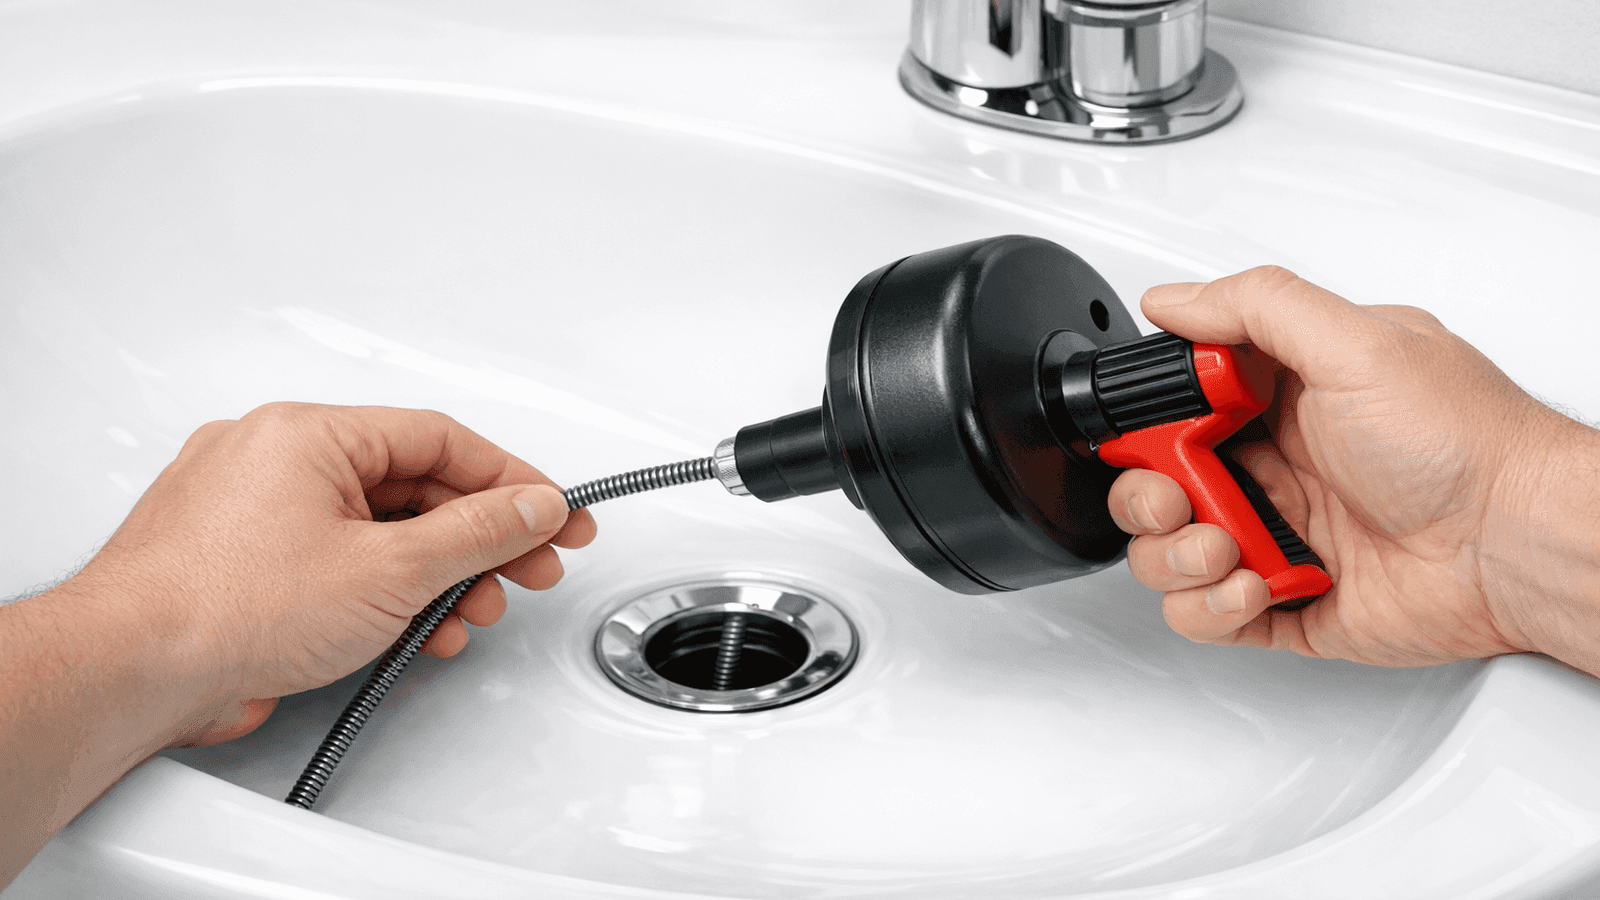
Photo: Correct two-handed technique for inserting a hand drain snake into a bathroom sink drain
Water Shutoffs: The Most Important Safety Skill
Knowing how to shut off water quickly is the single most important plumbing skill a homeowner can have. A burst pipe releases more than 100 gallons of water per hour. Every minute spent searching for a shutoff valve during an active leak is a minute of water spreading into floors, walls, and the structure below.
This section covers two guides: locating and operating the shutoff valves already in your home, and adding new ones where they're missing.
Shut Off Water Supply
Every home has a main shutoff valve that cuts water supply to the entire structure. Common locations include near the water meter (often in the garage, utility closet, or crawl space), in the basement near where the main line enters, or outside near the foundation in a covered box at ground level. Each individual fixture typically has its own shutoff as well: the oval-shaped valve on the supply line behind the toilet, and the valves under sinks on both hot and cold supply lines.
Knowing the location of your main shutoff before an emergency is a 5-minute exercise that can prevent tens of thousands of dollars in water damage. Walk through your home right now. Test the main valve to confirm it turns freely. Note the location of each fixture shutoff. If a valve hasn't been operated in years, it may be stiff or stuck: a common problem in older homes where valves haven't been used in a decade.
Full guide: Shut Off Water Supply
Install a Shutoff Valve
Many older homes have fixtures with no dedicated shutoff valve, meaning any repair to that fixture requires shutting off water to the entire house. Adding individual fixture shutoffs is one of the most practical upgrades a homeowner can make. Once installed, you can isolate any single fixture for repair without disrupting water service to the rest of the home.
This is an intermediate-level repair taking 45-60 minutes. Push-fit (SharkBite) shutoff valves require no soldering and connect directly to existing copper or PEX supply lines. Parts cost $15-35 per valve. The most common installations are on the supply lines under sinks and behind toilets.
Full step-by-step guide: Install Shutoff Valve
In 18 years, the number one thing I see homeowners panic about is not knowing where the main shutoff is. I walk every customer through locating it before I leave any job. It is the single most important thing you can know, especially at 2 AM when a pipe bursts.
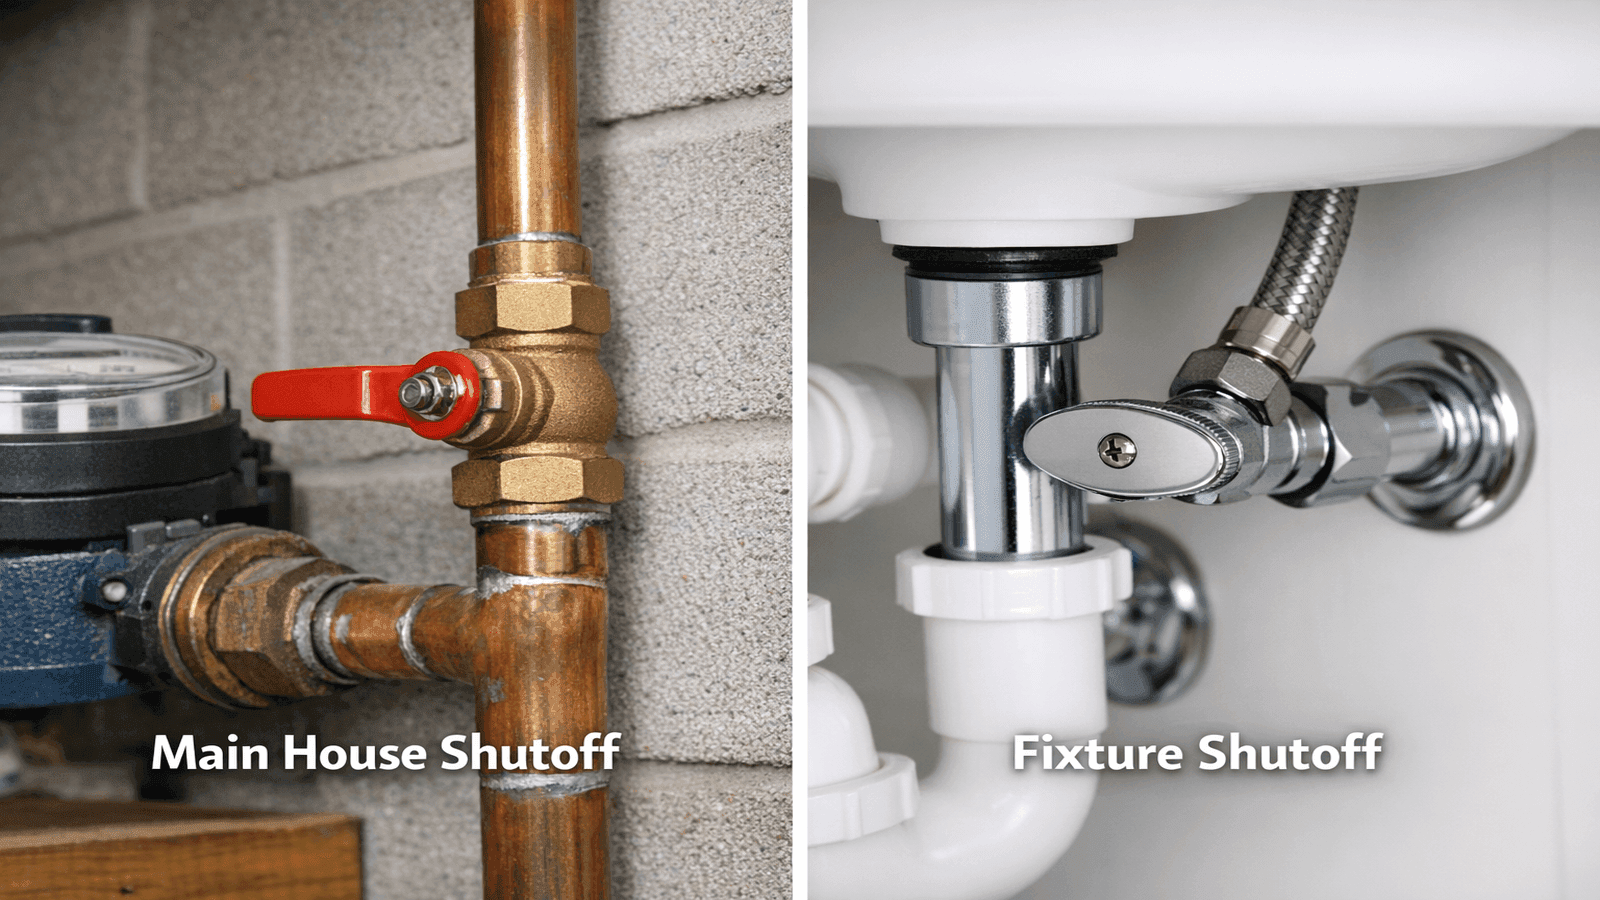
Photo: Labeled comparison of main house shutoff valve location versus individual fixture shutoff valve under a sink
The 7 DIY Plumbing Mistakes That Cost Homeowners the Most
These mistakes come up repeatedly in professional service calls. Each one is preventable with a small amount of knowledge applied before starting a repair.
1. Using chemical drain cleaners on old pipes
Caustic drain cleaners (sodium hydroxide-based products) generate significant heat and react with galvanized steel and copper, accelerating corrosion in pipes that are already aging. A single use won't destroy a pipe, but repeated use over years compounds the damage. Use a mechanical approach instead: a plunger or drain snake addresses the clog without touching the pipe walls.
2. Overtightening fittings
Plastic threads crack under excess torque, rubber seals compress and warp, and compression fittings deform beyond their usable range when overtightened. The standard rule is hand-tight plus a quarter turn. If the connection still drips at that torque, the problem is the seal or washer, not the amount of force applied.
3. Skipping the water shutoff
This is the most common cause of a minor repair turning into an emergency. Before touching any supply line, fitting, or toilet component, locate and close the nearest shutoff valve. If you're unsure which valve controls that fixture, close the main house shutoff first. No repair is worth starting with live water pressure on an open line.
4. Mixing incompatible pipe materials
Connecting copper directly to galvanized steel without a dielectric union creates galvanic corrosion: an electrochemical reaction between dissimilar metals that eats through pipe walls over a period of years. The two metals act as a battery when in direct contact with water between them. Always use the correct transition fitting for mixed-material connections. Your hardware store or plumbing supply house can identify the right fitting if you bring a sample of both pipe types.
5. Wrong drain slope
Horizontal drain lines require exactly 1/4-inch of drop per foot of horizontal run. Too flat and solids settle in the pipe, causing chronic slow drains and eventual clogs that no amount of snaking fully clears. Too steep and water evacuates the pipe faster than solids, leaving debris stuck to the pipe walls. This is most relevant when adding or extending a drain line, not for simple fixture repairs.
6. Ignoring vent pipes
Gurgling sounds from a drain after you flush or run water nearby usually signal a venting problem, not a clog. Drain vent pipes equalize air pressure in the drain-waste system. When they're blocked by debris, bird nests, or ice in cold climates, the drainage system can't move water efficiently. Snaking the drain won't fix a vent blockage. If multiple drains make gurgling sounds simultaneously, the vent stack is the first thing to investigate.
7. Skipping permits on real work
Permit requirements vary by jurisdiction, but most require permits for work that adds, moves, or modifies supply or drain lines, water heater replacement, and anything involving gas lines. Unpermitted work discovered during a pre-sale home inspection can trigger correction orders, delay closing, and in some cases require tearing out completed work and starting over with a licensed contractor.
Get quotes from top-rated pros.
Of all seven mistakes on this list, number 3 is responsible for the most expensive calls I receive: skipping the shutoff. I had a homeowner call me last year who tried to replace a toilet fill valve without turning off the supply line. Flooded the bathroom, soaked through to the ceiling below. A $20 repair became an $8,000 water damage claim. Turn. Off. The. Water.
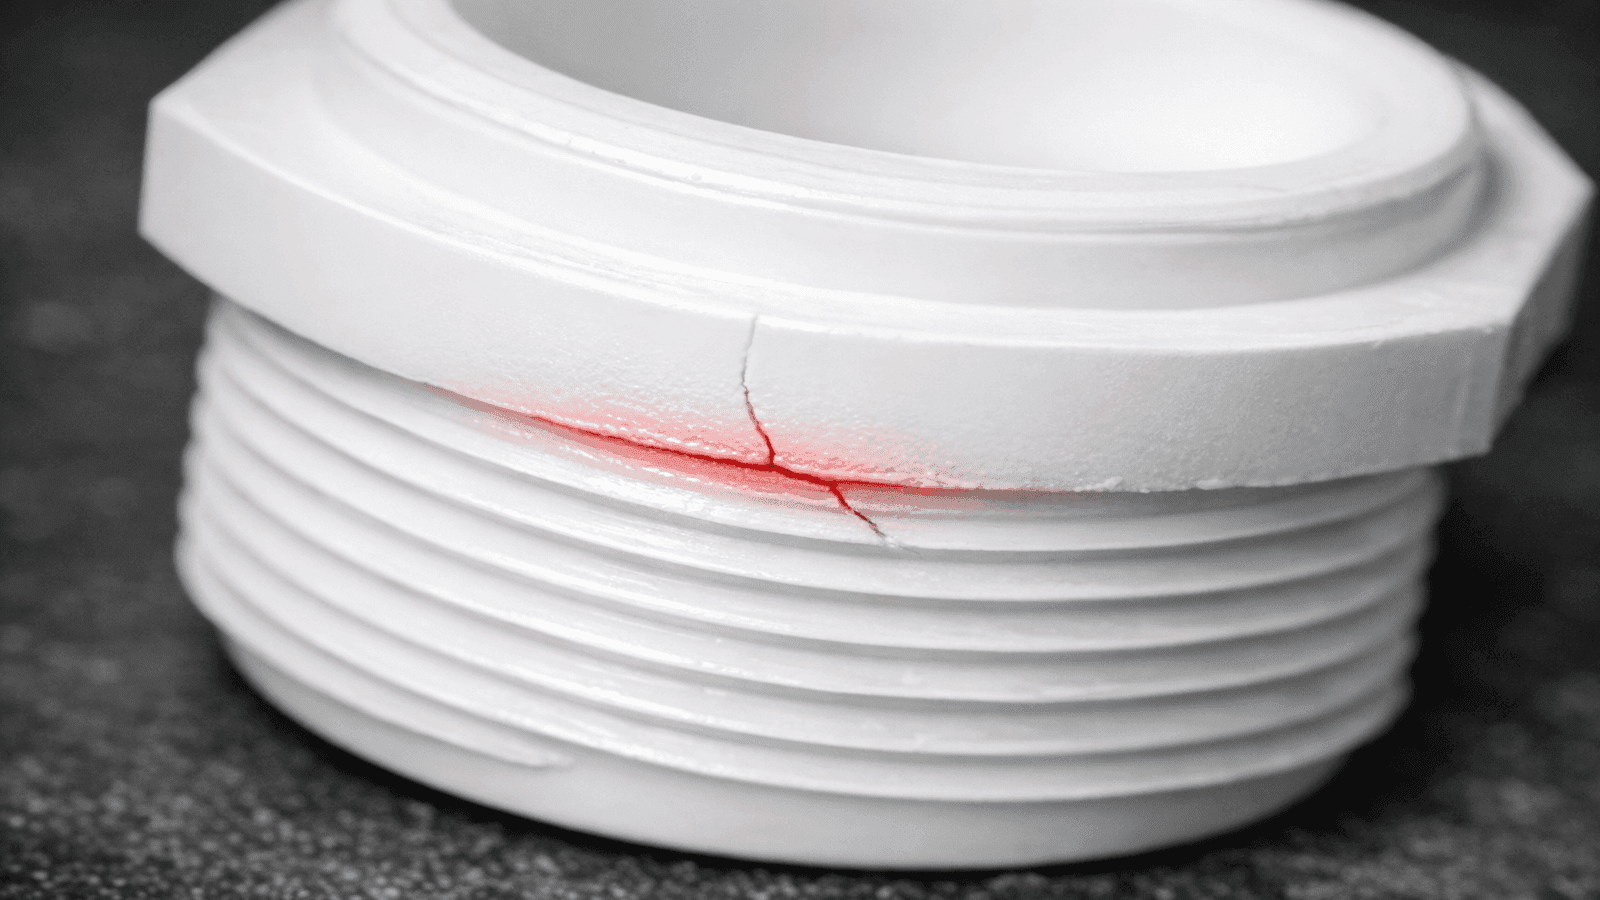
Photo: Close-up of a cracked white PVC pipe fitting caused by overtightening during a DIY plumbing repair
Advanced DIY: Two Skills Worth Learning
Once you're comfortable with beginner and intermediate repairs, two skills significantly expand the range of work you can handle on your own: replacing P-traps and soldering copper pipes. Neither requires professional training or certification, but both reward careful preparation.
Replace a P-Trap
The P-trap is the curved section of pipe beneath every sink drain. Its shape retains a small standing pool of water that blocks sewer gases from traveling up through the drain opening into your home. It's also the most common source of under-sink leaks, drips, and unpleasant odors.
Replacing a P-trap is beginner-to-intermediate work using slip-joint PVC fittings. No soldering, no special tools beyond channel-lock pliers, and no pipe cutting in most cases. The parts cost $8-20 and are available at any hardware store. The job takes 20-30 minutes.
One common mistake to avoid: P-trap arms come in different diameters (1-1/4 inch for bathroom sinks, 1-1/2 inch for kitchen sinks). Bring the old trap or measure the drain tailpiece before buying parts to make sure you get the correct size.
Full step-by-step guide: Replace P-Trap
Plumbing Soldering Guide
Copper pipe repairs require soldering: applying heat with a torch to bond a fitting to pipe using flux and lead-free solder. The technique is learnable with practice and is the only reliable method for copper supply line repairs in most residential applications.
Three things are non-negotiable before attempting this repair. First, proper ventilation in the work area: soldering flux produces fumes that shouldn't be breathed in an enclosed space. Second, a fire-resistant cloth or heat shield placed behind the pipe to protect the wood framing, drywall, or insulation nearby. Third, certified lead-free solder and flux for any supply line carrying potable water. Using leaded solder on drinking water lines is both a code violation and a health hazard.
If you don't own a torch kit, the tools cost $40-80 for a basic setup. The skill itself takes 45-90 minutes of practice to reach a reliable standard. Once you can solder consistently, you can repair copper supply lines, replace corroded fittings, and add new runs without calling a professional for work that was previously out of reach.
Full step-by-step guide: Plumbing Soldering Guide
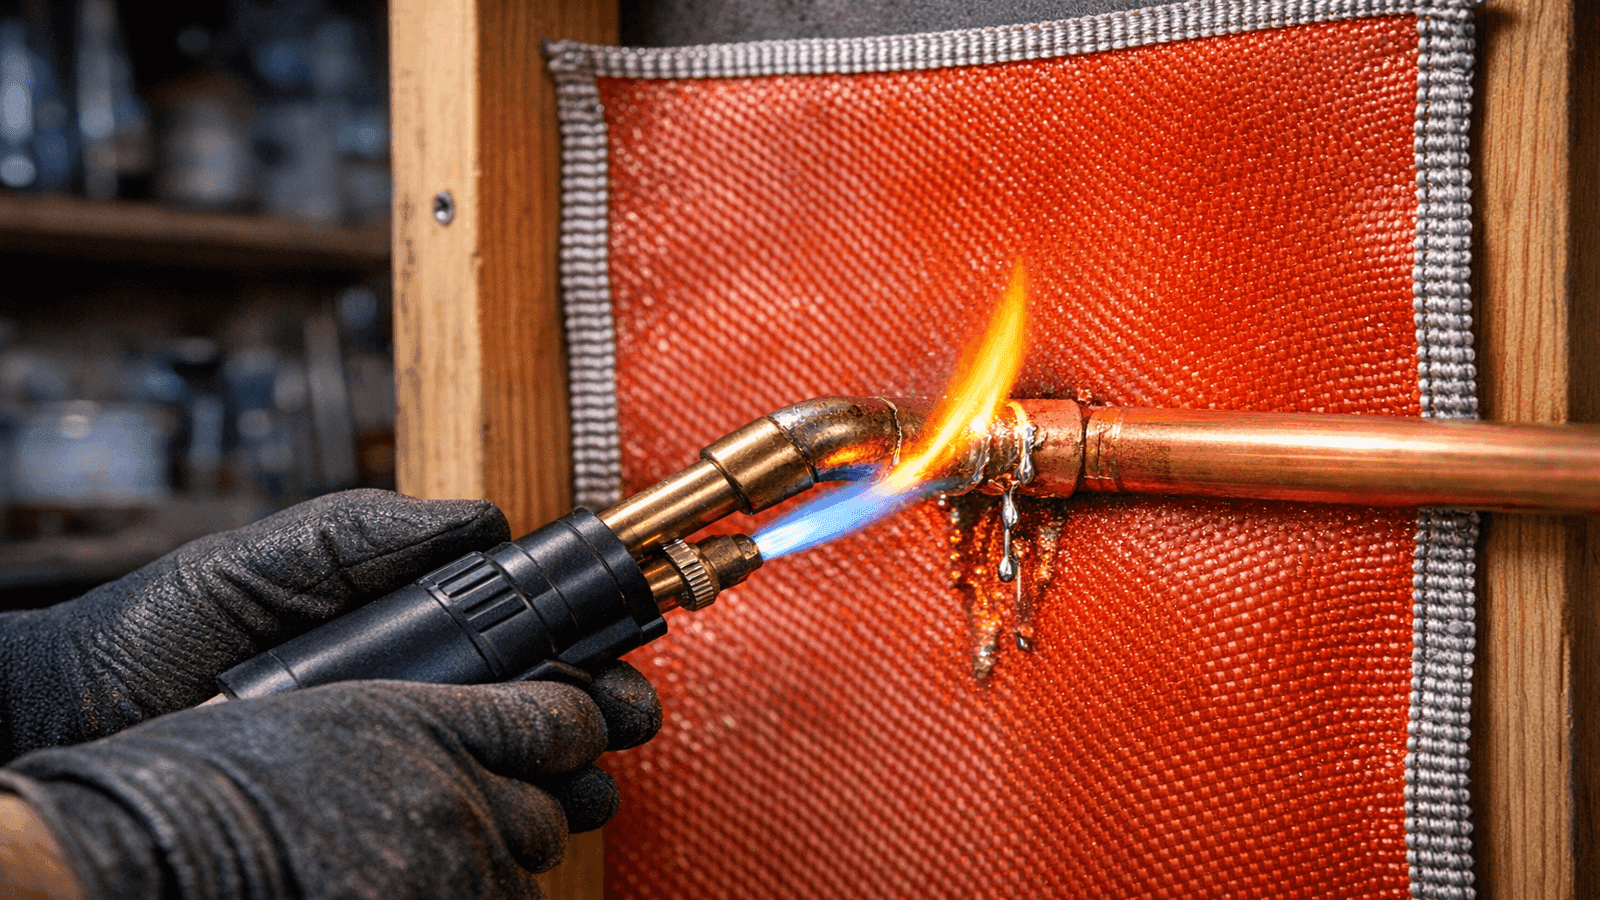
Photo: Correct technique for soldering a copper pipe joint showing proper 45-degree torch angle and fire-resistant protective cloth behind the pipe
Conclusion
Three things you can do today that will change how you handle every plumbing problem going forward:
- Locate your main shutoff valve and confirm that every adult in your household knows where it is and how to operate it.
- Build a $150 starter toolkit using the list in this guide before you need it, not during a crisis.
- Bookmark these 10 guides so you have a step-by-step resource the moment something goes wrong.
Most plumbing problems don't give advance notice. A toilet starts running at midnight. A shower drain backs up the morning guests arrive. A fitting drips when you reach under the sink for something else entirely. The homeowners who handle these situations calmly are the ones who already knew where the shutoff was and already owned the right tools.
For jobs that exceed your comfort level or fall into the permit-required category, NearbyHunt connects you with licensed local plumbers who can take it from there.
Disclaimer: Cost ranges listed in this guide are national averages based on 2025-2026 industry data. Actual costs vary by location, severity, and contractor. Always get multiple quotes for plumbing work. Prices in major metro areas may run 20-40% higher than national averages. This guide is for educational purposes; consult a licensed plumber for issues beyond basic DIY repairs.
Sources and References
- The Farnsworth Group — DIY Home Improvement Statistics 2026
- Angi — How Much Does a Plumber Cost?
- HomeAdvisor — Plumber Cost Guide
- PHCC — Plumbing-Heating-Cooling Contractors Association
- EPA WaterSense Program
- Family Handyman — Common DIY Plumbing Mistakes
- John Dunham and Associates — Plumber Shortage Analysis
- U.S. Bureau of Labor Statistics — Plumbers, Pipefitters, and Steamfitters

Michael Jennings is a licensed master plumber & water systems specialist with over 18 years of hands-on experience in residential and commercial plumbing, serving clients across California and Texas. At NearbyHunt, he shares practical advice on pipe installations, water heater maintenance, and home plumbing upgrades. Michael has helped thousands of homeowners prevent costly water damage and improve water efficiency through modern plumbing solutions.

Robert is a licensed master plumber with over 20 years of experience serving both residential and commercial clients across the Midwest. Specialising in advanced plumbing systems and sustainable water technologies, Rob brings deep technical insight and hands-on expertise to every project. As a reviewer for NearbyHunt, he ensures all plumbing content reflects the highest standards of safety, compliance, and practicality.