- Lead-free solder is required by federal law for all potable water systems; the Safe Drinking Water Act limits lead content to 0.2% in solder and flux, with pipes and fittings capped at a weighted average of 0.25% lead.
- Look for NSF/ANSI 61 and NSF/ANSI 372 certification on solder packaging when working on drinking water lines: these two standards confirm compliance.
- A complete beginner soldering kit (torch, solder, flux, emery cloth, tubing cutter) costs $60 to $100 at most home improvement stores.
- MAP gas burns at approximately 3,730 degrees F versus propane at 3,600 degrees F, making MAP gas the faster option for plumbing joints, especially on 1-inch pipe and above.
- Water in the pipe is the single most common reason a solder joint fails: even one drip prevents capillary flow and creates a leak.
- Soldered copper joints done properly can last 50 or more years with zero maintenance, outperforming most push-fit alternatives for permanent installations.
Copper pipe soldering, also called "sweating," is one of the most reliable methods for joining copper plumbing. It creates a permanent, pressure-tested, code-compliant connection that can last the life of a house. While it looks intimidating the first time, the technique is straightforward once you understand why each step matters.
DIY soldering is well within reach for a prepared homeowner. Hiring a plumber for a single copper joint repair typically runs $150 to $350, depending on location and access. With a $60 to $100 tool investment, you can make the same repair yourself and have the equipment ready for future jobs.
This guide covers every step, the tools you need, how to avoid the most common mistakes, and when it makes more sense to call a professional.
This guide is part of the DIY Plumbing Guides series. Licensed plumbers in the NearbyHunt network confirm that the vast majority of solder joint failures they encounter stem from two causes: attempting to solder a wet pipe or heating the solder wire instead of the fitting.
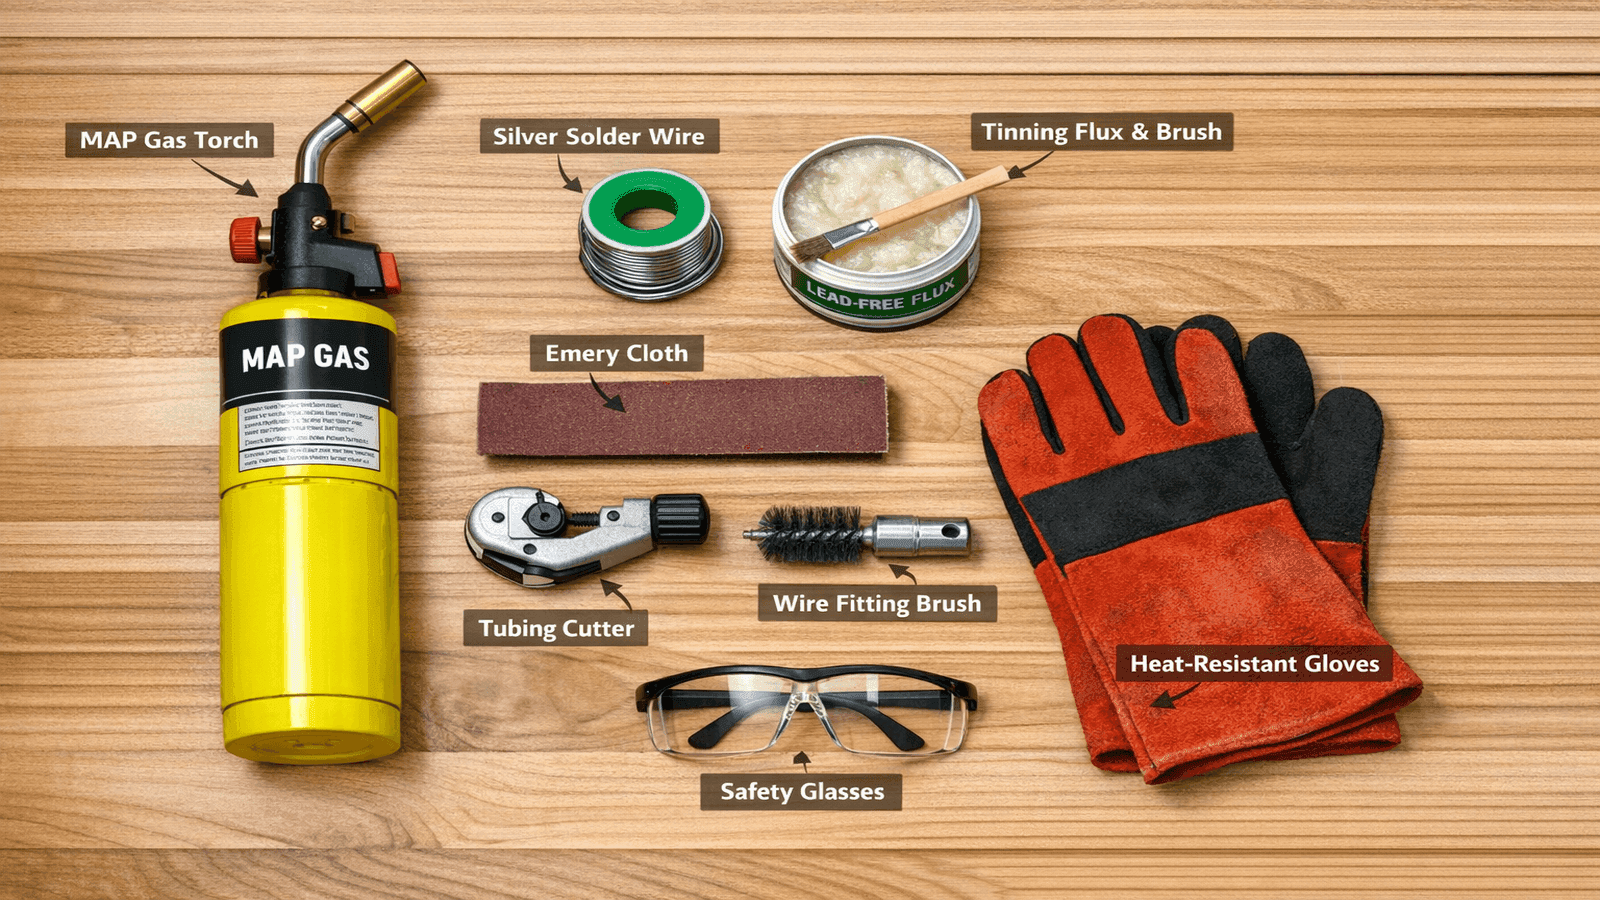
Photo: Soldering tools laid out on a work surface including torch, flux, lead-free solder, emery cloth, and tubing cutter
Is Soldering the Right Method for Your Repair?
Soldering is the right choice when you need a permanent, code-compliant copper joint that will hold full line pressure indefinitely. It is the standard method used by licensed plumbers on new construction and whole-house repiping jobs.
Push-fit fittings like SharkBite are a legitimate alternative in specific situations. They connect in seconds without a torch and work on copper, CPVC, and PEX. However, most plumbing codes restrict push-fit fittings from being buried in concrete, inside walls, or above ceilings where the joint cannot be inspected. Soldered joints have no such restriction and are accepted everywhere by every code.
Lead-free solder is required by federal law. The Safe Drinking Water Act banned lead solder for potable water systems in 1986. The 2014 revision tightened the standard further, reducing the allowable weighted average lead content in pipes and fittings to 0.25% and limiting lead in solder and flux to 0.2%. Look for NSF/ANSI 61 or NSF/ANSI 372 certification on any solder purchased for drinking water lines.
I use SharkBite push-fit connectors in exactly two situations: an emergency repair where I need water back on immediately, and a spot repair inside a finished wall where I cannot safely use a torch. For everything else; supply lines, manifolds, hot water heater connections, any joint that will be concealed; I solder. A SharkBite fitting is a good tool. It is not a permanent substitute for a well-sweated joint.

Tools and Materials You'll Need
Gather everything before you start. Once the torch is lit you want both hands free.
| Tool / Material | Purpose | Approximate Cost |
| Tubing cutter (pipe cutter) | Makes a clean, square cut with no burrs | $10-$20 |
| Reaming tool or emery cloth | Removes burrs inside and outside the cut end | $5-$12 |
| Wire fitting brush | Cleans the interior of the copper fitting socket | $5-$10 |
| Lead-free tinning flux | Prevents oxidation, promotes solder flow | $8-$15 |
| Flux brush | Applies flux evenly to both surfaces | $2-$5 |
| Lead-free solder (95/5 or 97/3 tin-antimony) | Filler metal that bonds the joint | $12-$30 per spool |
| MAP gas torch kit | Heats the fitting to soldering temperature | $40-$60 |
| Propane torch kit (alternative) | Lower heat, adequate for 1/2" and 3/4" pipe | $25-$40 |
| Heat shield / fire-resistant pad | Protects framing, insulation, and drywall | $10-$20 |
| Wet rags | Cool the joint, wipe excess solder | On hand |
| Safety glasses and heat-resistant gloves | Personal protection | $15-$30 |
Total first-time kit estimate: $60-$100 (propane) or $80-$120 (MAP gas). Most items are reusable for dozens of future repairs.
MAP gas versus propane: MAP gas burns at approximately 3,730 degrees F versus propane at approximately 3,600 degrees F. The difference is modest, but MAP heats fittings noticeably faster and performs better on larger pipe (1-inch and above). Either gas works fine for standard 1/2-inch and 3/4-inch residential supply lines.
Solder selection: The two most common lead-free alloys for plumbing are 95/5 (tin-antimony) and 97/3 (tin-copper). Both are NSF-certified when purchased from reputable brands such as Oatey, Harris, or LA-CO.
Step-by-Step Soldering Process
Follow these steps in order. Skipping any step, especially cleaning and drying, is the primary cause of leaking joints.
1. Shut off the water supply and drain the line completely. Open a faucet downstream to relieve pressure and allow air into the pipe. See How to Shut Off Your Water Supply if you are unfamiliar with your main shutoff location.
2. Cut the pipe square using a tubing cutter. Rotate the tool around the pipe while gradually tightening the cutting wheel. A hacksaw leaves jagged, uneven edges: do not use one.
3. Ream the inside edge of the cut with the reaming tool built into most tubing cutters, or sand lightly with emery cloth to remove the small burr created by cutting.
4. Clean both surfaces until bright copper shows. Wrap emery cloth around the outside of the pipe end and sand in a circular motion for 10 to 15 seconds. Insert the wire brush into the fitting socket and twist several times. Do not touch the cleaned areas: oils from skin prevent the solder from bonding.
5. Apply lead-free tinning flux to both the pipe end and the inside of the fitting socket. Coat all contact surfaces completely. Any bare spot is a potential leak path.
6. Assemble the joint. Push the fitting onto the pipe all the way to the internal stop. Twist it a quarter turn to spread the flux evenly across both surfaces.
7. Heat the fitting, not the pipe. Position the inner blue cone of the torch flame against the fitting body, rotating to heat it evenly on all sides. This is the most critical technique point in the entire process.
8. Test for temperature by touching solder to the joint away from the flame. When the fitting is hot enough, solder will immediately melt on contact with the copper. If solder beads up or resists melting, continue heating for 5 to 10 more seconds.
9. Feed solder into the joint. Touch the solder wire to the seam between the pipe and fitting at the base of the socket, on the side opposite the torch. The solder wicks into the gap by capillary action. Feed 1/2-inch to 3/4-inch of solder per 1/2-inch joint. A bright ring of solder visible around the full circumference indicates a properly filled joint.
10. Remove heat and let the joint cool undisturbed for 30 to 60 seconds. Do not move or bump the pipe while solder is solidifying. Wipe the joint with a wet cloth to remove flux residue. Flux left on copper is mildly corrosive and will pit the pipe over time.
The most common beginner error I see is holding the torch on the solder wire itself to melt it into the joint. That approach fails every time. The fitting has to be hot enough to melt the solder on its own; that is the only way capillary action pulls the solder all the way into the socket. The second most common mistake is trying to solder a pipe that still has water in it. Even a small trickle sitting in the bottom of the pipe turns to steam and pushes the solder back out. If I cannot get the pipe fully dry, I stuff a small piece of white bread into the line about 12 inches back. It absorbs the residual water and dissolves on its own once water is restored.
Get quotes from top-rated pros.
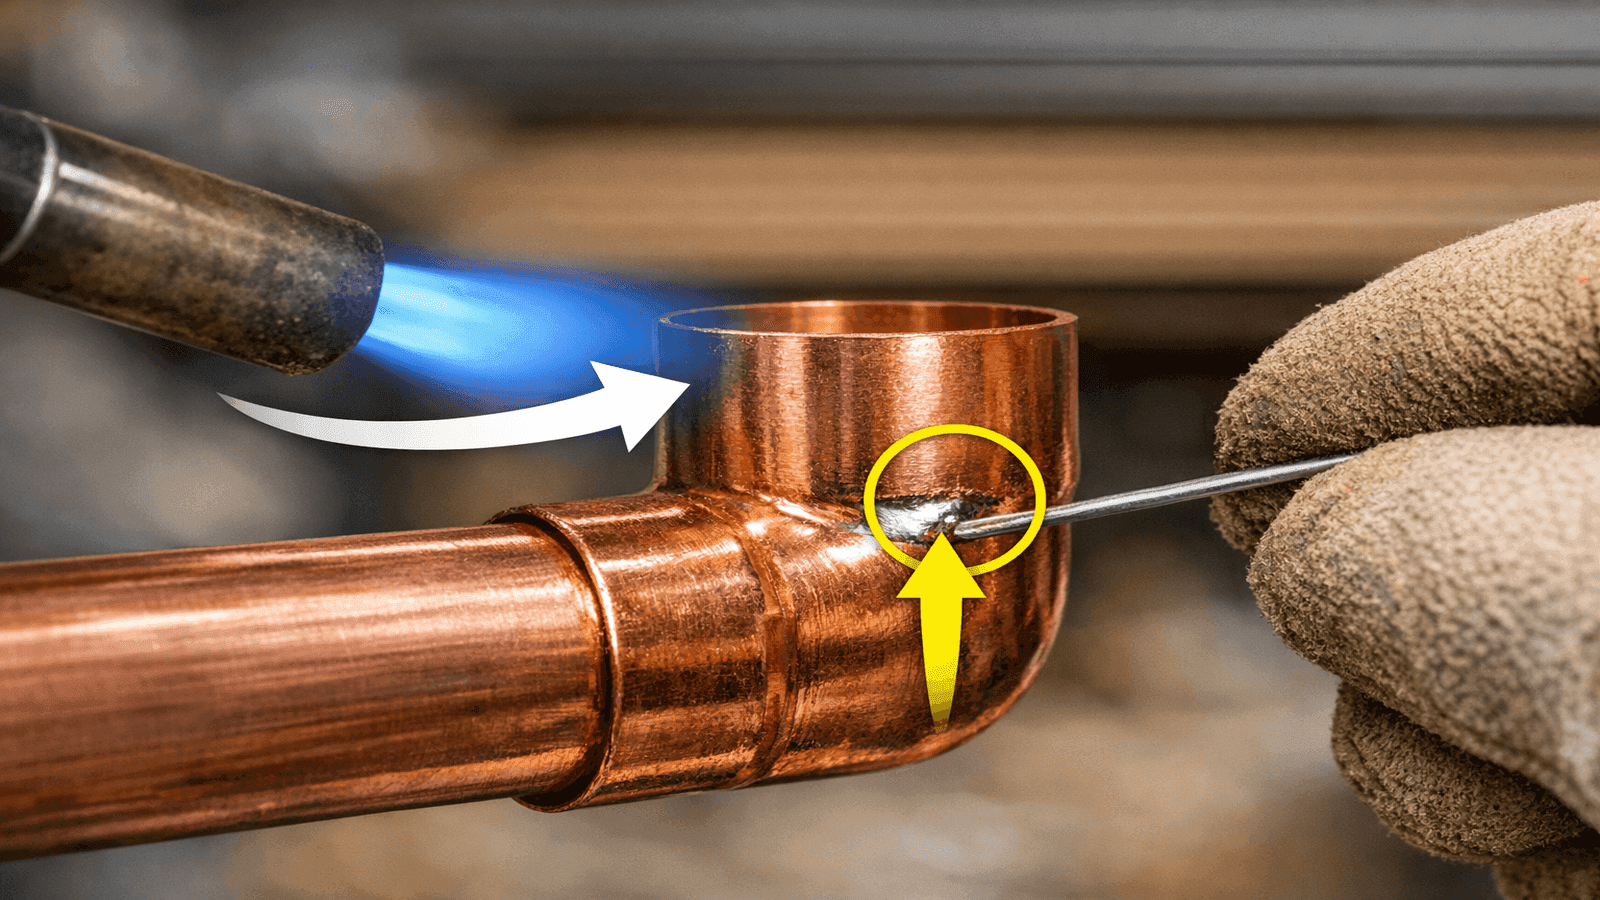
Photo: Correct torch angle applied to copper fitting body with solder wire fed to the opposite side, arrows showing capillary flow direction into the socket
Troubleshooting Bad Joints
A properly soldered joint has a uniform, shiny ring of solder visible around the entire socket with no gaps, holes, or beads sitting on the outside surface.
Signs of a bad joint:
- Solder beaded up on the outside rather than wicking into the socket
- Uneven ring with visible gaps at any point around the circumference
- Dull, grainy, or frosted solder appearance (overheated or moved while cooling)
- Drips of solder hanging below the joint (too much solder or wrong temperature)
How to redo a bad joint: Heat the fitting again until the solder melts, then pull the fitting straight off while wearing heat-resistant gloves. Wipe all surfaces clean while hot, let the metal cool completely, clean both surfaces again with emery cloth and wire brush, re-flux, reassemble, and re-solder from the beginning.
If solder beads up and falls off the joint, that is almost always one of three things: the pipe is still wet, the surfaces were not cleaned thoroughly, or the torch was applied to the solder instead of the fitting. Fix the root cause before you try again. Re-soldering over a contaminated joint just makes the repair harder and wastes materials.
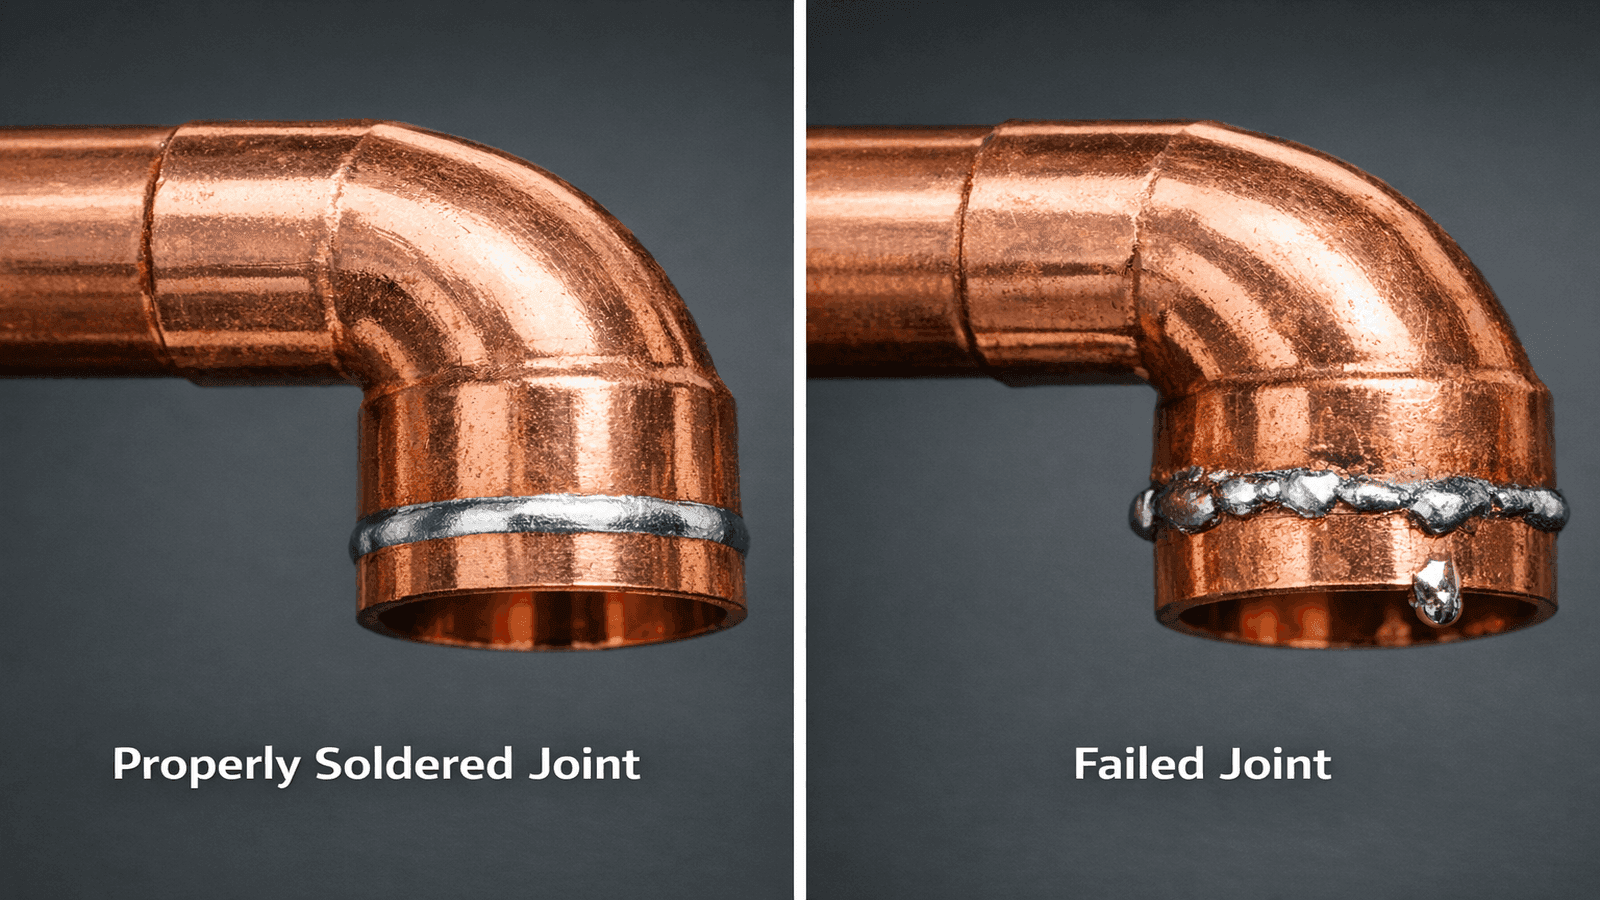
Photo: Side-by-side comparison of a properly soldered copper joint with a clean uniform ring on the left versus a failed joint with beaded solder on the right
Safety Rules for Soldering
- Fire hazard: A torch flame will ignite wood framing, insulation, and drywall in seconds. Always position a heat shield between the torch and any combustible surface. Keep a spray bottle of water within reach. Never leave a lit torch unattended, even for a moment.
- Ventilation: Flux fumes are an irritant to the eyes, nose, and throat. Work with windows open or use a fan to direct fumes away from your face. In confined spaces, wear an N95 respirator.
- Burns: Copper retains heat for several minutes after the torch is removed. Treat any recently soldered fitting as hot. Use heat-resistant gloves within five minutes of soldering.
- Gas cylinder handling: Store cylinders upright and away from heat sources. Turn the valve fully off after each use. Never use a damaged or corroded cylinder.
I have seen torch fires start in wall cavities from a single careless second. A $12 heat shield pad is the single best insurance policy for any soldering job near wood framing. I keep three of them in my truck. Whenever I am working in a tight space, I position one on each side of the fitting, not just behind it.
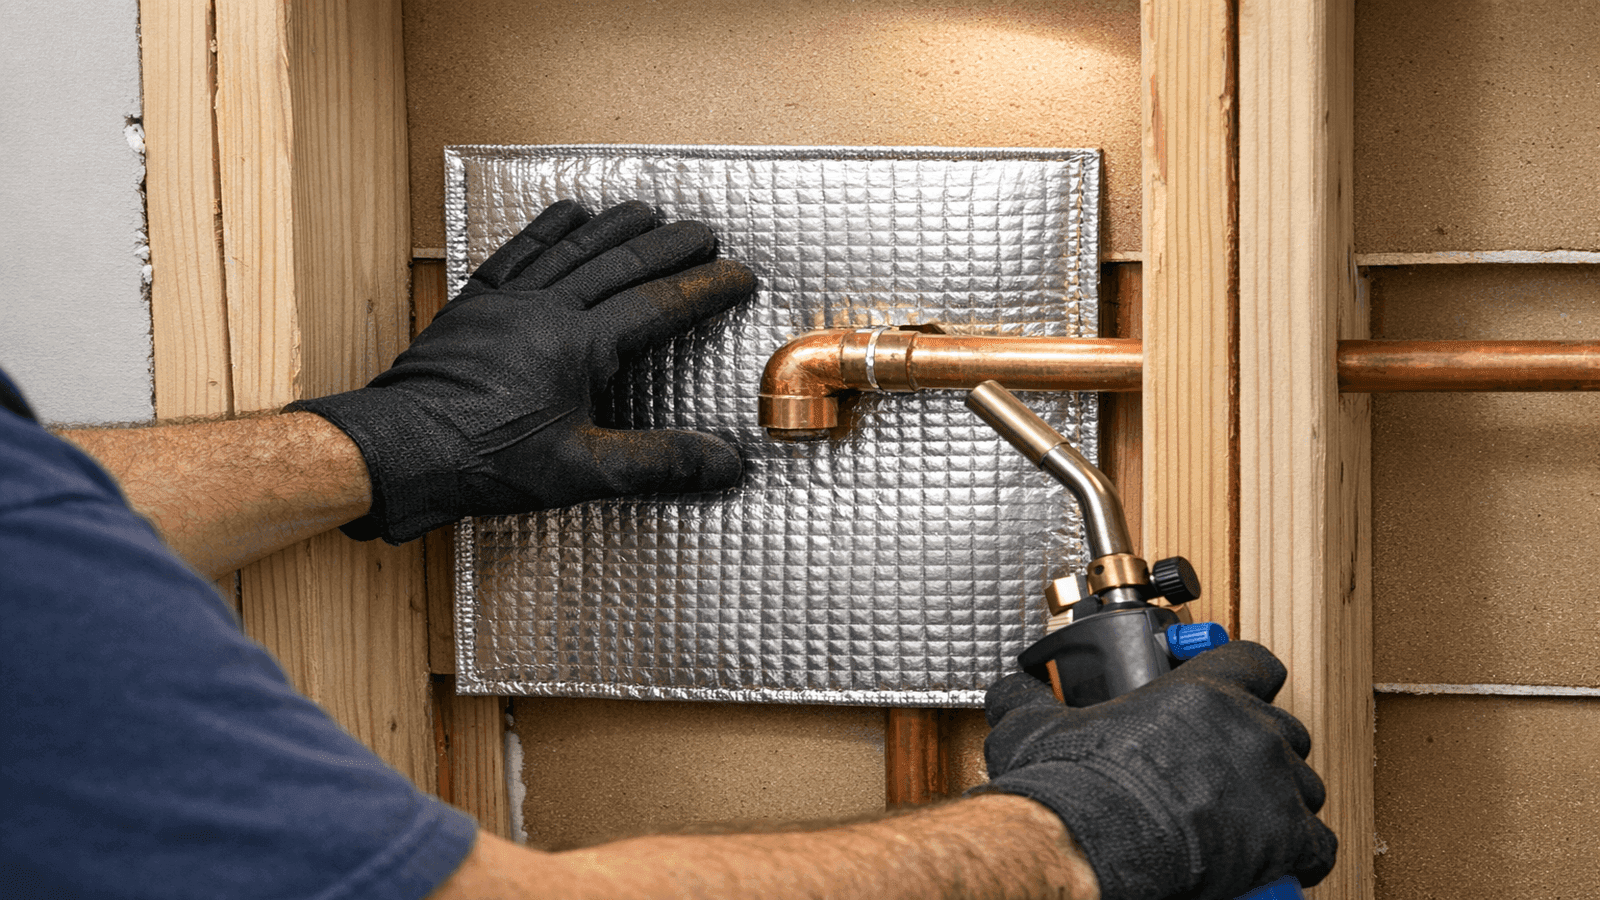
Photo: Licensed plumber positioning a fire-resistant heat shield behind a copper fitting inside a wall cavity before applying a torch
When to Hire a Plumber Instead
Some situations call for a licensed professional regardless of skill level.
- Slab leaks: Copper pipe buried under concrete requires jackhammering, rerouting, or trenchless repair. This is not a DIY task under any circumstances.
- Inside walls and ceilings: Using a torch in an enclosed wall cavity creates serious fire risk. Use push-fit fittings instead, or call a plumber. See Install a Shutoff Valve for push-fit alternatives that work in confined locations.
- Gas lines: Gas pipe requires brazed connections, not soft solder, and must be inspected by a licensed professional. Never attempt gas line work without a license.
- Permit-required work: Replacing more than a certain linear footage of supply pipe requires a permit and inspection in most jurisdictions. Check with your local building department before starting any significant repiping project.
- Persistent leaks after two repair attempts: If a joint leaks after two properly executed solder attempts, there may be a deeper issue with pipe condition or water chemistry. A licensed plumber can diagnose and address the root cause. For related repairs, see Fix a Leaky Faucet for guidance on adjacent leak sources.
Cost comparison: A plumber repairing a single accessible copper joint typically bills $150 to $350, including parts. For a homeowner who already owns the basic tool kit, the same repair costs $10 to $25 in materials.
Get quotes from top-rated pros.
Conclusion
Soldering copper pipe is a foundational plumbing skill that pays dividends over decades. With a $60 to $100 tool investment, a clean working environment, and the 10-step process above, most homeowners can produce leak-free joints that meet code and last as long as the house itself. The keys are simple: clean surfaces, dry pipe, heat the fitting (not the solder), and let capillary action do the work.
For more DIY plumbing repairs you can tackle with the same basic tool kit, visit the full DIY Plumbing Guides series.
Disclaimer: Cost ranges listed in this guide are national averages based on 2025-2026 industry data. Actual costs vary by location, severity, and contractor. Always get multiple quotes for plumbing work. Prices in major metro areas may run 20-40% higher than national averages. This guide is for educational purposes; consult a licensed plumber for issues beyond basic DIY repairs.
Sources & References
- U.S. EPA: Use of Lead Free Pipes, Fittings, Fixtures, Solder, and Flux for Drinking Water: https://www.epa.gov/sdwa/use-lead-free-pipes-fittings-fixtures-solder-and-flux-drinking-water
- NSF International: Safe Drinking Water Act Requirements (NSF/ANSI 61 and 372): https://www.nsf.org/consumer-resources/articles/lead-free-drinking-water
- ANSI Blog: Lead Free Drinking Water: Regulations and NSF/ANSI 372: https://blog.ansi.org/lead-free-drinking-water-regulations-nsf-ansi-372/
- Safe Water Engineering: Understanding New Lead-Free Requirements for Faucets and Household Plumbing (2024): https://www.safewaterengineering.com/lead-free-requirements
- Family Handyman: How To Solder Copper Pipe, a Step-by-Step Guide: https://www.familyhandyman.com/project/how-to-solder-copper-pipe/
- Oatey: How to Solder Copper Pipes: https://www.oatey.com/resources/how-to-solder-copper-pipe
- Michael R. Jennings, Licensed Master Plumber, Dallas TX, License MP-47821-TX, 18+ years field experience

Michael Jennings is a licensed master plumber & water systems specialist with over 18 years of hands-on experience in residential and commercial plumbing, serving clients across California and Texas. At NearbyHunt, he shares practical advice on pipe installations, water heater maintenance, and home plumbing upgrades. Michael has helped thousands of homeowners prevent costly water damage and improve water efficiency through modern plumbing solutions.

Robert is a licensed master plumber with over 20 years of experience serving both residential and commercial clients across the Midwest. Specialising in advanced plumbing systems and sustainable water technologies, Rob brings deep technical insight and hands-on expertise to every project. As a reviewer for NearbyHunt, he ensures all plumbing content reflects the highest standards of safety, compliance, and practicality.