- A faucet dripping once per second wastes over 3,000 gallons of water per year, according to EPA WaterSense data, enough for more than 180 showers.
- Fixing a leaky faucet DIY costs $5 to $15 in parts. Hiring a plumber runs $150 to $350 on average, based on Angi 2026 and Homewyse 2025 data.
- There are 4 distinct faucet types (ball, cartridge, ceramic disc, compression) and each fails differently. The repair method that works for one will not work for another.
- Dripping faucets account for 37% of all residential plumbing service calls, making this the single most common DIY plumbing repair.
- Household leaks combined waste nearly 1 trillion gallons of water annually nationwide, with 10% of homes leaking 90 or more gallons per day.
- Most faucet repairs take 30 to 60 minutes and require no special tools beyond a basic wrench set, screwdrivers, and a replacement washer or cartridge costing under $15.
That steady drip from your faucet sounds minor, but EPA data confirms it is not. One drop per second adds up to more than 3,000 gallons wasted every year and a measurable bump in your water bill every single month.
This guide covers everything you need to stop the drip for good. Here is what you will find:
- How to identify which of the 4 faucet types you have before buying any parts
- Tools and parts to gather before shutting off the water
- Step-by-step repair for each faucet type
- When to replace the entire faucet rather than repair it
- When the job calls for a licensed plumber
This guide is part of the DIY Plumbing Guides series covering the most common household plumbing repairs.
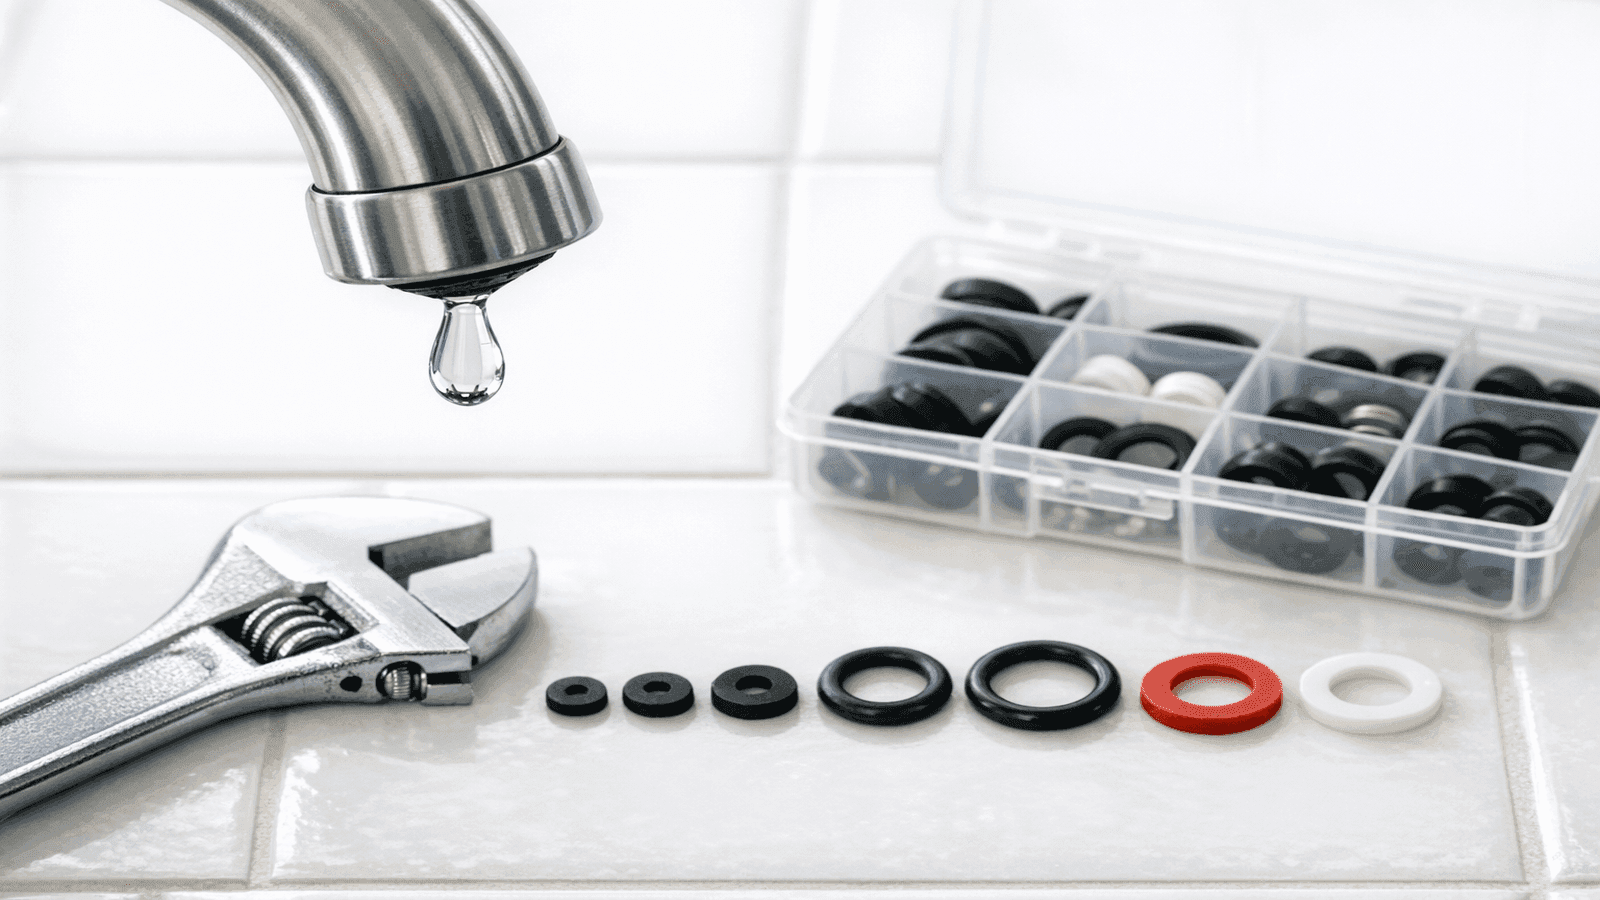
Photo: Overhead shot of a kitchen faucet spout with a visible water droplet dripping, wrench and replacement washer kit laid out on the counter beside it
Identify Your Faucet Type First
Buying a replacement part before identifying the faucet type is the fastest way to make two trips to the hardware store. Each type has a distinct appearance and a distinct failure mechanism. The table below covers all four.
| Faucet Type | How to Identify | Where It Drips From | Common Failed Part |
| Ball faucet | Single lever that rotates in all directions (left/right/forward/back) | Spout when off; around base | Ball, springs, or seat |
| Cartridge faucet | Single or double handle, smooth rotation with no grinding | Spout when off | Cartridge (pull out, replace exact model) |
| Ceramic disc | Single lever, wide cylindrical body, moves up/down not rotating | Spout or base | Cracked ceramic disc or failed O-ring |
| Compression | Two separate handles (one hot, one cold), typically older homes | Spout when off, gets worse when turned | Rubber washer (seat washer) |
Before any repair, shut off the water supply at the angle stop valve under the sink.
You can identify most faucet types without removing a single screw. If the handle rotates freely in a ball-and-socket motion, it's a ball faucet. If it swings smoothly on a single axis and feels solid at the end points, it's likely cartridge or ceramic. If it requires you to crank it tighter and tighter to stop the drip, that's a classic compression faucet with a worn washer. Knowing which you have takes 10 seconds and saves you the wrong trip to the hardware store.

Tools and Parts You Will Need
Gather everything before turning off the water. A scramble mid-repair with no water pressure, wet hands, and a disassembled faucet is avoidable.
| Item | Purpose | Approximate Cost |
| Adjustable wrench | Remove packing nut and supply connections | $10-$20 (own it already) |
| Phillips and flathead screwdrivers | Remove handle screws | $0 (own it) |
| Allen wrench / hex key set | Set screws under decorative caps | $5-$10 |
| Needle-nose pliers | Remove cartridges, springs, seats | $8-$15 |
| Replacement washer or cartridge | Core repair part (type-specific) | $5-$40 |
| O-ring kit | Ceramic disc and ball faucet base leaks | $3-$8 |
| Plumber's grease | Lubricate O-rings and moving parts | $3-$5 |
| Bucket and old towels | Catch residual water in lines | $0 (use what you have) |
For cartridge faucets specifically, bring the old cartridge to the hardware store or photograph the model number stamped on the faucet body. Cartridges are not universal, and the exact match is what matters.
If there is no shutoff valve (angle stop) under your sink, read How to Install a Shutoff Valve before beginning any repair.
Get quotes from top-rated pros.
Fix by Faucet Type
The repair steps below address the most common scenario: a drip from the spout with the handle in the OFF position. Base leaks and handle leaks are separate issues with separate fixes.
Ball Faucet
A ball faucet has a single lever that rotates in every direction, giving it that loose, fluid feel. The small springs and rubber seats supporting the rotating ball wear down over time. The ball itself develops grooves. When either fails, water gets past.
Steps:
- Turn off both supply valves under the sink. See the shut-off water supply guide if you are not sure where they are.
- Open the faucet handle to release pressure and drain remaining water in the lines.
- Pop off the decorative cap on top of the handle. Remove the Allen screw underneath.
- Lift off the handle to expose the collar and packing nut.
- Use an adjustable wrench to unscrew the collar cap. Remove it.
- Lift out the ball. Note or photograph its orientation before it comes out.
- Use needle-nose pliers to pull out the two small springs and rubber seats sitting in the inlet holes.
- Replace all seats, springs, and the ball using a repair kit ($8 to $15 for branded kits that include all worn parts).
- Reassemble in reverse order. Hand-tighten the collar cap, then add a quarter turn with the wrench.
- Turn the supply valves back on slowly and test.
Pro tip: Ball faucet repair kits from Delta, Moen, and Price Pfister include every part that wears. Buy the kit matched to your brand rather than individual parts.
Cartridge Faucet
A cartridge faucet has one or two handles with a smooth, controlled rotation and no grinding or grit. It is the most common type in bathrooms and newer kitchen faucets. The cartridge is a self-contained unit with internal seals. When those seals wear, the cartridge cannot fully stop flow.
Steps:
- Turn off the supply valves and open the faucet to drain the lines.
- Pry off the decorative cap on the handle, remove the screw underneath, and pull the handle straight up.
- If there is a retaining clip (a small U-shaped metal piece at the top of the cartridge), use needle-nose pliers to pull it straight up and out.
- Grip the cartridge stem with pliers and pull straight up. It should slide out without forcing.
- Note the orientation of the cartridge (tabs, stem direction) before it comes out, or photograph it.
- Bring the old cartridge to the hardware store for an exact match. Replacement cartridges run $10 to $40 depending on brand.
- Insert the new cartridge in the same orientation. Replace the retaining clip.
- Reassemble the handle, turn the supply on slowly, and test.
Pro tip: Moen offers free lifetime cartridge replacement. Call their customer service line with the model number before purchasing a replacement anywhere else.
Ceramic Disc Faucet
A ceramic disc faucet has a single lever and a visibly wide, cylindrical valve body below the handle. The handle typically moves up and down to control volume rather than rotating. Two ceramic discs slide against each other inside. Mineral deposits or a hairline crack in one disc breaks the seal.
Steps:
- Turn off the supply valves and open the faucet to drain.
- Remove the handle screw (usually under a decorative cap) and pull the handle off.
- Unscrew the cylinder cap below the handle. This may require a large wrench.
- Lift out the ceramic disc cartridge as a single unit.
- Inspect the discs for visible cracks, chips, or heavy mineral buildup.
- If only mineral-fouled: soak in white vinegar for 30 minutes, scrub with a soft brush, and reinstall.
- If cracked or chipped: replace the disc cartridge. Cost is $20 to $50. Use the brand and model number for an exact match.
- Lubricate the O-rings with plumber's grease before reinstalling.
- Reassemble and turn the supply back on slowly. Ceramic discs can crack under sudden pressure, so open the supply valve gradually.
Compression Faucet
A compression faucet has two separate handles, one hot and one cold, each requiring multiple full turns to open or close. This type is common in homes built before 1980. A rubber seat washer at the base of the stem presses against a valve seat to stop flow. When the washer wears flat, it no longer seals and the drip begins.
Steps:
- Turn off the supply valves and open the handle to drain.
- Pry off the decorative index cap (marked H or C) and remove the screw underneath.
- Pull the handle off. If it is stuck, use a handle puller tool ($5 at hardware stores). Do not pry or force it.
- Use an adjustable wrench to unscrew the packing nut counterclockwise.
- Pull the stem straight out.
- At the base of the stem, find the rubber seat washer held by a brass screw. Remove the screw and washer.
- Match the washer diameter and thickness at the hardware store. Replacement washers cost $0.50 to $2.
- Install the new washer and replace the brass screw.
- While the stem is out, inspect the valve seat inside the faucet body for grooves or pitting. A damaged seat requires a seat wrench to resurface or replace.
- Reassemble and turn the supply on slowly. Test.
The most common mistake I see on compression faucets is stripping the packing nut trying to get the handle off. The handle itself is usually what's stuck, not the nut. People grab a wrench and go straight to the nut before removing the handle screw first. Remove the screw, pull the handle, and the packing nut comes off easily every time. If the handle is stuck after removing the screw, a handle puller costs $5 and saves you from cracking the body trying to pry it off.
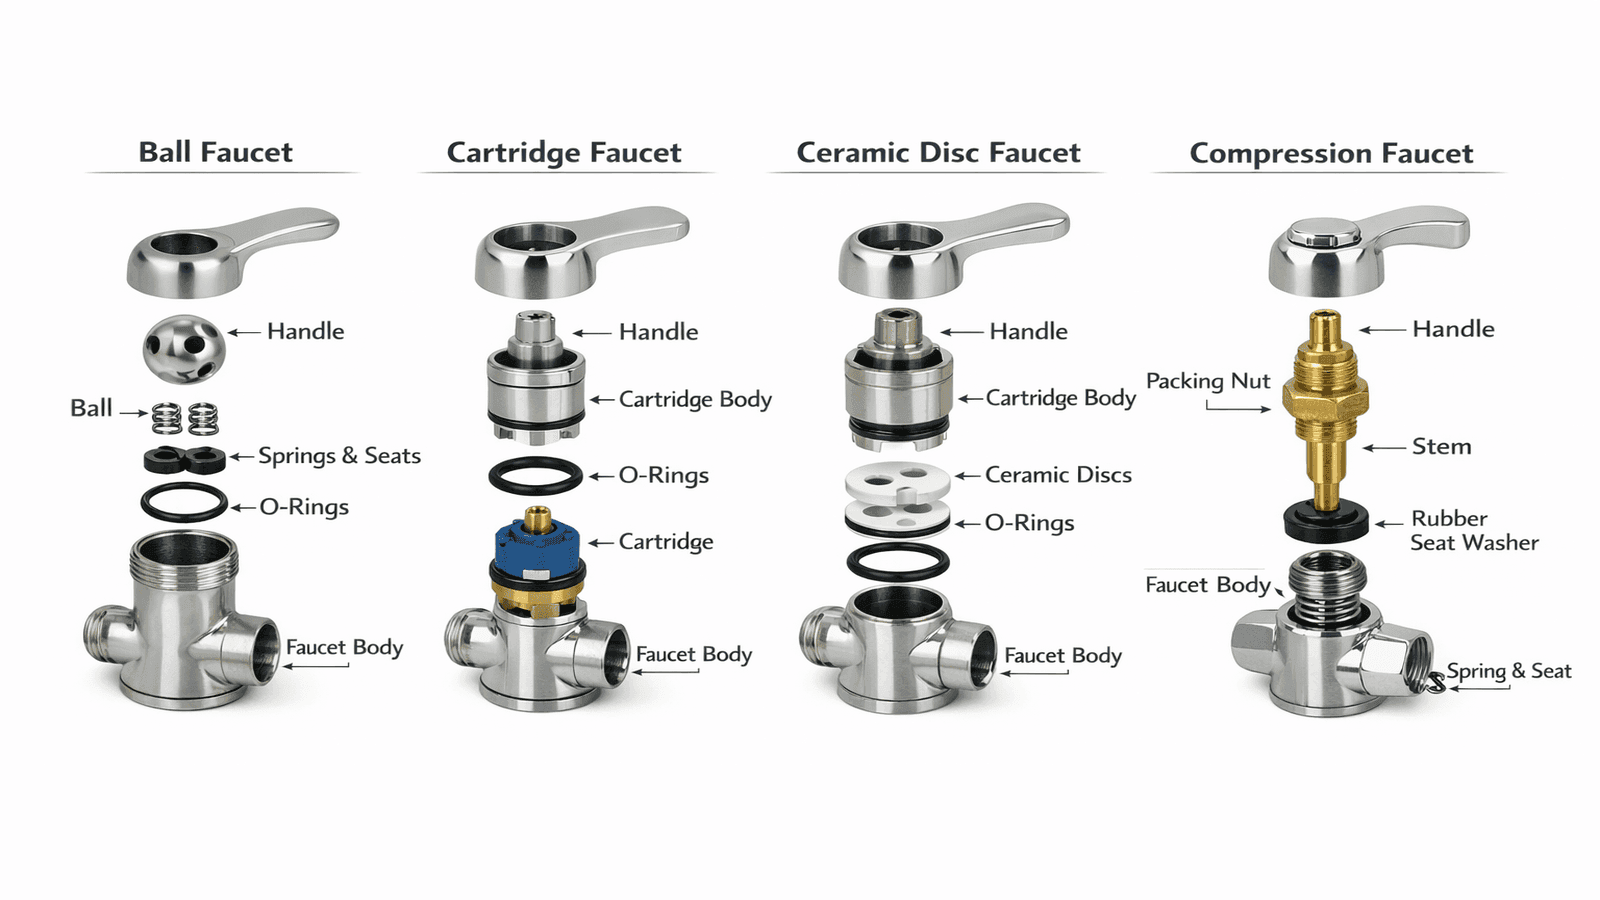
Photo: Exploded view diagram showing the four faucet types side by side with labeled internal parts: ball, cartridge, ceramic disc, and compression
Repair vs. Replace: Cost Comparison
Knowing when to repair and when to replace saves time and avoids throwing money at a faucet that is at the end of its life.
Get quotes from top-rated pros.
| Scenario | Repair Cost (DIY) | Repair Cost (Pro) | Replace Faucet Cost |
| Ball faucet (repair kit) | $8-$15 | $150-$250 | $100-$350 faucet + $150-$250 install |
| Cartridge replacement | $10-$40 | $150-$300 | Same as above |
| Ceramic disc cartridge | $20-$50 | $150-$300 | Same as above |
| Compression washer only | $1-$5 | $150-$200 | Same as above |
| Corroded valve seat (compression) | $10-$20 (seat wrench) | $200-$350 | Replacement recommended |
Replacement makes more sense when:
- The faucet is more than 15 years old and parts are discontinued
- Multiple components are failing simultaneously, not just one washer
- Corrosion or mineral buildup is severe throughout the body
- Cosmetic damage (chipped finish, cracked handle) alongside the leak
A single washer swap on a 5-year-old compression faucet is always worth it. But when I open a 25-year-old faucet and the seat is grooved, the packing is shot, and the handle is corroding from the inside, I tell homeowners to put that $10 repair part money toward a new faucet instead. Parts wear together. Fixing one part on a heavily worn faucet just means I'm back in 6 months fixing the next one.
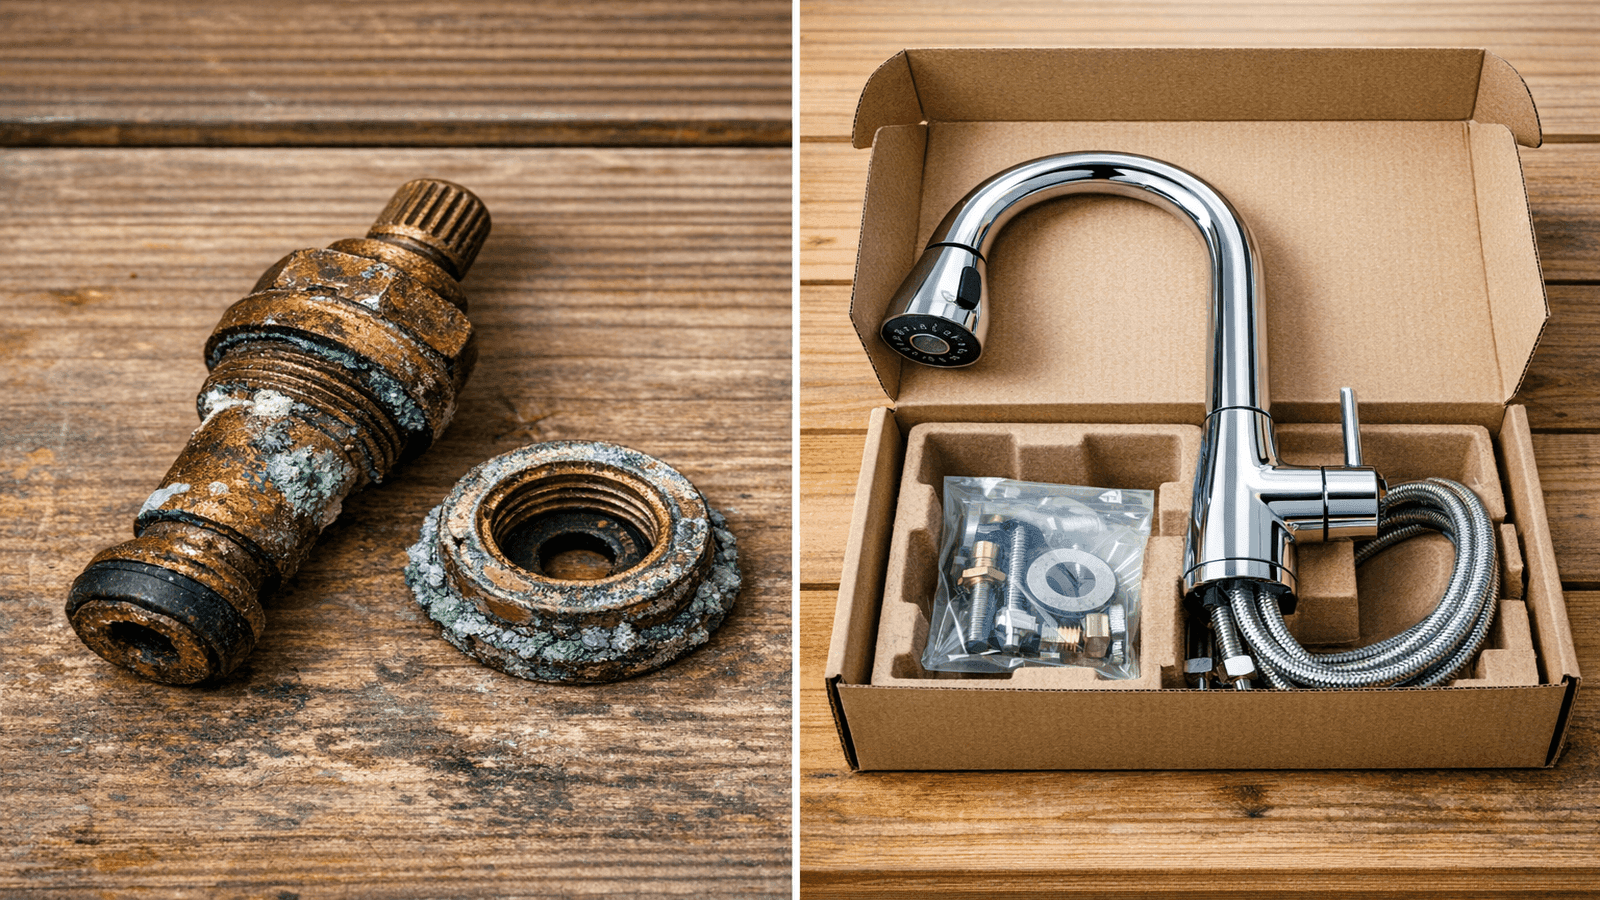
Photo: Side-by-side comparison of a corroded compression faucet stem with a grooved valve seat next to a new replacement faucet in its box
When to Call a Plumber
Some faucet problems are beyond what a basic repair can fix. Knowing where the line is prevents turning a $10 repair into a $600 water damage claim.
Call a licensed plumber when:
- The leak is coming from the valve body itself, not the spout. Internal cracks require faucet replacement, not patching.
- The valve seat inside a compression faucet is deeply grooved and a seat wrench cannot restore a flat surface.
- Supply lines behind the wall are leaking. This is a pipe issue, not a faucet issue.
- The shutoff valve under the sink is stuck, seized, or leaking when you try to close it.
- After completing the repair, the leak continues or moves to a new location.
Cost reality check (2025-2026 data):
- Standard faucet repair by a plumber: $150 to $350 (Angi 2026, HomeAdvisor 2025)
- Faucet replacement with parts and labor: $250 to $600 depending on faucet model
- Emergency or after-hours service: add $50 to $100 to the standard rate
If the pipe behind the wall is leaking, read the Plumbing Soldering Guide. If the angle stop under the sink is stuck or missing, read Install a Shutoff Valve first.
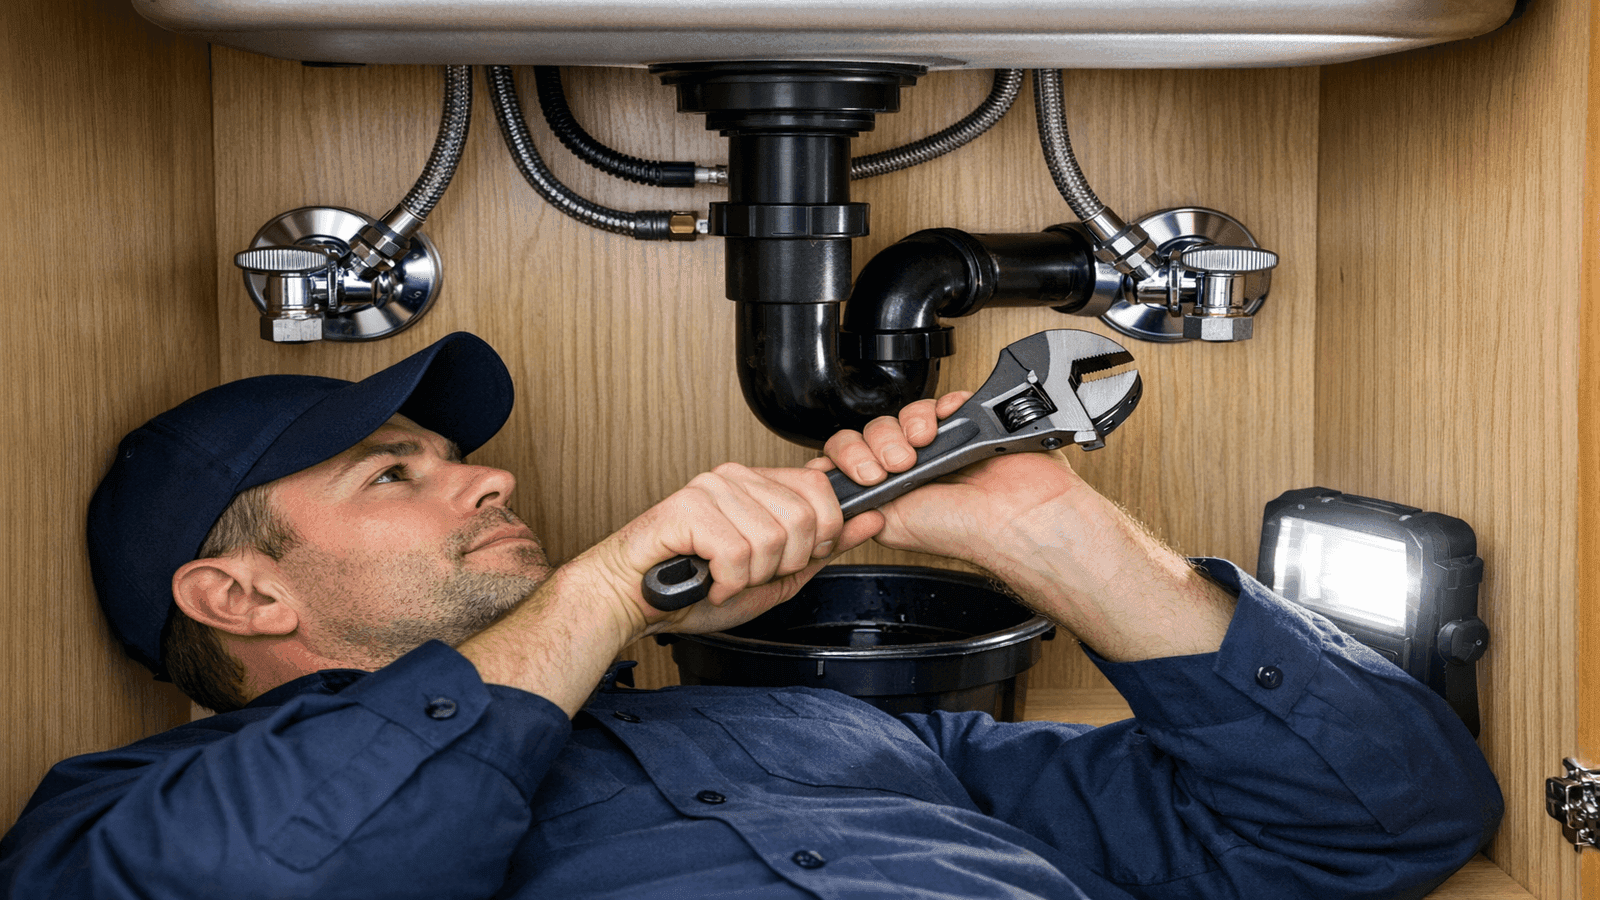
Photo: Licensed plumber working under a kitchen sink with both angle stop valves shut off, professional repair setting
Conclusion
A dripping faucet is one of the few home repairs where the gap between DIY cost ($5 to $15) and professional cost ($150 to $350) is this wide. Identifying your faucet type correctly, gathering parts before turning off the water, and following the type-specific steps above gets most homeowners to a dry faucet in under an hour.
If the repair does not hold or the problem is larger than the faucet itself, that is the right time to bring in a licensed plumber. For more DIY plumbing repairs covered step by step, visit the full DIY Plumbing Guides hub.
Disclaimer: Cost ranges listed in this guide are national averages based on 2025-2026 industry data. Actual costs vary by location, severity, and contractor. Always get multiple quotes for plumbing work. Prices in major metro areas may run 20-40% higher than national averages. This guide is for educational purposes; consult a licensed plumber for issues beyond basic DIY repairs.

Michael Jennings is a licensed master plumber & water systems specialist with over 18 years of hands-on experience in residential and commercial plumbing, serving clients across California and Texas. At NearbyHunt, he shares practical advice on pipe installations, water heater maintenance, and home plumbing upgrades. Michael has helped thousands of homeowners prevent costly water damage and improve water efficiency through modern plumbing solutions.

Robert is a licensed master plumber with over 20 years of experience serving both residential and commercial clients across the Midwest. Specialising in advanced plumbing systems and sustainable water technologies, Rob brings deep technical insight and hands-on expertise to every project. As a reviewer for NearbyHunt, he ensures all plumbing content reflects the highest standards of safety, compliance, and practicality.