- A running toilet wastes 200 gallons of water per day, or roughly 6,000 gallons per month, costing $150-300 per year in wasted water at average US rates.
- The EPA estimates 20% of US toilets are running right now, making this the single most common and costly household plumbing issue.
- A worn flapper causes about 65% of all running toilets and costs just $5-15 at any hardware store. Most homeowners fix it in under 10 minutes.
- The food-coloring tank test is the fastest way to confirm a flapper leak: add 5 drops to the tank, wait 10 minutes without flushing, and check if color appears in the bowl.
- DIY repair kits cost $5-30 for parts only. Hiring a plumber for the same fix runs $150-300, including labor.
- Three parts fail in order of likelihood: flapper (about 65% of cases), float (about 20%), fill valve (about 15%). Diagnosing first saves you from replacing the wrong part.
If you can hear your toilet running between flushes, it is not a minor annoyance. It is a plumbing leak, losing up to 200 gallons of water per day, adding $150-300 to your annual water bill while doing nothing useful. The EPA estimates that 1 in 5 US toilets is running right now, and most of them could be fixed in under 10 minutes with a $5-15 part.
This guide covers three things: how to diagnose which part is failing (takes about 3 minutes), how to fix the flapper, float, or fill valve in order of likelihood, and when to stop DIYing and call a plumber.
This guide is part of the DIY Plumbing Guides series covering the most common household plumbing repairs.
Licensed plumbers in the NearbyHunt network confirm that the flapper is the culprit in roughly 60% of running toilet calls, with float or fill valve issues accounting for the remainder.
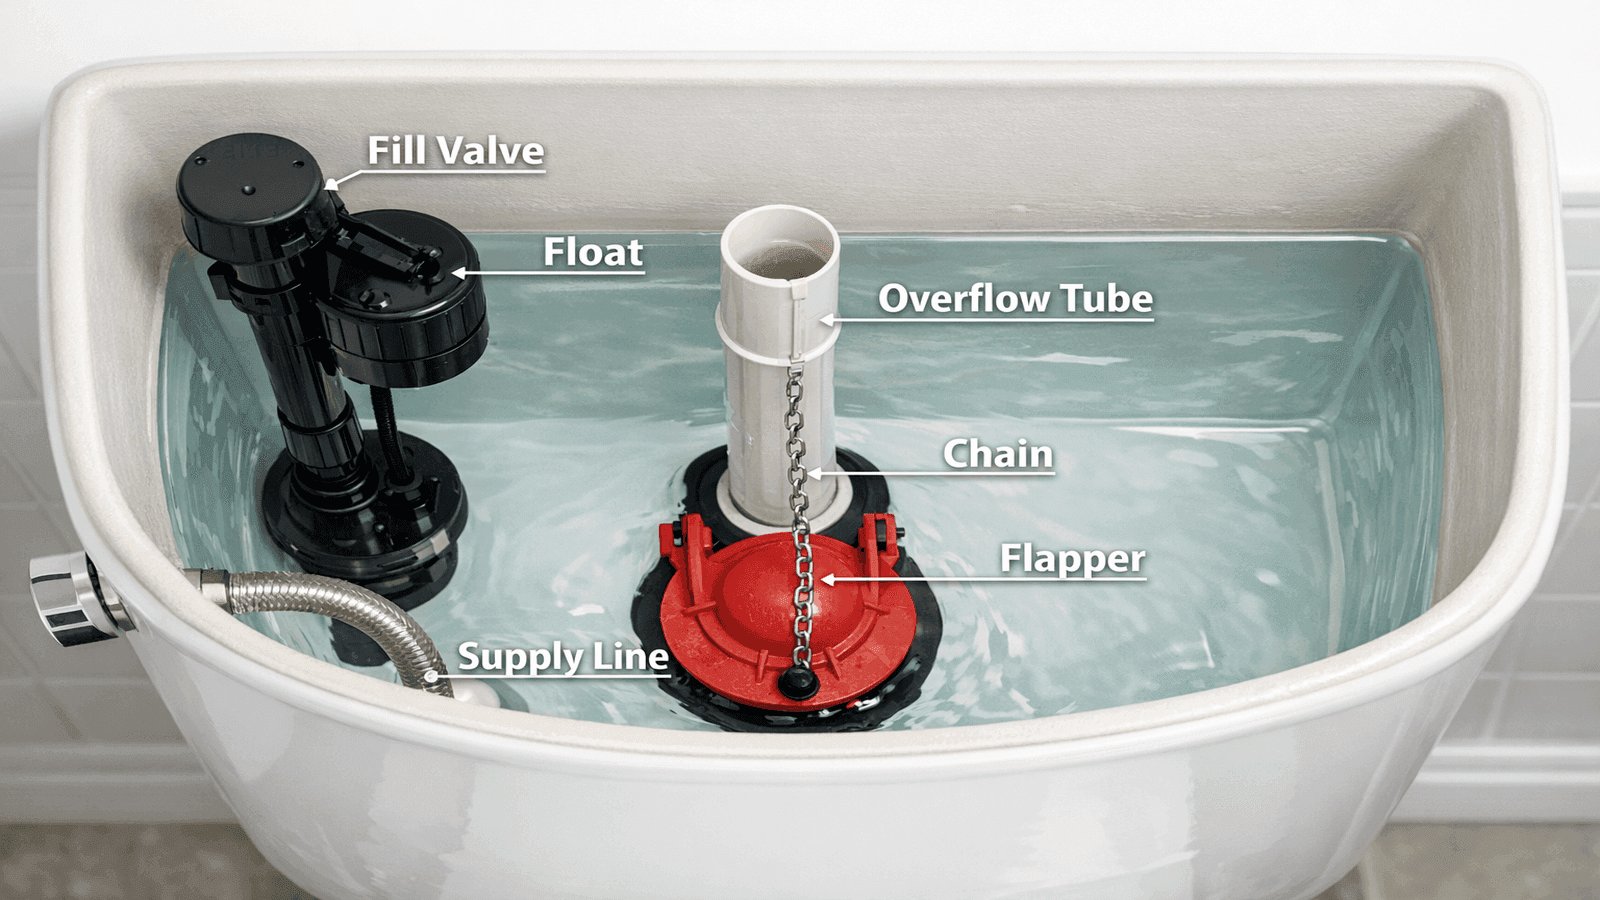
Photo: Top-down view of an open toilet tank with labeled components including flapper, float, fill valve, overflow tube, chain, and supply line

Get quotes from top-rated pros.
How to Diagnose Which Part Is Failing
The three parts that cause a running toilet each produce a distinct symptom. Check in this order before buying anything.
Step 1: The food-coloring tank test (flapper check)
- Remove the tank lid and set it safely aside.
- Add 5-10 drops of food coloring or a dye tablet to the tank water.
- Do not flush. Wait 10 minutes.
- Look in the bowl: if color appears, the flapper is leaking and needs replacement.
- If the bowl stays clear, the flapper seal is good. Move to Step 2.
Step 2: Check the float level (overflow tube check)
Look at the water level inside the tank. It should sit 1 inch below the top of the overflow tube (the vertical tube in the center of the tank). If water is flowing into or near the top of the overflow tube, the float is set too high. The fill valve will run continuously if water keeps spilling into the overflow tube.
Step 3: Inspect the fill valve
If the water level is correct and the flapper test passed, flush the toilet and watch the fill valve refill cycle. A faulty fill valve will run longer than 30-60 seconds, or will not shut off at all. Check for water squirting or spraying from the valve body itself.
The food-dye test is the first thing I do on every service call for a running toilet. In 18 years, it never lies. I've had homeowners spend $80 on a fill valve replacement before calling me, when all they had was a $7 flapper. Diagnose first, then buy parts. I always carry dye tablets in my truck for exactly this reason.
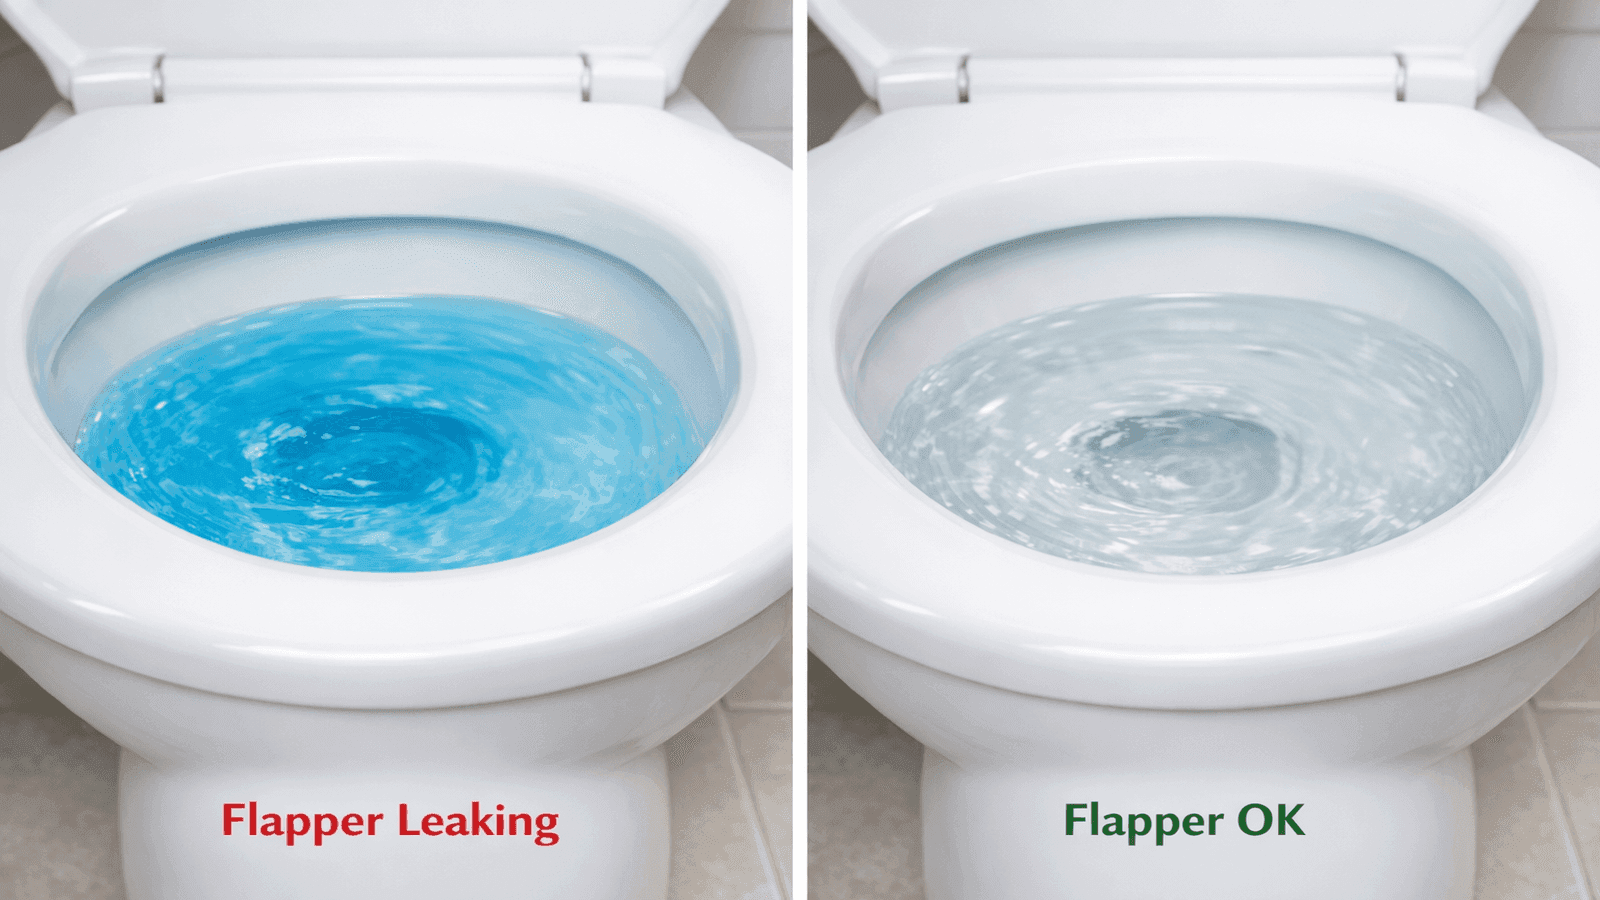
Photo: Side-by-side comparison showing blue-tinted toilet bowl water indicating a flapper leak on the left, and clear bowl water indicating a good flapper seal on the right
Fix 1: Replace the Flapper (Most Common Fix, About 65% of Cases)
Parts needed: Universal toilet flapper ($5-15 at any hardware store). Match the size if possible: most residential toilets use a 2-inch flapper; some Kohler and American Standard models require a 3-inch flapper.
Tools needed: None. Rubber gloves are optional.
Time: 5-10 minutes.
Steps:
- Turn off the water supply valve (the knob on the wall behind or below the toilet) by turning it clockwise until it stops.
- Flush the toilet to drain most of the tank water.
- Unhook the old flapper: the two side ears hook onto pegs on the overflow tube. Lift straight up and off.
- Unhook the chain from the flush handle arm.
- Clip the new flapper ears onto the same pegs on the overflow tube.
- Attach the chain to the flush handle arm. Leave about 0.5 inches of slack: too tight and the flapper won't seal; too loose and it won't open far enough to flush completely.
- Turn the water supply back on and let the tank refill.
- Flush twice and watch the flapper seat. It should drop flat and seal with no rocking or gaps.
- Repeat the food-coloring test after 10 minutes to confirm the leak is gone.
Cost comparison:
Cost comparison
| Approach | Part Cost | Labor Cost | Total |
| DIY flapper only | $5-$15 | $0 | $5-$15 |
| DIY repair kit (flapper + chain + hardware) | $10-$30 | $0 | $10-$30 |
| Professional plumber | $5-$15 | $100-$150 | $115-$200 |
The most common mistake I see is homeowners replacing the entire fill valve when the problem was just the flapper. I get at least two calls a month where someone says they already replaced the fill valve and the toilet is still running. We open the tank and find a flapper that's been warped by hard water or chlorine. A flapper lasts 4-5 years on average, sometimes less in areas with heavy chlorine treatment. If your toilet is running and it's been more than 5 years since you replaced the flapper, start there. Every time.
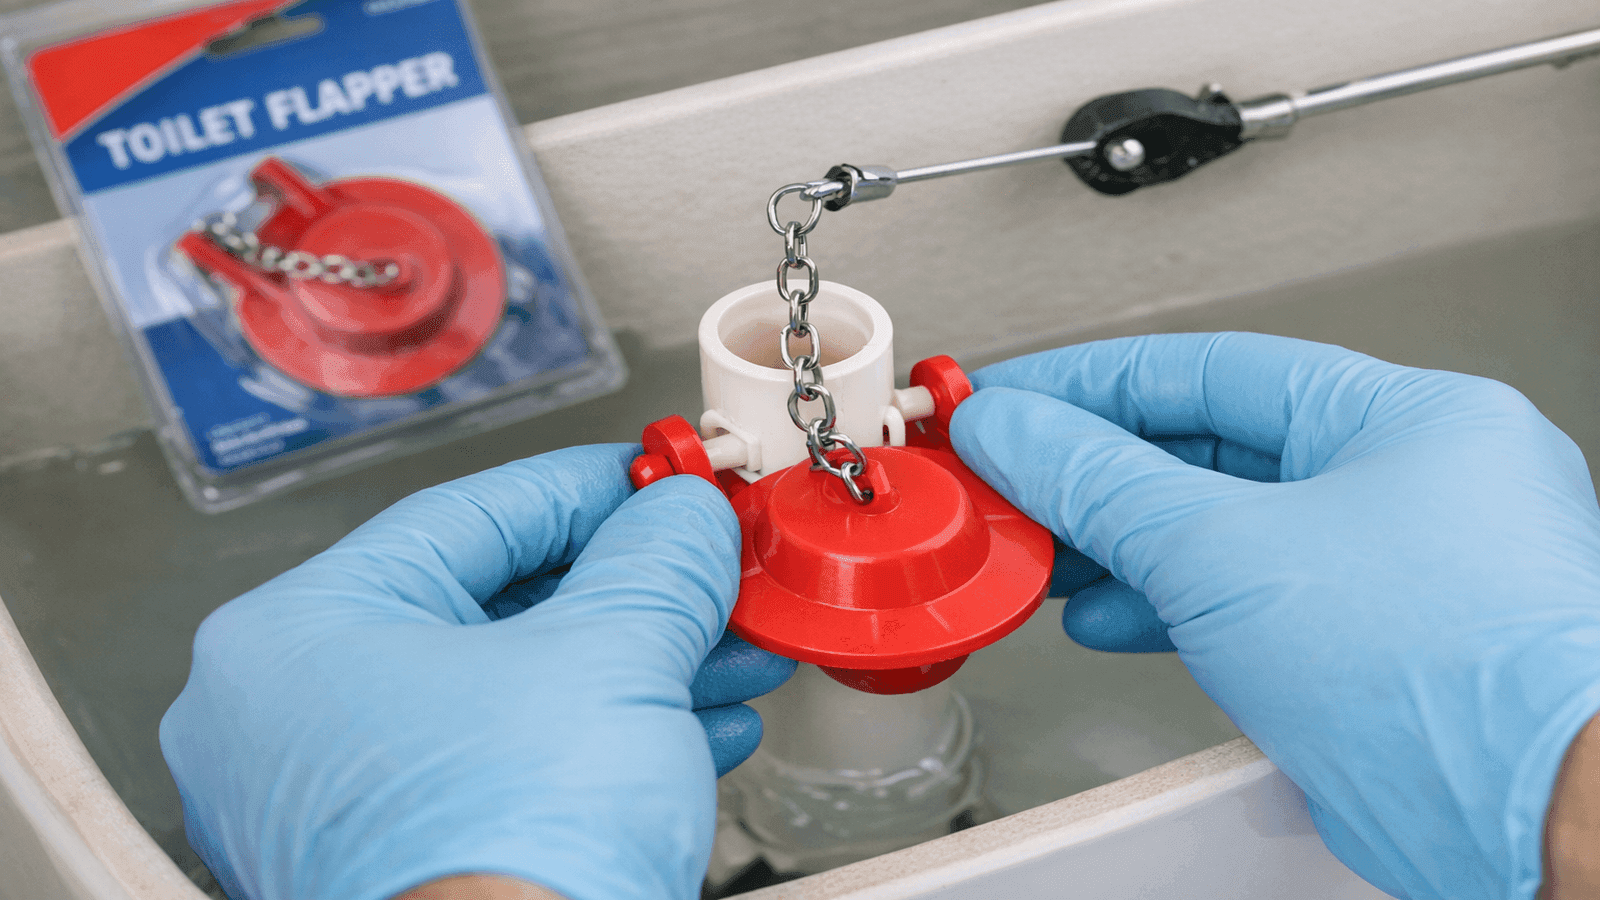
Photo: Gloved hands snapping a new red rubber flapper onto the overflow tube pegs inside a toilet tank, with the chain attached to the flush arm showing proper half-inch slack
Fix 2: Adjust the Float (Free Fix, No Parts Needed)
If the food-colouring test showed no flapper leak but water is running into the overflow tube, the float is set too high. This is a free fix requiring no parts.
There are two float types, and each requires a different adjustment.
Ball float (older toilets: arm with a ball on the end)
Bend the float arm slightly downward so the ball sits lower in the water. The goal is for the tank water to stop filling at least 1 inch below the top of the overflow tube. Some ball floats have a screw at the arm pivot; turn it counterclockwise to lower the shutoff level. Flush and confirm the fill valve shuts off before water reaches the overflow tube.
Cup float (modern toilets: cylindrical float that slides up and down the fill valve shaft)
Find the adjustment clip or screw on the fill valve shaft. Pinch the clip and slide the float down the shaft, or turn the screw counterclockwise. Adjust in small increments: lower the float 0.5 inches at a time, flush and check.
Target: water level 1 inch below the top of the overflow tube and 0.5 inches below the fill valve's critical level mark (the CL marking on the valve body).
When adjustment alone won't fix it: If the float is already at its lowest setting and water still runs into the overflow tube, the fill valve itself is worn and needs replacement. See Fix 3 below.
Get quotes from top-rated pros.
Fix 3: Replace the Fill Valve (Least Common, About 15% of Cases)
If the flapper is fine, the float is correctly adjusted, and water still runs continuously or the fill cycle never fully stops, the fill valve needs replacement.
Signs a fill valve is failing:
- Hissing or screeching sound from the tank during the fill cycle
- Fill cycle that runs more than 60-90 seconds after each flush
- Water spraying or squirting from the valve body
- Fill cycle that never fully shuts off
DIY fill valve replacement overview:
- Part cost: $10-30 for a universal fill valve (the Fluidmaster 400A is the most common residential replacement)
- Time: 20-30 minutes
- Tools: adjustable pliers, small bucket, towel
- Skill level: beginner
For complete step-by-step fill valve replacement instructions, including how to adjust the valve height and set the correct water level after installation, see: How to Replace a Toilet Fill Valve
A fill valve that is running constantly is doing one of two things: it either cannot build enough pressure to shut off due to internal wear, or it has debris stuck in the seal from hard water. Before replacing the entire valve, try this: turn off the supply, hold a cup over the top of the open fill valve, turn the supply back on briefly to flush debris out of the valve seat. I've fixed about 30% of 'bad fill valves' with this single step, no parts needed.
When to Call a Plumber
Most running toilet problems are flapper or float issues that any homeowner can fix in under 30 minutes. However, call a licensed plumber if you run into any of the following situations.
Call a plumber when:
- You find visible cracks in the tank or bowl: water stains around the base, soft floor around the toilet base, or visible fractures in the porcelain
- The toilet is rocking on its base: this can indicate a failed wax ring seal, which leads to floor damage and sewage odors
- All three parts have been replaced and the toilet still runs: this may indicate a faulty flush valve seat that needs reseating or replacement of the entire flush valve assembly
- The supply line or shut-off valve leaks when you turn it off: corroded shut-off valves can crack when turned for the first time in years
- The problem keeps returning within a few weeks of repair: repeat failures suggest a water quality issue (scale buildup, chloramine damage) that needs professional assessment
Cost reality check (2025-2026)
| Service | Typical Cost |
| Flapper replacement (pro) | $100-$175 |
| Fill valve replacement (pro) | $150-$225 |
| Full flush valve assembly replacement | $200-$350 |
| Wax ring and toilet reseat | $150-$300 |
| Emergency or after-hours call | Add $75-$150 surcharge |
In 18 years, the two situations I see homeowners get into trouble are: turning a stuck shut-off valve and cracking it, and replacing parts three times without fixing the underlying cause. If you've replaced the flapper and fill valve and the toilet runs again within a month, stop and call someone. There's either a flush valve seat problem or a water quality issue stripping rubber components faster than normal. Both of those need a licensed set of eyes.
Conclusion
A running toilet is one of the easiest household repairs to handle yourself. In the vast majority of cases (roughly 65%), a $5-15 flapper is all you need, and the whole job takes under 10 minutes. Start with the food-colouring test to confirm the flapper is the culprit, work through the float adjustment if that comes back negative, and replace the fill valve only if both of those checks pass. You'll save $100-200 in labour and stop wasting up to 200 gallons of water every single day.
For more DIY plumbing repairs at the same skill level, visit the full DIY Plumbing Guides series.
Disclaimer: Cost ranges listed in this guide are national averages based on 2025-2026 industry data. Actual costs vary by location, severity, and contractor. Always get multiple quotes for plumbing work. Prices in major metro areas may be 20-40% higher than the national average. This guide is for educational purposes; consult a licensed plumber for issues beyond basic DIY repairs.

Michael Jennings is a licensed master plumber & water systems specialist with over 18 years of hands-on experience in residential and commercial plumbing, serving clients across California and Texas. At NearbyHunt, he shares practical advice on pipe installations, water heater maintenance, and home plumbing upgrades. Michael has helped thousands of homeowners prevent costly water damage and improve water efficiency through modern plumbing solutions.

Robert is a licensed master plumber with over 20 years of experience serving both residential and commercial clients across the Midwest. Specialising in advanced plumbing systems and sustainable water technologies, Rob brings deep technical insight and hands-on expertise to every project. As a reviewer for NearbyHunt, he ensures all plumbing content reflects the highest standards of safety, compliance, and practicality.