- Changing your AC filter every 1-3 months is the single most impactful DIY maintenance task, preventing 80% of airflow-related breakdowns [1].
- Resetting your AC unit after a power surge or trip takes less than 5 minutes and resolves roughly 30% of "AC not working" complaints before a service call is needed [2].
- Cleaning condenser coils with a garden hose once per year can improve cooling efficiency by 5-10% and extend compressor life [3].
- Programming your thermostat correctly saves 10-15% on annual heating and cooling costs, or $100-$150 for the average household [4].
- Never handle refrigerant yourself. Federal law (EPA Section 608) requires certification to purchase, handle, or dispose of refrigerants. Violations carry fines up to $44,539 per day [5].
- Testing a capacitor with a multimeter is an intermediate DIY skill that can confirm whether a $15 part is the reason your AC won't start, potentially saving a $150-$300 service call [6].
Americans spend an average of $300 to $500 per year on HVAC service calls, but many of those visits address problems that homeowners can prevent or diagnose themselves [1]. Changing a clogged filter, resetting a tripped unit, or programming a thermostat correctly can save you hundreds of dollars and keep your system running efficiently between professional tune-ups.
That said, HVAC systems involve high-voltage electricity, pressurized refrigerant, and combustion gases. Knowing the line between safe DIY maintenance and work that requires a licensed technician is not optional. It is the most important skill in this entire guide. Every task covered here includes a clear safety rating so you know exactly what you can handle and what to leave alone.
Daniel Torres, a Certified HVAC Technician and Energy Efficiency Consultant with 14+ years of experience in Minneapolis, MN, contributed the expert insights throughout this guide. His advice draws from thousands of service calls where a simple DIY step could have prevented the problem entirely.

Get quotes from top-rated pros.
About 40% of the service calls I respond to could have been avoided with basic homeowner maintenance. A dirty filter is the number one cause of frozen coils, and a tripped breaker is the number one reason people think their AC is broken. Learning these simple checks saves real money.
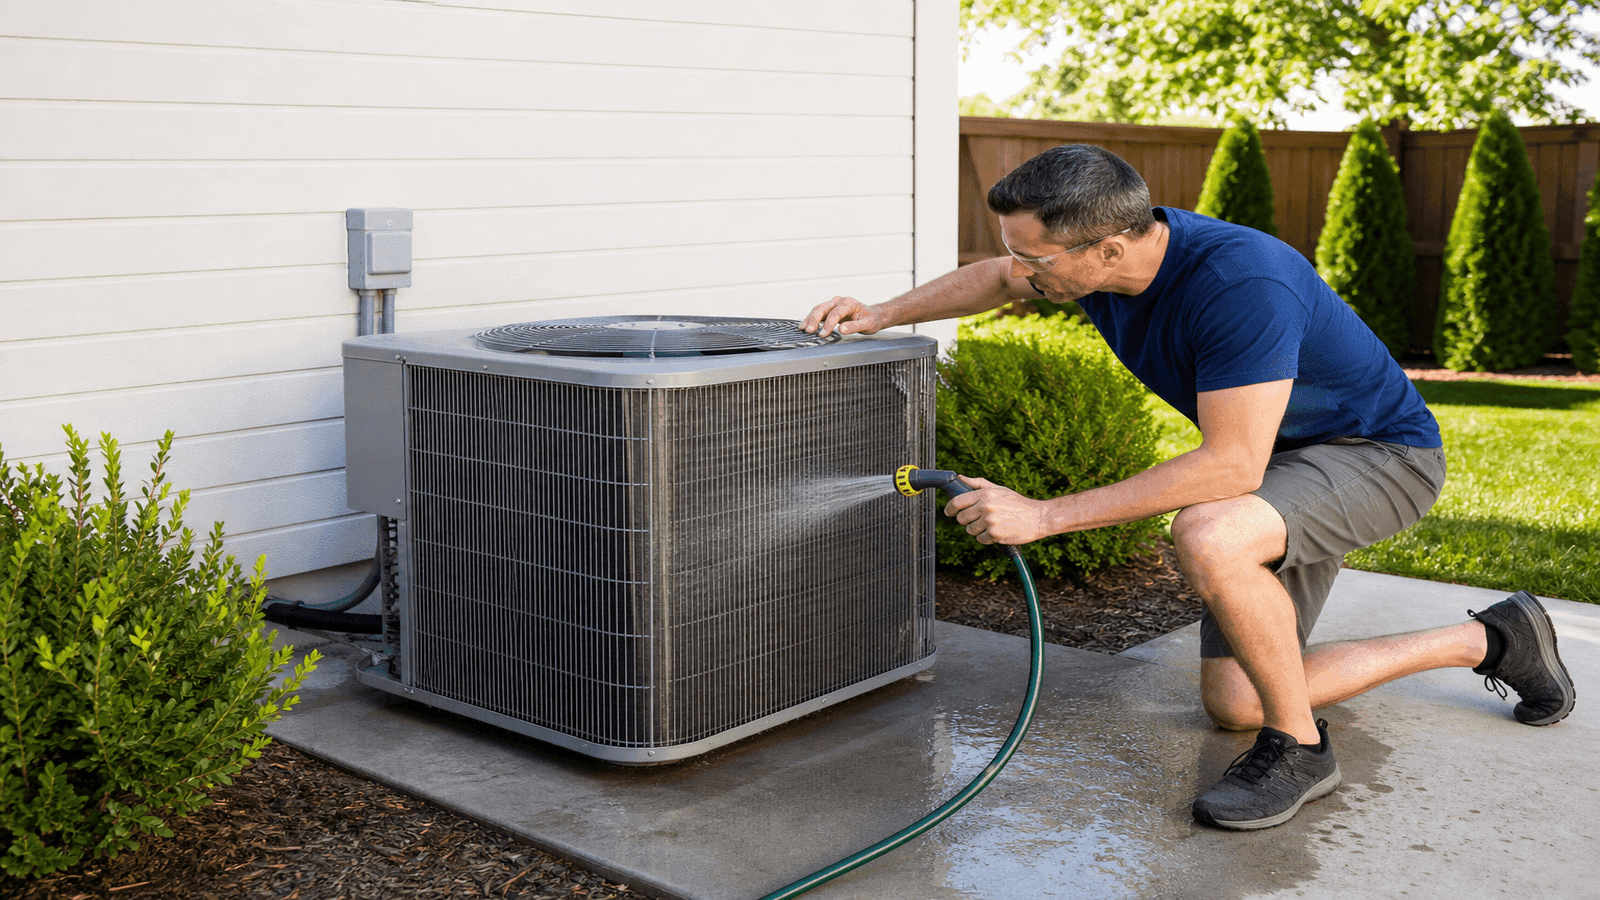
Photo: Homeowner performing basic HVAC maintenance on a residential air conditioning unit
Safe DIY vs. Call a Pro
Before tackling any HVAC task, understand where the safety line falls. HVAC professionals in the NearbyHunt network report that roughly 15% of the emergency calls they handle involve homeowners who attempted repairs beyond their skill level, resulting in electrical burns, refrigerant exposure, or voided warranties.
Safe for Most Homeowners (No Special Tools):
- Changing air filters
- Cleaning debris from outdoor condenser unit
- Resetting a tripped AC unit or breaker
- Programming or replacing a thermostat (low voltage)
- Bleeding radiators
- Cleaning furnace exterior and accessible components
- Checking and clearing condensate drain lines
Intermediate DIY (Basic Tools Required):
- Cleaning evaporator and condenser coils
- Testing a capacitor with a multimeter
- Replacing a thermostat (matching wires)
- Inspecting ductwork for visible leaks
Always Call a Licensed Professional:
- Anything involving refrigerant (federal law)
- Gas line connections or repairs
- Electrical work beyond the disconnect switch
- Compressor or blower motor replacement
- Ductwork modification or sealing
- Heat exchanger inspection (carbon monoxide risk)
- Any repair you are not 100% confident performing
The rule I give every homeowner is simple: if it involves refrigerant, gas, or opening the electrical panel, call a pro. Everything else on the safe list, you can learn in 10 minutes with the right guide. The money you save on filter changes alone pays for your annual professional tune-up.
How to Change Your AC Filter
Replacing your air filter is the easiest and most impactful maintenance task you can perform. A clogged filter restricts airflow, forces the system to work harder, increases energy bills by 5-15%, and can cause the evaporator coil to freeze [1].
When to Replace:
- 1-inch filters: every 1-3 months
- 4-inch media filters: every 6-12 months
- 5-inch filters: every 9-12 months
- With pets: check monthly, replace when visibly dirty
- During high-use seasons (summer/winter): check monthly
Choosing the Right MERV Rating:
Your system has a maximum MERV rating it can handle without restricting airflow. Installing a filter rated too high for your system causes the same problems as a dirty filter.
| MERV Rating | Captures | Best For | System Requirement |
| MERV 1-4 | Large dust, pollen | Basic protection | Any system |
| MERV 8 | Dust mites, mold spores | Standard homes | Most residential |
| MERV 11-13 | Pet dander, fine dust, some bacteria | Allergy sufferers | Check static pressure first |
| MERV 14-16 | Smoke, bacteria, virus carriers | Medical needs | Requires upgraded air handler |
Real-World Example (Lisa M., Omaha, NE): Lisa called for service because her AC was blowing warm air and ice was forming on the indoor unit. The technician found a MERV 13 filter jammed into a system rated for MERV 8. The restricted airflow froze the evaporator coil. Replacing it with the correct MERV 8 filter and letting the coil thaw solved the problem entirely. Total cost if she had just changed the filter herself: $8 for the filter. Actual cost with the service call: $185.
For the complete step-by-step process with photos and sizing charts, read: How to Change Your AC Filter
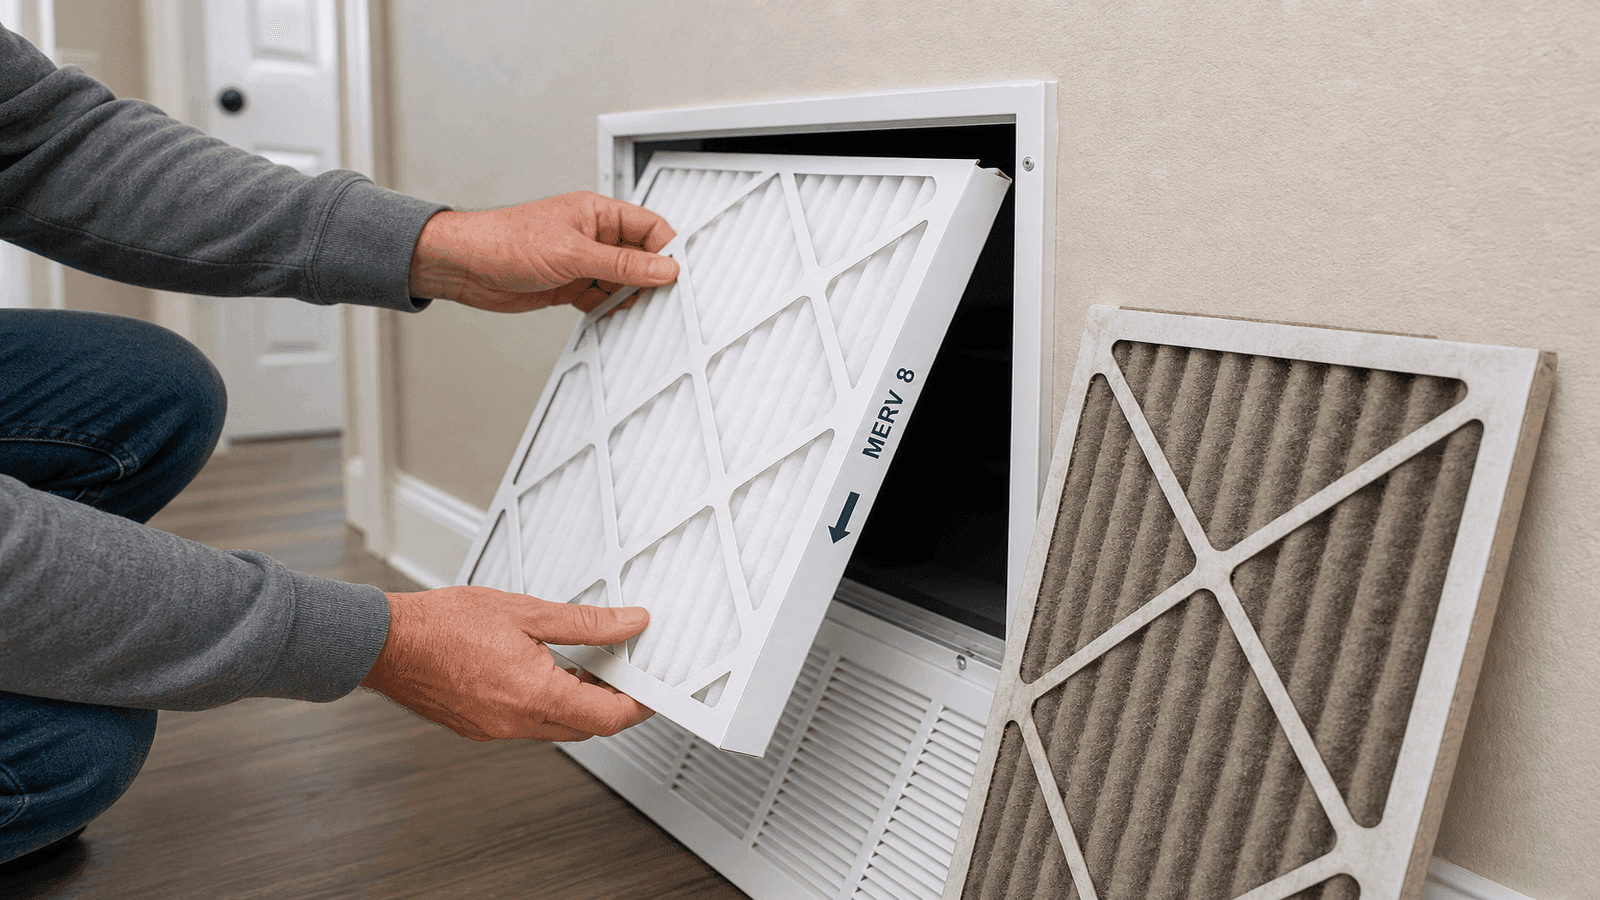
Photo: Close-up of a homeowner sliding a new MERV 8 air filter into a residential HVAC return vent
How to Reset Your AC Unit
When your AC stops working suddenly, a reset is the first troubleshooting step before calling for service. Power surges, brief outages, and electrical storms can trip your system's safety circuits without any underlying mechanical problem [2].
Common Reset Scenarios:
- AC stopped after a storm or power flicker
- Outdoor unit is humming but not starting
- Thermostat display is on but system won't respond
- Circuit breaker tripped
Basic Reset Steps:
- Turn the thermostat to OFF
- Locate the circuit breaker for your AC (usually labeled "AC" or "Air Handler" and "Condenser")
- Flip the breaker(s) to OFF
- Wait 30 seconds to 1 minute
- Flip the breaker(s) back to ON
- Wait 3-5 minutes before turning the thermostat back to COOL (this protects the compressor)
- Set the temperature 3-5 degrees below room temperature to trigger a cooling cycle
When a Reset Won't Fix It:
- Breaker trips again immediately after resetting (possible electrical short, call a pro)
- System runs but blows warm air (could be refrigerant issue, call a pro)
- Unusual burning smell after reset (turn off immediately, call a pro)
- Reset works but system trips again within hours (intermittent electrical problem)
For the full troubleshooting guide with system-specific instructions, see: How to Reset Your AC Unit
Get quotes from top-rated pros.
How to Clean AC Coils
Your AC has two coils that need periodic cleaning: the evaporator coil (indoor) and the condenser coil (outdoor). Dirty coils reduce heat transfer efficiency by up to 30% and force the compressor to work harder, shortening its lifespan [3].
Condenser Coil (Outdoor Unit), Safe DIY:
- Turn off power at the disconnect switch near the unit
- Remove large debris (leaves, grass clippings) by hand
- Use a garden hose to spray fins from inside out (never use a pressure washer)
- Straighten bent fins with a fin comb ($10 at hardware stores)
- Trim vegetation back 2 feet from all sides
Evaporator Coil (Indoor Unit), Intermediate DIY:
- Turn off system power
- Locate the coil access panel (usually on the air handler)
- Apply no-rinse evaporator coil cleaner (available at hardware stores, $8-$15)
- Let the foam break down dirt and drain into the condensate pan
- Clean the condensate drain line with a wet/dry vacuum or vinegar flush
I see condenser coils packed with cottonwood seeds, dryer lint, and grass clippings every summer. A 15-minute hose-down in spring prevents the efficiency loss that adds $20-$40 per month to your cooling bills. That is a 5-minute task that pays for itself immediately.
For the complete cleaning guide with safety precautions and product recommendations, read: How to Clean AC Coils
AC Not Cooling: Troubleshooting
Before spending $150-$300 on a service call for an AC that is not cooling, work through this DIY checklist. HVAC professionals in the NearbyHunt network estimate that 25-30% of "no cooling" service calls are resolved by one of these homeowner-accessible fixes [2].
DIY Troubleshooting Checklist:
- Check the thermostat: Set to COOL, fan to AUTO, temperature at least 3 degrees below room temp
- Check the filter: A clogged filter is the most common cause of poor cooling
- Check the breaker: Make sure both the air handler and condenser breakers are ON
- Check the outdoor unit: Is it running? Is it blocked by debris? Is the disconnect switch on?
- Check the condensate drain: A clogged drain triggers the safety float switch, shutting down the system
- Check supply vents: Make sure they are open and unblocked by furniture or curtains
- Check for ice: If you see ice on the refrigerant line or indoor coil, turn the system to FAN ONLY for 2-4 hours to thaw, then check the filter
If None of These Fix It:
The problem likely involves refrigerant levels, a failed capacitor, a bad compressor, or an electrical component. These require professional diagnosis and repair.
For the full diagnostic flowchart with step-by-step photos, see: AC Not Cooling: Troubleshooting Guide

Photo: Homeowner checking thermostat settings while troubleshooting an AC that is not cooling
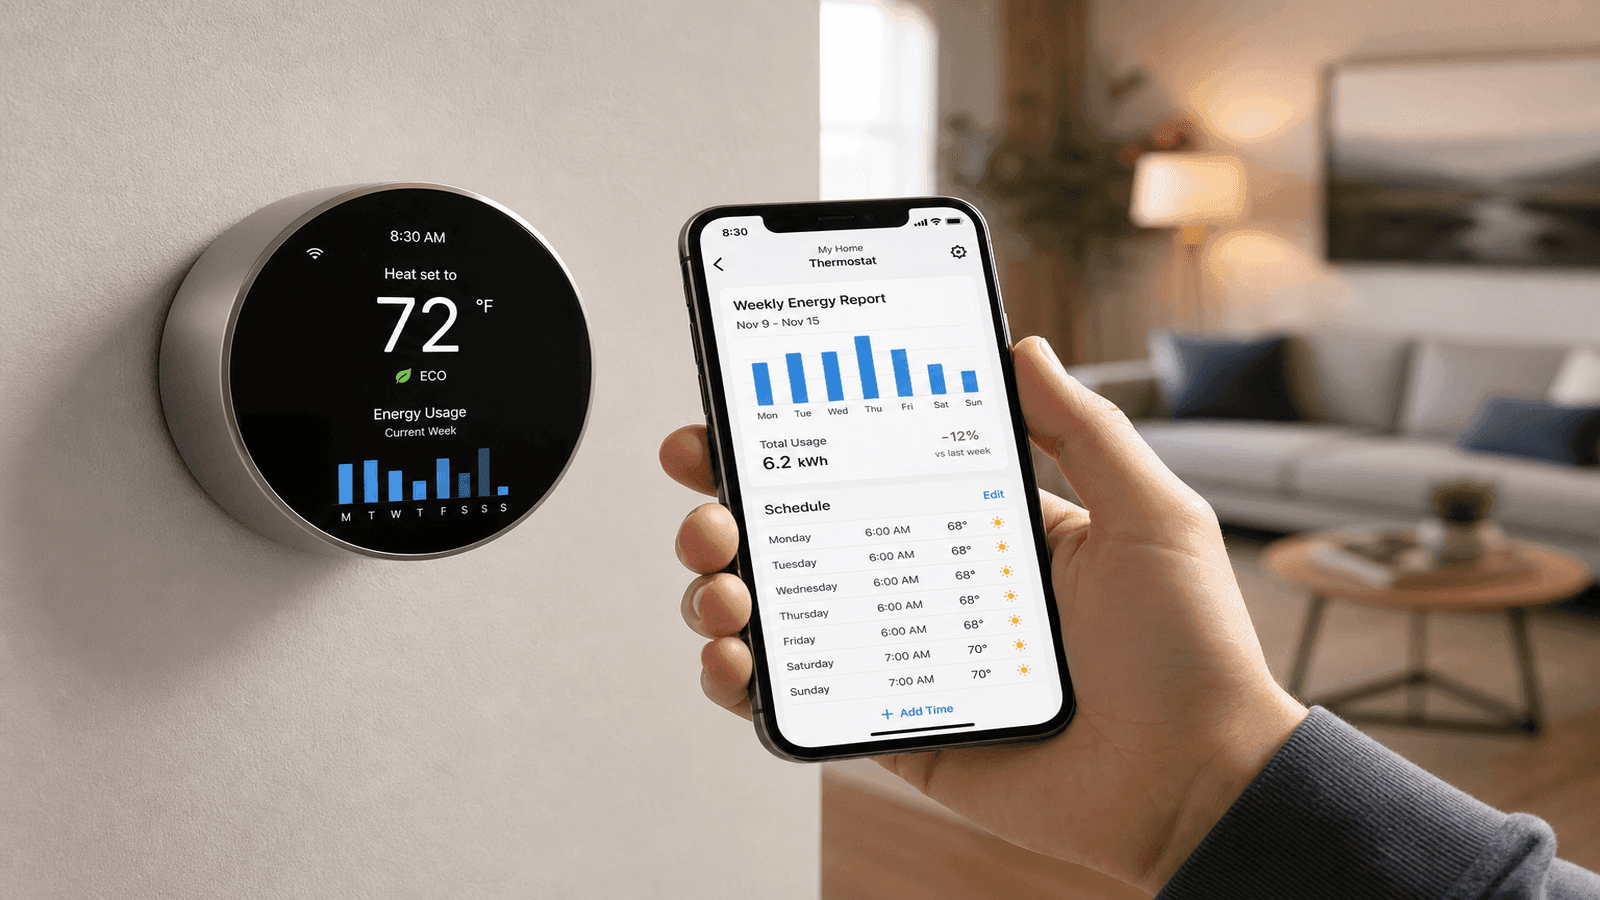
How to Program Your Thermostat
A properly programmed thermostat saves 10-15% on heating and cooling costs, or roughly $100-$150 per year for the average U.S. household [4]. Yet the DOE estimates that nearly 40% of programmable thermostats are left on a single constant temperature, eliminating the energy savings entirely.
Recommended Temperature Schedules
| Time Period | Cooling Season | Heating Season |
| Home and awake | 78°F | 68°F |
| Away at work | 85°F (or OFF) | 62°F |
| Sleeping | 82°F | 65°F |
Each degree of setback for 8 hours saves approximately 1% on your annual energy bill [4].
Smart Thermostat Benefits:
- Learn your schedule automatically (Nest, Ecobee)
- Geofencing adjusts temperature when you leave/return
- Energy usage reports identify waste patterns
- Remote control from your phone
- Typical savings: 10-15% ($100-$150/year)
- Typical cost: $150-$300 (pays for itself in 1-2 years)
For installation instructions covering all major brands and wiring diagrams, read: How to Program Your Thermostat
How to Bleed Radiators
If your hot water radiators have cold spots at the top while being warm at the bottom, trapped air is the culprit. Bleeding releases that air and restores even heat distribution. This is a 5-minute task per radiator with zero risk when done correctly.
What You Need: A radiator bleed key (available at any hardware store for $3-$5) and a small towel or container to catch water drips.
Steps:
- Turn on your heating system and let radiators warm up fully
- Identify which radiators have cold spots (feel the top vs. bottom)
- Turn off the heating system (reduces pressure for safer bleeding)
- Place a towel under the bleed valve (small square valve at the top corner)
- Insert the bleed key and turn counterclockwise slowly (quarter to half turn)
- You will hear hissing as air escapes. Hold until water begins to drip steadily
- Close the valve by turning clockwise. Do not overtighten
- Check your boiler pressure gauge. If it dropped below 1 bar, use the filling loop to top it up
For the complete guide including boiler pressure adjustment and when to call a professional, see: How to Bleed Radiators
Get quotes from top-rated pros.
How to Check Refrigerant Levels
Checking refrigerant levels is NOT a DIY repair. Federal law under EPA Section 608 prohibits unlicensed individuals from purchasing, handling, or adding refrigerant [5]. However, you can identify symptoms of low refrigerant so you know when to call for professional service.
Warning Signs of Low Refrigerant:
- AC runs constantly but does not cool the home to the set temperature
- Ice forming on the refrigerant line (the copper pipe running to the outdoor unit)
- Ice on the evaporator coil (visible through the access panel)
- Hissing or bubbling sounds near the indoor unit (indicates an active leak)
- Higher than normal electric bills with no change in usage patterns
- Warm air from supply vents even though the system is running
What a Professional Will Do:
A certified technician will connect manifold gauges to measure superheat and subcooling, identify the leak location using electronic leak detectors or UV dye, repair the leak, evacuate the system, and recharge with the correct amount of refrigerant. Cost: $200-$600 depending on the refrigerant type and leak severity.
Important 2026 Note: New systems manufactured after January 2025 use R-454B refrigerant, which has a lower global warming potential but is classified as mildly flammable (A2L). Existing R-410A systems can still be serviced, but refrigerant costs are rising as production decreases [5].
For the full guide on recognizing refrigerant issues and what to expect during a professional service call, read: How to Check Refrigerant Levels
>Need a Certified HVAC Technician?
> Refrigerant work requires EPA 608 certification. NearbyHunt connects you with licensed, certified HVAC pros in your area. Find HVAC Pros on NearbyHunt
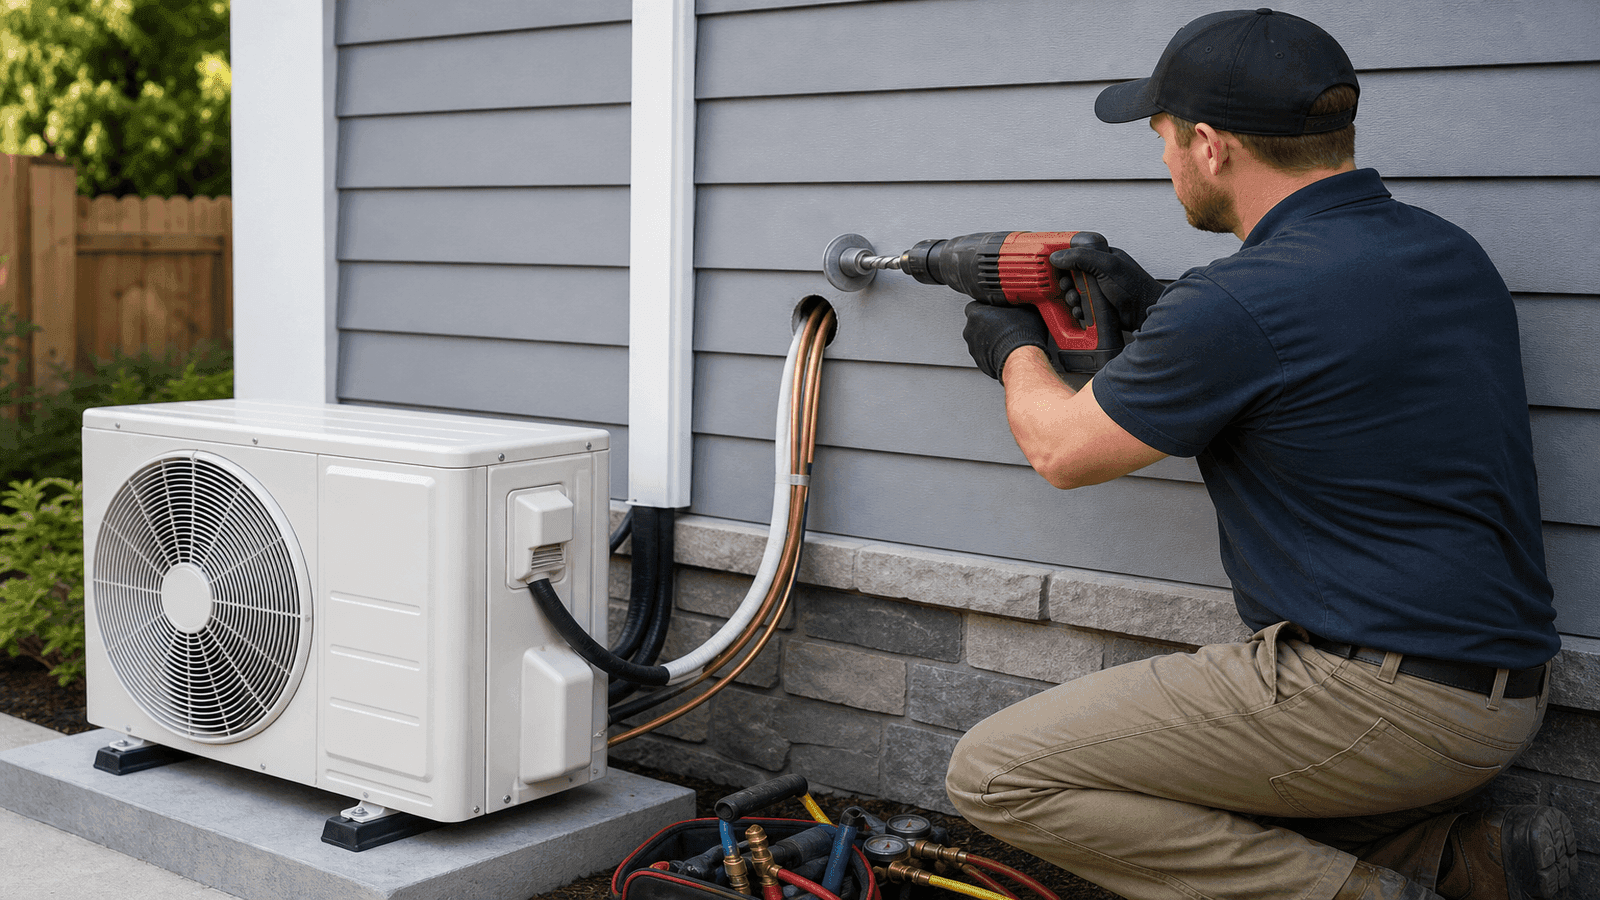
How to Replace Your Thermostat
Replacing a thermostat is a manageable DIY project for most homeowners. Modern thermostats use low-voltage wiring (24V), which is safe to handle with the system powered off. The key is matching the wires correctly from your old thermostat to the new one.
Before You Start:
- Verify your new thermostat is compatible with your system type (heat pump, conventional, dual-fuel)
- Take a photo of your existing wiring before disconnecting anything
- Label each wire with the terminal letter it connects to (R, W, Y, G, C, O/B)
When to Call a Pro Instead:
- Your system uses high-voltage (120V/240V) wiring (some baseboard heaters)
- You need to run a new C-wire (common wire) for a smart thermostat
- Your existing wires don't match standard color coding
- You have a complex multi-zone system
For step-by-step installation with wiring diagrams for all major brands, read: How to Replace Your Thermostat
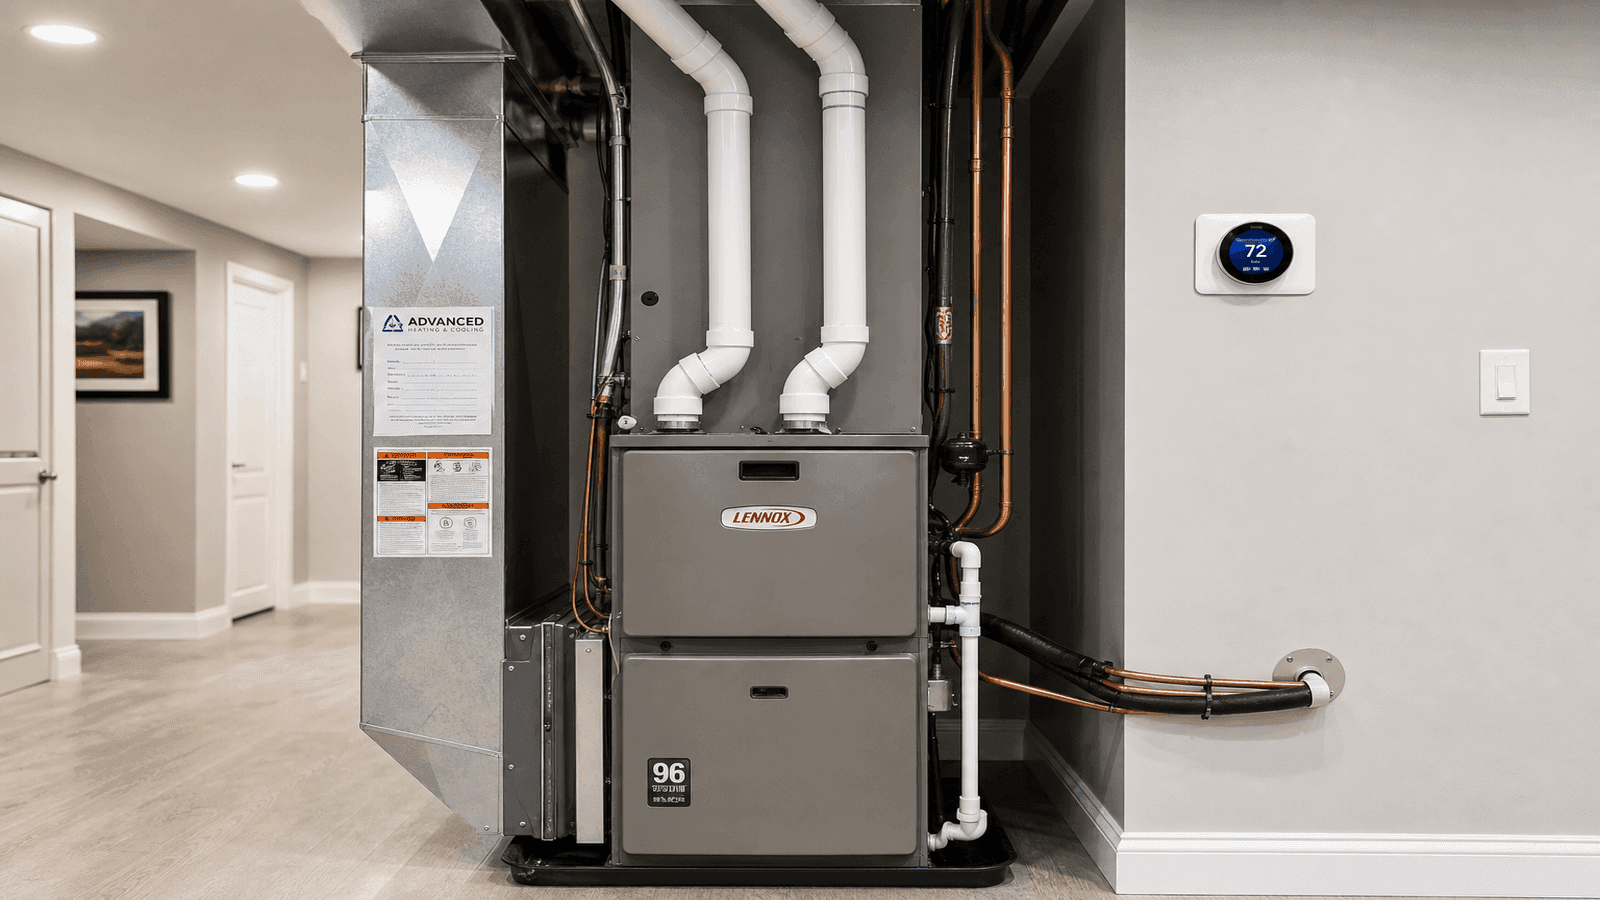
How to Clean Your Furnace
Annual furnace cleaning keeps your heating system running safely and efficiently. A dirty furnace works harder, uses more fuel, and can develop dangerous conditions like cracked heat exchangers or blocked flue pipes. The safe DIY portions focus on accessible components. Internal inspections should be part of your annual professional tune-up.
Safe DIY Cleaning Tasks:
- Replace the furnace filter (same process as AC filter)
- Vacuum around the furnace base and burner area (with power OFF)
- Clean the blower compartment if accessible (remove panel, vacuum dust)
- Clear the area around the furnace (no storage within 3 feet)
- Check the flue pipe for visible rust, holes, or disconnections
- Test carbon monoxide detectors near the furnace
Leave These to a Professional:
- Heat exchanger inspection (cracked heat exchangers leak carbon monoxide)
- Burner cleaning and adjustment
- Gas valve inspection
- Flame sensor cleaning (requires specific technique to avoid damage)
- Combustion analysis
For the complete annual furnace maintenance checklist, read: How to Clean Your Furnace
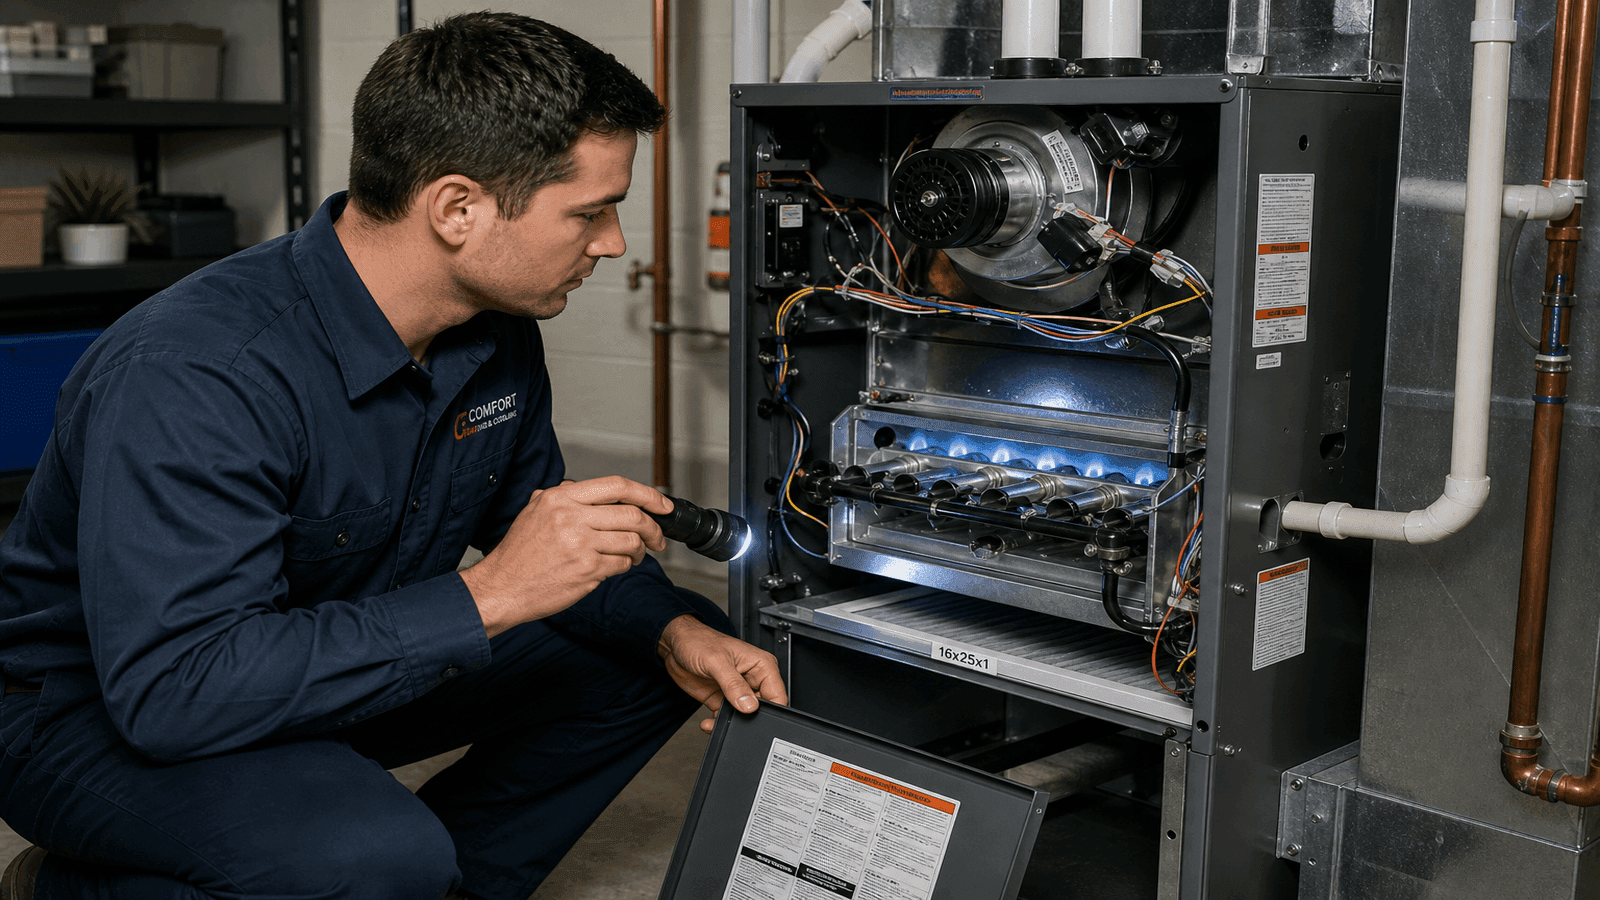
Photo: HVAC technician inspecting the interior of a residential gas furnace during annual maintenance
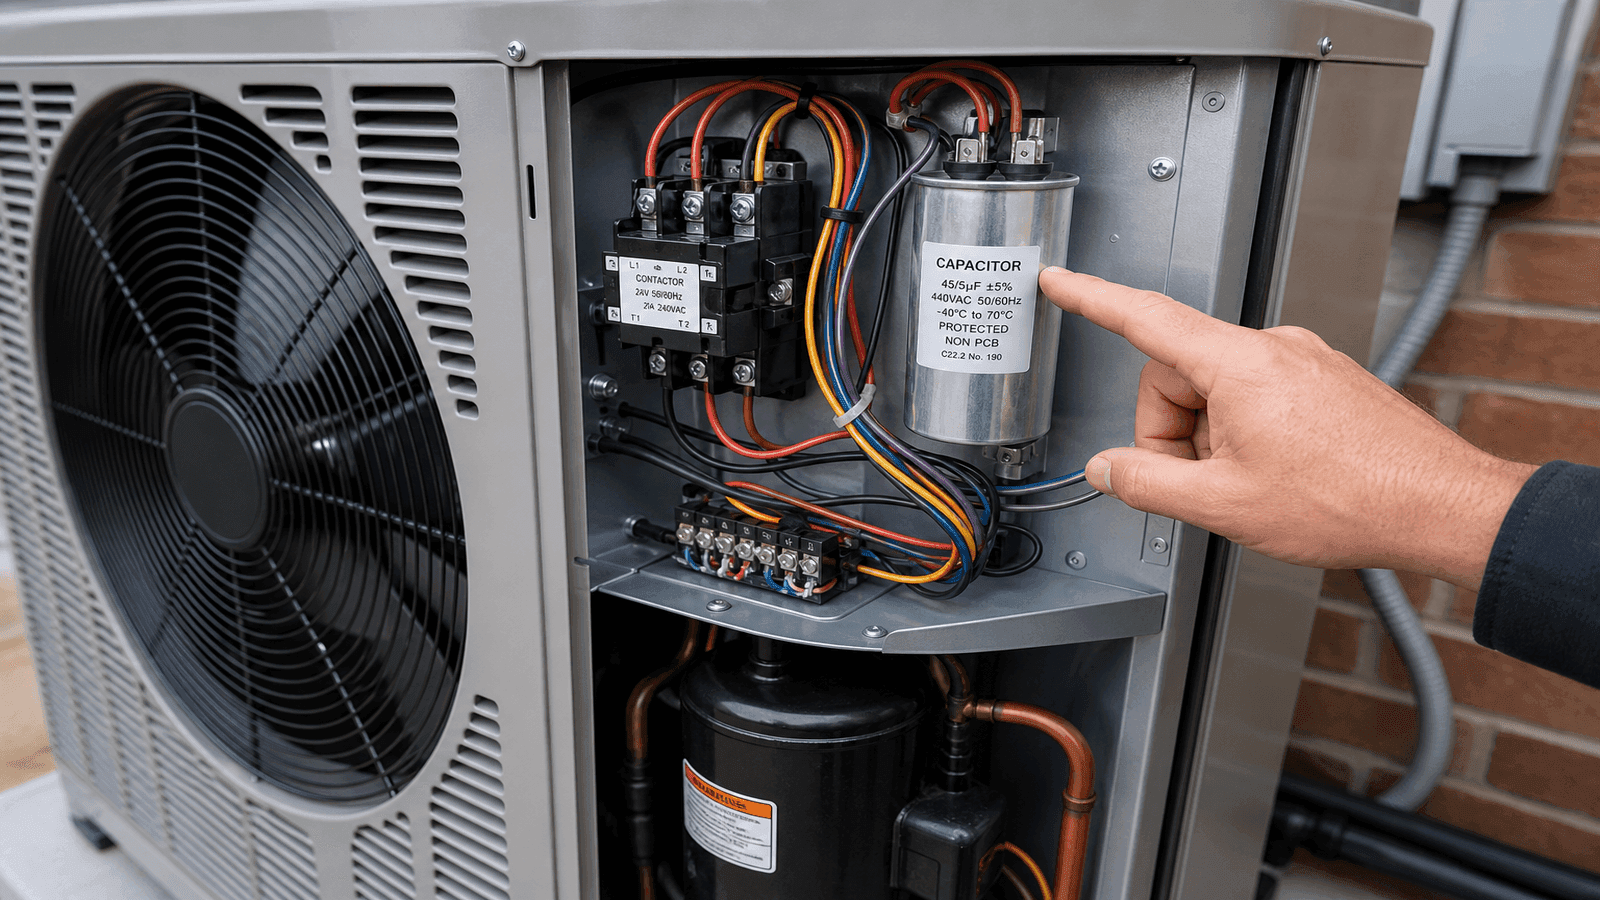
How to Test an HVAC Capacitor
A failed capacitor is one of the most common reasons an AC unit hums but won't start, or starts and stops repeatedly. Capacitors store electrical energy and provide the initial surge needed to start the compressor and fan motors. Testing a capacitor with a multimeter is an intermediate DIY skill that can confirm whether a $15 part is causing the problem before you call for a $150-$300 service visit [6].
Safety Warning: Capacitors store electrical charge even when the system is OFF. You must discharge the capacitor before touching it. Use an insulated screwdriver to bridge the terminals (HERM to C, then FAN to C). Wear insulated gloves and safety glasses.
Testing Steps:
- Turn off power at the breaker AND the outdoor disconnect switch
- Remove the access panel on the outdoor unit
- Locate the capacitor (cylindrical or oval metal can with wires connected to terminals)
- Discharge the capacitor using an insulated screwdriver across each terminal pair
- Photograph the wire connections before removing anything
- Disconnect the wires
- Set your multimeter to capacitance mode (MFD or microfarad symbol)
- Touch the probes to the capacitor terminals
- Compare the reading to the rated value printed on the capacitor
- If the reading is more than 5-10% below the rated value, the capacitor needs replacement
Real-World Example (Kevin D., Austin, TX): Kevin's AC stopped running on a 102°F day. The outdoor unit hummed but the fan and compressor would not start. He tested the dual-run capacitor with a multimeter and found it reading 18 MFD instead of the rated 45 MFD. He ordered a matching replacement from a local supply house for $22 and installed it himself. A service call for the same repair would have cost $250-$350.
For the complete testing and replacement guide with multimeter settings, read: How to Test an HVAC Capacitor
Seasonal HVAC Maintenance Schedule
Consistent maintenance prevents breakdowns, extends equipment life by 5-10 years, and keeps your system running at peak efficiency. Here is the schedule that HVAC professionals recommend.
| Season | Task | DIY or Pro | Frequency |
| Spring | Replace/check air filter | DIY | Every 1-3 months |
| Spring | Clean condenser coils (outdoor) | DIY | Annually |
| Spring | Clear debris from outdoor unit | DIY | Monthly during season |
| Spring | Professional cooling tune-up | Pro | Annually |
| Spring | Check refrigerant levels | Pro | Annually |
| Fall | Replace/check air filter | DIY | Every 1-3 months |
| Fall | Clean furnace blower area | DIY | Annually |
| Fall | Test carbon monoxide detectors | DIY | Twice yearly |
| Fall | Bleed radiators (if applicable) | DIY | Annually before heating season |
| Fall | Professional heating tune-up | Pro | Annually |
| Year-round | Check thermostat programming | DIY | Seasonally |
| Year-round | Keep vents open and unblocked | DIY | Ongoing |
| Year-round | Listen for unusual sounds | DIY | Ongoing |
The homeowners who follow this schedule almost never call me for emergencies. It is the ones who skip maintenance for three or four years who end up with a dead compressor on the hottest day in July. A $200 annual tune-up prevents $3,000 emergency repairs.
Disclaimer: This article provides general educational guidance on HVAC maintenance tasks. It is not a substitute for professional training or manufacturer-specific instructions. Always turn off power before working on any HVAC component. Never handle refrigerant without EPA Section 608 certification. If you are not confident performing any task described here, contact a licensed HVAC professional. Costs mentioned are national averages as of 2026 and may vary by location.
Sources & References
[1] U.S. Department of Energy. "Maintaining Your Air Conditioner."
[2] ServiceTitan. "HVAC Statistics: The Data You Need to Know for 2026."
[3] ENERGY STAR. "Heating and Cooling Maintenance Checklist."
[4] U.S. Department of Energy. "Programmable Thermostats."
[5] EPA. "Section 608 Technician Certification."
[6] Bob's Repair. "How to Test Air Conditioner Capacitor."
[7] ASHRAE. "Standard 62.2: Ventilation and Indoor Air Quality."
[8] Carrier. "How Often Should You Change Air Filters."

Daniel is an EPA-certified HVAC technician & Energy Efficiency Consultant with over 14 years of experience in maintaining and installing heating and cooling systems throughout the Midwest. Passionate about sustainability, Dan specialises in energy-efficient retrofits and intelligent climate control systems. He writes for NearbyHunt to help homeowners extend the lifespan of their HVAC units while lowering utility bills.

Christine is an EPA-certified HVAC professional with 17 years of experience in heating, cooling, and indoor air quality systems. She has managed large-scale residential installations and worked as a technical trainer for new HVAC apprentices. Chris’s reviews focus on accuracy, safety, and performance standards in modern HVAC practices.