- A dirty furnace loses up to 10% of its heating efficiency, translating to $100-$200 in wasted energy per heating season according to the Department of Energy [1].
- DIY furnace cleaning (filter, blower, exterior, vents) takes 60-90 minutes and costs under $30 in supplies, while professional deep cleaning runs $150-$300 [2].
- Heat exchanger inspection, gas valve adjustment, burner tuning, and combustion analysis must always be performed by a licensed HVAC technician due to carbon monoxide risks [3].
- The CPSC reports that heating systems contribute to an average of 63 carbon monoxide deaths per year in the U.S., making proper furnace maintenance a safety priority, not just an efficiency concern [4].
- Annual professional furnace inspection combined with seasonal DIY cleaning prevents up to 95% of major breakdowns according to ASHRAE Standard 180 guidelines [5].
Your furnace runs roughly 2,000-3,000 hours per heating season, circulating thousands of cubic feet of air through your home every day. Over those months, dust, pet hair, and debris accumulate on filters, blower components, and burner assemblies. That buildup forces the system to work harder, burning more fuel while delivering less heat.
Daniel Torres, a Certified HVAC Technician with EPA 608 Universal, NATE, and HVAC Excellence certifications and 14 years of field experience in Minneapolis, developed this cleaning guide based on what he sees during hundreds of annual furnace inspections. His consistent finding: homeowners who perform basic seasonal cleaning between professional visits spend 40-60% less on emergency repairs.
This guide covers every cleaning task a homeowner can safely handle and clearly identifies the steps that require a licensed professional. Furnaces involve natural gas, high-voltage electrical components, and the potential for carbon monoxide exposure. Knowing the boundary between safe DIY work and professional-only service is the most important thing you will learn here.

Get quotes from top-rated pros.
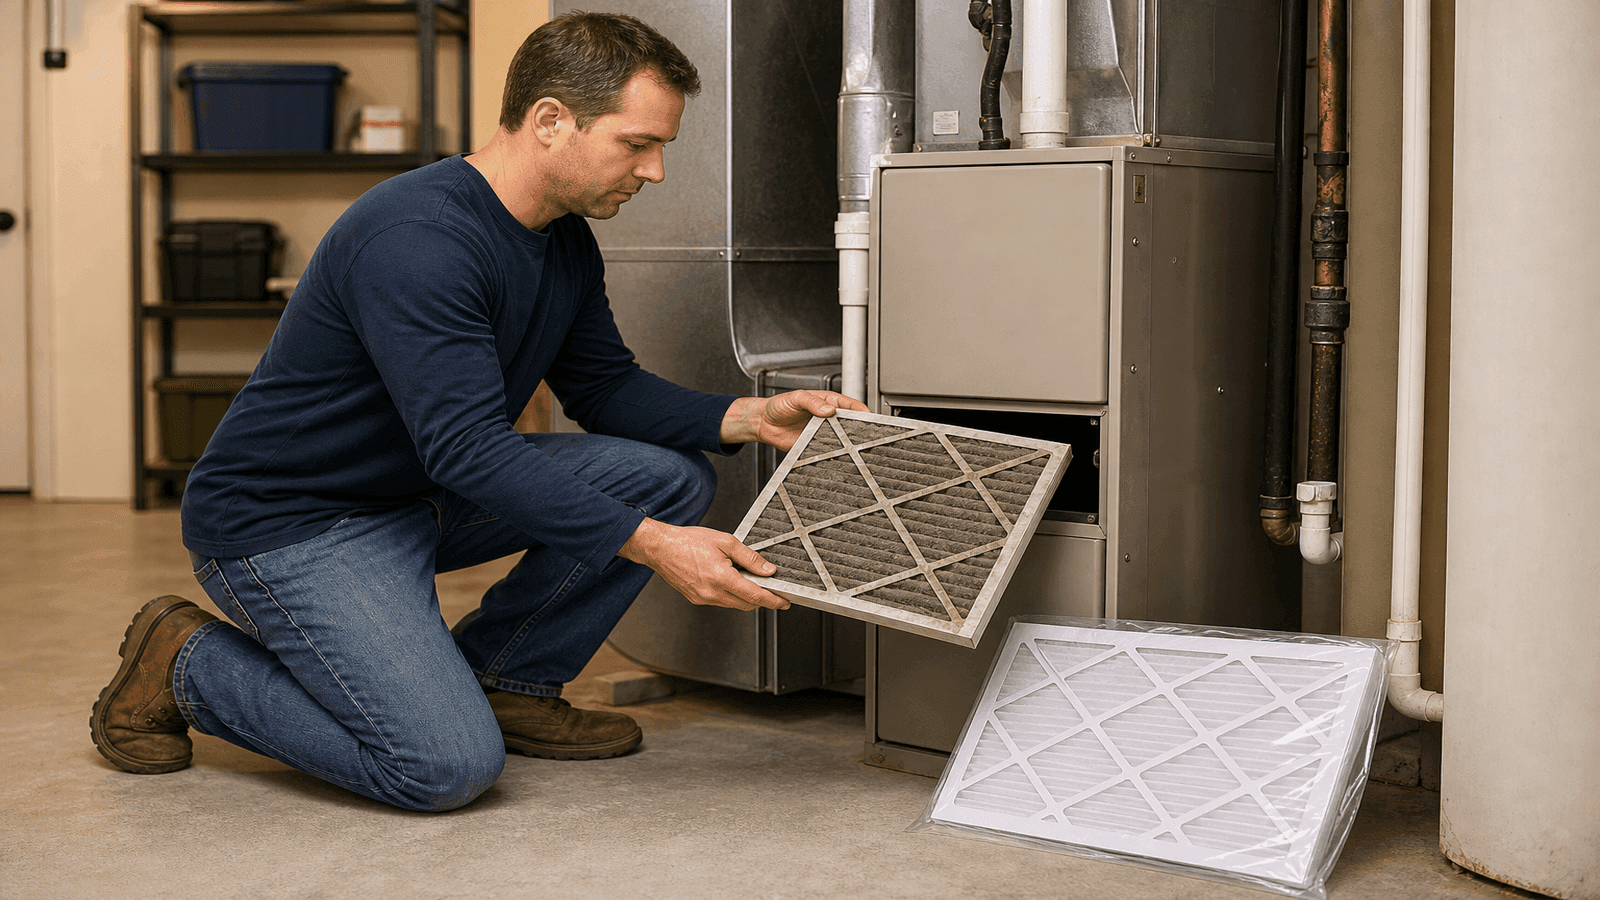
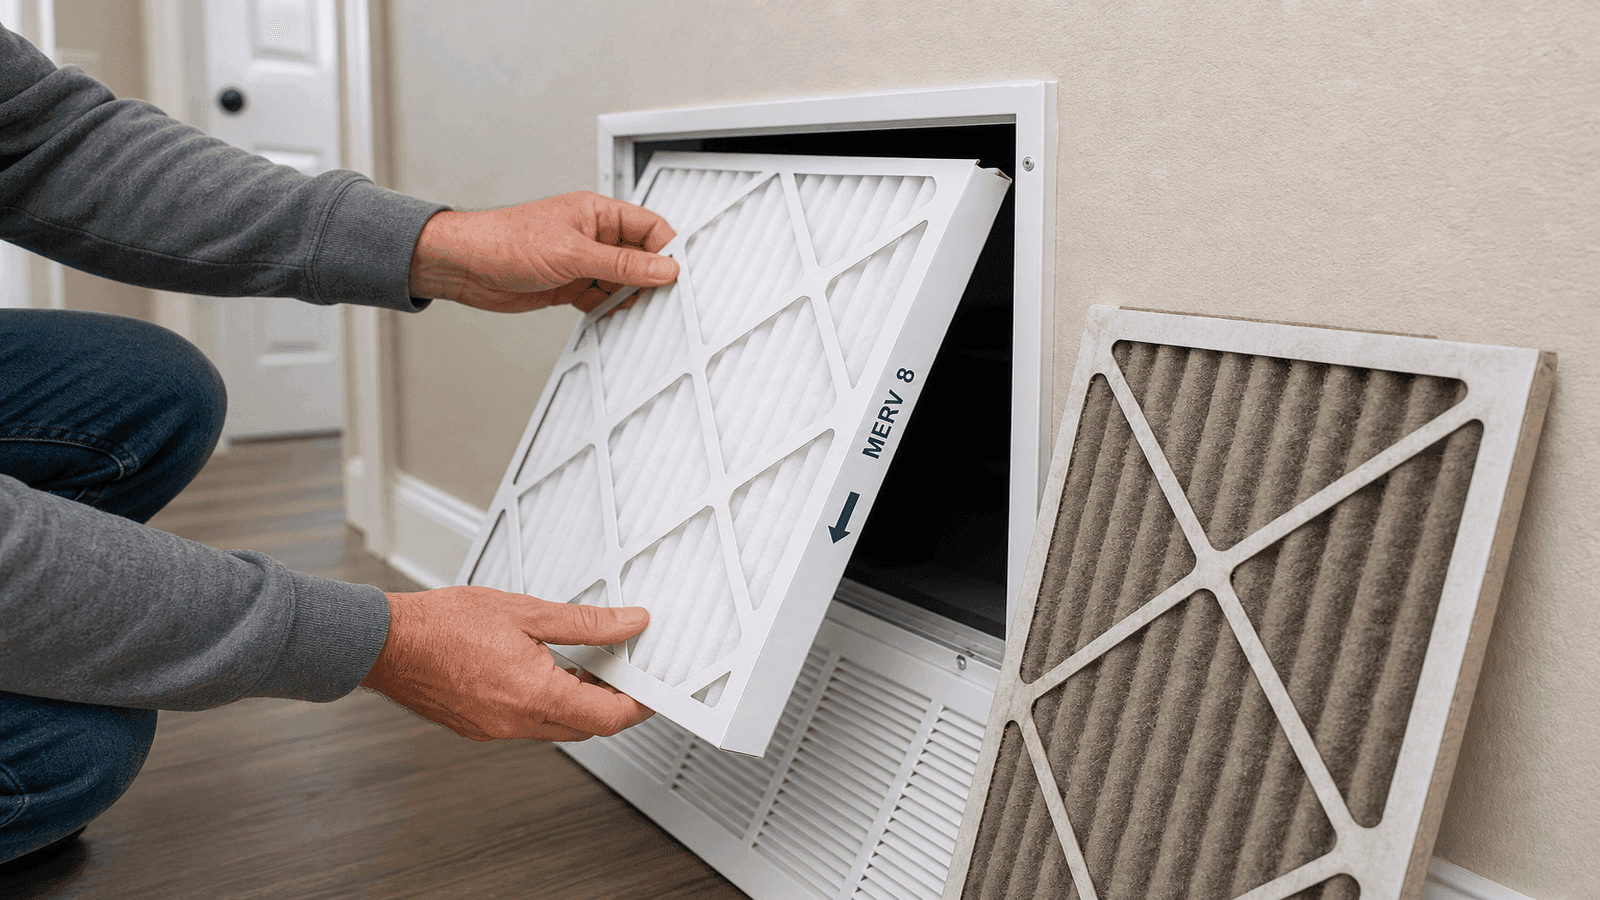
Photo: Homeowner removing a dirty furnace air filter from a residential gas furnace in a basement utility room
Safety First: Before You Start
Every furnace cleaning session begins with two shutoffs. Skip either one and you risk electrical shock, burns, or gas exposure.
Step 1: Turn off the furnace power. Locate the power switch on or near the furnace (usually a standard light switch on the side of the unit or on a nearby wall). Flip it to OFF. If your furnace does not have a dedicated switch, turn off the breaker at your electrical panel.
Step 2: Shut off the gas supply. Find the gas valve on the supply pipe leading to your furnace. Turn the handle perpendicular to the pipe (a quarter turn) to close it. Wait 5 minutes before opening any access panels to allow residual gas to dissipate.
Step 3: Allow the furnace to cool. If the furnace was running recently, wait at least 30 minutes for internal components to cool before touching anything inside the cabinet.
Warning: If you smell gas at any point during this process, leave your home immediately and call your gas utility company from outside. Do not flip any electrical switches, use your phone, or create any sparks while inside the home.
Tools and Supplies You Need
Gather these items before you start. Total cost for supplies is typically under $30.
- Replacement air filter (correct size for your system)
- Shop vacuum with hose attachment
- Soft-bristle brush or old toothbrush
- Microfiber cloths
- Screwdriver set (Phillips and flathead)
- Flashlight or headlamp
- Disposable dust mask or N95 respirator
- Safety glasses
- Bucket of warm soapy water
Step 1: Replace the Air Filter
This is the single most important maintenance task you can perform. The Department of Energy confirms that a clogged filter reduces airflow, forces the blower motor to work harder, and can increase heating costs by 5-15% [1].
How to replace the filter:
- Locate the filter slot, typically found where the return air duct meets the furnace cabinet or inside the blower compartment.
- Slide the old filter out and note the arrow printed on the frame indicating airflow direction.
- Check the old filter. Hold it up to a light source. If you cannot see light through it, replacement is overdue.
- Insert the new filter with the airflow arrow pointing toward the furnace (toward the blower motor).
- Write the installation date on the filter frame with a marker.
Filter replacement schedule
| Filter Type | Replacement Frequency |
| 1-inch fiberglass | Every 30 days |
| 1-inch pleated | Every 60-90 days |
| 4-inch media filter | Every 6-12 months |
| Washable/reusable | Clean every 30 days |
Homes with pets, smokers, or allergy sufferers should replace filters on the shorter end of each range.
I pull filters out of furnaces that look like they haven't been changed in a year. That one neglected filter is usually the root cause of the service call. A $15 filter replacement every 2-3 months is the cheapest insurance you can buy for your heating system.
Step 2: Clean the Blower Assembly
The blower is the fan that pushes heated air through your ductwork. Dust-coated blower blades reduce airflow efficiency and strain the motor. Carrier recommends cleaning the blower assembly as part of annual homeowner maintenance [6].
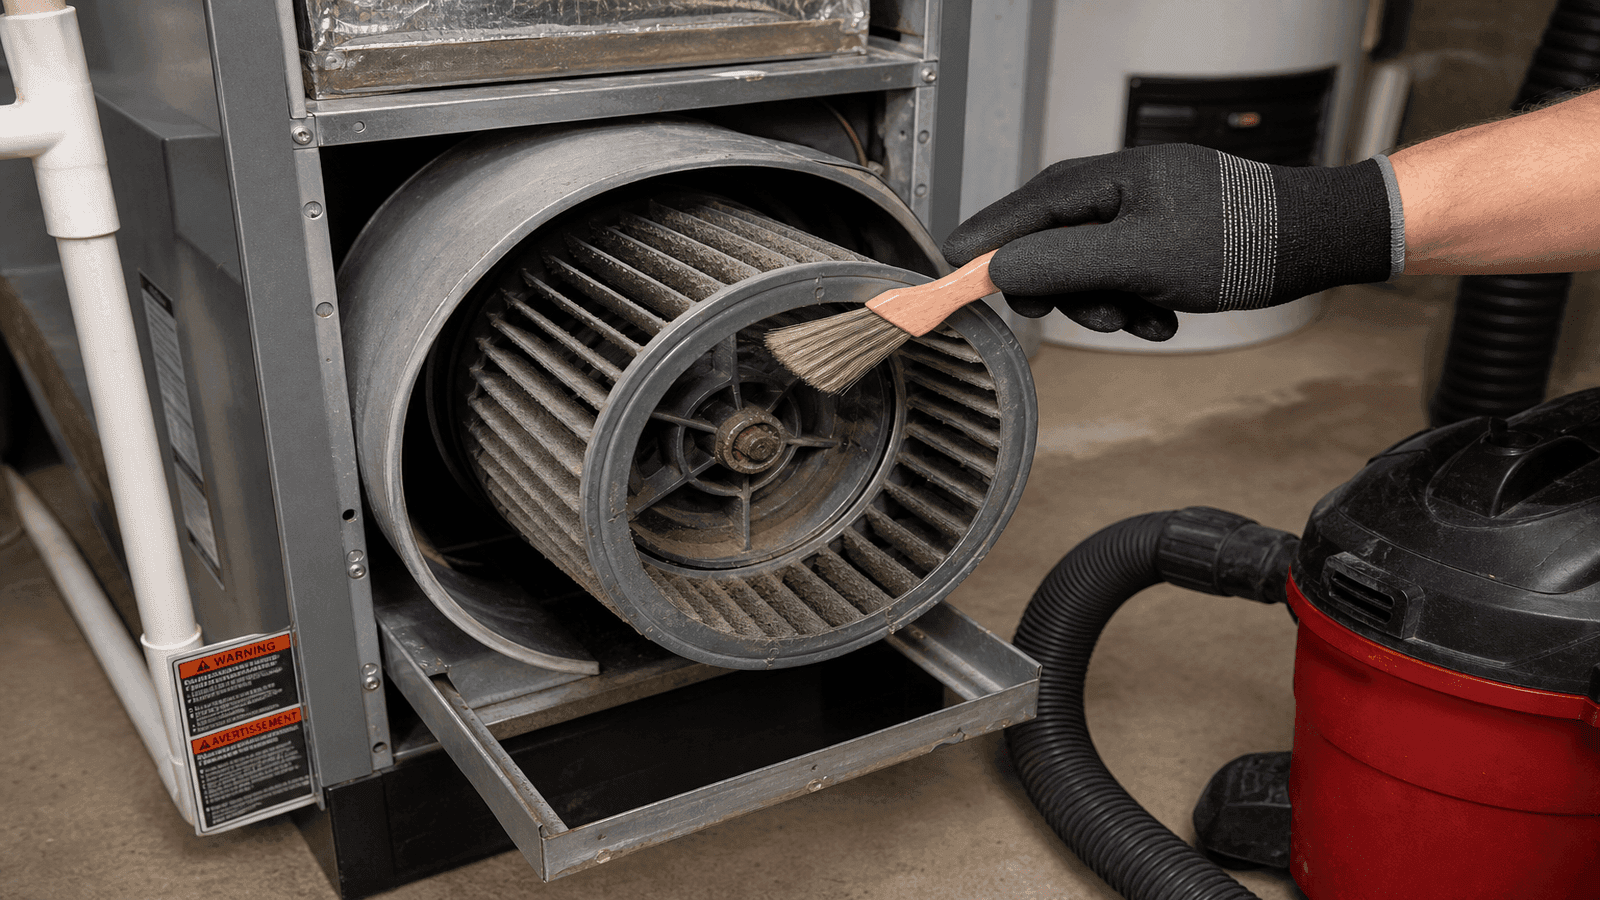
Photo: Close-up of a residential furnace blower assembly being cleaned with a soft brush, showing dust buildup on fan blades
How to clean the blower:
- Remove the access panel on the front of the furnace (usually held by screws or clips).
- Locate the blower assembly at the bottom of the furnace. It looks like a cylindrical fan (squirrel cage design) inside a metal housing.
- If the blower slides out on a track, carefully pull it forward for better access. Some units require removing mounting bolts first. Take a photo before disconnecting anything so you can reassemble correctly.
- Use a soft-bristle brush to gently clean each blower blade. Work from the center outward.
- Vacuum loose debris from the blower housing with your shop vacuum.
- Wipe the blower housing interior with a damp microfiber cloth.
- Slide the blower back into position and secure mounting hardware.
Do not spray water or cleaning solutions directly onto the blower motor or electrical connections. If the blower blades are heavily caked with grime that brushing cannot remove, schedule a professional deep cleaning ($150-$300).
Get quotes from top-rated pros.
Step 3: Vacuum the Furnace Interior
With the blower area accessible, clean the rest of the furnace cabinet interior.
- Use the hose attachment on your shop vacuum to remove dust and debris from the bottom of the furnace cabinet.
- Vacuum around the gas burner area carefully. Do not move, bend, or adjust any gas lines, valves, or burner components.
- Clean the area around the draft inducer fan (located near the top of the furnace) by vacuuming loose dust.
- Wipe accessible interior surfaces with a dry microfiber cloth.
What NOT to touch: Do not attempt to disassemble, clean, or adjust the heat exchanger, gas valve, burner orifices, or ignition system. These components require professional training, specialized tools, and combustion analysis equipment. Improper handling can cause gas leaks or carbon monoxide exposure.
Step 4: Clean Supply and Return Vents
Dirty vents restrict airflow throughout your home, creating hot and cold spots and making the furnace cycle longer than necessary. The Department of Energy reports that typical duct systems lose 25-40% of conditioned air through leaks and obstructions [1].
How to clean vents:
- Remove vent covers from walls, floors, or ceilings using a screwdriver.
- Soak metal vent covers in warm soapy water for 10-15 minutes.
- Scrub with a soft brush to remove dust buildup, then rinse and dry completely.
- While covers are off, use your shop vacuum to clean as far into the duct opening as the hose will reach.
- Reinstall vent covers and make sure none are blocked by furniture, rugs, or curtains.
Check every supply and return vent in your home. Homeowners often overlook vents behind furniture or under beds, and a single blocked return vent can reduce system efficiency noticeably.
Step 5: Clean the Flame Sensor
The flame sensor is a small metal rod that detects whether the burner is lit. A dirty flame sensor is one of the most common causes of furnace short cycling and failure to ignite. This is an intermediate DIY task suitable for homeowners comfortable working around furnace components.
How to clean the flame sensor:
- Locate the flame sensor. It is a thin metal rod (usually with a single wire attached) mounted near the burner assembly. Consult your furnace manual if unsure.
- Remove the single mounting screw holding the sensor in place.
- Gently pull the sensor out.
- Lightly rub the metal rod with fine-grit sandpaper (220-grit) or an emery cloth until the surface is clean and shiny. Do not use coarse sandpaper.
- Wipe with a clean cloth to remove sanding residue.
- Reinstall the sensor and tighten the mounting screw.
If cleaning the flame sensor does not resolve ignition issues, the sensor may need replacement ($10-$30 for the part) or the problem lies elsewhere. Call a professional if your furnace still fails to stay lit after cleaning.
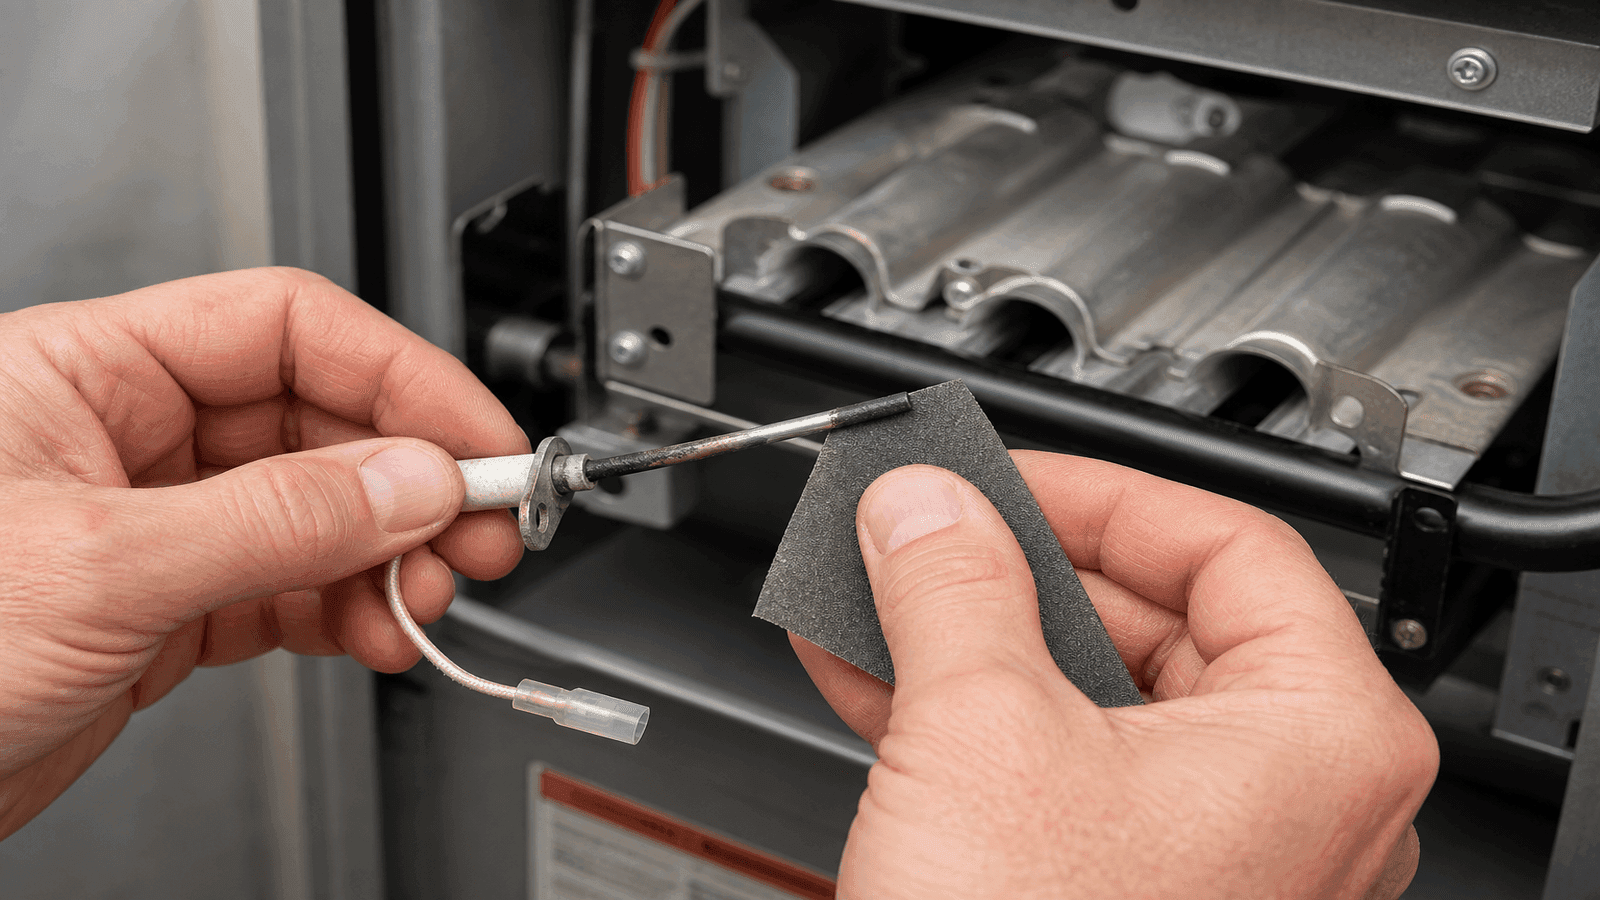
Photo: Homeowner using fine-grit sandpaper to clean a furnace flame sensor, with the sensor removed and visible near the burner assembly
Step 6: Inspect and Clean the Condensate Drain
High-efficiency condensing furnaces (90% AFUE and above) produce condensation that drains through a PVC line. A clogged condensate drain causes water backup that triggers a safety shutoff.
- Locate the condensate drain line (white PVC pipe) exiting the furnace.
- Check for visible blockages at the drain opening.
- Pour a cup of white vinegar or a mixture of warm water and bleach (1 tablespoon per cup) through the drain line to dissolve algae and mineral buildup.
- Check the condensate trap (if accessible) and clean it by removing and rinsing in warm water.
- Verify that the drain line flows freely by pouring a small amount of water through it and confirming it exits at the other end.
If the drain is severely clogged and will not clear with vinegar, a professional can use compressed air or a drain snake to restore flow ($75-$150).
Step 7: Clean the Exterior and Surrounding Area
The area around your furnace matters more than most homeowners realize. Restricted airflow around the unit affects combustion air supply and creates fire hazards.
- Wipe down the furnace exterior with a damp cloth.
- Clear a minimum of 3 feet of open space on all sides of the furnace.
- Remove any stored items, paint cans, cleaning chemicals, or flammable materials from the furnace area. The National Fire Protection Association (NFPA) requires that combustible materials be kept away from heating equipment [7].
- Vacuum the floor around and beneath the furnace.
- Make sure the combustion air intake (if your furnace has a direct vent pipe through the wall) is clear of snow, leaves, or debris on the exterior of your home.
DIY vs. Professional: Know the Line
This is the most critical section of this guide. Furnace cleaning involves components that can produce carbon monoxide, an odorless and colorless gas that kills over 200 Americans annually [4]. The CPSC specifically recommends annual professional furnace inspections to detect cracked heat exchangers, which are invisible to homeowners but can leak CO directly into living spaces [4].
Safe DIY Tasks
| Task | Difficulty | Frequency |
| Replace air filter | Easy | Every 30-90 days |
| Clean blower assembly | Moderate | Annually |
| Vacuum furnace interior | Easy | Annually |
| Clean supply and return vents | Easy | Annually |
| Clean flame sensor | Intermediate | Annually |
| Clean condensate drain | Easy | Annually |
| Clean exterior and surrounding area | Easy | Monthly |
Professional-Only Tasks (Never DIY)
| Task | Why Professional Only | Cost |
| Heat exchanger inspection | Requires combustion analyzer to detect cracks and CO leaks | $150-$300 |
| Burner adjustment and tuning | Incorrect gas-air mixture creates CO or fire risk | $100-$200 |
| Gas valve testing | High-pressure gas components require licensed handling | $150-$250 |
| Combustion analysis | Requires calibrated equipment to measure CO, O2, and flue temperature | Included in tune-up |
| Electrical component testing | High-voltage capacitors and control boards | $100-$300 |
| Flue pipe inspection | Improper venting causes CO buildup in living spaces | $75-$150 |
| Carbon monoxide testing | Requires professional-grade CO detector at heat exchanger | Included in tune-up |
I have seen homeowners attempt to adjust burner flame height using online videos. What they do not realize is that the color and shape of the flame tells me only part of the story. I need a combustion analyzer to measure the exact CO and O2 levels in the flue gases. A flame that looks normal to the untrained eye can still be producing dangerous levels of carbon monoxide.
Get quotes from top-rated pros.
Furnace Cleaning Schedule
Follow this timeline to keep your furnace running safely and efficiently throughout the year.
Monthly (October through March):
- Check and replace the air filter
- Verify all vents are open and unblocked
- Listen for unusual sounds during operation
- Check thermostat operation
Before Heating Season (September-October):
- Complete the full DIY cleaning outlined in this guide
- Schedule a professional furnace tune-up ($150-$300)
- Test carbon monoxide detectors and replace batteries
- Check condensate drain for blockages
End of Heating Season (April-May):
- Replace the air filter one final time
- Clean the area around the furnace
- Note any performance issues to report at next professional visit
Every 3-5 Years:
- Professional duct cleaning ($300-$500)
- Professional deep cleaning of blower and internal components
- Evaluation of furnace age and replacement planning (furnaces over 15-20 years old)
Case Study: The Nguyen Family's Heating Emergency
Tom and Sarah Nguyen of Bloomington, Minnesota, contacted Daniel through NearbyHunt in November 2025 after their 14-year-old gas furnace started short cycling every 3-5 minutes during a cold snap with overnight lows reaching -10F.
Daniel's inspection found a filter that had not been changed in over 7 months, blower blades coated in a thick layer of dust and pet hair (the family has two dogs), and a flame sensor so carbon-fouled that ignition was failing intermittently.
The critical finding was a hairline crack in the upper portion of the heat exchanger, likely caused by years of overheating from restricted airflow. Daniel's combustion analysis detected elevated CO levels at the heat exchanger surface, confirming active carbon monoxide leakage.
The cracked heat exchanger required complete furnace replacement at $4,500 installed. Daniel estimates that regular filter changes and annual professional inspections would have caught the restricted airflow before it caused heat exchanger damage, saving the family roughly $3,500 (the difference between a $4,500 replacement and annual maintenance costs of $200 per year over several years).
The Nguyens now follow the monthly filter schedule and book their professional tune-up every September.
NearbyHunt Network Insight
Service data from HVAC professionals in the NearbyHunt network reveals clear patterns in furnace-related requests across the U.S.:
| Service Request | % of Furnace Calls | Average Cost |
| Furnace not heating | 31% | $200-$600 |
| Annual cleaning and tune-up | 24% | $150-$300 |
| Short cycling or shutting off | 16% | $150-$500 |
| Strange noises from furnace | 11% | $150-$400 |
| Furnace blowing cold air | 10% | $200-$500 |
| Carbon monoxide alarm triggered | 8% | $250-$700 |
Network professionals report that 68% of emergency furnace calls during peak heating months involve systems that had not received professional maintenance in over two years. The average emergency repair cost ($350-$600) is more than double the cost of an annual preventive tune-up ($150-$300).
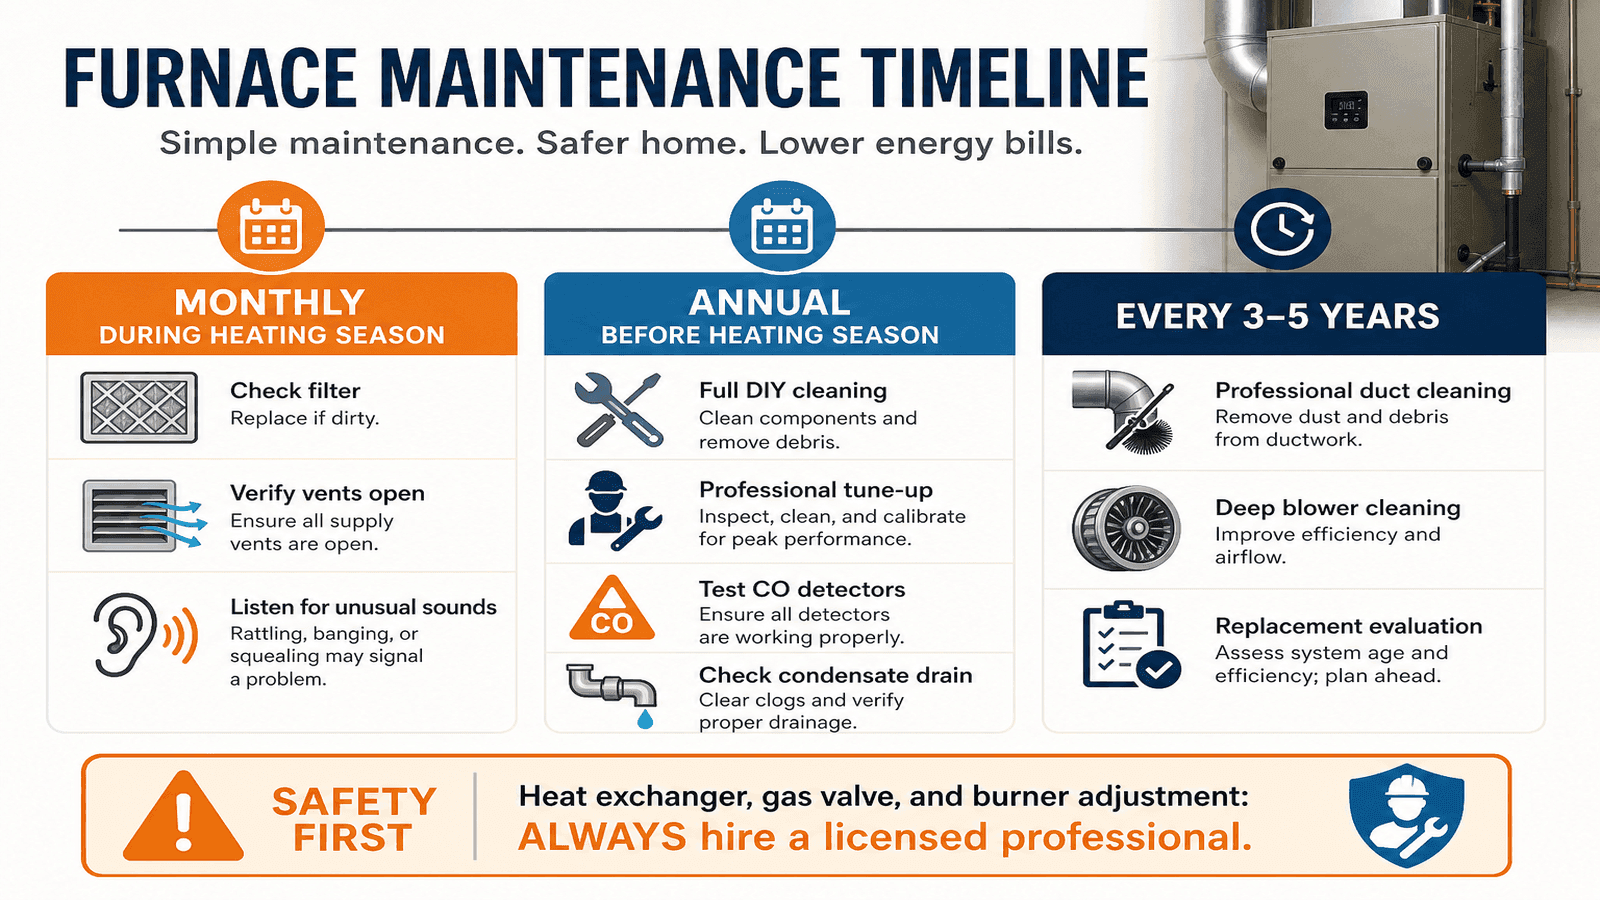
Photo: Seasonal furnace maintenance checklist infographic showing monthly DIY tasks and annual professional service timeline
When to Replace Instead of Clean
Cleaning and maintenance extend furnace life, but every furnace eventually reaches the point where replacement is more cost-effective than continued repair. ENERGY STAR recommends considering replacement when your furnace is over 15 years old and requires frequent repairs [8].
Signs it is time to replace:
- Furnace is 15-20+ years old
- Repair costs exceed 50% of a new furnace price
- Heating bills have increased steadily despite regular maintenance
- Heat exchanger is cracked (non-negotiable replacement)
- System requires 3 or more repairs per year
- Furnace has an AFUE rating below 80% (modern furnaces achieve 90-98%)
A new high-efficiency furnace (95%+ AFUE) costs $3,500-$7,500 installed and typically pays for itself in energy savings within 5-8 years. For more HVAC DIY maintenance guidance, see our complete HVAC How-To and DIY guide.
Find HVAC Professionals on NearbyHunt
When furnace cleaning goes beyond filters and blower blades, NearbyHunt connects you with licensed, insured HVAC technicians who hold EPA 608 and NATE certifications. Every professional in the network is vetted for proper licensing and insurance. Get multiple quotes, compare verified reviews, and book your annual tune-up through one platform.
Sources and References
[1] U.S. Department of Energy. "Furnaces and Boilers."
[2] Bryant Heating and Cooling. "Furnace Cleaning Guide: Costs, DIY Tips & Pro Benefits."
[3] U.S. Consumer Product Safety Commission. "Carbon Monoxide Fact Sheet."
[4] U.S. Consumer Product Safety Commission. "CPSC Urges Annual Furnace Inspection to Prevent CO Deaths."
[5] ASHRAE. "ANSI/ASHRAE/ACCA Standard 180: Inspection and Maintenance of HVAC Systems."
[6] Carrier. "9 Step Furnace Cleaning Guide."
[7] National Fire Protection Association. "Home Heating Safety."
[8] ENERGY STAR. "Furnaces."
Disclaimer: Furnace cleaning and maintenance involve natural gas, high-voltage electrical components, and the potential for carbon monoxide exposure. The DIY tasks in this guide are limited to basic cleaning that does not involve gas system components, heat exchanger access, or combustion adjustments. Heat exchanger inspection, burner tuning, gas valve service, and combustion analysis must always be performed by a licensed, insured HVAC technician. Costs referenced are national averages from 2025-2026 data and may vary by region. If you smell gas or suspect a carbon monoxide leak, evacuate your home immediately and call 911 or your gas utility. Always install and maintain carbon monoxide detectors on every level of your home. This article is for informational purposes only and does not replace professional HVAC service for your specific equipment.

Daniel is an EPA-certified HVAC technician & Energy Efficiency Consultant with over 14 years of experience in maintaining and installing heating and cooling systems throughout the Midwest. Passionate about sustainability, Dan specialises in energy-efficient retrofits and intelligent climate control systems. He writes for NearbyHunt to help homeowners extend the lifespan of their HVAC units while lowering utility bills.

Christine is an EPA-certified HVAC professional with 17 years of experience in heating, cooling, and indoor air quality systems. She has managed large-scale residential installations and worked as a technical trainer for new HVAC apprentices. Chris’s reviews focus on accuracy, safety, and performance standards in modern HVAC practices.