- Replacing a dirty AC filter can lower your energy bill by 5 to 15%, saving $100 to $300 annually on cooling costs for the average U.S. household [1]
- Standard 1-inch filters need replacement every 30 to 90 days, while 4-inch media filters last 6 to 12 months depending on household conditions
- MERV 8 to 13 filters are the sweet spot for residential systems, balancing particle capture with proper airflow
- The entire replacement takes under 5 minutes once you know your filter size and location, making it the easiest HVAC maintenance task
- A clogged filter is the number one cause of frozen evaporator coils, which can lead to costly compressor damage if left unchecked
- Homes with pets, smokers, or allergy sufferers need monthly filter changes rather than the standard 90-day cycle
Your AC filter is the cheapest component in your HVAC system, yet skipping its replacement causes more service calls than any other maintenance failure. The U.S. Department of Energy estimates that a clogged filter increases energy consumption by 5 to 15 percent [1]. For a household spending $2,000 per year on cooling, that translates to $100 to $300 in wasted electricity from a part that costs $5 to replace.
The EPA reports that indoor air pollutant levels are often 2 to 5 times higher than outdoor levels [2]. Your AC filter is the primary barrier between those particles and your lungs. When it clogs, dust, pet dander, pollen, and mold spores recirculate through your home instead of getting trapped.
This guide covers filter selection, sizing, step-by-step replacement, and maintenance scheduling based on standard HVAC protocols. For a broader overview of DIY HVAC maintenance, see the complete HVAC How To and DIY guide.

Get quotes from top-rated pros.
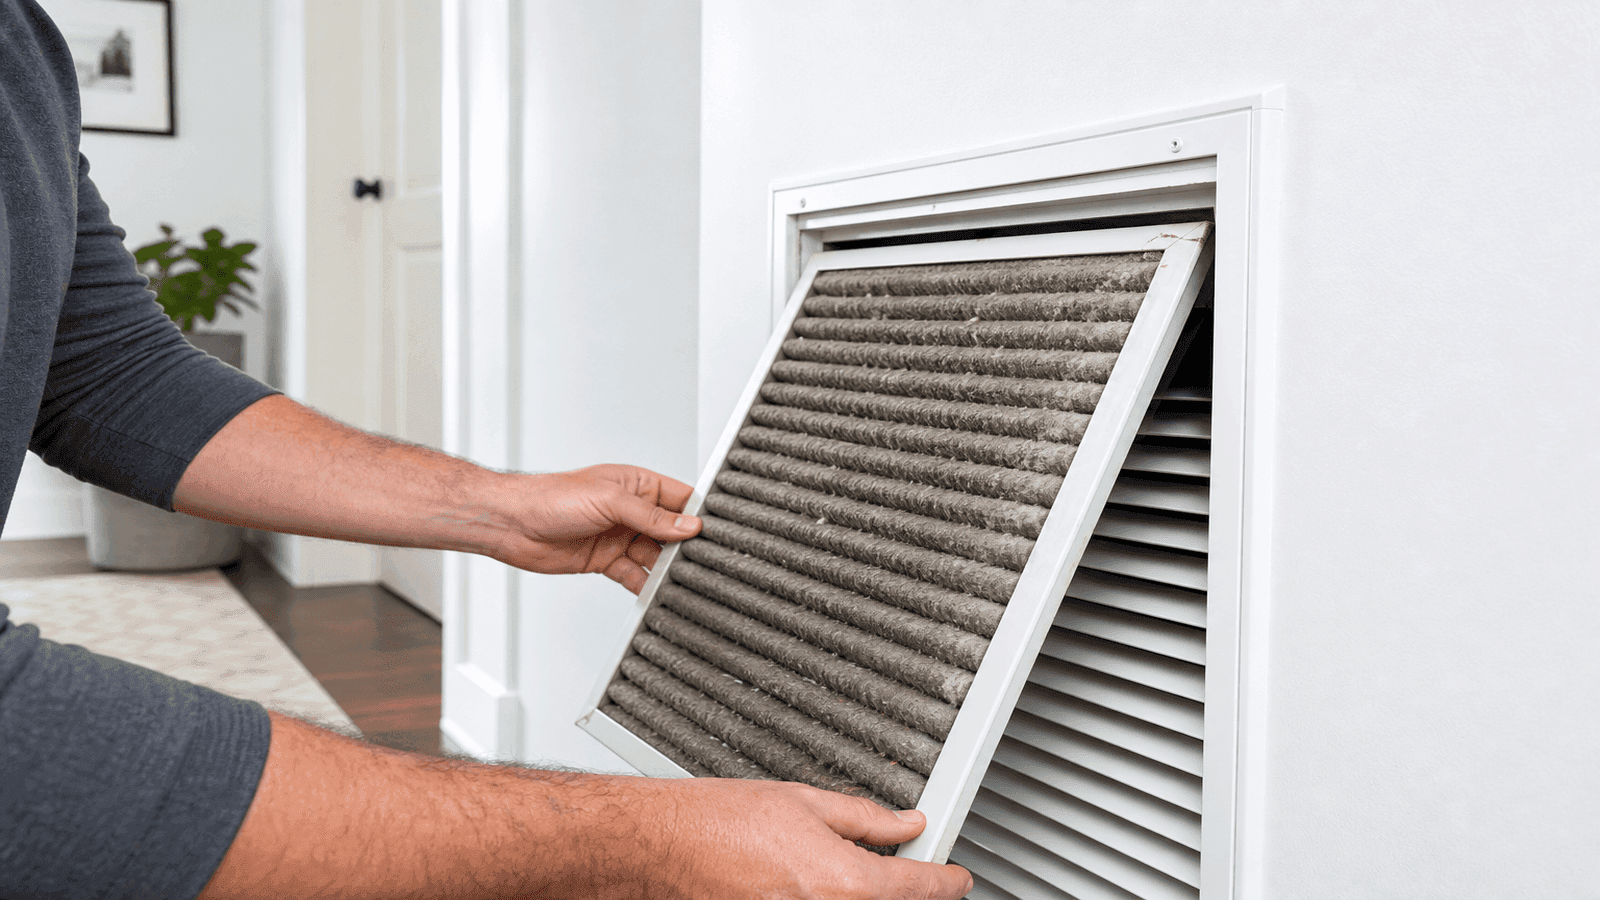
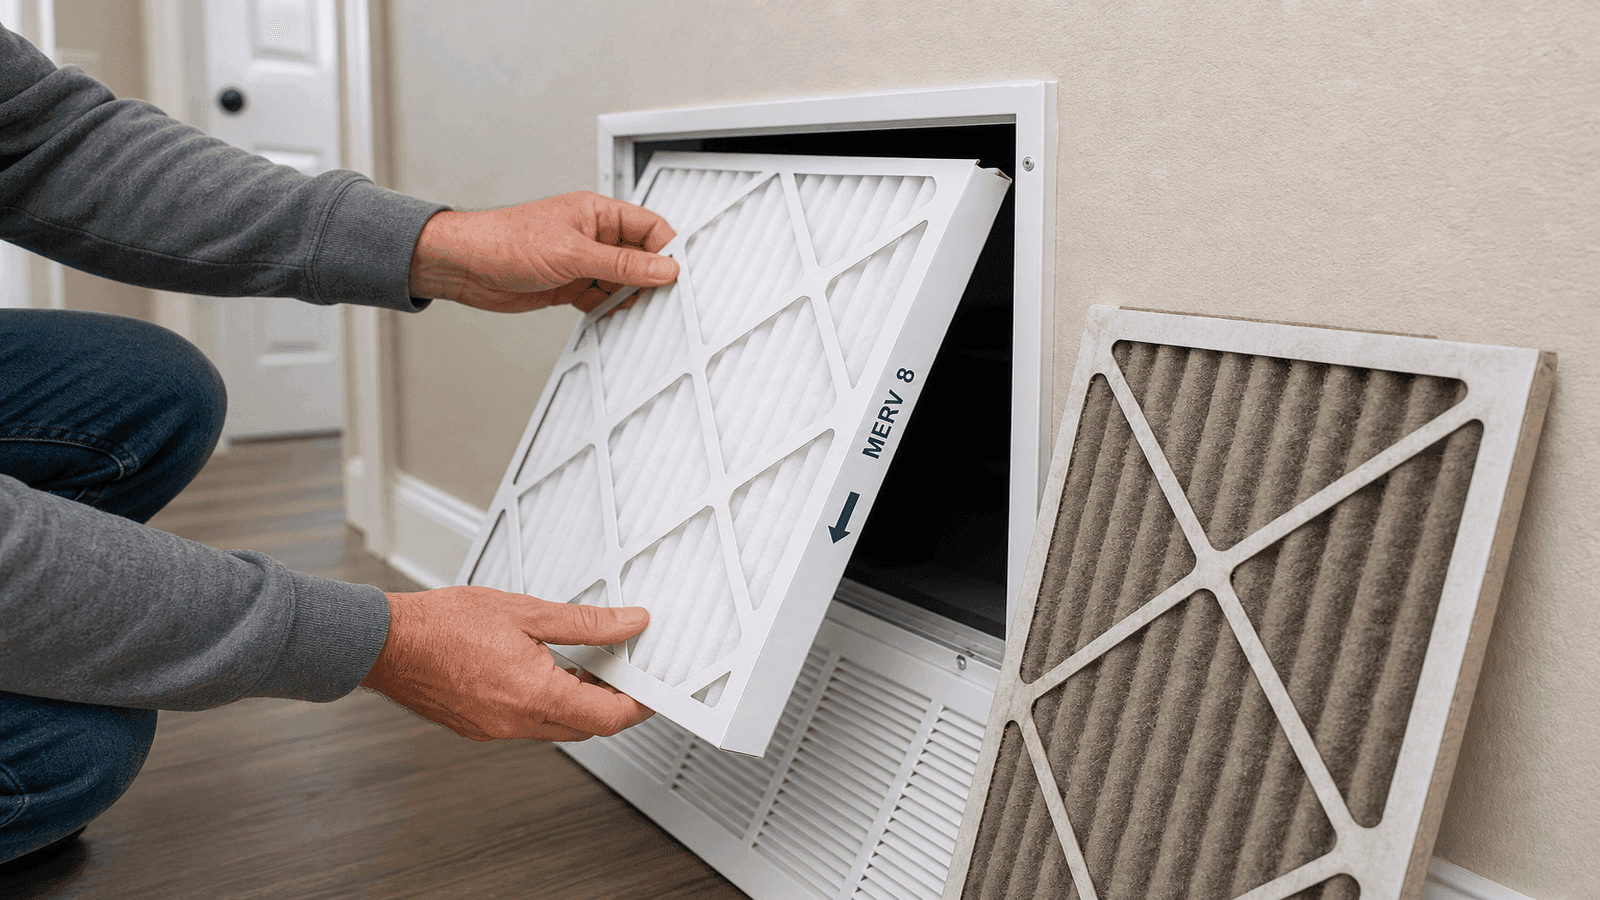
Photo: Homeowner removing a dirty AC filter from a return air vent showing visible dust buildup on the filter surface
Why Your AC Filter Matters
Your HVAC system moves between 1,000 and 2,000 cubic feet of air per minute through ductwork, across the evaporator coil, and into your living spaces. The filter sits at the intake point of that airflow and captures particles before they reach the coil and blower motor.
When the filter clogs, three things happen simultaneously. First, airflow drops. The blower motor works harder to pull the same volume of air through a restricted opening, consuming more electricity and wearing out faster. Second, the evaporator coil receives less warm air to absorb, causing its temperature to drop below freezing. Ice forms on the coil, further blocking airflow, and the problem compounds until the system shuts down or the compressor sustains damage. Third, particles bypass the overloaded filter and settle on the coil fins, reducing heat transfer efficiency permanently until a technician performs a coil cleaning.
What a dirty filter costs you
| Impact Area | Clean Filter | Dirty Filter |
| Monthly energy cost | Baseline | 5-15% increase [1] |
| System lifespan | 15-20 years | 10-15 years |
| Indoor air quality | EPA acceptable levels | 2-5x higher pollutant concentration [2] |
| Coil cleaning frequency | Every 2-3 years | Every 6-12 months |
| Risk of frozen coil | Minimal | High after 90+ days without change |
I respond to frozen coil calls every week during summer. Nine times out of ten, I pull out the filter and it is so packed with dust that you cannot see light through it. That single $10 filter, if it had been replaced on schedule, would have prevented a $200 to $400 service call.
HVAC professionals in the NearbyHunt network report that dirty filters account for approximately 35% of all residential AC service calls during peak summer months, making filter replacement the most effective preventive step a homeowner can take.
Choosing the Right Filter Type
Not all AC filters perform the same job. The type you choose affects air quality, energy efficiency, and how often you need to replace it. Here is a breakdown of the main options available at most hardware stores and online retailers.
Fiberglass Flat-Panel Filters
These are the cheapest option at $1 to $5 each. They capture large particles like dust bunnies and lint but miss smaller allergens. Their MERV rating typically falls between 1 and 4. They need replacement every 30 days and are best suited for rental properties or situations where you simply need basic system protection without allergen filtration.
Pleated Filters
Pleated filters use folded synthetic media to create more surface area within the same frame size. This design captures smaller particles (pet dander, mold spores, pollen) while maintaining reasonable airflow. They range from MERV 8 to MERV 13 and cost $5 to $20 each. For most homeowners, a pleated filter in the MERV 8 to 11 range provides the best balance of filtration and cost [3].
High-Capacity Media Filters
These 4-inch or 5-inch thick filters fit into a dedicated housing installed by an HVAC technician. Brands like Honeywell, Aprilaire, and Lennox manufacture these for specific system models. They cost $20 to $100 each but only need replacement once or twice per year. Their larger surface area delivers MERV 11 to 16 performance without the airflow restriction that a 1-inch MERV 13 filter can cause.
Washable/Reusable Filters
Electrostatic washable filters cost $30 to $80 upfront and can be rinsed and reused for several years. Their filtration performance is typically equivalent to MERV 4 to 8. The trade-off is lower particle capture compared to disposable pleated filters, and they require thorough drying before reinstallation to prevent mold growth inside the filter housing.
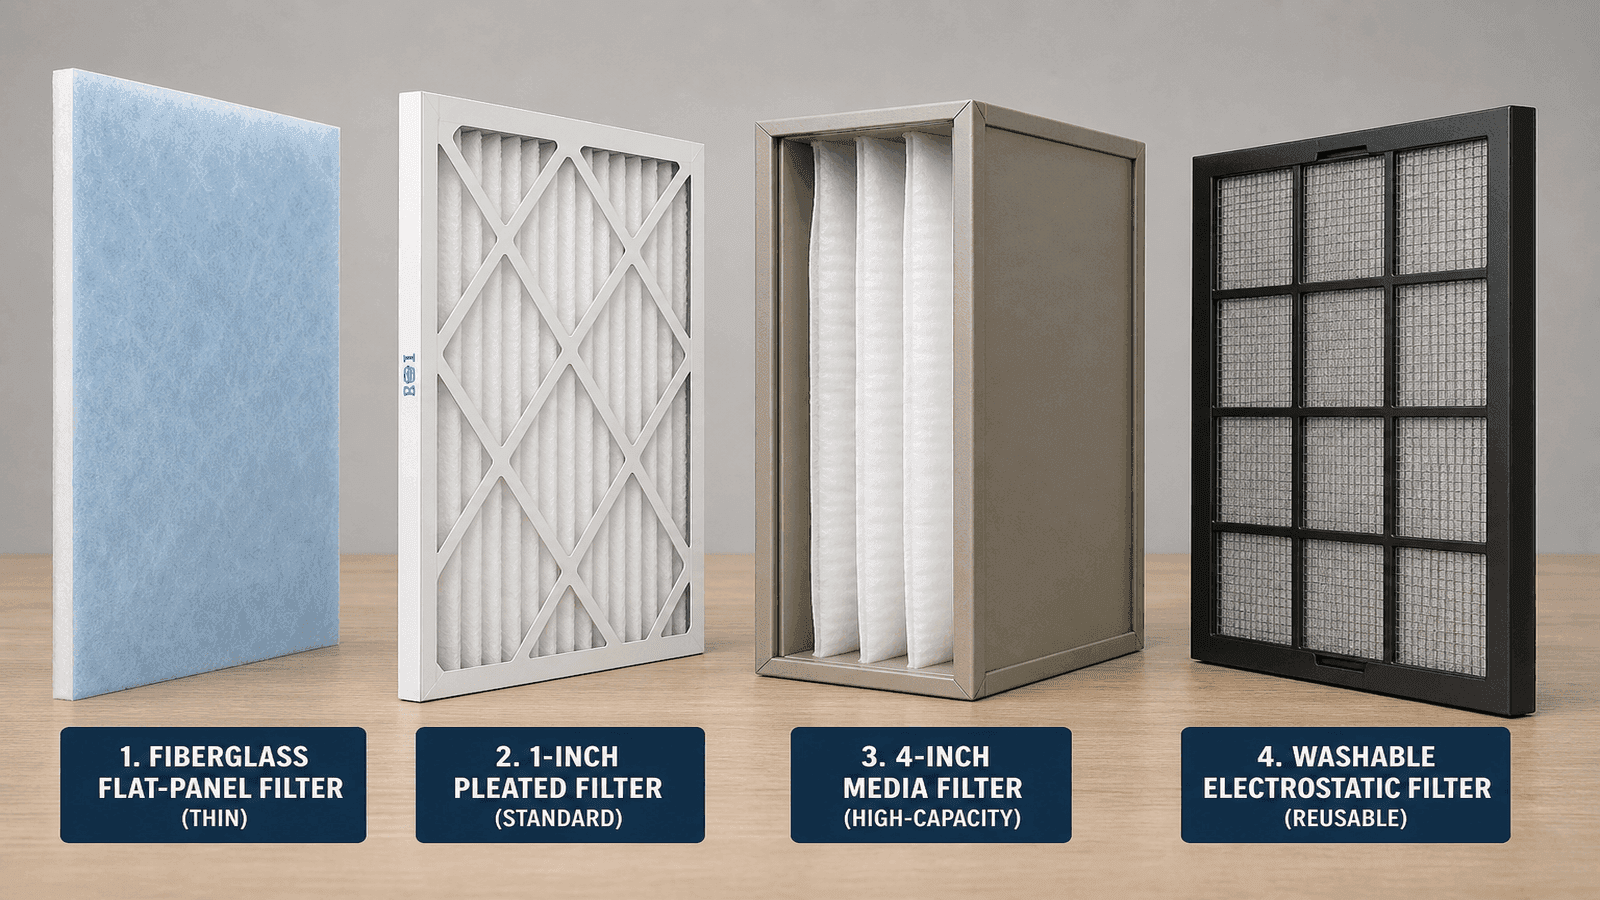
Photo: Comparison of four AC filter types side by side showing fiberglass, pleated, high-capacity media, and washable electrostatic filters with visible difference in thickness and material density
Filter type comparison
| Filter Type | MERV Range | Cost Per Filter | Replacement Frequency | Best For |
| Fiberglass flat-panel | 1-4 | $1-$5 | Every 30 days | Basic system protection |
| Pleated standard | 8-13 | $5-$20 | Every 60-90 days | Most households |
| High-capacity media (4-5 inch) | 11-16 | $20-$100 | Every 6-12 months | Allergies, pets, premium filtration |
| Washable electrostatic | 4-8 | $30-$80 one-time | Wash monthly | Budget-conscious, low-allergen homes |
Understanding MERV Ratings
MERV stands for Minimum Efficiency Reporting Value, a standard developed by the American Society of Heating, Refrigerating, and Air-Conditioning Engineers (ASHRAE). The scale runs from 1 to 20, with higher numbers indicating finer particle capture [3].
For residential HVAC systems, the practical range is MERV 8 through MERV 13. Going below MERV 8 provides minimal allergen protection. Going above MERV 13 in a standard residential system can restrict airflow to the point where the blower motor strains, energy costs increase, and the system may short-cycle.
Residential MERV ratings explained:
- MERV 1-4: Captures pollen, dust mites, and carpet fibers. Minimal protection for window units and older systems.
- MERV 5-8: Adds mold spores and cement dust. MERV 8 is the minimum recommended rating for most homes [3].
- MERV 9-12: Captures lead dust, humidifier particles, and Legionella bacteria. Good for homes with pets or mild allergies.
- MERV 13: The highest rating for standard residential equipment. Captures bacteria, tobacco smoke, and sneeze droplets. The EPA recommends MERV 13 when system compatibility allows [2].
Get quotes from top-rated pros.
I always check the system specs before recommending a filter upgrade. A 20-year-old furnace with a single-speed blower was not designed for a MERV 13 filter. Putting one in without verifying static pressure limits is like breathing through a wet washcloth. The system suffocates, the coil freezes, and you end up calling me anyway.
To verify your system's MERV limit, check the owner's manual for the maximum recommended rating, or ask your HVAC technician to measure static pressure with the new filter installed. Systems with variable-speed blower motors generally tolerate higher MERV ratings than single-speed units.
Finding Your Filter Size
Every AC filter has three dimensions printed on its frame: length, width, and depth. Common residential sizes include 16x20x1, 16x25x1, 20x20x1, 20x25x1, and 20x25x4 (measured in inches).
The easiest method is to pull out your current filter and read the size printed on the cardboard frame. If no filter is installed, measure the width, height, and depth of the filter slot and round up to the nearest standard size. Your HVAC owner's manual also lists compatible sizes, which is especially important for 4-inch or 5-inch media filter housings.
Filters must fit snugly in the slot without gaps. A filter that is too small allows unfiltered air to bypass the media entirely. A filter that is too large will not slide into the housing and can damage the frame if forced.
Step-by-Step Filter Replacement
Changing your AC filter requires no tools, no technical knowledge, and no prior experience. The entire process takes 3 to 5 minutes.
Before you start:
- Purchase the correct filter size and MERV rating (see previous sections)
- Turn off your HVAC system at the thermostat. This prevents the blower from pulling unfiltered air while the filter slot is empty
- Have a trash bag ready for the old filter
Step 1: Locate your filter. In most homes, the filter sits in the return air vent (a large rectangular grille on a wall or ceiling) or inside the air handler/furnace cabinet behind a removable panel. Some homes have filters in both locations. If you have multiple return vents, each one may contain a separate filter.
Step 2: Remove the old filter. For return vent filters, unlatch the grille cover and swing it open. Slide the old filter out carefully, keeping it horizontal to avoid spilling dust. For air handler filters, open the service panel and slide the filter out from its tracks.
Step 3: Check the airflow direction arrow. Every disposable filter has an arrow on its frame indicating airflow direction. This arrow must point toward the blower motor. For return vent filters, the arrow points into the duct (toward the wall). For air handler filters, it points toward the blower compartment.
Step 4: Insert the new filter. Slide the new filter into the slot with the airflow arrow pointing in the correct direction. Confirm it sits flush against the frame with no gaps on any side.
Step 5: Close up and restart. Secure the grille or panel. Turn your HVAC system back on at the thermostat. If you hear whistling or rattling, recheck the filter seating.
Step 6: Record the date. Write the installation date on the filter frame with a marker, or set a phone reminder for the next replacement. This prevents the guesswork that leads to 6-month-old filters still sitting in the system.
Photo: Close-up of hands inserting a new pleated AC filter into a return air vent showing the airflow direction arrow pointing toward the duct opening
Replacement Schedule by Household Type
The standard 90-day recommendation printed on most filter packaging is a baseline, not a universal rule. Your actual replacement interval depends on several household factors that affect how quickly the filter loads with particles.
Recommended replacement intervals
| Household Situation | 1-Inch Filter | 4-Inch Filter |
| Single occupant, no pets | Every 90 days | Every 12 months |
| Couple, no pets | Every 90 days | Every 9-12 months |
| Family with children, no pets | Every 60-90 days | Every 6-9 months |
| One pet (dog or cat) | Every 60 days | Every 6 months |
| Multiple pets | Every 30-45 days | Every 4-6 months |
| Household member with allergies or asthma | Every 30-45 days | Every 3-4 months |
| Smoker in the household | Every 30 days | Every 3-4 months |
| Home near construction or dirt road | Every 30 days | Every 3-4 months |
| Vacation home (minimal use) | Every 6-12 months | Every 12 months |
Seasonal adjustments matter. During peak summer and winter months when the system runs continuously, filters load faster. A filter that lasts 90 days in spring may only last 45 days in July or January. Check your filter monthly by holding it up to a light source. If you cannot see light through the filter media, it is time to replace regardless of how many days it has been installed [4].
Maria, a homeowner in Phoenix, AZ, noticed her electricity bill jumped from $180 to $245 during June 2025 compared to the same month the previous year. Her AC was running constantly but the house never reached the thermostat set point of 76 degrees. She called an HVAC technician who found a 1-inch fiberglass filter that had not been changed in over five months. The filter was completely matted with desert dust and pet hair from her two dogs. The evaporator coil had a thin layer of dust buildup from particles bypassing the overloaded filter. The technician replaced the filter ($8), cleaned the coil ($150), and her system immediately restored normal cooling. Her July electricity bill dropped back to $195. The total cost of the neglected filter: $158 for the service call and coil cleaning, plus an estimated $65 in excess electricity over the months the filter was clogged. A $8 filter every 30 days would have prevented the entire situation.
Get quotes from top-rated pros.
Pet owners in dusty climates are the highest-risk group for filter neglect. I tell my clients in the Southwest to set a recurring calendar reminder for the first of every month. Pull the filter out, look at it, and decide. That 30-second check prevents the $200 frozen coil call every single time.
Common Mistakes to Avoid
Buying the wrong size. A filter that is even half an inch too small creates a gap where unfiltered air bypasses the media entirely. Always verify the size printed on your current filter before purchasing.
Installing the filter backward. The airflow arrow must point toward the blower, not toward the room. A backward filter sags or collapses under suction pressure within weeks.
Using too high a MERV rating. A MERV 16 hospital-grade filter in a standard residential system restricts airflow severely, causing the blower motor to overheat and the coil to freeze. Stick to MERV 8-13 unless your technician confirms your system can handle higher [3].
Running the system without a filter. Even a few days without a filter allows dust to coat the evaporator coil and blower components. Always have a replacement on hand before removing the old one.
Ignoring the filter after a renovation. Drywall dust and sawdust load filters extremely fast. After any construction work, replace the filter immediately and again after one week.
Cost Breakdown and Savings
AC filter maintenance is one of the few home maintenance tasks where the math is overwhelmingly clear. The cost of doing it right is a fraction of the cost of skipping it.
Annual filter costs by type:
Annual filter costs by type
| Filter Strategy | Annual Cost | Filters Per Year | Total Annual |
| Cheap fiberglass, monthly change | $2-$5 each | 12 | $24-$60 |
| Pleated MERV 8, every 90 days | $8-$15 each | 4 | $32-$60 |
| Pleated MERV 13, every 60 days | $12-$20 each | 6 | $72-$120 |
| 4-inch media MERV 13, yearly | $25-$45 each | 1-2 | $25-$90 |
What you save by replacing on schedule:
- Energy savings: 5-15% of cooling costs, or $100-$300 per year for the average household [1]
- Avoided coil cleaning: $100-$400 per cleaning session
- Extended system lifespan: preventing 3-5 years of premature wear
- Avoided emergency service calls: $150-$300 per frozen coil visit
The annual cost difference between the cheapest and best filtration strategy is roughly $30 to $90. The potential cost of filter neglect ranges from $250 to $700 per year in excess energy, service calls, and accelerated equipment wear. For homeowners who want professional guidance on filter selection and system optimization, find a certified HVAC technician near you on NearbyHunt to get a recommendation matched to your specific equipment.

Photo: Infographic comparing annual costs of regular AC filter replacement versus costs of filter neglect including energy waste, coil cleaning, and emergency service calls
When to Call a Professional
Filter replacement is a straightforward DIY task, but certain situations call for professional involvement.
Schedule a professional HVAC inspection if:
- Your filter clogs within 2 weeks repeatedly (possible duct leakage pulling in attic debris)
- Ice forms on refrigerant lines even with a clean filter (refrigerant issue)
- Airflow feels weak even after a fresh filter (blower motor or ductwork problem)
- Musty odors persist regardless of filter condition (ductwork contamination)
- You want to upgrade to a 4-inch or 5-inch media filter housing
A standard HVAC tune-up costs $75 to $150 and includes filter inspection, coil assessment, refrigerant check, and electrical inspection [5].
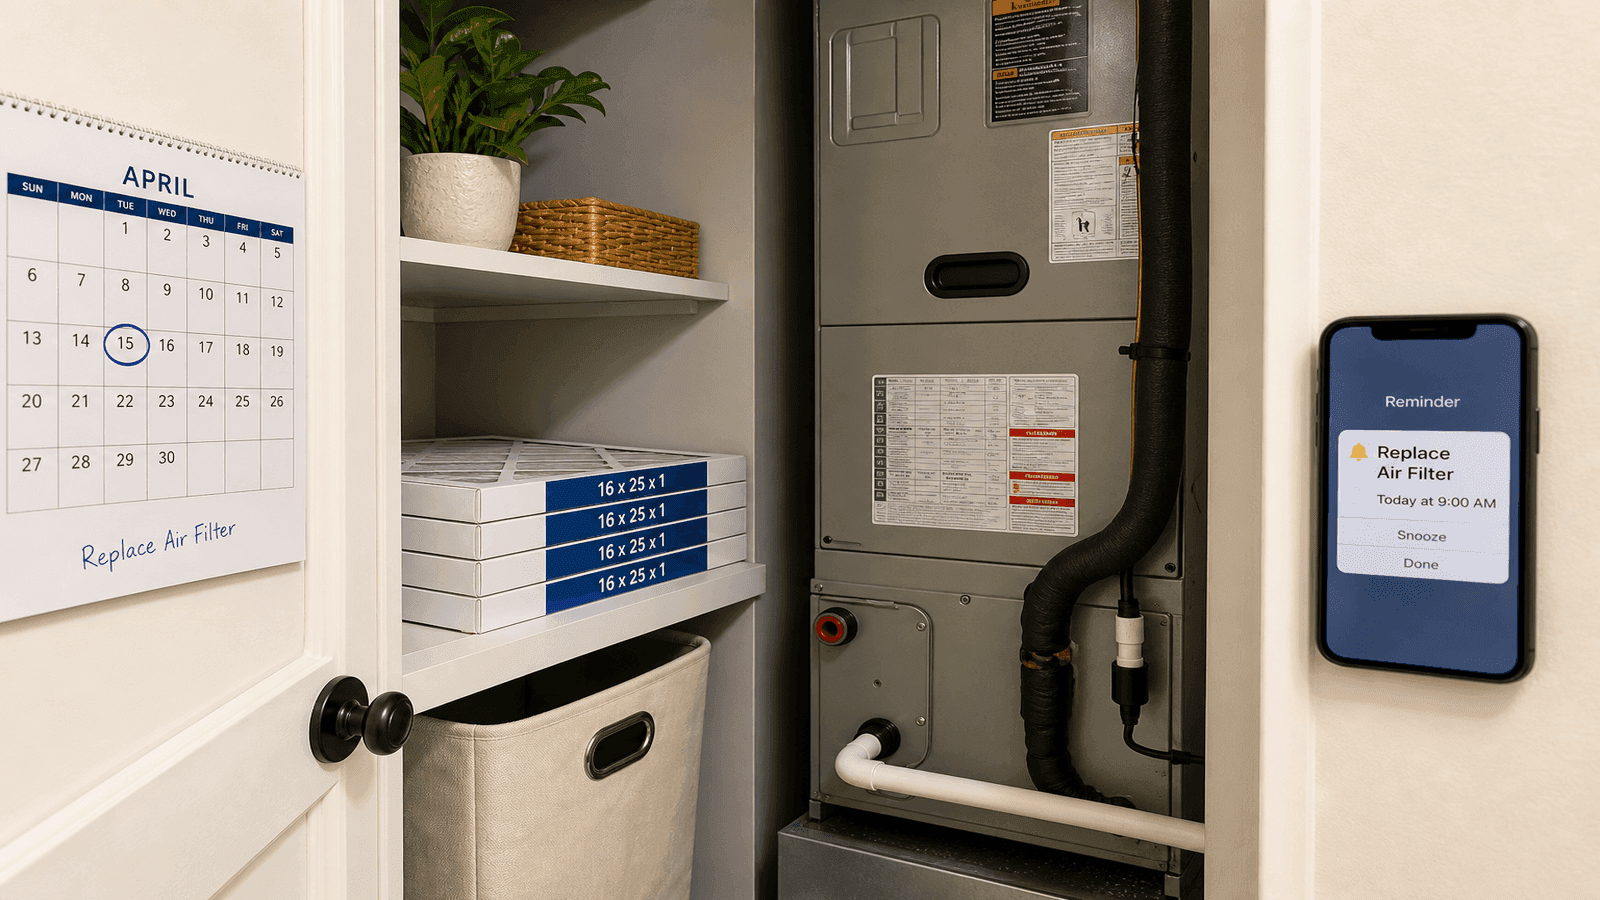
Photo: Organized home maintenance station showing a stack of replacement AC filters stored near the air handler with a calendar reminder visible on the wall
Disclaimer: This article provides general guidance for residential AC filter maintenance. Specific recommendations may vary based on your HVAC system model, local climate, and household conditions. Always consult your system's owner manual for manufacturer-specific instructions. For professional assessment of your system's filtration needs, consult a licensed HVAC technician. NearbyHunt connects homeowners with local professionals but does not perform HVAC services directly.*

Daniel is an EPA-certified HVAC technician & Energy Efficiency Consultant with over 14 years of experience in maintaining and installing heating and cooling systems throughout the Midwest. Passionate about sustainability, Dan specialises in energy-efficient retrofits and intelligent climate control systems. He writes for NearbyHunt to help homeowners extend the lifespan of their HVAC units while lowering utility bills.

Christine is an EPA-certified HVAC professional with 17 years of experience in heating, cooling, and indoor air quality systems. She has managed large-scale residential installations and worked as a technical trainer for new HVAC apprentices. Chris’s reviews focus on accuracy, safety, and performance standards in modern HVAC practices.