- A full roof installation on an average 2,000 sq. ft. home costs between $8,000 and $25,000 in 2026, depending on material choice and labor market.
- The complete installation sequence runs: deck inspection, drip edge, underlayment (including ice-and-water shield), flashing, field material, ridge vents, and final inspection.
- Permits are required in most jurisdictions. Skipping a permit can void your manufacturer warranty and create problems at resale.
- Asphalt shingles remain the most installed roofing material in the U.S. due to cost, availability, and installer familiarity, but metal and synthetic options are growing fast.
- Hiring a GAF Master Elite or manufacturer-certified contractor unlocks extended warranty coverage that unlicensed crews cannot offer.

Get quotes from top-rated pros.
A new roof is one of the largest home investments most families ever make. Done correctly, it adds decades of weather protection, lowers energy bills, and preserves structural integrity. Done poorly, it creates leaks, mold, rot, and expensive repairs within a few years.
This guide covers every phase of roofing installation in 2026: choosing materials, understanding the installation sequence for each type, navigating permits and building codes, and deciding when the job is truly DIY-friendly versus when it is firmly in licensed-contractor territory.
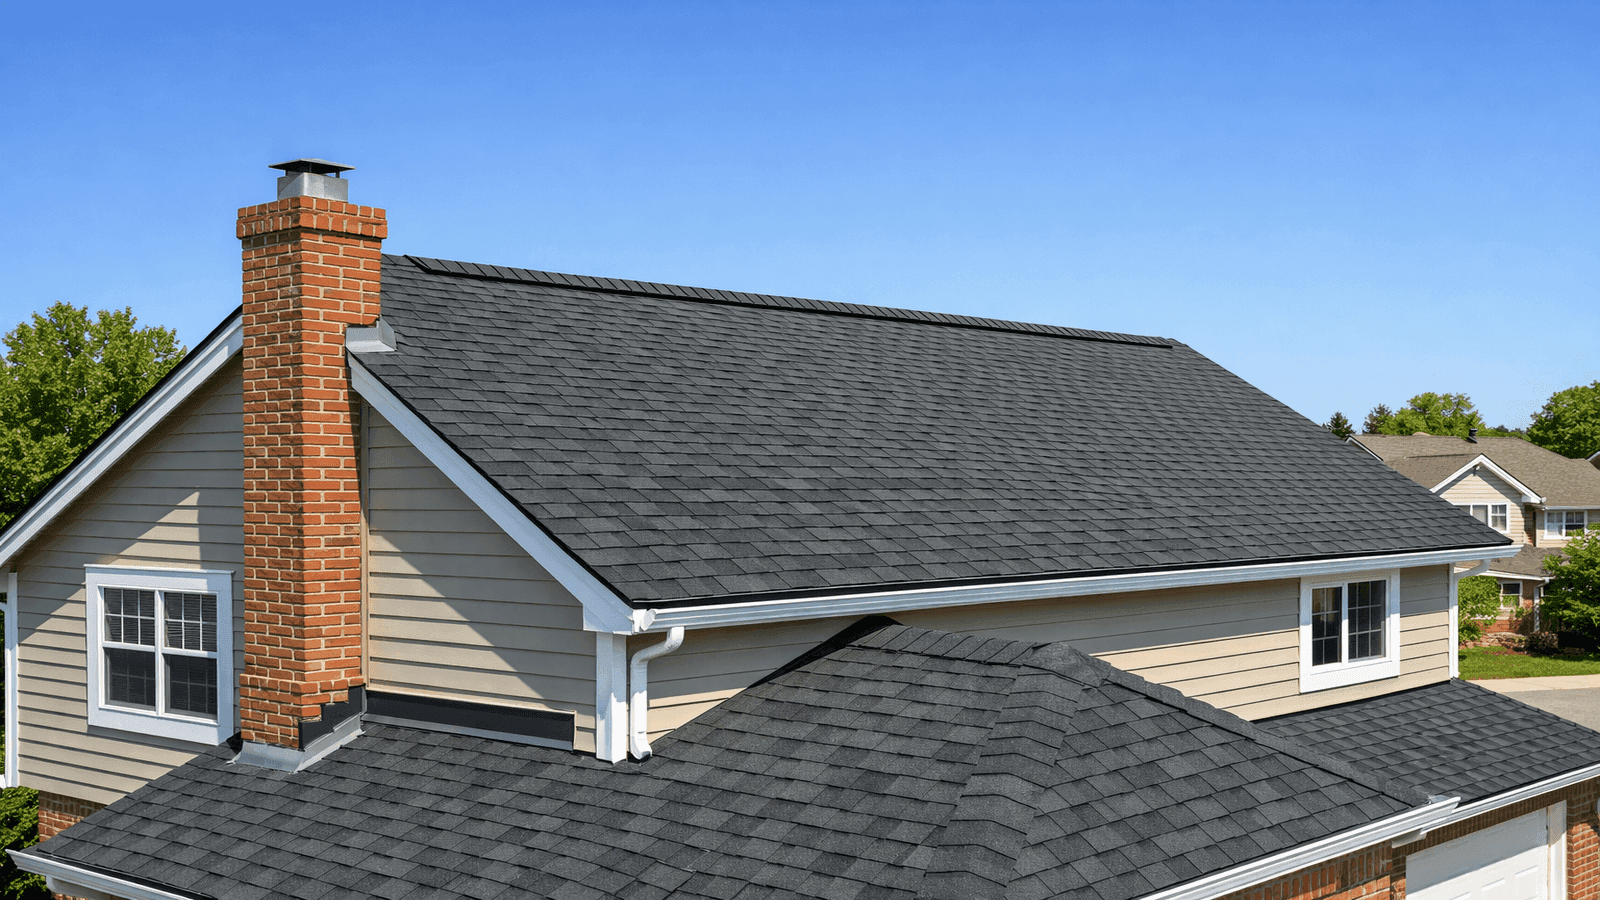
Photo: Overview of a completed residential roof installation showing clean shingle lines, ridge vent, and proper flashing around a chimney in a suburban neighborhood setting.
Why Proper Roofing Installation Matters
A roof is only as good as its installation. The materials sitting on any home can be the highest-rated shingles on the market, but if the underlayment is wrong, the flashing is cut short, or the nailing pattern violates the manufacturer spec, the warranty is void before the first rainstorm.
According to the National Roofing Contractors Association (NRCA), improper installation is responsible for more than 70% of all roofing failures, outpacing weather events and material defects combined [1]. That statistic shapes every recommendation in this guide.
James Carver, a licensed roofing contractor with more than 1,800 roofing projects completed across the U.S. South and Midwest over a 20-year career, sees installation-related failures routinely.
In St. Louis, I see two failure modes over and over: flashing that was never properly set into the step-cut on a sidewall, and underlayment that was installed without enough overlap in valleys. Both are invisible once the shingles go on, but both leak within three to five years.
The licensed roofers in our NearbyHunt network report that 62% of roof leak calls they receive are traced back to installation defects rather than material failure or storm damage. That number holds whether the original crew was unlicensed DIY labor or a low-bid contractor who cut corners on underlayment and flashing.
Proper installation is not just about doing the work. It is about doing it in the right sequence, with the right materials, at the right weather conditions, and with documentation that satisfies both the local building department and the manufacturer's warranty requirements.
Roofing Material Options
The 2026 residential roofing market offers more material choices than at any point in the past. Here is a straightforward breakdown of the most common options by installed cost and expected lifespan.
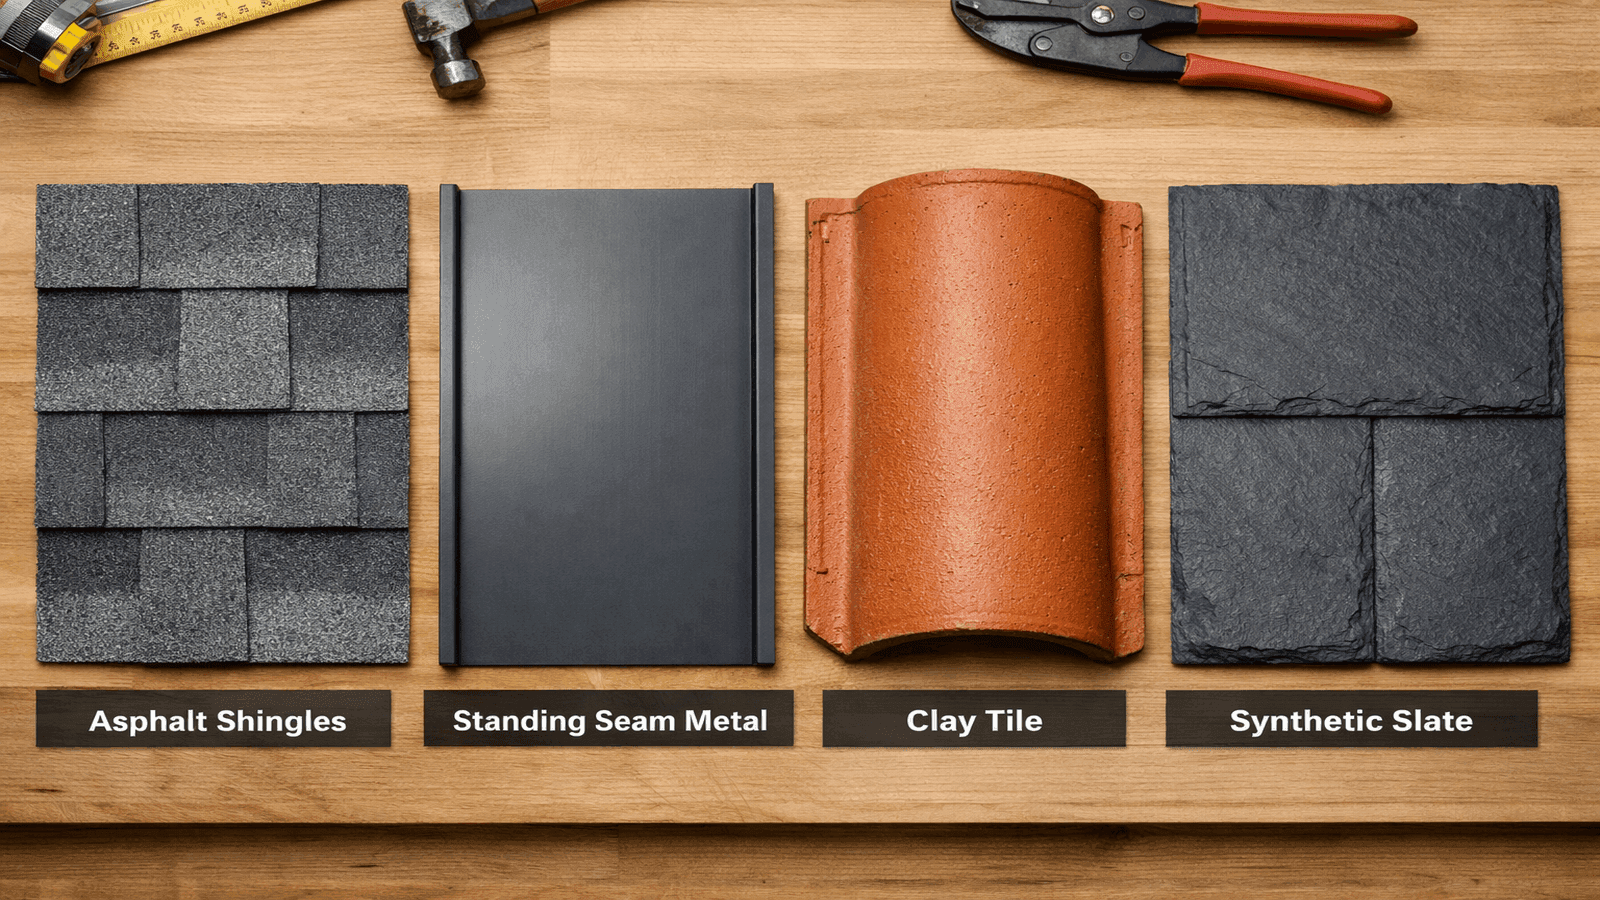
Photo: Side-by-side comparison photo showing samples of asphalt shingles, metal panels, clay tile, and synthetic slate laid out on a workbench for visual comparison.
Asphalt Shingles
The dominant U.S. roofing material by a wide margin. Three-tab shingles are the entry-level product, with architectural (dimensional) shingles now the standard specification for most residential replacements. Luxury or designer shingles mimic the look of slate or wood shake at a lower weight.
Installed cost: $4.35 to $9.80 per square foot for architectural shingles in 2026, with a national average near $8,900 for a standard replacement [2].
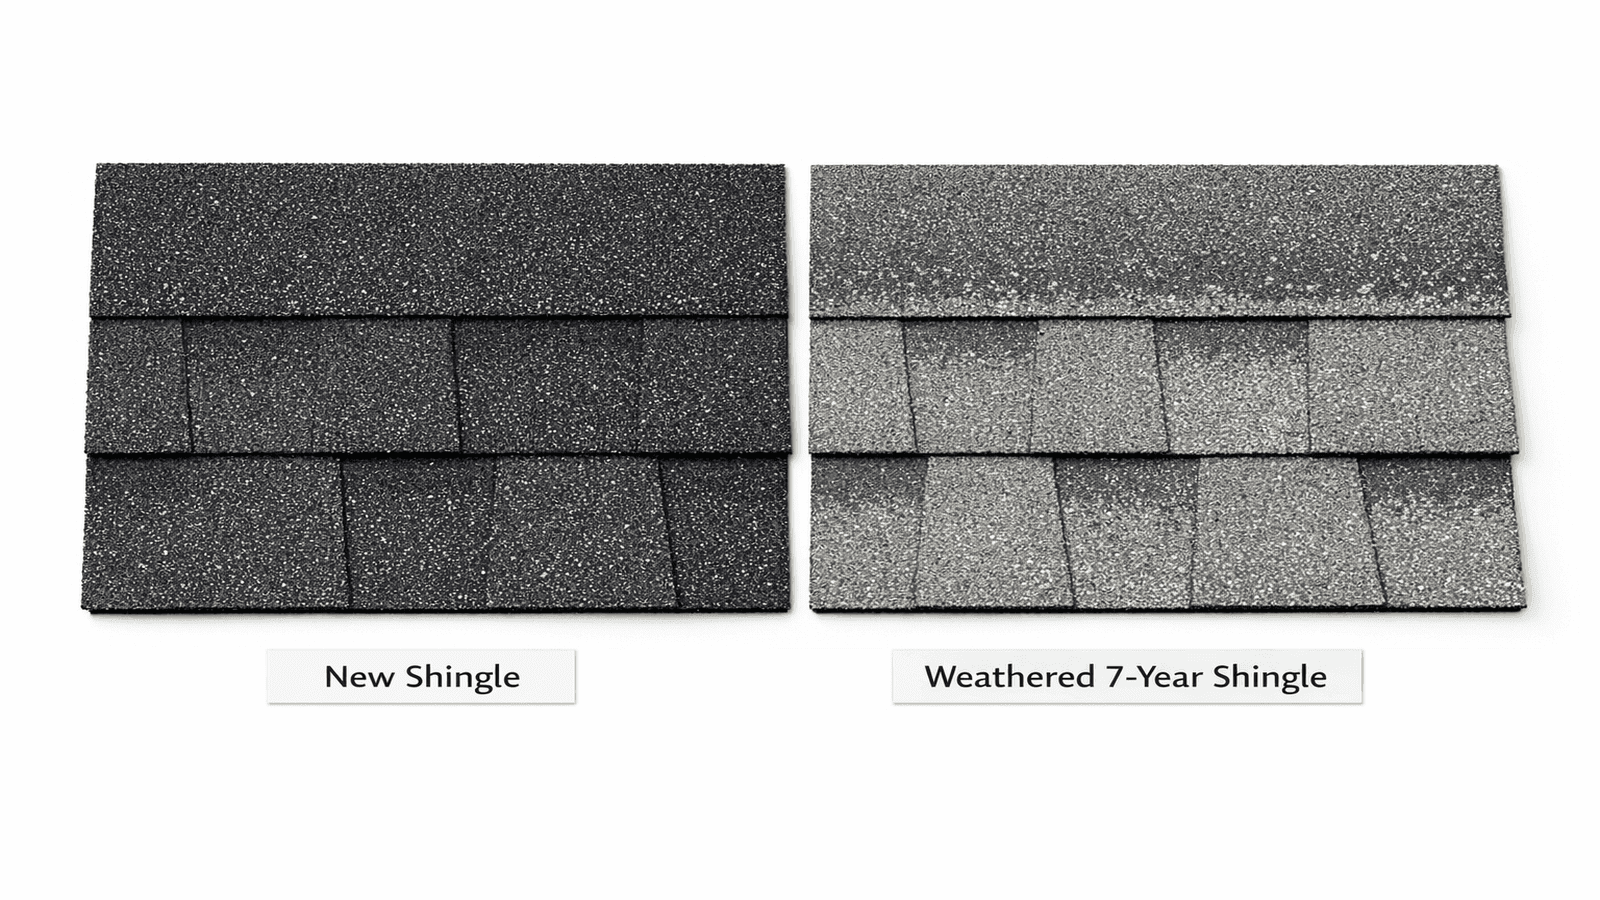
Lifespan: 20 to 30 years for architectural; up to 50 years for premium impact-resistant grades.
See the detailed Shingle Installation Guide for step-by-step nailing patterns, starter course placement, and hip and ridge finishing.
Metal Roofing
Standing seam and exposed-fastener metal panels are both growing in market share, particularly in hail-prone areas of the Midwest and South. Installed cost ranges from $7.00 to $14.00 per square foot for exposed-fastener systems, rising to $14.00 to $25.00 per square foot for premium standing seam [3].
Metal roofs properly installed last 40 to 70 years, require minimal maintenance, and qualify for many state and federal energy-efficiency incentives in 2026.
For complete installation guidance by panel type, visit the Metal Roof Installation cluster article.
Clay and Concrete Tile
Common in the Southwest, Florida, and coastal markets. Tile requires a structurally reinforced roof deck (concrete tile runs 9 to 12 pounds per square foot) and specialized installation skills. Installed cost: $10.00 to $18.00 per square foot for concrete; $15.00 to $30.00 per square foot for natural clay [3].
Lifespan: 50 years or more when installed correctly.
Wood Shakes and Shingles
Popular in the Pacific Northwest and luxury markets. Cost: $9.00 to $14.00 per square foot installed. Fire codes in many Western states now restrict or prohibit wood shake in fire-risk zones. Always verify local ordinances before specifying wood roofing.
Synthetic and Composite
High-density polymer shingles, rubber slate, and fiber-cement products occupy the middle ground: lighter than tile, more durable than wood, and often warrantied for 30 to 50 years. Installed cost: $7.00 to $14.00 per square foot. Growing rapidly due to Class 4 impact ratings that reduce homeowner insurance premiums by 15 to 30% in most hail-prone states.
The Installation Sequence: Layer by Layer
Regardless of the finish material, every quality roof installation follows the same base sequence. Skipping or reordering steps creates failure points.

Photo: Cross-section photo or diagram showing the layered components of a residential roof from deck outward, clearly labeling OSB decking, drip edge, ice-and-water shield, felt underlayment, and finished shingles.
Step 1: Deck Preparation
Before any new material goes on, the existing deck must be inspected. Rotted, soft, or delaminated plywood sections are cut out and replaced with new OSB or plywood matching the original thickness. Building codes require a solid nailing surface with no bounce or flex.
For details on decking materials and repair, see the Roof Decking Installation guide.
Get quotes from top-rated pros.
Step 2: Drip Edge
A metal drip edge is installed along all eaves before underlayment goes down, and along all rakes (gable edges) after the underlayment is in place. Drip edge directs runoff away from the fascia and prevents water from wicking back under the starter course.
IRC R905.2.8.5 (2021 edition, adopted in most jurisdictions by 2026) requires drip edge on all new asphalt shingle installations [4]. See full installation details in the Drip Edge Installation guide.
Step 3: Ice-and-Water Shield
In cold-climate regions and around all penetrations, a self-adhering polymer-modified bitumen membrane is applied directly to the deck. The IRC requires ice-and-water shield to extend a minimum of 24 inches above the inside face of the exterior wall, with many northern states requiring 36 to 48 inches [4].
This membrane is not optional in a properly permitted installation. James Carver notes that in Missouri, inspectors regularly reject roofs that lack proper ice-and-water shield coverage at valleys and eaves.
Step 4: Felt Underlayment
15-lb or 30-lb felt (or synthetic underlayment rated to ASTM D226 or D4869) is applied horizontally from eave to ridge, lapped a minimum of 2 inches at horizontal seams and 4 inches at end laps [4]. Synthetic underlayment products have largely replaced felt on high-pitch roofs due to improved tear resistance and longer exposure ratings.
See the Roof Underlayment Installation guide for a full material comparison and installation walkthrough.
Step 5: Flashing
All transitions where the roof plane meets a vertical surface (walls, chimneys, dormers, skylights) require step flashing and counterflashing set into a mortar joint or housewrap tape. Valley flashing and pipe boot flashing are installed before the field shingles reach those areas.
This is where most contractor quality differences become visible. See the Chimney Flashing Installation guide for the full step-flashing and counterflashing sequence.
Step 6: Field Material Installation
Shingles, metal panels, tiles, or shakes are installed from the eave up to the ridge according to manufacturer specifications. Nailing pattern, exposure width, and starter course alignment all affect both weather performance and warranty compliance.
Step 7: Ridge Cap and Ridge Vent
The ridge cap seals the topmost peak. On ventilated installations, a ridge vent is installed before the cap shingles or trim panels to allow continuous attic airflow from soffit to ridge. Balanced ventilation (1 sq. ft. of net free area per 150 sq. ft. of attic floor space) is required by IRC R806 [4].
See the Ridge Vent Installation guide for sizing, placement, and common mistakes.
Step 8: Final Inspection and Cleanup
Magnetic rollers collect loose fasteners. Valleys and penetrations receive a visual walk-through. Gutters are cleared of debris. A final inspection is conducted by the local building department on permitted jobs.
New Roof Installation Process
A complete roof replacement on a 2,000 sq. ft. home follows a predictable timeline when crews are experienced and weather cooperates.
Day 1: Tear-off of existing material, deck inspection, deck repairs, drip edge.
Day 1-2: Ice-and-water shield, underlayment, valley and step flashing.
Day 2-3: Field shingles or panels, ridge vent, ridge cap.
Day 3: Final inspection, cleanup, magnetic sweep, debris removal.
Most residential asphalt shingle replacements complete in 1 to 3 days. Tile roofs typically run 6 to 12 days due to tile layout, mortar work, and the care required around fragile material [5].
For a detailed walkthrough of every phase, visit the New Roof Installation Process guide.
Homeowner case study: Marcus T. of Memphis, Tennessee replaced a 22-year-old three-tab shingle roof after two consecutive hail seasons. His 2,400 sq. ft. home had 14 squares of decking requiring replacement due to hidden rot under the old shingles. The licensed crew completed tear-off and installation in three days. Total project cost: $14,800, covered 80% by his homeowner's insurance after a successful storm damage claim. Marcus noted that the contractor's documentation of deck rot was critical to the insurance adjuster approving the higher settlement.
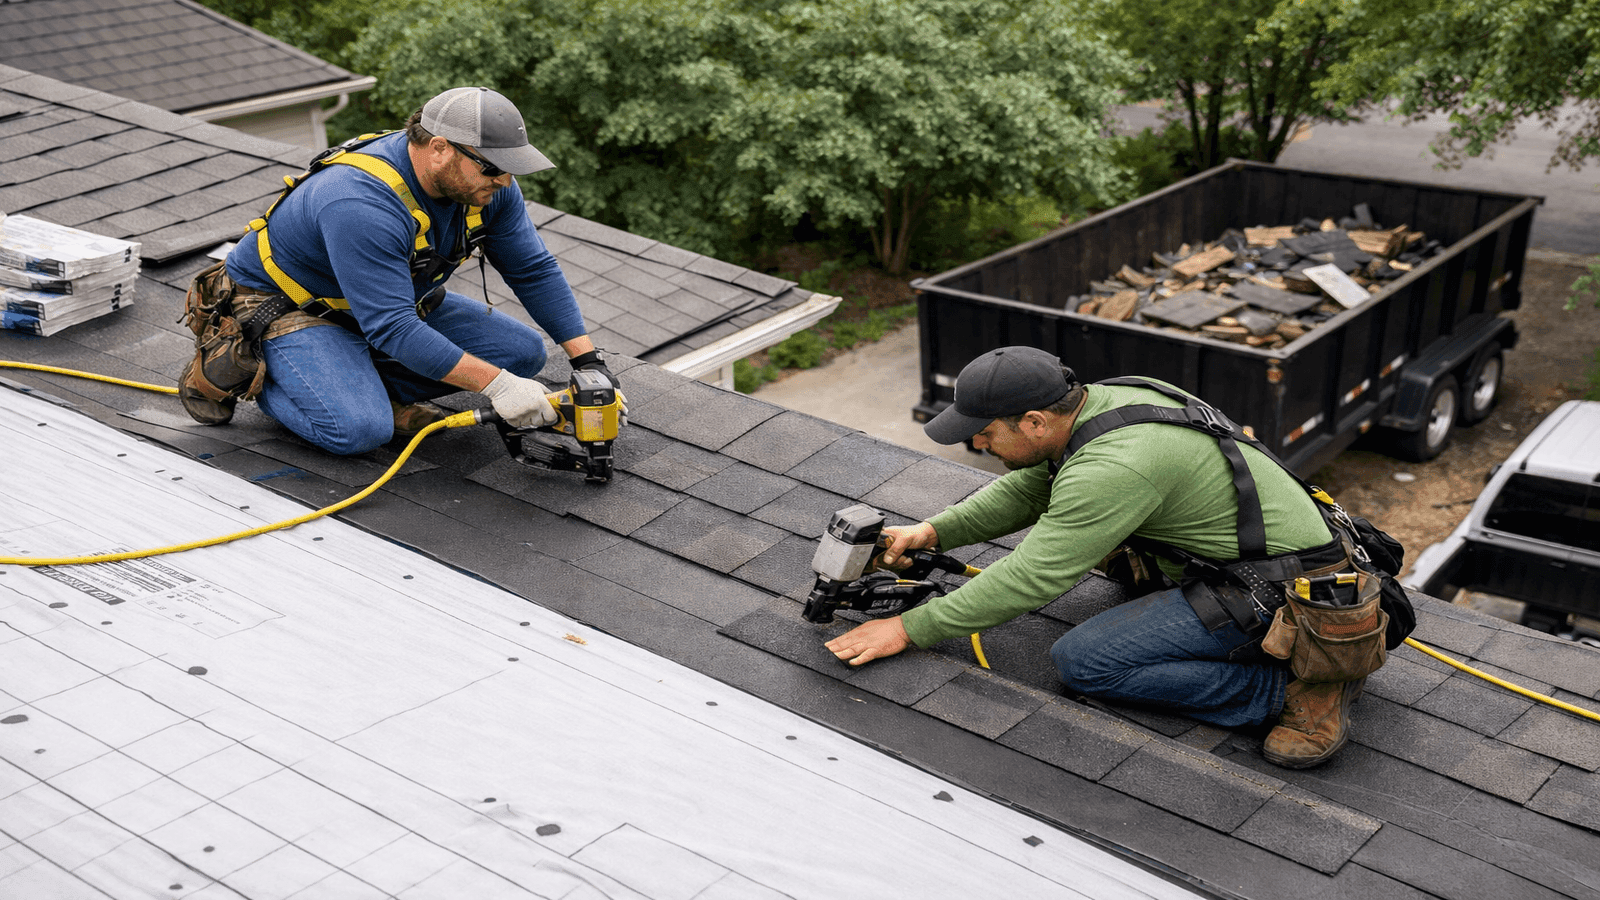
Photo: Photo of a roofing crew mid-installation on a residential home, showing new underlayment laid on the deck and workers positioning shingles, with a debris trailer visible in the driveway below.
Metal Roof Installation
Standing seam metal roofing has the most demanding installation requirements of any common residential roofing material. Panels must be cut to length, clipped to prevent thermal movement issues, and sealed at all transitions with compatible sealant. Exposed-fastener panels are more forgiving but require neoprene-gasketed screws at exact intervals.
Key differences from shingle installation:
- Metal expands and contracts significantly with temperature. Hidden clips on standing seam systems allow panel movement without fastener stress.
- Metal roofing requires a clean, flat deck. High spots create oil-canning (waviness) that is purely cosmetic but difficult to fix after installation.
- Cutting metal panels produces sharp edges and flying metal chips. Proper PPE (gloves, eye protection, long sleeves) is mandatory.
- Sealant at transitions must be metal-compatible. Standard roofing caulk fails against metal expansion and contraction.
The licensed roofers in our NearbyHunt network report that improper sealant selection is the single most common metal roof installation error they encounter on re-roofing calls. Butyl tape and EPDM-compatible sealants are the correct choice for most panel systems.
Standing seam is a beautiful product when it is installed right, but I have seen more bad standing seam jobs than bad shingle jobs. The margin for error at the eave detail and the hip transition is very small. This is not a good DIY project unless you have done it before.
For complete panel-by-panel guidance, see the Metal Roof Installation guide.
Shingle Installation
Asphalt shingle installation is the most common roofing task in the U.S. and the one most likely to be attempted by skilled DIYers. Even so, manufacturer specifications are more detailed than most homeowners realize.
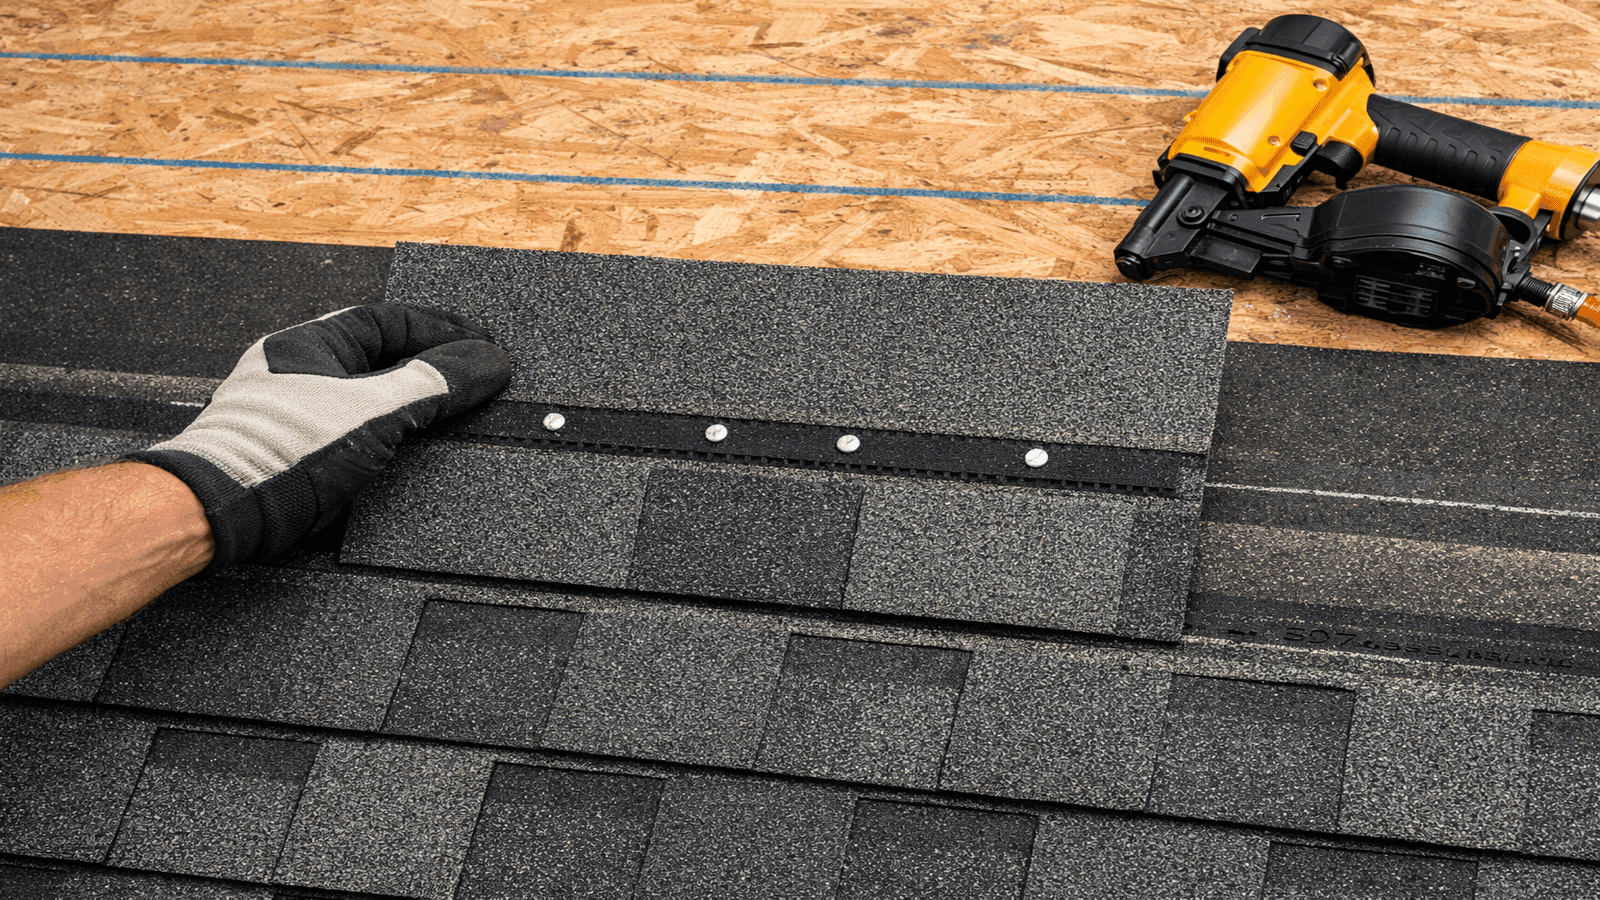
Photo: Close-up photo showing proper shingle nailing pattern with chalk lines snapped on the roof deck and architectural shingles being installed at the correct 5-5/8-inch exposure measurement.
Key installation parameters for architectural shingles:
- Starter course: A full shingle or dedicated starter strip is required at the eave with a 5/8-inch overhang beyond the drip edge. Self-sealing strips must face down toward the gutter.
- Nailing: 4 nails per shingle is the minimum; 6 nails are required in high-wind zones (IRC Table R301.2(2) defines wind zones). Nails must land in the nailing zone (above the seal strip, below the top edge of the laminate).
- Exposure: Standard architectural shingles expose 5-5/8 inches per course. Deviating from manufacturer-specified exposure voids the warranty.
- Offset pattern: Joints between shingles in adjacent courses must be offset by at least 1.5 inches. Most installers use a 6-inch rake-edge offset for a visually clean pattern.
- Hip and ridge cap: Pre-formed cap shingles or cut-down three-tab sections are installed with a 5-inch exposure and nailed 1 inch from each side edge.
For the complete step-by-step shingle installation sequence, see the Shingle Installation Guide.
Roof Decking, Underlayment, and Waterproofing
The foundation layers beneath the visible roofing material determine long-term performance more than the finish product itself.
Roof Decking
Most residential roofs use 7/16-inch or 1/2-inch OSB or 1/2-inch plywood sheathing over rafters spaced 24 inches on center. The IRC requires sheathing to be H-clipped at unsupported edges when rafter spacing exceeds 16 inches and sheathing is less than 1/2-inch thick [4].
Decking panels are installed with 1/8-inch gaps at all edges to allow for expansion. Failure to maintain these gaps causes buckling in hot, humid conditions, which telegraphs through the shingle layer as visible ridges.
For full deck installation and repair guidance, see Roof Decking Installation.
Underlayment
The underlayment layer serves as a secondary water barrier and provides temporary weather protection during installation. Options include:
- 15-lb felt: Economical, well-understood, code-compliant per ASTM D226 Type I. Tears more easily than synthetic in high wind during installation.
- 30-lb felt: Heavier, more durable, better suited to complex roofs with multiple penetrations.
- Synthetic underlayment: Polypropylene or polyester-reinforced products rated to ASTM D1970 (ice-and-water class) or ASTM D226 equivalents. Lighter, stronger, UV-resistant for up to 6 months exposure (product-dependent).
For a material-by-material comparison and full installation sequence, see Roof Underlayment Installation.
Get quotes from top-rated pros.
Flashing, Drip Edge, and Penetrations
Flashing is the most skill-intensive part of any roofing installation. It is also the source of most field failures.
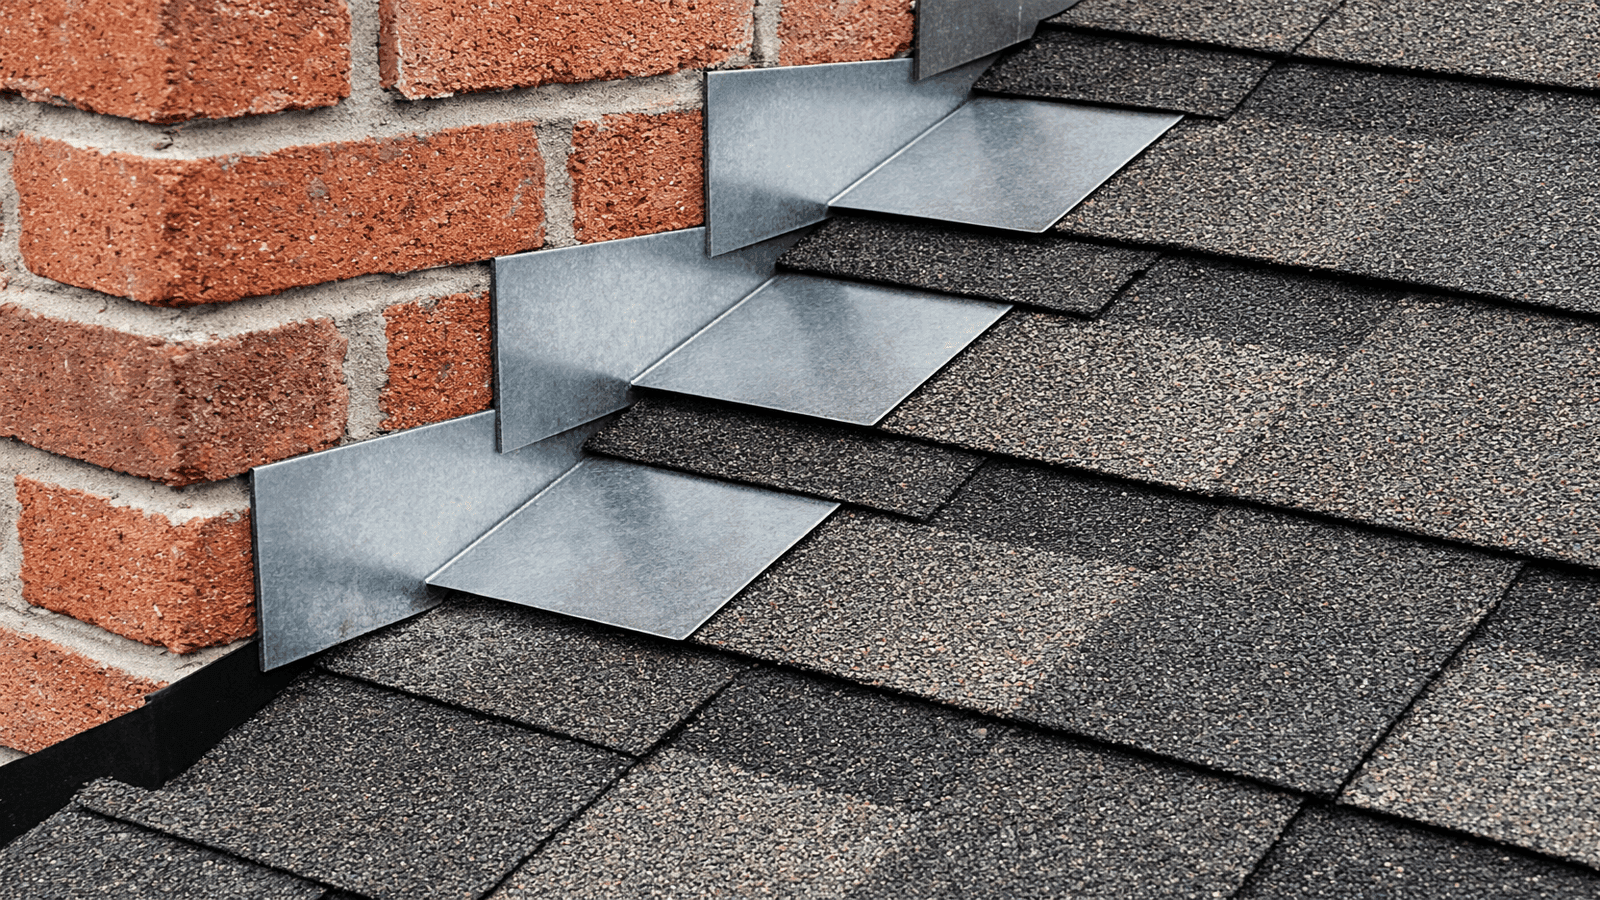
Photo: Detailed photo of properly installed step flashing at a sidewall transition, showing alternating L-shaped metal pieces woven with shingles against a brick wall surface.
Drip Edge
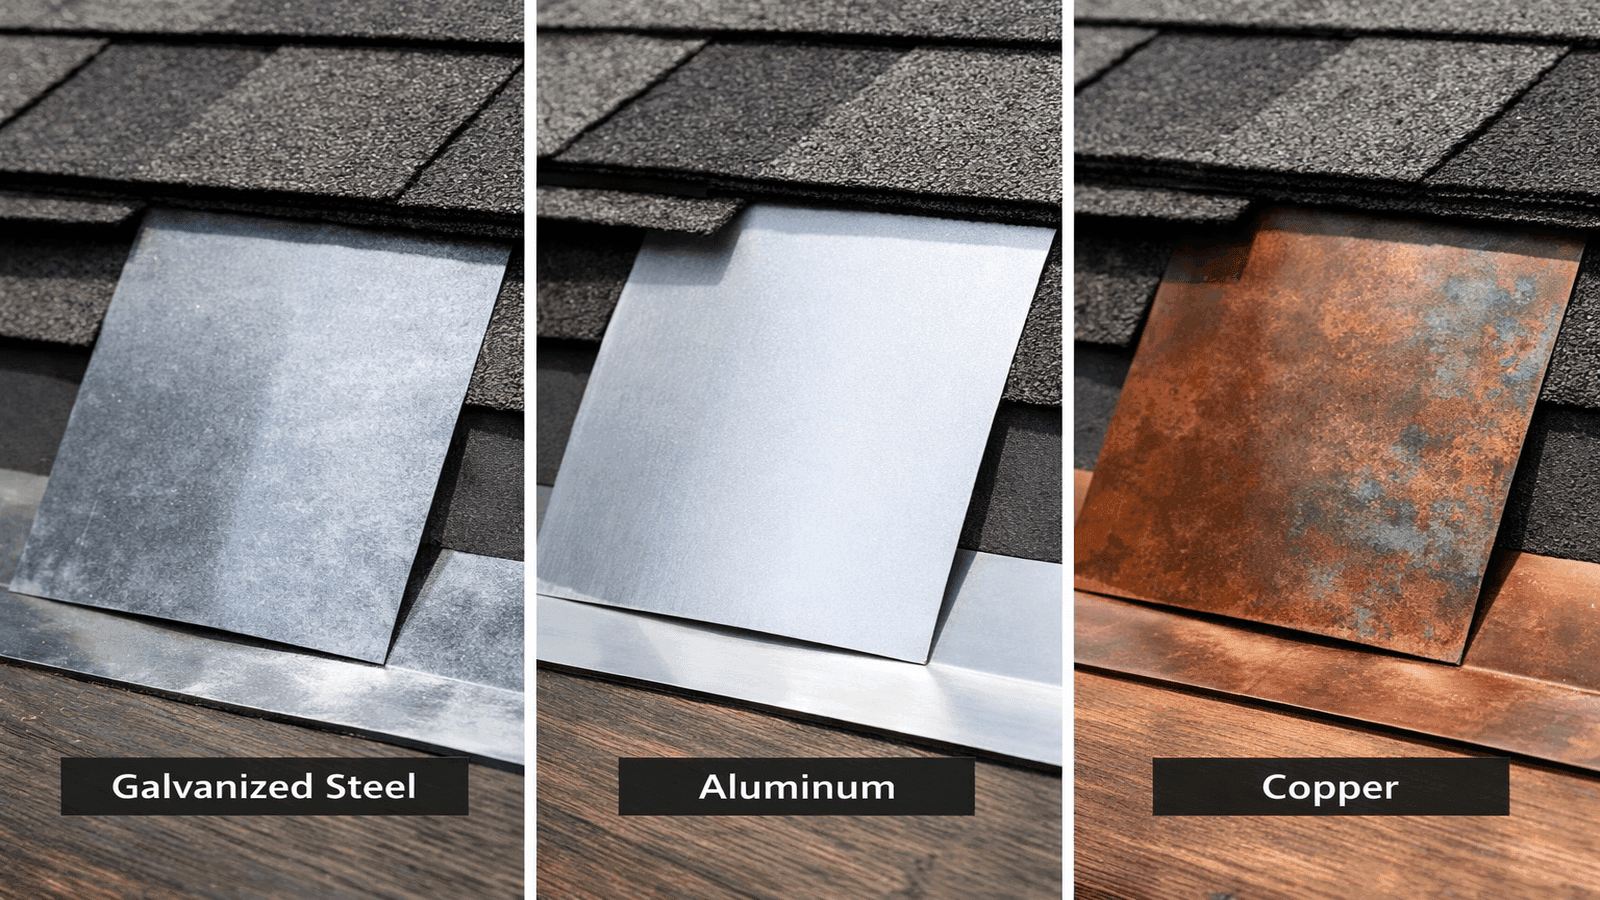
26-gauge galvanized steel or aluminum drip edge is the industry standard. It is installed at the eave before underlayment, then at the rake after underlayment. The 2021 IRC explicitly requires drip edge and specifies a minimum 1/4-inch overhang beyond the fascia edge [4].
See Drip Edge Installation for the complete eave and rake sequence.
Step Flashing
At every wall-to-roof transition, L-shaped flashing pieces (typically 4x4-inch or 4x7-inch galvanized steel) are woven into each course of shingles. Each piece overlaps the one below by at least 2 inches. The top edge slides behind the housewrap or siding.
Chimney Flashing
Chimney flashing is the most complex penetration detail. It consists of base flashing (wraps up from the deck), step flashing (courses up the chimney sides), and counterflashing (embedded into the mortar joint and bent down over the base flashing). A saddle (cricket) is required behind any chimney wider than 30 inches per IRC R903.2.1 [4].
James Carver estimates that a properly detailed chimney flashing job takes a skilled crew 1.5 to 2 hours per chimney. Rushed or inexperienced installations that skip the saddle or use sealant instead of counterflashing fail within 5 years consistently.
For the full chimney flashing sequence, see Chimney Flashing Installation.
Pipe Boots and Vents
Rubber or metal pipe boot flashings seal around plumbing vent penetrations. Neoprene rubber boots degrade in UV after 15 to 20 years and are a common maintenance replacement item. In 2026, two-piece lead-cap boots are increasingly specified in premium installations for longer service life.
Ridge Vent and Attic Ventilation
Balanced attic ventilation is not optional in a code-compliant installation. Insufficient ventilation causes heat buildup that degrades shingles from below, creates ice dam conditions in cold climates, and retains moisture that rots the deck.
Ventilation Math
The IRC requires a minimum of 1 sq. ft. of net free ventilation area per 150 sq. ft. of attic floor area, reduced to 1:300 when at least 40% of required ventilation is provided at the upper portion of the attic (ridge) and at least 40% at the lower portion (soffit) [4].
For a 1,500 sq. ft. attic floor, this means a minimum of 10 sq. ft. of net free area total, split roughly 50/50 between ridge and soffit.
Ridge Vent Installation
Continuous ridge vents (shingle-over type) are cut into the sheathing along the ridge, typically leaving 1 inch of deck on each side of the ridge board. The vent is nailed down, then cap shingles are applied over it. Avoid blocking the internal baffles with caulk or roofing cement.
For ridge vent sizing, product selection, and installation, see the Ridge Vent Installation guide.
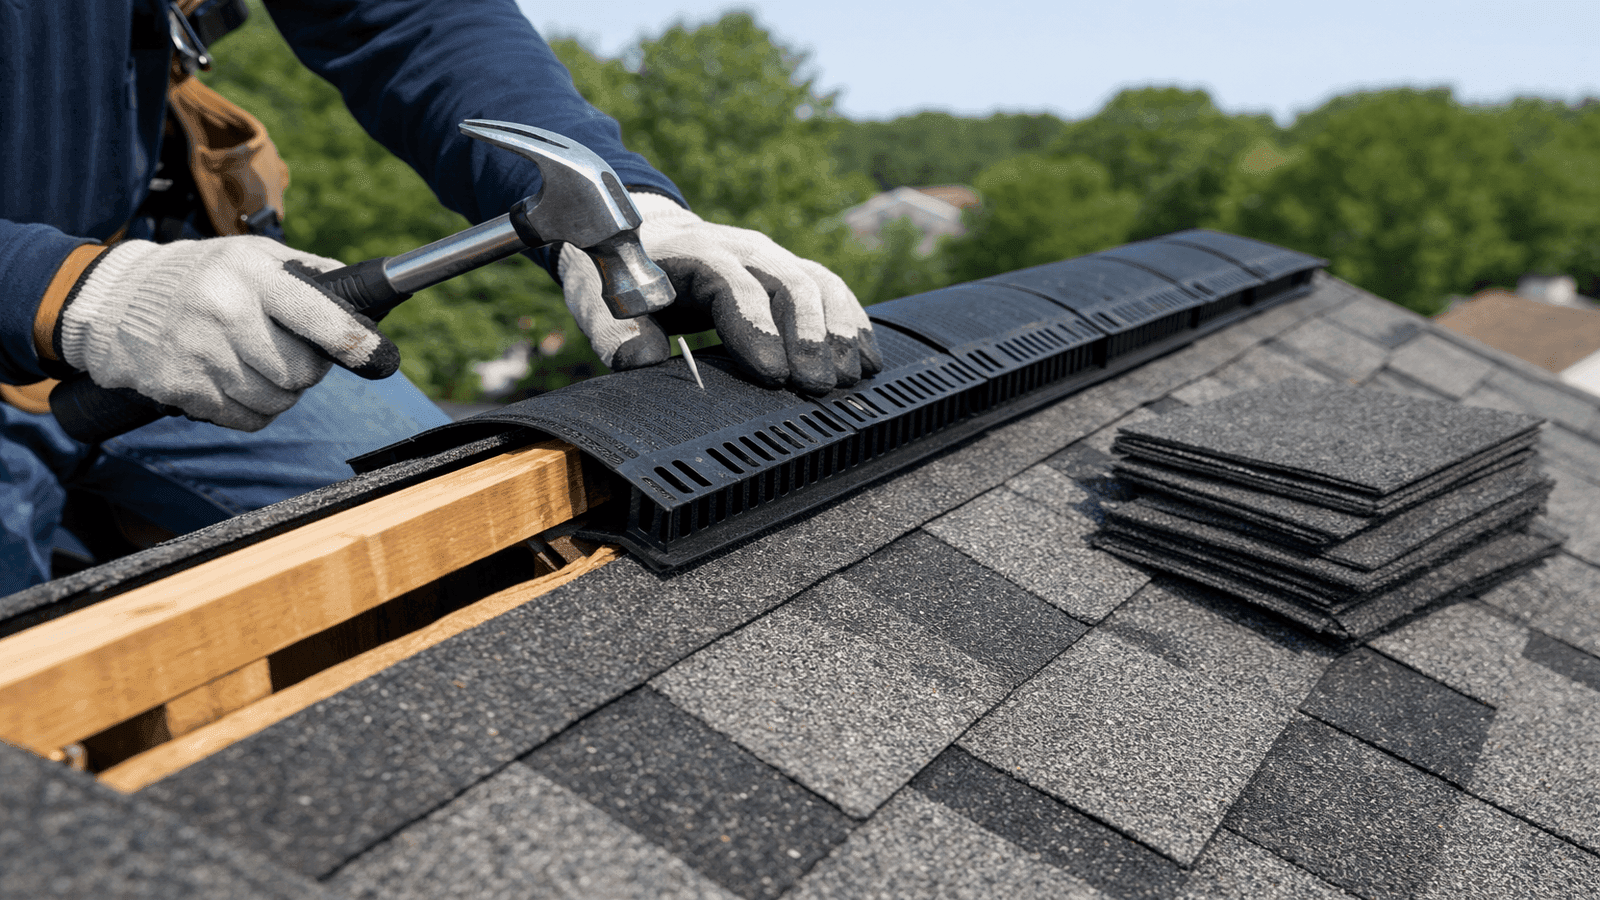
Photo: Photo showing a continuous ridge vent being installed on a roof peak, with visible sheathing cutback along the ridge and the vent channel material being nailed prior to cap shingle application.
Specialty Installations: Skylights, Solar Mounts, Chimneys
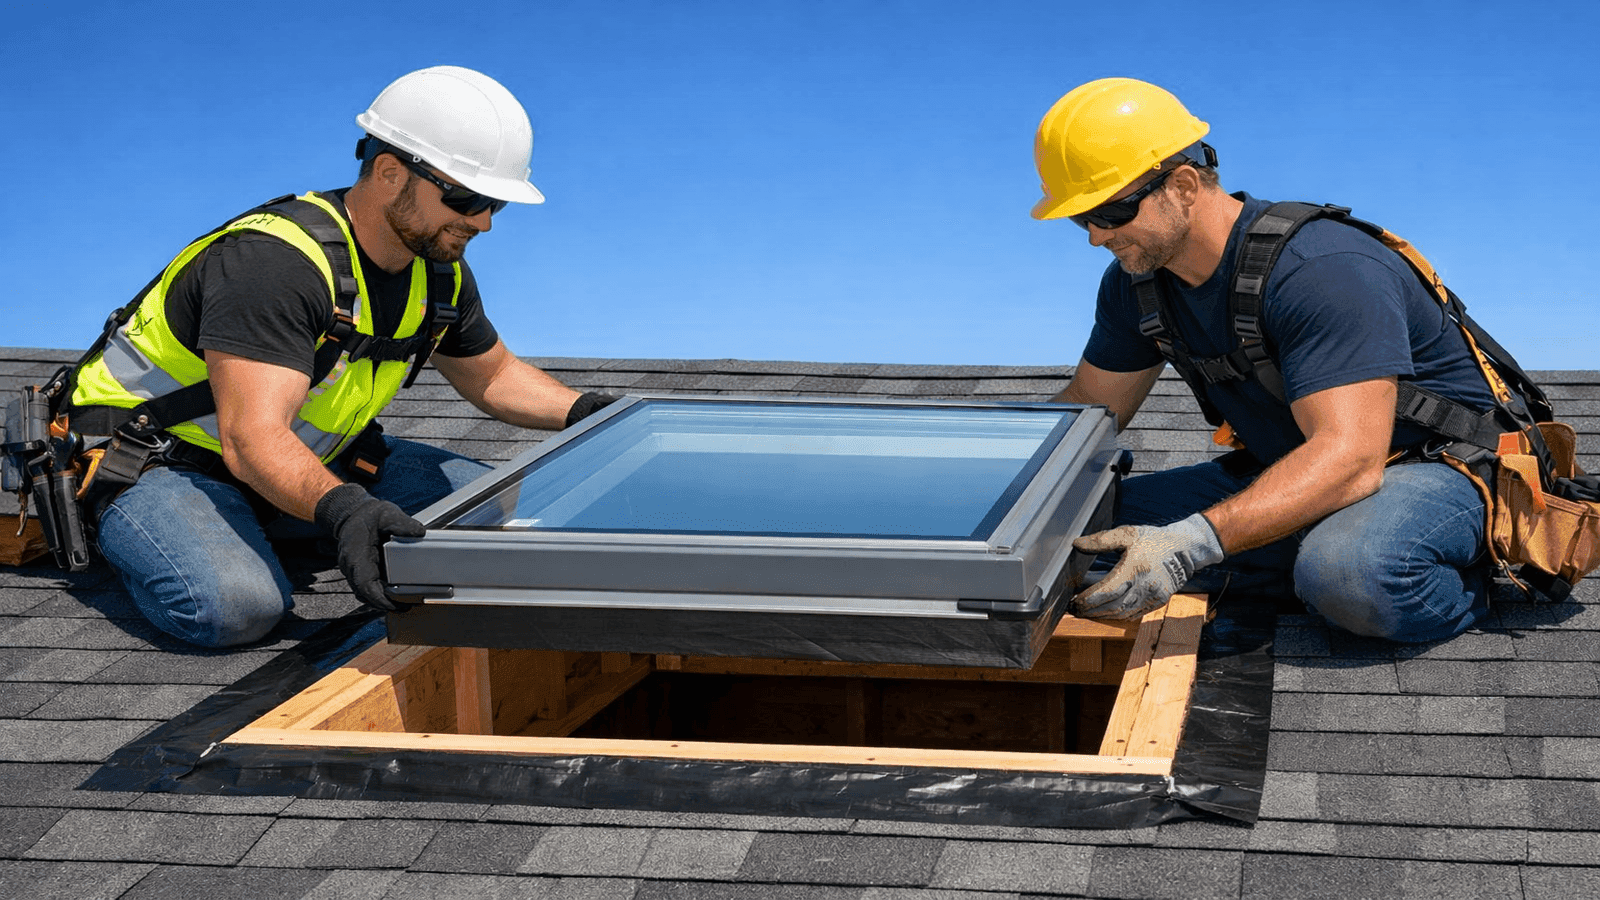
Skylight Installation
Skylights require their own curb or frame, flashing kit, and interior finishing. Factory-built flashing kits (available from Velux, Fakro, and others) are strongly preferred over site-fabricated flashing. The curb must be plumb and square, and the flashing must be integrated into the underlayment, not laid on top of installed shingles.
Poor skylight installation is a leading source of interior water damage claims. The licensed roofers in our NearbyHunt network recommend that homeowners always verify their contractor uses the manufacturer's specific flashing kit rather than a generic alternative.
For the full skylight installation process, see Skylight Installation.
Solar Panel Roof Mounts
Rooftop solar mounts penetrate the roof deck and must be flashed as carefully as any other penetration. Rafter-mounted L-foot brackets with approved flashings are installed through the shingles, bolted to rafters, and sealed with EPDM or butyl sealant. Roof rails then attach to the brackets and panels clip to the rails.
Improperly flashed solar mounts void both the roofing warranty and potentially the solar warranty. In 2026, building-integrated photovoltaic (BIPV) systems that replace the roofing material rather than penetrating it are growing as an alternative for new construction.
See Solar Panel Roof Mount for the complete mounting and flashing walkthrough.
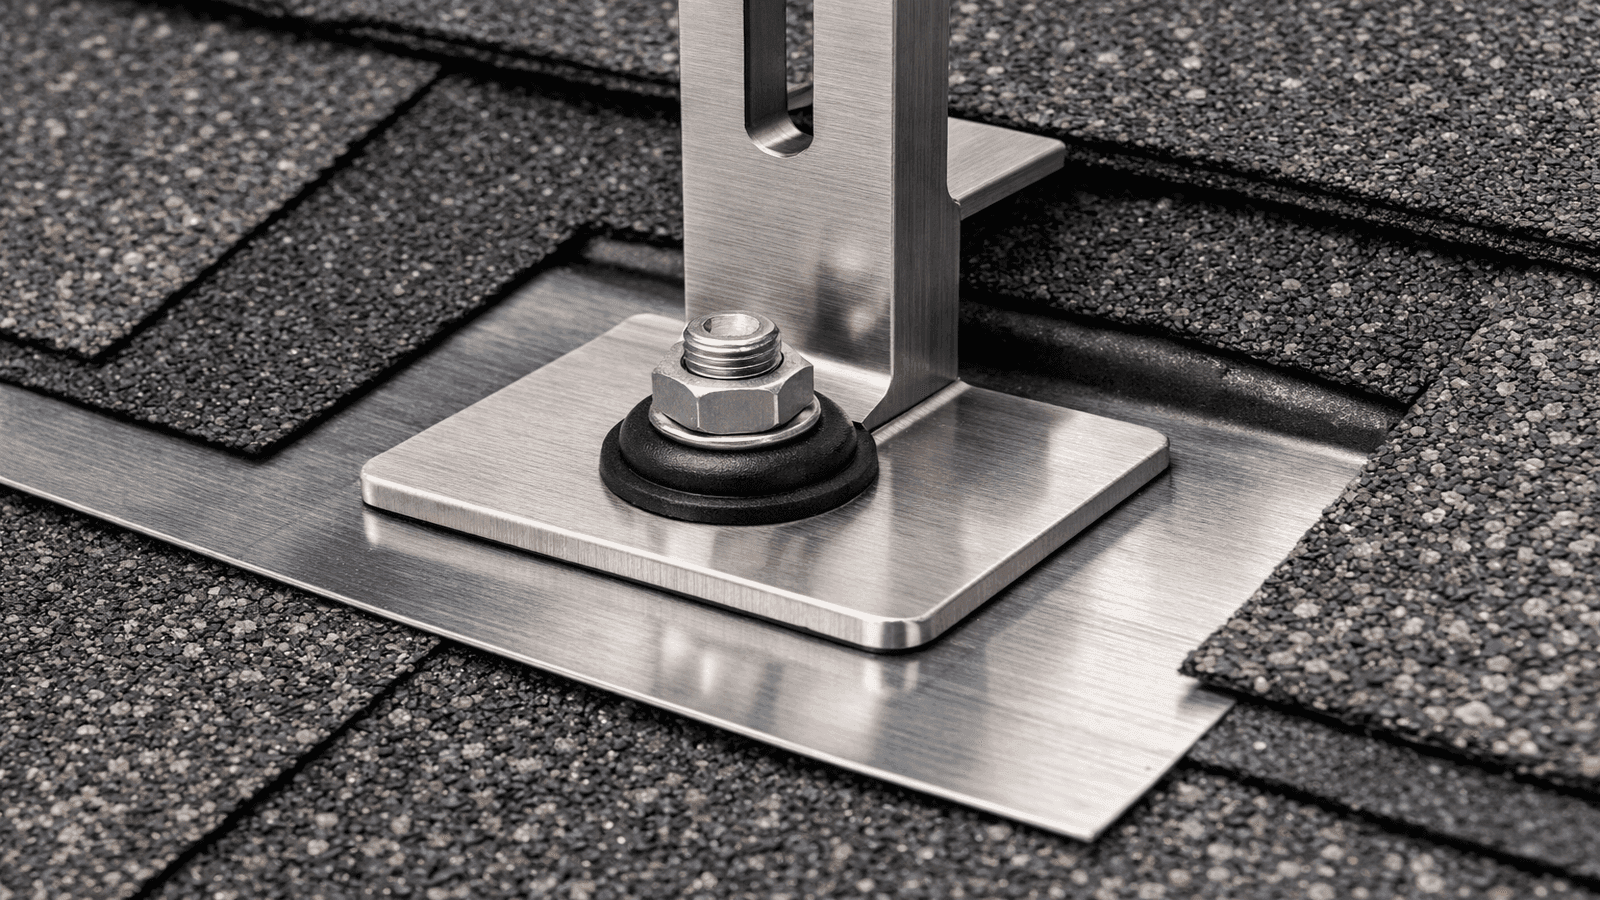
Photo: Photo of a solar panel L-foot mounting bracket being sealed and flashed on an asphalt shingle roof, showing the bracket base, EPDM gasket, and stainless lag bolt before rail installation.
Permits, Codes, and Inspections
When Permits Are Required
Most jurisdictions require a permit for any complete roof replacement. Repair of fewer than a specified number of squares (typically 1 to 3 squares) may be exempt, but full tear-offs and re-roofs are almost universally permitted work.
Pulling a permit requires submitting the proposed material specifications and paying a fee (typically $100 to $500 depending on jurisdiction and project size). An inspector then visits before the job starts (deck inspection after tear-off) and after completion to verify compliance.
Why this matters beyond compliance: Unpermitted roofing work is increasingly flagged during real estate transactions. Title companies and insurance carriers in many states now request permit history. A roof installed without a permit can delay or kill a home sale, or result in a claim denial after storm damage.
I have had homeowners call me panicking because they are closing in two weeks and the buyer's inspector found the previous roofer never pulled a permit. In Missouri, you can sometimes get a retrospective permit, but it involves an invasive inspection and it is expensive. Just pull the permit the first time.
IRC Chapter 9
The 2021 International Residential Code Chapter 9 governs roofing for one- and two-family dwellings in the majority of U.S. jurisdictions by 2026 [4]. Key provisions:
- R905.2: Asphalt shingle minimum slope (2:12 with modified application at 2:12 to 4:12; standard at 4:12 and above)
- R903.2: Flashing requirements at all roof-to-wall and penetration transitions
- R906/R907: Re-roofing requirements (number of allowable layers; tear-off required in most cases before a third layer)
- R806: Ventilation requirements
Local amendments add to, not subtract from, these minimums. Coastal counties, high-wind zones, and fire-risk areas all carry additional provisions.
Get quotes from top-rated pros.
Hiring a Roofing Contractor
Credentials to Verify
- State contractor's license: Required in most states. Verify online through your state contractor licensing board.
- Insurance: General liability (minimum $1 million per occurrence) and workers' compensation covering all employees. Request certificates from the insurer directly.
- Manufacturer certification: GAF Master Elite, Owens Corning Platinum Preferred, and similar programs train and audit contractors to ensure proper installation. Certification unlocks extended warranties (up to 50 years) unavailable to non-certified crews.
Getting Bids
Obtain three bids. A useful comparison requires that every bid specify the same material (manufacturer, product line, color), the same underlayment type, and includes permits, cleanup, and hauling. Bids that omit line items are not comparable.
The licensed roofers in our NearbyHunt network recommend asking these three questions of every bidder: (1) Will you pull the permit? (2) What underlayment product are you specifying? (3) Is my warranty registered with the manufacturer by your crew?
Find Licensed Roofers Near You at NearbyHunt and get matched with manufacturer-certified contractors in your zip code.
Red Flags
- Demand for full payment before work starts
- Offer to waive or work around the permit
- Lack of a written contract specifying material brand, product, and color
- No physical business address or only a P.O. box
- Pressure to decide immediately after a storm
Storm chasers (out-of-area contractors who follow hail events) are disproportionately represented in roofing fraud complaints. James Carver advises always checking the contractor's business registration in your state before signing anything.
The best question I tell homeowners to ask any bidder is this: can I see the permit you pulled for your last three jobs in this county? A legitimate, licensed contractor will hand you that list without hesitation. Anyone who deflects is a red flag.
DIY vs. Professional: Honest Assessment
A subset of roofing tasks is within reach of a careful, experienced DIYer with a solid understanding of safety. Most of the job is not.
Reasonable DIY Tasks
- Replacing a few damaged shingles on a low-slope, easily accessible section
- Installing pipe boots or vent caps on a simple gable roof
- Installing ridge vent on a low-pitch roof with proper fall protection
- Applying roof coating to a flat membrane roof
Not Recommended for DIY
- Full tear-off and re-roof on anything more complex than a simple gable
- Metal roofing installation (panel cutting, clip installation, ridge trim are highly skill-dependent)
- Tile installation (weight distribution, mortar work, and fragility require professional handling)
- Any work at ridge height on a steep-slope roof without commercial fall protection
Safety note: The Bureau of Labor Statistics reports roofing as one of the highest fatal injury rate occupations in the U.S. construction sector. Any work above 6 feet on a pitched surface requires fall protection. At minimum, use roof jacks, an OSHA-compliant safety harness, and anchor points rated for fall arrest.
Costs and Timelines
Cost by Material (2026)
| Material | Installed Cost per Sq. Ft. | Expected Lifespan |
| 3-tab asphalt | $4.50 to $6.00 | 15 to 20 years |
| Architectural shingles | $4.35 to $9.80 | 25 to 30 years |
| Impact-resistant shingles | $6.50 to $9.00 | 30 to 50 years |
| Exposed-fastener metal | $7.00 to $14.00 | 40 to 60 years |
| Standing seam metal | $14.00 to $25.00 | 50 to 70 years |
| Concrete tile | $10.00 to $18.00 | 50+ years |
| Natural slate | $15.00 to $30.00 | 75 to 100+ years |
| Wood shake | $9.00 to $14.00 | 25 to 35 years |
| Synthetic composite | $7.00 to $14.00 | 30 to 50 years |
Labor accounts for 50 to 60% of total installed cost in most markets. In high-cost metropolitan areas (Chicago, Seattle, New York), labor adds 20 to 35% above the national average [2].
Timeline by Material
| Material | Typical Timeline (2,000 sq. ft. home) |
| Asphalt shingles | 1 to 3 days |
| Exposed-fastener metal | 2 to 4 days |
| Standing seam metal | 3 to 6 days |
| Concrete tile | 6 to 12 days |
| Natural slate | 7 to 14 days |
Hidden Cost Factors
- Deck replacement: $75 to $110 per sheet of OSB or plywood, plus labor. A moderately damaged deck can add $1,500 to $5,000 to a project.
- Permits and inspections: $100 to $500 depending on jurisdiction.
- Dumpster or hauling: $300 to $600 for a full tear-off.
- Steep slope premium: Most contractors add 10 to 25% for pitches above 8:12.
- Multi-story premium: 10 to 20% for second-story or higher work.
Disclaimer
The information in this guide is provided for general educational purposes. Roofing installation involves working at heights with heavy materials and power tools. Always comply with local building codes, obtain required permits, and use appropriate fall protection equipment. Costs referenced are national averages for 2026 and will vary by location, contractor, and material market conditions. For work that requires permits or involves structural repairs, consult a licensed roofing contractor in your jurisdiction.
Sources & References
Cited Sources
[1] National Roofing Contractors Association. "Common Causes of Roofing System Failures." NRCA Technical Resources. https://www.nrca.net
[2] Forbes Home. "How Much Does a New Roof Cost in 2026?" Forbes Home Roofing Cost Guide. https://www.forbes.com/home-improvement/roofing/new-roof-cost/
[3] This Old House. "How Much Does a New Roof Cost?" This Old House Cost Guides. https://www.thisoldhouse.com/roofing/new-roof-cost
[4] International Code Council. "2021 International Residential Code, Chapter 9: Roof Assemblies." ICC Digital Codes. https://codes.iccsafe.org
[5] IKO Industries. "What to Expect During Roof Replacement: Timeline and Tips." IKO Roofing Blog. https://www.iko.com/blog/what-to-expect-during-roof-replacement-timeline-and-tips
Supporting Resources
- Atlas Roofing Corporation. "2021-2024 Building Codes: Roofing Provisions." https://www.atlasroofing.com/asphalt-life/2021-2024-roofing-code-provisions
- Bob Vila. "How Much Does a New Roof Cost? (2026 Data)." https://www.bobvila.com/articles/cost-to-replace-a-roof/
- This Old House. "Building Codes for Residential Roofing: Everything You Need to Know." https://www.thisoldhouse.com/roofing/building-codes-for-residential-roofing

James is a licensed roofing contractor with 20 years of experience in roof installation, inspection, and repair across the U.S. South and Midwest. He specialises in asphalt shingles, metal roofing, and storm damage restoration. On NearbyHunt, James offers practical advice on roof maintenance, insurance claims, and selecting the right materials for long-lasting protection.

Jacob is a licensed roofing contractor with over 18 years of experience in roof inspection, installation, and restoration. Based in Texas, he has led hundreds of successful roofing projects across residential and commercial properties. Jacob is also a certified storm damage specialist, ensuring that all NearbyHunt roofing content meets industry best practices and safety standards.