- Solar panels penetrate your roof at every mounting point — proper through-flashing (woven under shingles, not surface-sealed) is the only method that protects long-term against water infiltration
- Rail-based systems remain the most field-proven approach for asphalt shingle roofs; rail-less and shared-rail systems offer installation speed advantages when used by experienced crews
- Every lag bolt must anchor into a structural rafter with a minimum 2.5 inches of embedment depth — never into sheathing alone
- Most asphalt shingle manufacturers require a certified or licensed contractor to install roof penetrations in order to preserve the shingle warranty; a solar-only company without a licensed roofer on site can void your roof warranty
- A roof should have at least 25 years of remaining service life before solar panels are installed; panels typically carry 25-year performance warranties and cannot be easily relocated as the roof ages
- James Carver has completed solar-related roofing work on more than 1,800-plus residential projects across the U.S. South and Midwest, and the majority of solar leak callbacks involve flashings applied above shingles rather than woven underneath them

Get quotes from top-rated pros.
Solar panels are a long-term investment in energy production — but they are also a long-term penetration in your roof. Every mounting point creates a hole. Every hole is a potential water entry point for the next 25 to 30 years. Whether those penetrations stay dry depends almost entirely on whether the mounting hardware was flashed correctly at installation.
This guide is part of our Roofing Installation guide and covers everything homeowners need to evaluate a solar mounting proposal: mounting system types, flashing requirements, lag bolt specifications, conduit penetration details, roof warranty implications, load calculations, cost ranges, and the right questions to ask any solar contractor who will be putting holes in your roof.
The NearbyHunt network of licensed roofers reports that 68% of solar-related roof leaks they investigate involve one of two errors: flashings installed above shingles instead of woven under them, or missing flashing boots at conduit penetrations. Both errors are entirely preventable, and both are the result of solar installation crews who do not understand roofing.
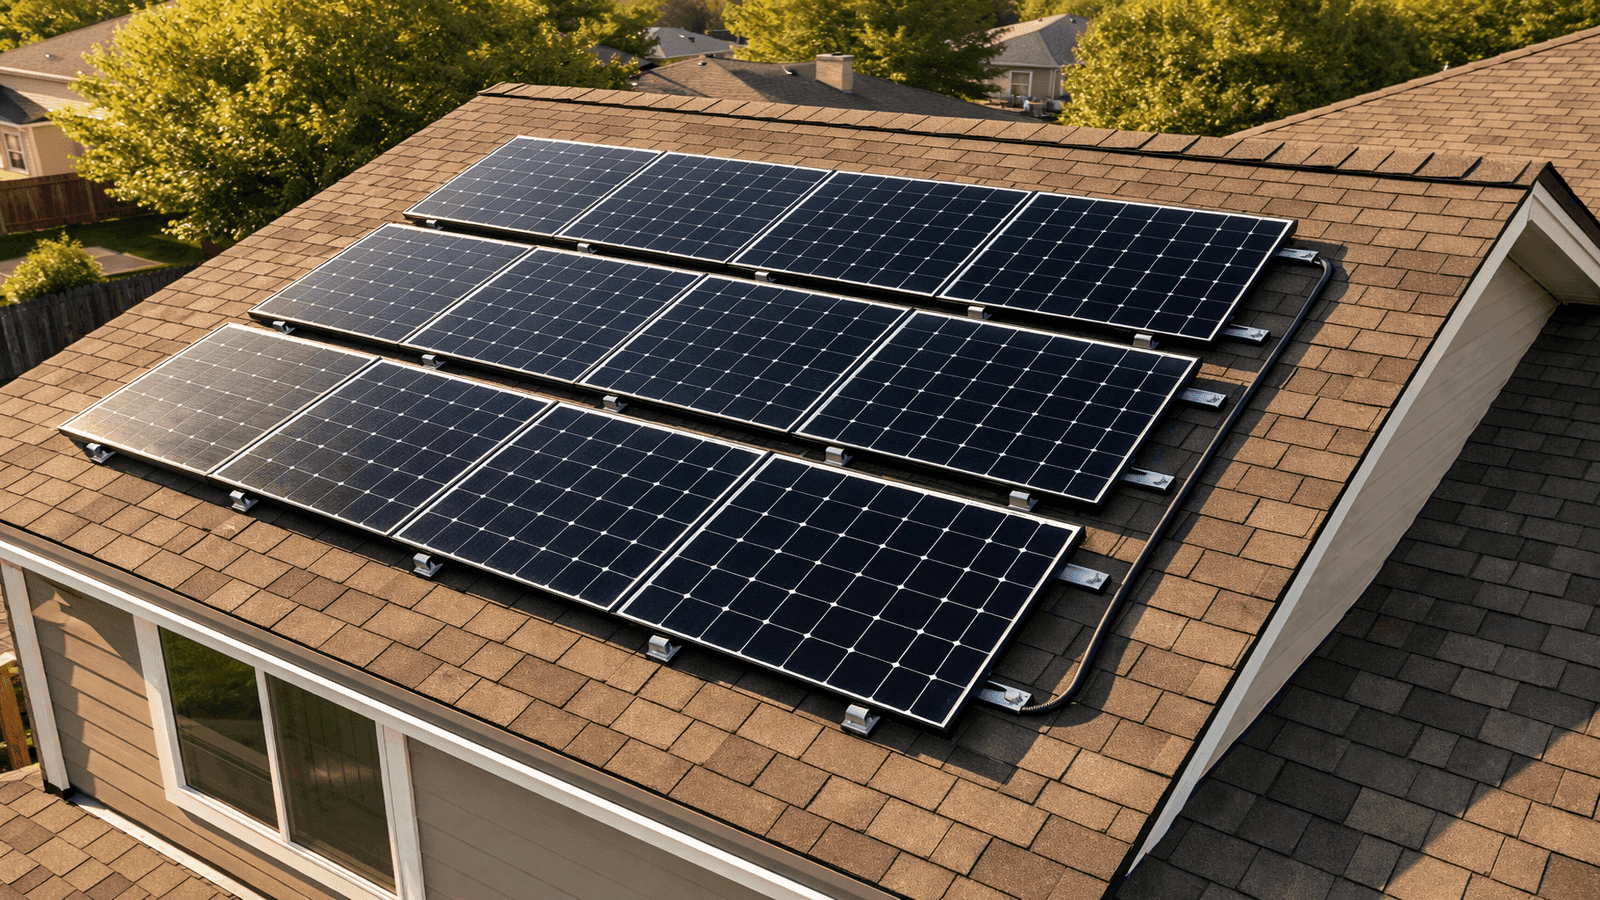
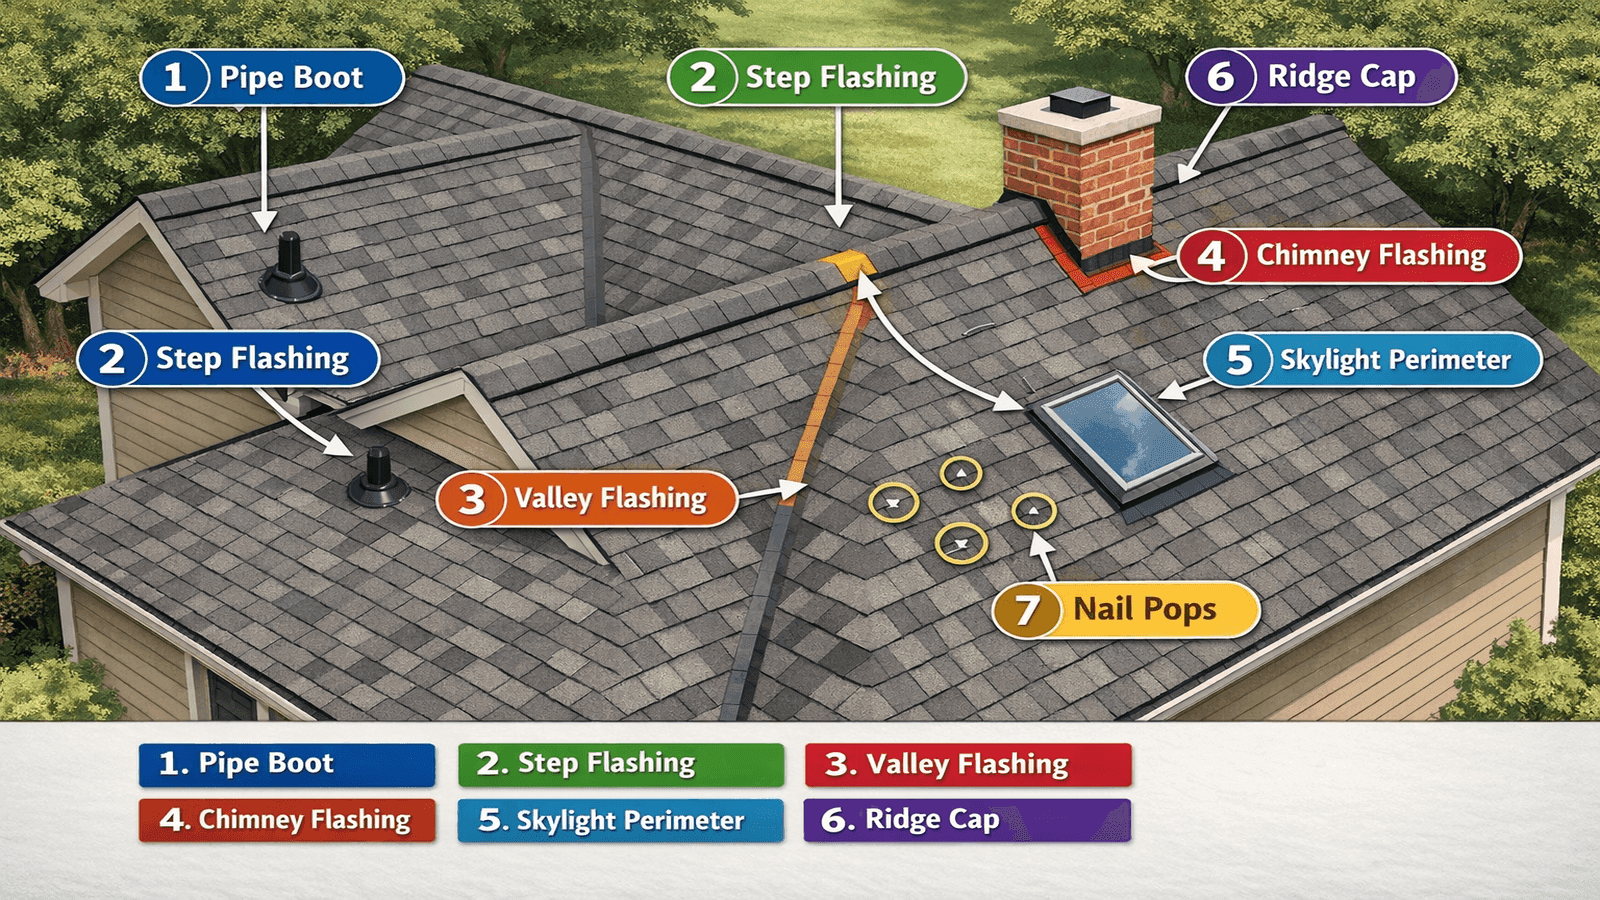
Photo: Rooftop solar array on residential asphalt shingle roof showing correctly installed aluminum rail system with panel rows and visible flashing at each mounting foot
Mounting System Types
Three mounting system architectures dominate residential solar installations in 2026. Each has distinct structural and waterproofing implications.
Rail-Based Systems
Rail-based systems are the most widely used approach for residential asphalt shingle roofs. Aluminum or steel rails run horizontally across multiple rafter bays. Mounting feet (also called standoffs or flashings) are attached to rafters at intervals and the rails bolt to those feet. Solar panels then clamp onto the rails.
Structural advantage: Load is distributed across multiple rafter attachment points and transferred into the rail, reducing stress concentration at any single penetration. A 10-panel array might use 20 or more attachment points.
Waterproofing: Each standoff foot penetrates the roof individually and must be individually flashed. The rail itself does not contact the roof.
Wire management: Rails provide a natural raceway for wiring, which can be zip-tied along the underside of the rail and kept off the roof surface and out of sunlight — a significant reliability advantage over rail-less configurations [1].
Best for: Asphalt shingle, cedar shake, and metal roofs. The most field-tested system for contractors who work on varied roof types.
Cost impact: Rail hardware and additional labor add roughly $0.15–$0.25/watt compared to rail-less systems, though this difference narrows with crew familiarity.
Rail-Less Systems
Rail-less (or rail-free) systems attach each panel directly to individual standoff hardware bolted to rafters — no continuous rail spans between attachment points. Manufacturers like EcoFasten Solar have developed rail-less hardware that allows panels to span directly between adjacent mounting points.
Speed advantage: Rail-less installations are typically 35–40% faster to install once crews are trained, with some systems requiring approximately 90 seconds per module after the mounting hardware is set [2].
Material savings: Fewer components reduce material costs by 30–35% on the mounting system itself, though this represents only a fraction of total installed system cost.
Limitation: Without the rail as a structural member, panel-to-panel load distribution is reduced. Wire management becomes more challenging because there is no rail channel to route cables through. Conduit must be managed separately.
Best for: Experienced solar crews working on structurally uniform roofs where rafter spacing is consistent.
Shared-Rail Systems
Shared-rail systems use a single rail positioned at the junction between two panel rows. The top of the lower row and the bottom of the upper row both clamp to the same rail. This reduces the total number of rails by roughly half compared to standard rail-based configurations.
Advantage: Reduced material cost and fewer roof penetrations for the rail mounting feet.
Constraint: Array layout must accommodate the shared-rail geometry, which reduces flexibility for irregular roof shapes or obstacle avoidance.
| System Type | Typical Attachment Points (10-panel) | Wire Management | Installation Speed | Best Application |
| Rail-based | 20–24 feet | Excellent | Standard | All roof types, best for mixed-skill crews |
| Rail-less | 20–24 feet | Requires separate conduit | 35–40% faster | Uniform rafter spacing, experienced crews |
| Shared-rail | 12–16 feet | Good | Moderate | Rectangular arrays, cost-sensitive projects |
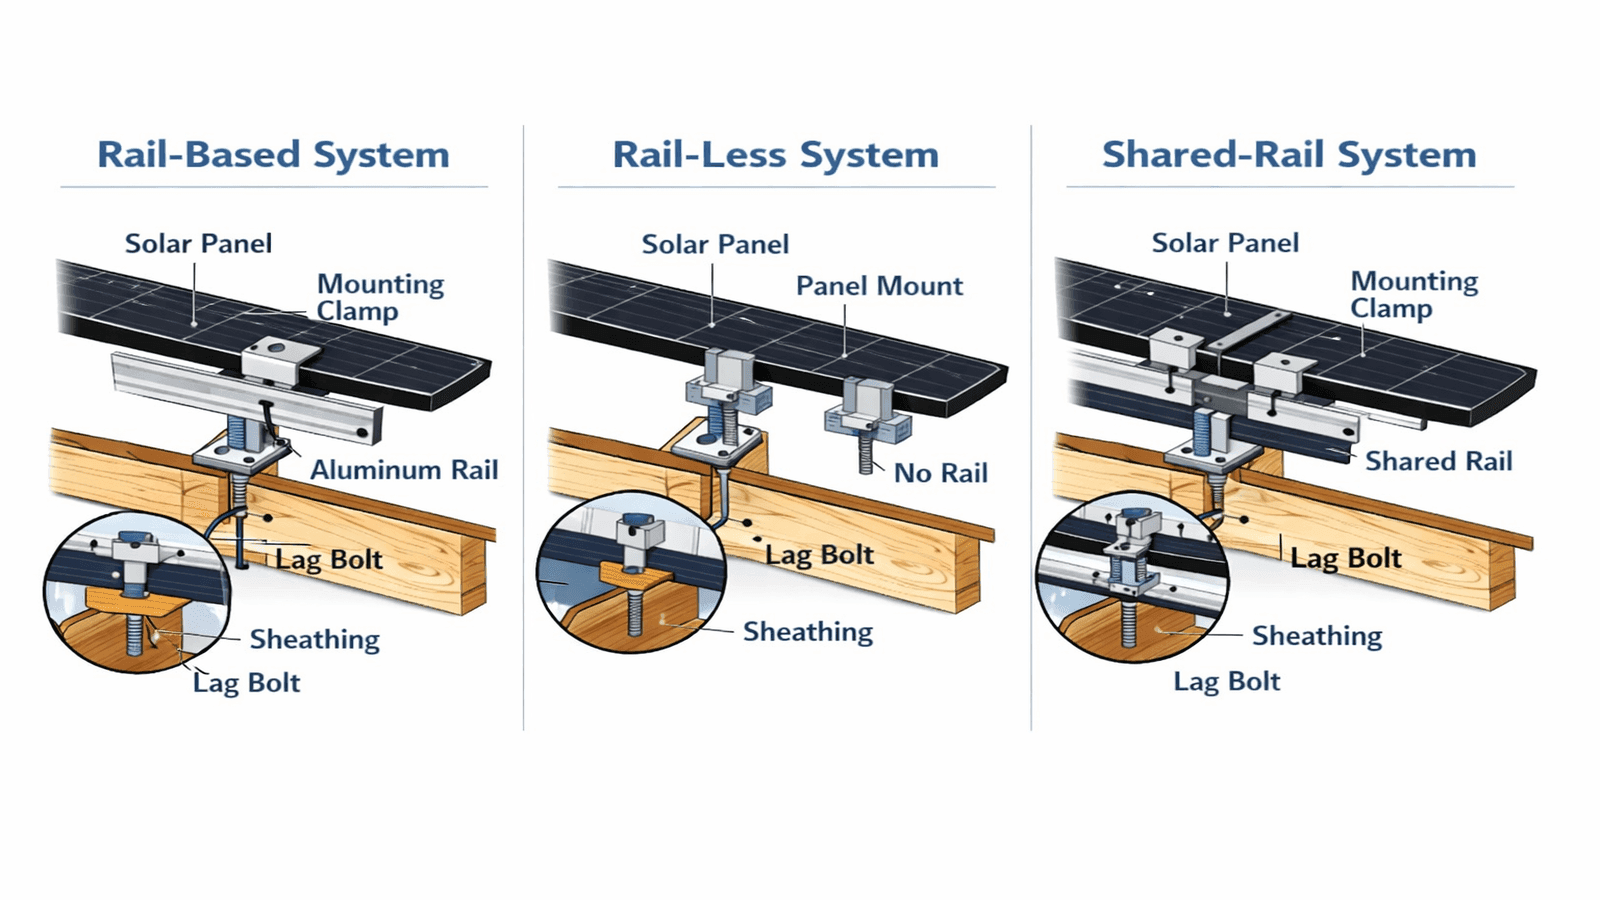
Photo: Cross-section diagram comparing rail-based, rail-less, and shared-rail solar mounting systems showing standoff feet, lag bolt path into rafter, and panel attachment details
Get quotes from top-rated pros.
Lag Bolt Penetration Requirements
Every mounting foot — regardless of system type — must anchor into the structural rafter below. This is non-negotiable. Anchoring into sheathing alone is a structural failure that will not survive wind uplift loads in most jurisdictions.
Rafter location: Before drilling, the installer must locate rafters precisely. Most residential rafters are 16 inches or 24 inches on center, but actual positioning can vary. Rafter finders, probe methods, and attic confirmation are all used to verify. An installation team that skips rafter confirmation and drills based solely on assumed spacing creates unpredictable structural connections.
Lag bolt specification: The industry standard for residential rail mounts is a 5/16-inch stainless steel lag bolt with a minimum 2.5 inches of embedment into the rafter (not counting sheathing thickness). For 3/4-inch sheathing, this typically means a 3.5-inch or 4-inch total lag length. Some jurisdictions require 3 inches of embedment for high-wind zones [3].
Stainless steel requirement: Galvanized hardware corrodes over time in contact with pressure-treated lumber and in humid attic environments. Stainless steel fasteners are specified by most mount manufacturers and required by some roofing manufacturers as a warranty condition.
Uplift load design: A properly engineered solar mount for a typical residential system must resist uplift forces of 20–50 pounds per square foot depending on wind zone, roof pitch, and array position. James Carver has identified systems installed in Gulf Coast markets with hardware that met code in the installer's origin state but did not meet Florida's enhanced wind requirements.
I've pulled permits in Louisiana, Mississippi, and Texas on the same week and seen three different embedment depth requirements for the exact same mounting hardware. What passes in one state fails inspection in the next. Before any solar company tells you their standard installation meets code, ask them to pull the local permit first — the permit process forces them to specify actual hardware to the local jurisdiction, not a generic national spec. — James Carver, Licensed Roofing Contractor
Proper Flashing vs. Surface Sealant
This is where most solar-related roof leaks originate, and it is the most important section in this guide.
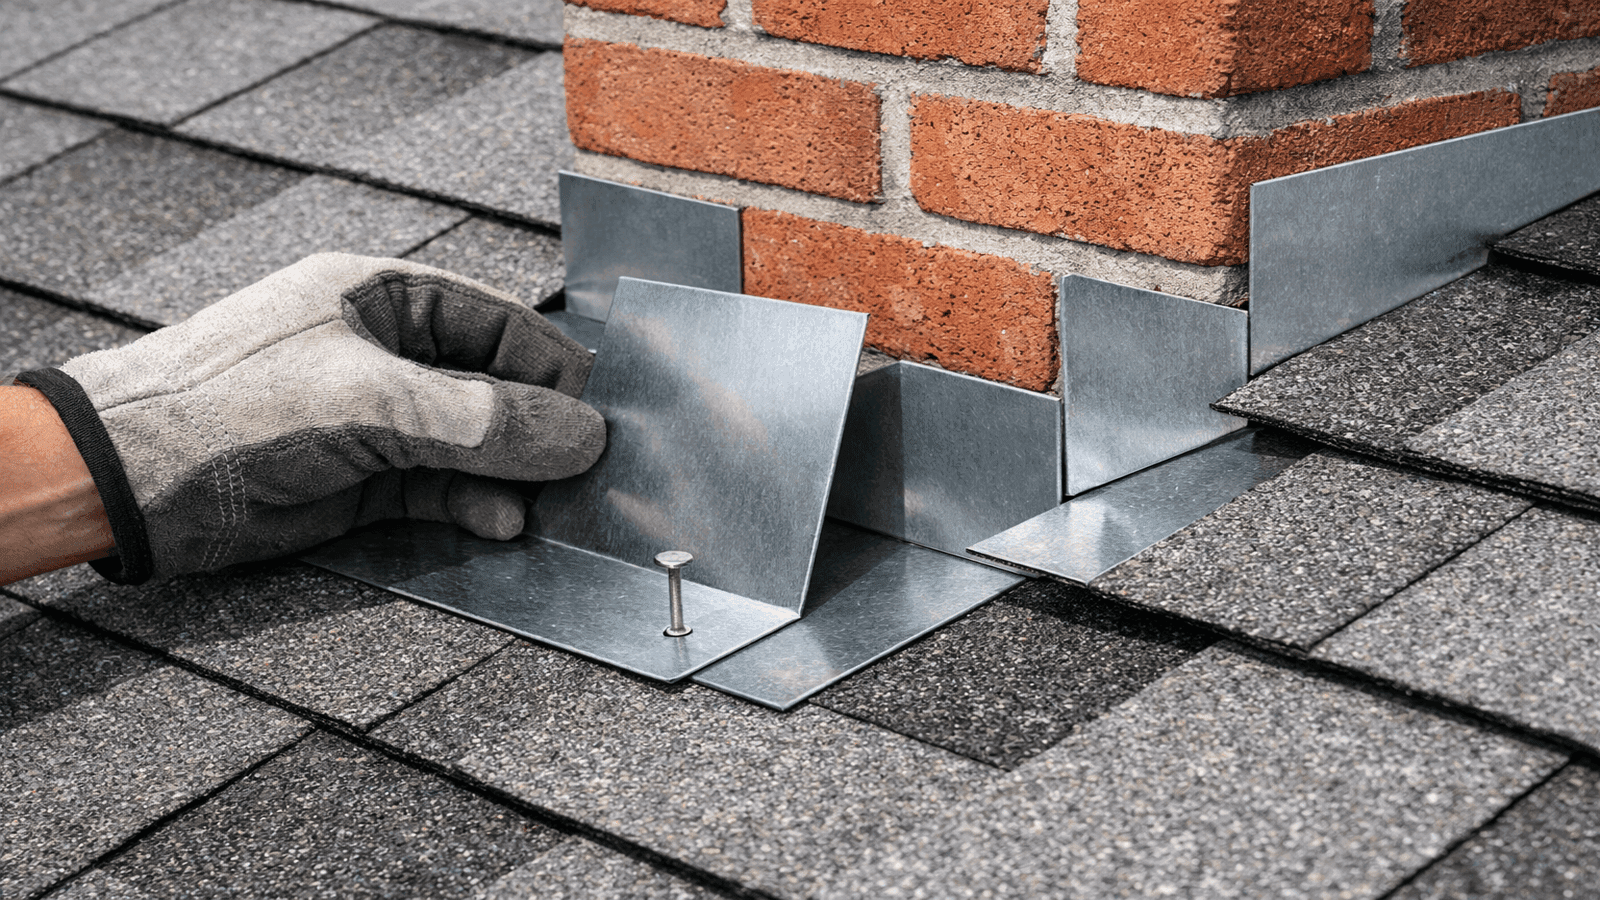
When a lag bolt penetrates an asphalt shingle roof, the penetration must be waterproofed with through-flashing — a metal flashing plate that integrates into the shingle system the same way a pipe boot or step flashing does. The flashing sits on top of the shingles below and is woven under the shingles above it, so water flowing down the roof always sheds over the flashing rather than under it.
What through-flashing looks like: The installer lifts the shingles above the penetration point and slides the flashing pan underneath them. The standoff or mounting foot bolts through the center of the flashing. The shingles above are re-laid on top of the flashing upper portion. A butyl or EPDM seal ring under the standoff base creates a secondary seal against the flashing surface.
What surface sealant looks like: The installer drives a lag bolt through the shingle surface, applies roofing caulk around the bolt head and standoff base, and calls it done. The shingles above remain undisturbed. No flashing plate is installed. All waterproofing depends on a bead of sealant between the standoff base and the shingle surface.
Why surface sealant fails: Sealants shrink, crack, and lose adhesion through thermal cycling. A residential roof in Phoenix, AZ experiences temperature swings from below freezing in winter to 160°F surface temperature in summer. Sealant that looked sound at installation will develop micro-gaps within two to five years. By contrast, correctly integrated through-flashing relies on gravity and shingle overlap — the same principles that have waterproofed roofs for a century — rather than material integrity of a sealant bead.
David H., Phoenix, AZ — Case Study:
David hired a solar company that employed its own installation crew with no licensed roofer on the team. The crew installed all 12 mounting points using surface sealant rather than through-flashing. The sealant appeared adequate at initial inspection. After two Phoenix monsoon seasons, water infiltrated at 6 of the 12 penetration points. The damage included wet insulation, two sections of rotted decking, and water-staining on the interior drywall of a bedroom ceiling — a total damage estimate of $4,200.
Correction required removing all 12 panels and the rail system, stripping the affected shingle sections, installing proper through-flashing at every mounting foot, replacing two 4x8 sections of decking, and reinstalling. The solar company disclaimed roofing responsibility and the homeowner's insurance carrier denied the claim on the basis that the damage resulted from improper installation rather than a storm event. David paid for the correction out of pocket.
The NearbyHunt network of licensed roofers reports that 68% of solar-related roof leaks they investigate involve either flashings above shingles instead of under them, or missing flashing boots at conduit penetrations.
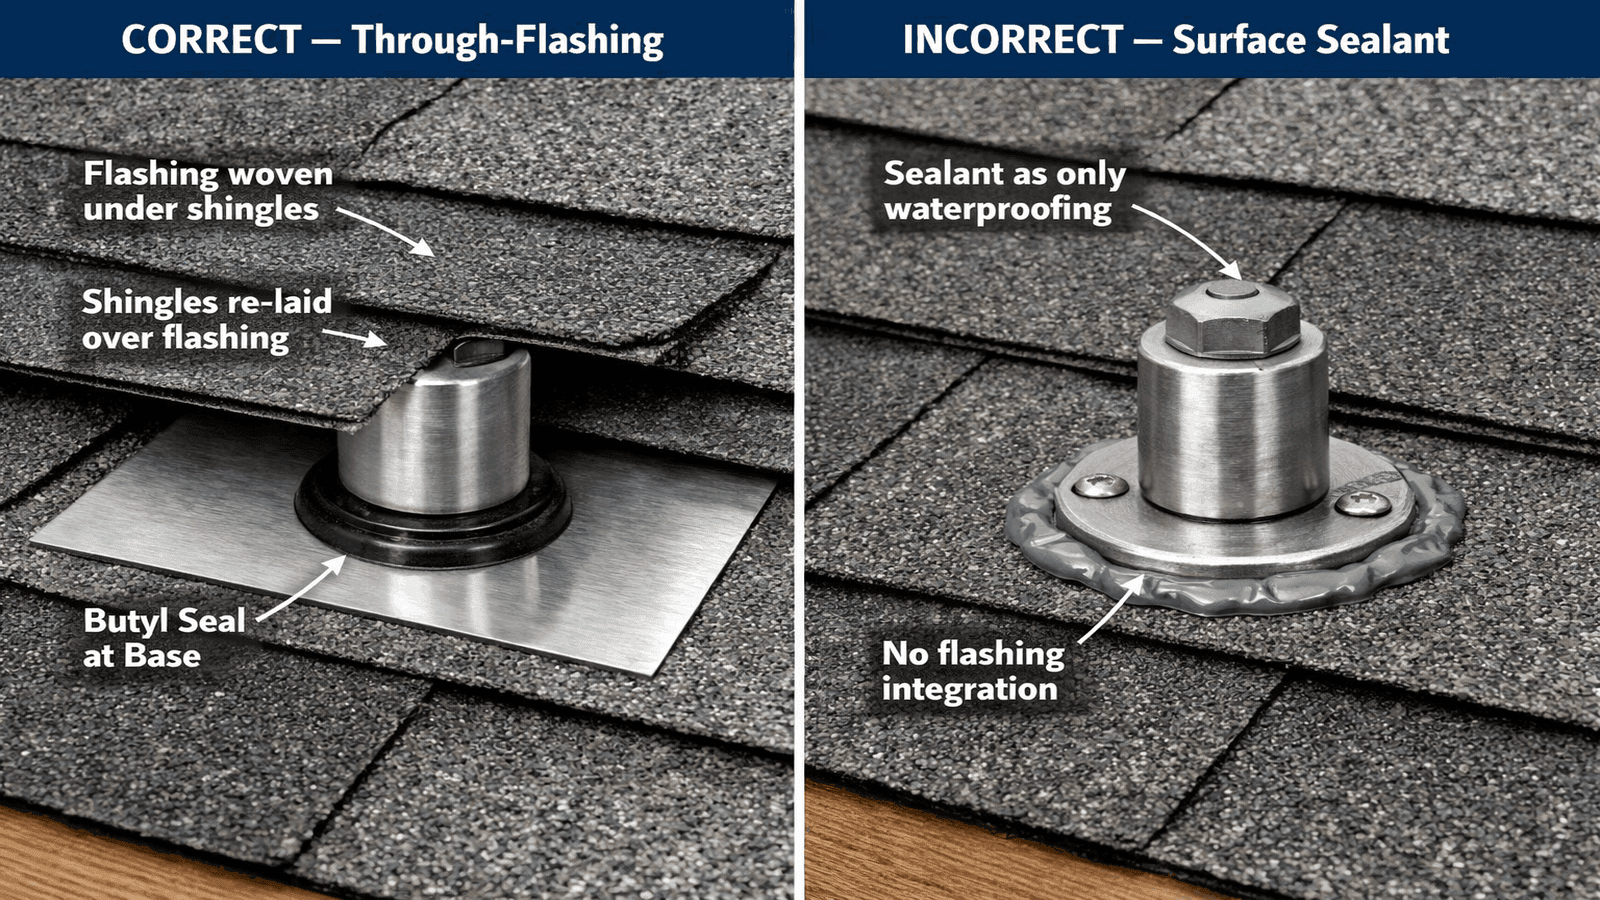
Photo: Comparison of correct solar mount through-flashing woven under shingles versus incorrect surface sealant with exposed lag bolt and caulk bead
The flashing conversation is the fastest way to tell whether a solar installer understands roofing. If they can't explain the difference between a through-flashing that integrates into the shingle layer and a surface-sealed standoff boot, they should not be drilling into your roof. I've re-flashed systems from companies with 500-plus reviews online and A+ BBB ratings. Marketing doesn't flash a roof — technique does. — James Carver, Licensed Roofing Contractor
Conduit Routing and Flashing Boots
The electrical conduit that runs from your array down the roof slope to your inverter or combiner box creates additional penetration points that require their own waterproofing.
Conduit entry point: Where conduit exits the roof surface (typically at a lower section of the roof near the eave or at a wall penetration), the penetration must be sealed with a pipe boot flashing designed for the conduit diameter. The same through-flashing principle applies: the pipe boot flashing must be woven into the shingle system, not surface-sealed.
Missing flashing boots: This is one of the two most common solar leak sources identified by NearbyHunt network contractors. Solar installation crews often drill conduit holes and seal with spray foam or caulk, neither of which provides lasting waterproofing at a roof penetration.
Flexible conduit routing: Where conduit runs along the roof surface (rather than inside), it should be routed in rigid EMT or liquid-tight flexible conduit supported above the roof surface, not laid directly on shingles. Direct shingle contact abrades both the conduit jacket and the shingle granule surface beneath it.
Conduit through the attic (preferred): Whenever possible, conduit should be routed through the attic interior rather than externally on the roof surface. Attic routing eliminates exterior roof surface conduit runs, reduces UV exposure of wiring, and removes the conduit exit penetration from the weather-exposed roof slope. Homeowners should ask their solar installer whether internal conduit routing is included in the proposal.
Roof Warranty Implications
Installing solar panels on a manufacturer-warranted roof is a critical decision that must be handled before installation begins, not after.
Manufacturer requirements: GAF, Owens Corning, CertainTeed, and most major shingle manufacturers specify that any roof penetration — including solar mount penetrations — must be made by a licensed roofing contractor or performed according to the manufacturer's flashing specifications to maintain warranty coverage. A solar installation made by a solar-only company without a licensed roofer on site can void the materials warranty on your shingles, even if no shingles are visibly damaged [1].
Pre-installation notification: Before solar installation begins, contact your shingle manufacturer's warranty department and your installing roofer (if your shingles were professionally installed) to confirm what is required to maintain coverage. Some manufacturers require a pre-installation inspection and a post-installation inspection to re-certify the warranty.
Remaining roof life requirement: Solar panels carry 25-year performance warranties. Installing a solar system on a roof with 8 to 10 years of remaining life creates a guaranteed conflict: your panels will still be under warranty when your roof needs full replacement, and panel removal for re-roofing is expensive. The standard recommendation from the NRCA and most licensed roofing contractors — including James Carver — is a minimum of 25 years of remaining service life before solar installation. If your roof is more than 15 years old, a professional roof inspection before solar installation is essential.
What happens when the roof needs replacement: Removing a solar array for re-roofing typically costs $1,500 to $3,000 for a standard residential system, added on top of the cost to replace your roof. This cost is rarely disclosed in solar sales presentations.
Get quotes from top-rated pros.
Weight Load Calculations
A rooftop solar system adds dead load to your roof structure. For most residential construction, this load is within structural tolerances — but it requires verification, not assumption.
Typical panel weight: Modern residential solar panels weigh 40 to 50 pounds each. A 10-panel system adds 400 to 500 pounds distributed across the roof area covered by the array.
Pounds per square foot: Distributed across a typical 200 to 300 square foot array footprint, the dead load addition is 1.5 to 2.5 pounds per square foot for the panels themselves. Including mounting hardware, racking, and wiring, the total system dead load typically runs 3 to 4 lbs per square foot of roof area covered.
Structural adequacy: Most residential roof structures designed to IRC standards can accommodate this load. However, homes with modified rafter spans, prior structural repairs, visible sagging, or non-standard framing should have a structural engineer review the loading before installation. This is especially important for older homes where rafter sizing may reflect lower historical code standards.
Snow load interaction: In markets where roofs carry significant snow loads, the solar array's horizontal footprint retains snow rather than allowing it to slide. This can increase localized roof loading during winter storm events. High-snow-load markets (ASCE 7 ground snow load of 40 lbs/sq ft or more) warrant structural review as a standard practice before solar installation.
Cost Breakdown
Understanding how costs are structured helps homeowners evaluate proposals and identify what is — and is not — included in a quoted price.
Installed system cost range: In 2026, residential solar installation typically runs $2.50 to $3.50 per watt for the complete system before any state-level incentives [2]. A 10 kW system falls in the $25,000 to $35,000 range.
Note on the federal ITC: The 30% Residential Solar Tax Credit (ITC) expired on December 31, 2025. Solar panels placed in service in 2026 are not eligible for the federal credit. Check your state for available incentives.
Mounting hardware specifically: The racking and mounting system typically represents 7 to 10 percent of total installed cost, or roughly $0.20 to $0.35 per watt. For a 10 kW system, that is $2,000 to $3,500 for hardware, not including labor to install it.
Roofing labor add-on: When a licensed roofer is involved in the installation — either employed by the solar company or hired separately — expect an additional $400 to $800 for a standard residential array. This fee covers proper through-flashing at each mounting point, conduit boot flashings, and roof inspection before and after mounting. This is the most valuable $600 in the entire installation budget.
| Cost Component | Typical Range (10 kW System) | Notes |
| Solar panels | $8,000–$12,000 | Varies by brand, efficiency tier |
| Mounting/racking hardware | $2,000–$3,500 | Rail, feet, fasteners, clamps |
| Inverter | $1,500–$3,000 | String vs. microinverter |
| Electrical/wiring | $2,000–$4,000 | Permits, panels, conduit |
| Labor (installation crew) | $3,000–$5,000 | Varies by market |
| Roofing labor (licensed) | $400–$800 | Often omitted in solar-only quotes |
| Permit fees | $200–$500 | Local jurisdiction |
| Total range | $25,000–$35,000 | Before state incentives |
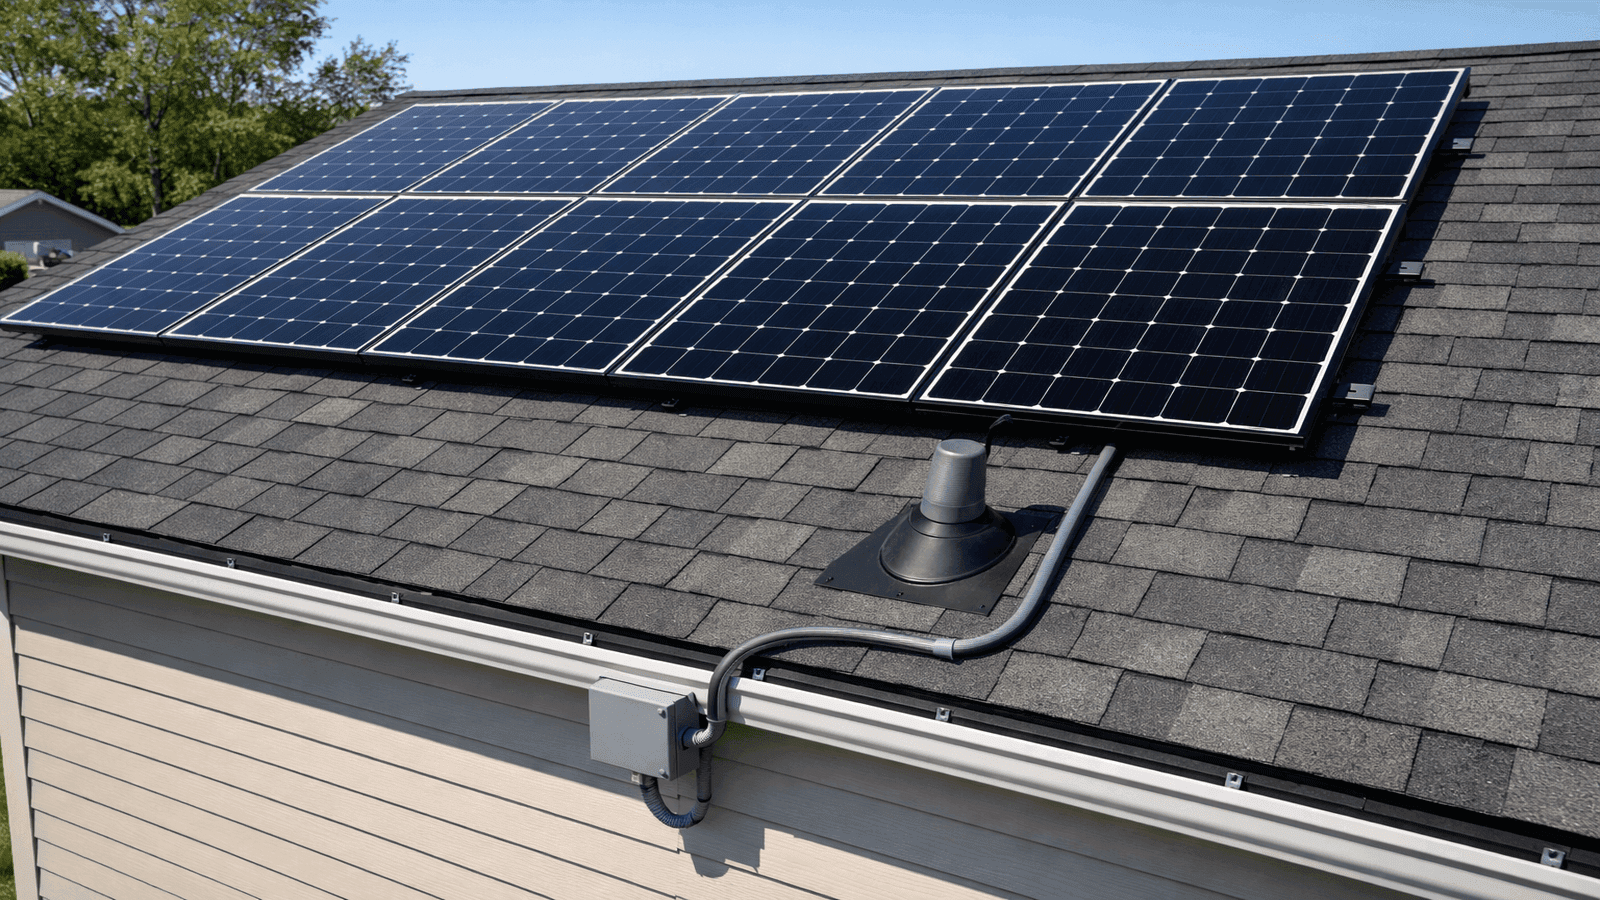
Photo: Aerial view of completed residential rooftop solar installation showing panel layout, rail system, conduit routing, and flashing detail at roof eave penetration
What to Ask Your Solar Contractor
Before signing any solar installation contract, homeowners should get clear written answers to these questions about roofing qualifications:
"Is a licensed roofing contractor performing the roof penetrations?"
If the answer is no, or if the company says their installers are "trained" but not licensed as roofers, understand that your roof warranty may be at risk and that any leak resulting from faulty flashing will be disputed between the solar company and your roofing manufacturer.
"Are you using through-flashing woven under the shingles, or surface sealant?"
Any qualified installer should know what this question means. If the answer involves "lag seals," "flashing feet with sealant applied," or "waterproofing boots," ask to see the specific flashing product and confirm whether it integrates into the shingle layer or sits on top of it.
"How will the conduit exit the roof, and will a boot flashing be used?"
Ask specifically about conduit routing — interior versus exterior — and what flashing product will be used at any conduit roof penetration.
"What is the manufacturer's warranty impact, and will you provide that in writing?"
A reputable solar installer who involves licensed roofers should be able to confirm that their installation method meets your shingle manufacturer's requirements and will provide this confirmation in writing.
"What does panel removal for re-roofing cost, and who performs it?"
Get the number in writing. Solar companies that quote low removal costs often sub this work to crews who may not coordinate with the roofing contractor, leading to damage at the removal interface.
In my experience across 1,800-plus residential projects across the U.S. South and Midwest, the single most important thing a homeowner can do before solar installation is call their shingle manufacturer's warranty line and ask what is required to maintain coverage. In roughly one-third of cases, the solar proposal already on the table would void the warranty as written. That call costs nothing and can save thousands, James Carver, Licensed Roofing Contractor
Finding Qualified Solar Roofing Contractors
A rooftop solar installation sits at the intersection of electrical, structural, and roofing trades. The electrical and structural elements are almost always handled competently — solar companies are required to pull electrical permits and those inspections are rigorous. The roofing element is the gap.
Look for installers who either employ licensed roofing contractors on their installation crew or who coordinate explicitly with a licensed roofing contractor for the mounting and flashing work. Ask to see the roofing contractor's license number. Verify it with your state licensing board.
If your solar proposal does not include a licensed roofer, you have two options: require one as a contract condition, or hire your own licensed roofer to inspect and re-flash the penetrations immediately after installation.
Disclaimer
The installation specifications, costs, and load figures cited in this article represent typical ranges for residential projects in the continental United States as of 2026. Local building codes, wind zones, seismic zones, roof structure variations, and shingle manufacturer requirements vary significantly. All solar panel installations should be permitted through the local authority having jurisdiction. Consult a licensed roofing contractor and a licensed electrical contractor before proceeding with any rooftop solar installation. Nothing in this article constitutes engineering advice or a warranty of any installation outcome.
Sources & References
[1] Atlas Roofing. (2024). "Warranties Needed for Rooftop Solar Panels
[2] EnergySage. (2026). "Solar Panel Cost
[3] National Roofing Contractors Association (NRCA). (2023)
[4] EcoFasten Solar. (2025). "Rail-Less Solar Mounting System Technical Specifications
[5] S-5! Metal Roof Innovations. (2025). "Rail vs. Rail-Less Solar Mounting
[6] U.S. Department of Energy / NREL. (2024). "Structural Considerations for Solar Installers

James is a licensed roofing contractor with 20 years of experience in roof installation, inspection, and repair across the U.S. South and Midwest. He specialises in asphalt shingles, metal roofing, and storm damage restoration. On NearbyHunt, James offers practical advice on roof maintenance, insurance claims, and selecting the right materials for long-lasting protection.

Jacob is a licensed roofing contractor with over 18 years of experience in roof inspection, installation, and restoration. Based in Texas, he has led hundreds of successful roofing projects across residential and commercial properties. Jacob is also a certified storm damage specialist, ensuring that all NearbyHunt roofing content meets industry best practices and safety standards.