- Replacing 1-10 damaged shingles costs $50-$150 in materials DIY vs. $150-$400 hiring a roofer — a straightforward skill with the right technique
- Architectural shingles require a different removal method than 3-tab — forcing the same technique tears the thicker laminated layers and damages surrounding shingles
- Never replace shingles when temperatures are below 40°F: cold shingles crack during bending and won't self-seal properly for weeks
- DIY is appropriate for pitches of 6:12 or less on accessible sections with no valleys, skylights, or chimneys involved
- James Carver has replaced shingles on over 1,800 residential roofs — the most common mistake is using nails that are too short (1.5" minimum required to reach the decking through existing underlayment)
A wind storm took three shingles off your garage roof. A falling branch cracked five more on the back slope. These are legitimate DIY repairs — not every shingle problem requires a contractor. But the technique matters: wrong nail placement, wrong shingle type, or wrong temperature turns a $60 fix into a bigger leak than you started with.
This guide covers the complete process for replacing both 3-tab and architectural shingles, including how to match your existing shingles, the exact nail placement pattern, and the common mistakes that cause DIY repairs to fail within one season. It's part of our complete DIY Roofing Guides: How-To Tutorials & Safety Tips for homeowners.
The licensed roofers in our NearbyHunt network report that 60% of DIY shingle replacements they're called to fix failed because of two issues: wrong nail position (too high or too low in the nailing zone) and shingles installed in cold weather that never sealed. Both are fully preventable [1].

Get quotes from top-rated pros.

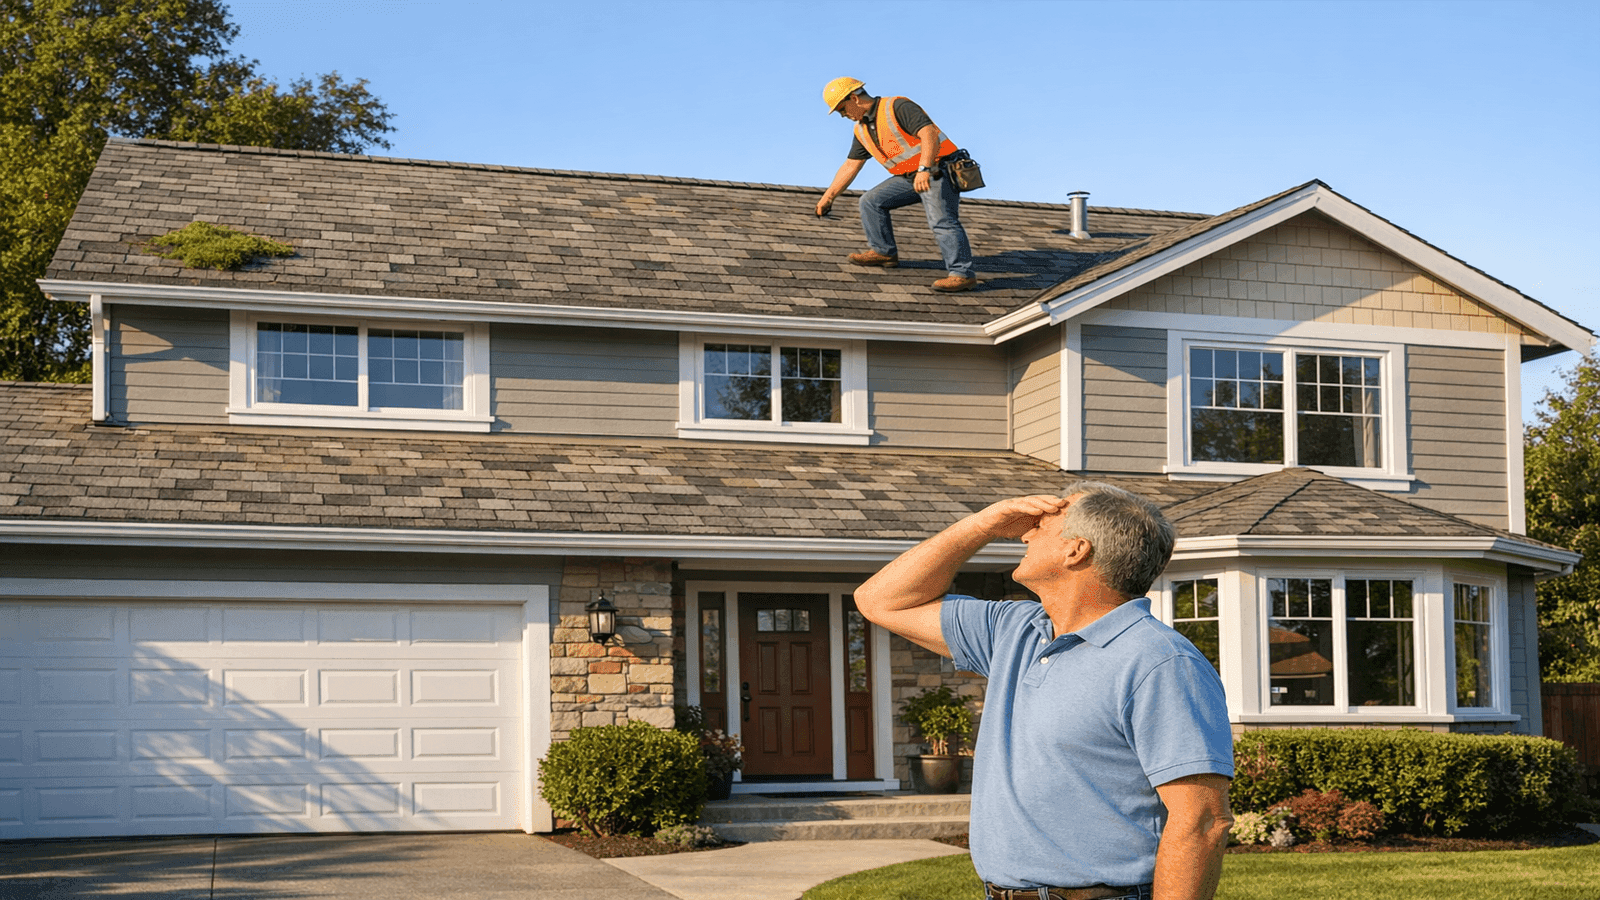
Photo: Homeowner carefully lifting a damaged asphalt shingle to replace it on a low-slope residential roof with safety equipment visible
Can You Replace Shingles Yourself?
Shingle replacement is one of the most accessible roofing DIY tasks — but not every shingle situation qualifies. Here's how to assess your job honestly before climbing up.
DIY-appropriate situations:
- Isolated damage of 10 or fewer shingles in a single area
- Accessible slope of 6:12 pitch or less (gentler than 6 inches of rise per 12 inches of run)
- Below the ridge line, away from valleys, skylights, chimneys, and wall intersections
- Shingle type is 3-tab or standard architectural — not specialty products like designer slate-look or impact-resistant types
Situations that require a professional:
- Ridge cap replacement (working at the peak of the roof)
- Any repair involving valley flashing or step flashing
- Damage near skylights or chimney (flashing work is involved)
- More than 10 shingles in an area (may indicate systemic damage — a pro should assess)
- Pitch above 6:12 (serious fall risk without walk boards and proper harness anchors)
| Scenario | DIY Appropriate? | Reason |
| 3-5 blow-off shingles, low slope | Yes | Simple, low risk |
| Cracked shingles on steep slope | No | Fall risk above 6:12 |
| Shingles near chimney | No | Flashing likely involved |
| Shingles near skylight | No | Curb flashing, not just shingles |
| Ridge cap blow-off | No | Requires peak of roof work |
| 15+ shingles blown off | No | Potential systemic damage |
Materials and Tools Checklist
Getting the right materials before you climb is critical. Matching the wrong shingle or using undersized nails is the difference between a repair that lasts 15 years and one that fails in the first storm.
Materials:
- Matching shingles — bring a removed damaged shingle to the store for exact matching; check the attic for the manufacturer label stapled to the underlayment or a leftover bundle from original installation
- Roofing nails — 1.5" galvanized ring-shank (minimum); never use smooth shank nails for shingle work
- Roofing cement — asphalt-based, not caulk; use Henry 208 or similar for bedding sealant strips in cool weather
- Butyl tape — for sealing around any lifted flashing during the process
Tools:
- Flat pry bar (for lifting tab sealants and removing nails)
- Hammer or roofing nail gun
- Utility knife (for trimming shingle tabs if needed)
- Chalk line (for alignment on larger patches)
- Caulk gun (for roofing cement application)
- Roofing nail removal tool or cat's paw
Safety:
- Roof harness with ridge anchor (mandatory for any slope above 4:12) [4]
- Non-slip roofing boots
- Safety glasses
| Item | Purpose | Approximate Cost |
| Matching shingles (1 bundle) | Replacement material | $35-$80 |
| Roofing nails (1 lb box) | Fastening | $6-$12 |
| Roofing cement (small tube) | Sealant bedding | $8-$15 |
| Flat pry bar | Nail and shingle removal | $15-$25 |
| Roof harness | Fall protection | $60-$120 (or rent) |
Step-by-Step: Replacing 3-Tab Shingles
3-tab shingles are the flat, uniform shingles with three rectangular tabs per strip. They're installed in uniform rows and each shingle is nailed once through its center nailing zone.
Step 1: Warm the sealant strip.
If it's a cool day (below 70°F), let the sun warm the roof for an hour before starting. The sealant strip that bonds shingles to each other releases more easily when warm. Never force cold shingles — they snap.
Step 2: Break the sealant seal.
Use your flat pry bar to gently work under the tabs of the shingle directly above the damaged one. Slide it along the sealant strip to break the bond. You're lifting the course above, not removing it.
Step 3: Remove the nails from the damaged shingle.
A 3-tab shingle is held by 4 nails, positioned 5/8" from each end and 1" above the cutout slots. The course above it also has nails running through your damaged shingle — lift it enough to access and remove those 4 nails too. You're typically removing 8 nails total.
Step 4: Slide out the damaged shingle.
With nails removed, slide the damaged shingle straight out toward you. Inspect the decking beneath — any soft spots, black mold, or rotted wood means you have a bigger issue that needs attention before re-shingling.
Step 5: Slide the new shingle into position.
Align the new shingle with the vertical joints of the surrounding courses — joints should never align between courses. The bottom edge of the new shingle should be flush with the tabs of the course below it.
Step 6: Nail the new shingle.
4 nails, placed 5/8" from each end and exactly 1" above the bottom of the cutouts. This is the nailing zone — not higher, not lower. Drive nails flush, not overdriven.
Step 7: Re-bed the sealant strips.
Apply a small dab of roofing cement under the tabs of the course above to re-seal them. In temperatures below 60°F, also apply cement under the sealant strip of your new shingle — it won't self-seal in cold weather.
The 4-nail placement seems simple, but I see homeowners drive nails too high constantly — above the nailing zone puts them into the headlap of the course below, which offers almost no holding power. In any wind zone above 90 mph, I use 6 nails per shingle — two extra in the center. It takes 30 seconds and doubles the wind resistance.
Get quotes from top-rated pros.
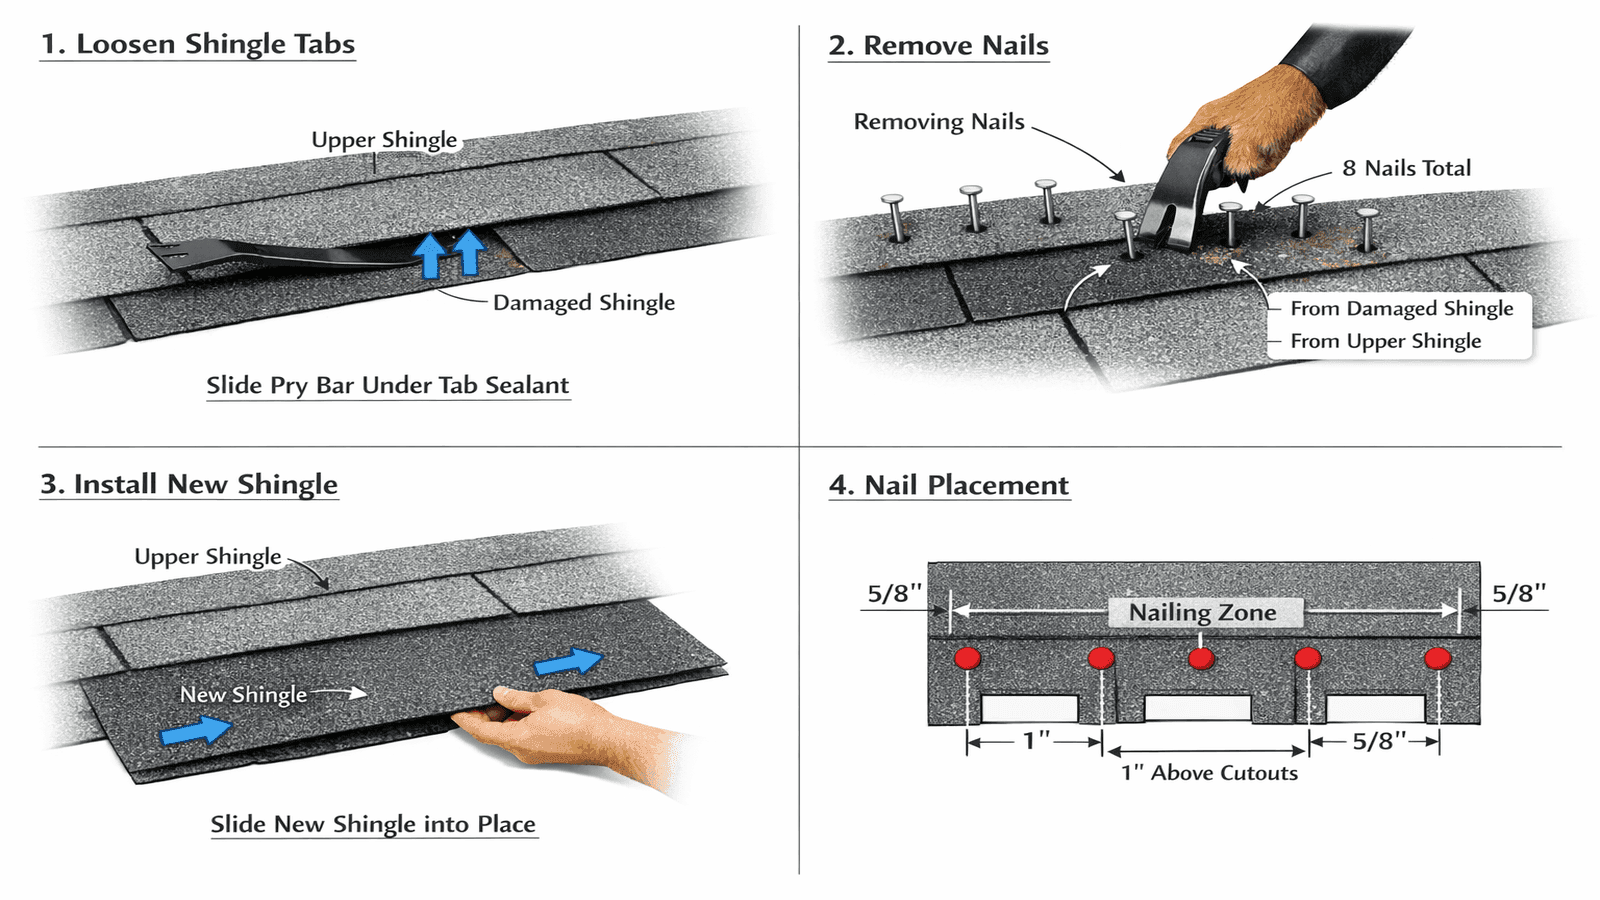
Photo: Step-by-step diagram showing 3-tab shingle removal: pry bar lifting course above, nail removal with cat's paw, sliding new shingle into position, and correct 4-nail placement pattern with measurements
Step-by-Step: Replacing Architectural (Dimensional) Shingles
Architectural shingles are thicker and heavier than 3-tab, with a laminated layer that creates the shadow lines giving them their dimensional appearance. The technique is similar but requires more care because the lamination tears if you rush the removal.
Key differences from 3-tab:
More nails. Architectural shingles use 6 nails per strip in most applications — 4 in the standard nailing zone plus 2 toward the center for wind resistance. Some manufacturers (Owens Corning Duration, GAF Timberline HDZ) specify exact nail placement on the shingle itself — look for the printed nailing line [2][3].
Thicker tab sealant. The sealant strips on architectural shingles are heavier than 3-tab and require more force to break free in cool weather. Use the pry bar slowly and work across the whole strip before pulling.
Starter strip may be involved. If you're replacing shingles near the eave, check whether the starter strip underneath is intact. It's a separate component — a shingle with the tabs removed — and it sometimes needs replacement when eave shingles are replaced.
Course alignment is critical. Because architectural shingles have random tab patterns, there's no "joint" alignment to follow. Instead, align by the exposure depth — the visible portion of each shingle should match surrounding courses exactly. Use a chalk line at the exposure measurement to guide placement.
The mistake I see constantly is someone treating architectural shingles like 3-tab and trying to lift them fast. That tears the laminate layer and damages adjacent shingles you don't need to replace. Slow and deliberate — work the pry bar an inch at a time across the sealant strip, and the whole thing comes free cleanly.
Matching Old Shingles to New
Matching replacement shingles is often harder than the repair itself. Shingles fade 15-20% over their first five years of sun exposure, so new shingles will always look brighter than your existing roof [6][7].
Finding your product: Check the attic — the manufacturer's product name is usually on the label of the original packaging, often stapled to the underlayment in a corner of the attic. If not, remove one damaged shingle and bring it to a roofing supply house (not just a big-box store) for expert matching.
Color variance: New shingles typically look noticeably brighter for 6-12 months as they weather and blend. On a rear slope or hidden section, this matters less than on a front-facing pitch.
Discontinued colors: If your color was discontinued, match as close as possible OR replace the entire visible plane for a uniform appearance. Replacing just 3 shingles with a slightly wrong color on a front-facing slope is more visible than the damage was.
The licensed roofers in our NearbyHunt network report that 60% of DIY shingle replacements use the wrong color because homeowners guess based on appearance rather than matching the manufacturer label [6].
| Shingle Age | Match Difficulty | Best Option |
| Under 5 years | Moderate — still good match | Same manufacturer and SKU |
| 5-10 years | Difficult — some fading occurred | Closest available + accept variance |
| 10-15 years | Very difficult | Replace entire plane if front-facing |
| 15+ years | Usually impossible | Full replacement is often better value |
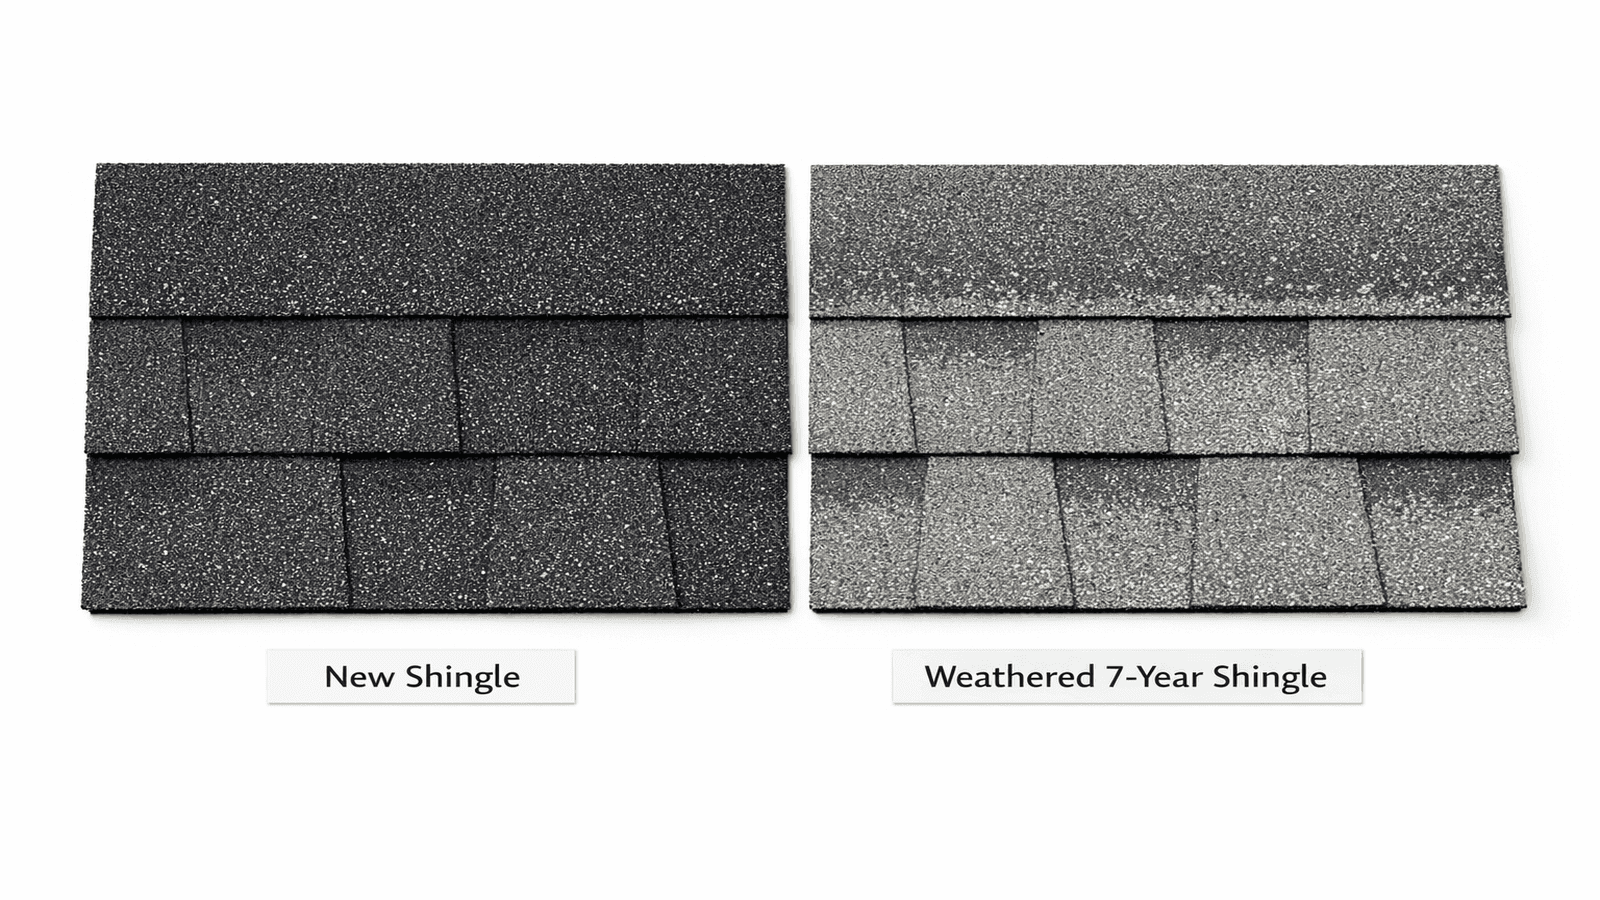
Photo: Close-up comparison showing new architectural shingle next to a 7-year-old weathered matching shingle demonstrating normal color variance over time
Sealing, Nailing, and Common Mistakes
The repair technique is simple; the mistakes are specific and predictable.
Nail too high (above the nailing zone): The nailing zone is printed on every shingle. Above it, nails penetrate the headlap of the course below — they're holding that course, not yours. Your shingle will blow off in the first significant wind. This is the most common DIY failure point [1][5].
Nail too low (through the tab): A nail below the nailing zone splits the tab of your new shingle. The tab becomes a flap that lifts in wind and channels water directly to the nail head.
Overdriving nails: A nail gun set too hot punches through the shingle. That hole is now a water entry point. Drive nails flush — the shingle surface should be dimple-free with no tearing around the nail head.
Using the wrong sealant: Never use silicone caulk on shingles — it doesn't bond to asphalt properly. Use only asphalt-based roofing cement (Henry 208 or equivalent).
Leaving exposed nail heads: Every nail head that you can see should have a small dab of roofing cement covering it. Exposed nail heads on field shingles are chronic micro-leak points.
Here's the quick test I use at the end of every shingle repair: grip the lower corner of each new shingle and pull gently upward. It should resist with the sealant bond. If it lifts easily, the sealant hasn't activated yet — that's fine in warm weather, it needs 24-48 hours of sun. In cool weather, that corner needs a dab of roofing cement. A shingle that lifts freely in the first wind event after installation is going to blow off.
Get quotes from top-rated pros.
After the Repair: Inspection Checklist
Don't call it done until you've completed these checks.
From the ground (binoculars): Look at your repair from the street or yard. The new shingles should sit flat with no lifted corners, the bottom edge should align with surrounding courses, and there should be no visible gap at any seam. Misalignment that's visible from the ground will collect debris and channel water.
From the attic (after the next rain): Go back to the attic after the first rain following your repair. Check for any daylight visible at the repair zone and verify the deck wood above the repair is dry. Damp deck wood means water is still entering — something was missed.
30-day check: Return to the attic 30 days after installation. The sealant strip should be fully bonded by now. Verify that the deck wood is uniformly dry and there's no new staining at the repair zone.
Real-World Case Study
Marcus T. of Houston, Texas had eight shingles cracked by hail on the back slope of his garage roof. He'd watched some videos, but wasn't confident about the nail placement for architectural shingles. He reached out with photos, and James walked him through the process.
Marcus completed the repair in about 2.5 hours including setup time. He matched the shingle correctly using the label in his attic, used 6 nails per shingle in the manufacturer's printed nailing zone, and applied roofing cement under lifted tabs after a cloudy day installation.
He saved $280 in contractor fees. One mistake: he drove two nails slightly too deep on the first shingle, creating slight surface dimpling. James showed him how to cover those nail heads with roofing cement to seal them. After one rainy season, the repair is holding perfectly.
The takeaway: correct nail placement matters more than anything else. Measure your nailing zone before you drive a single nail.
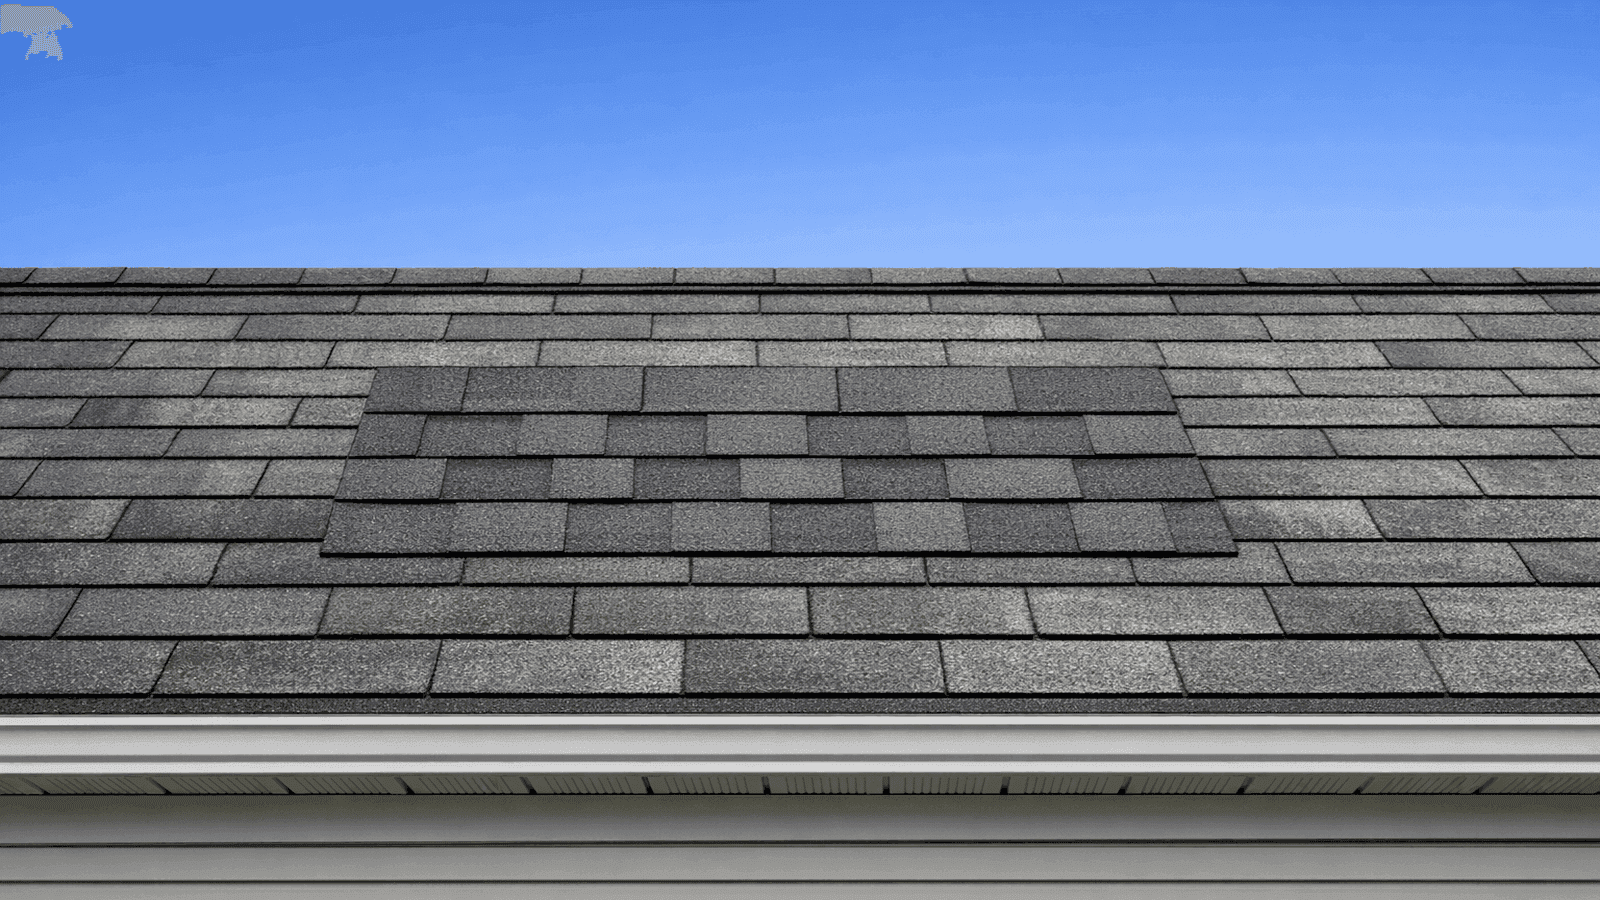
Photo: Ground-level view of completed shingle repair on a low-slope residential roof showing proper alignment and consistent tab pattern matching adjacent shingles
When to Call a Professional
Certain shingle situations look simple but require skills and tools beyond a typical DIY repair.
More than 10 shingles in any cluster: Widespread damage usually means something systemic — hail impact, severe wind, or deck deterioration. A contractor's assessment before repair protects you from fixing surface damage while deck rot or underlayment failure goes unaddressed.
Soft decking under the shingles: If your pry bar sinks slightly into the wood or you hear a hollow sound tapping the deck, there's rot. You can't just shingle over it. The deck section needs replacement first.
Any damage involving flashing: Replacing shingles at a valley, chimney, skylight, or dormer wall involves flashing — metal work that requires different skills and materials than shingle replacement.
| Situation | DIY OK? | Why | Professional Cost Range |
| 1-8 shingles, low slope, no features | Yes | Straightforward technique | $150-$400 if hired |
| 10+ shingles in any area | No | Need systemic assessment | $400-$1,500 |
| Soft decking discovered | No | Deck repair required first | $600-$3,000 |
| Near chimney or skylight | No | Flashing work involved | $300-$1,200 |
| Above 6:12 pitch | No | Safety equipment required | $300-$1,000 |
For complex shingle repairs or storm damage assessment, find licensed roofers near you through NearbyHunt.
Conclusion
Replacing a handful of shingles is a legitimate DIY project when you follow the correct technique. The key is matching your existing product, working in temperatures above 40°F, placing nails precisely in the printed nailing zone, and bedding the sealant strips in cool weather. Done right, a DIY shingle replacement lasts as long as a professionally installed one.
Know your limits: if the damage involves flashing, spans more than 10 shingles, or sits on a steep pitch, hire a professional. The $300 you spend on a contractor is far less than the $3,000 deck replacement that can result from a repair done wrong.
Disclaimer: Material cost estimates are national averages for 2026 and vary by region, shingle brand, and local supply pricing. DIY roofing carries fall risk — always use a properly anchored roof harness for any slope above 4:12. Obtain multiple quotes from licensed roofing contractors for any repair beyond minor shingle replacement.
Sources & References
- [1] National Roofing Contractors Association. (2025). "Asphalt Shingle Roofing Installation Guide." https://www.nrca.net
- [2] Owens Corning. (2025). "Duration Shingle Installation Instructions." https://www.owenscorning.com
- [3] GAF. (2025). "Timberline HDZ Installation Guide." https://www.gaf.com
- [4] OSHA. (2024). "Residential Construction — Fall Protection." https://www.osha.gov
- [5] Forbes Home. (2026). "Roof Shingle Replacement Cost Guide." https://www.forbes.com/home-improvement/roofing
- [6] Bob Vila. (2025). "How to Replace Roof Shingles." https://www.bobvila.com
- [7] This Old House. (2025). "DIY Shingle Repair Guide." https://www.thisoldhouse.com

James is a licensed roofing contractor with 20 years of experience in roof installation, inspection, and repair across the U.S. South and Midwest. He specialises in asphalt shingles, metal roofing, and storm damage restoration. On NearbyHunt, James offers practical advice on roof maintenance, insurance claims, and selecting the right materials for long-lasting protection.

Jacob is a licensed roofing contractor with over 18 years of experience in roof inspection, installation, and restoration. Based in Texas, he has led hundreds of successful roofing projects across residential and commercial properties. Jacob is also a certified storm damage specialist, ensuring that all NearbyHunt roofing content meets industry best practices and safety standards.