- A properly installed roof tarp provides 90 days of weather protection before UV degradation sets in, giving you enough time to schedule permanent repairs without rushing.
- Tarps must extend at least 4 feet beyond all damaged areas on every side and must wrap over the ridge to create a complete water shed.
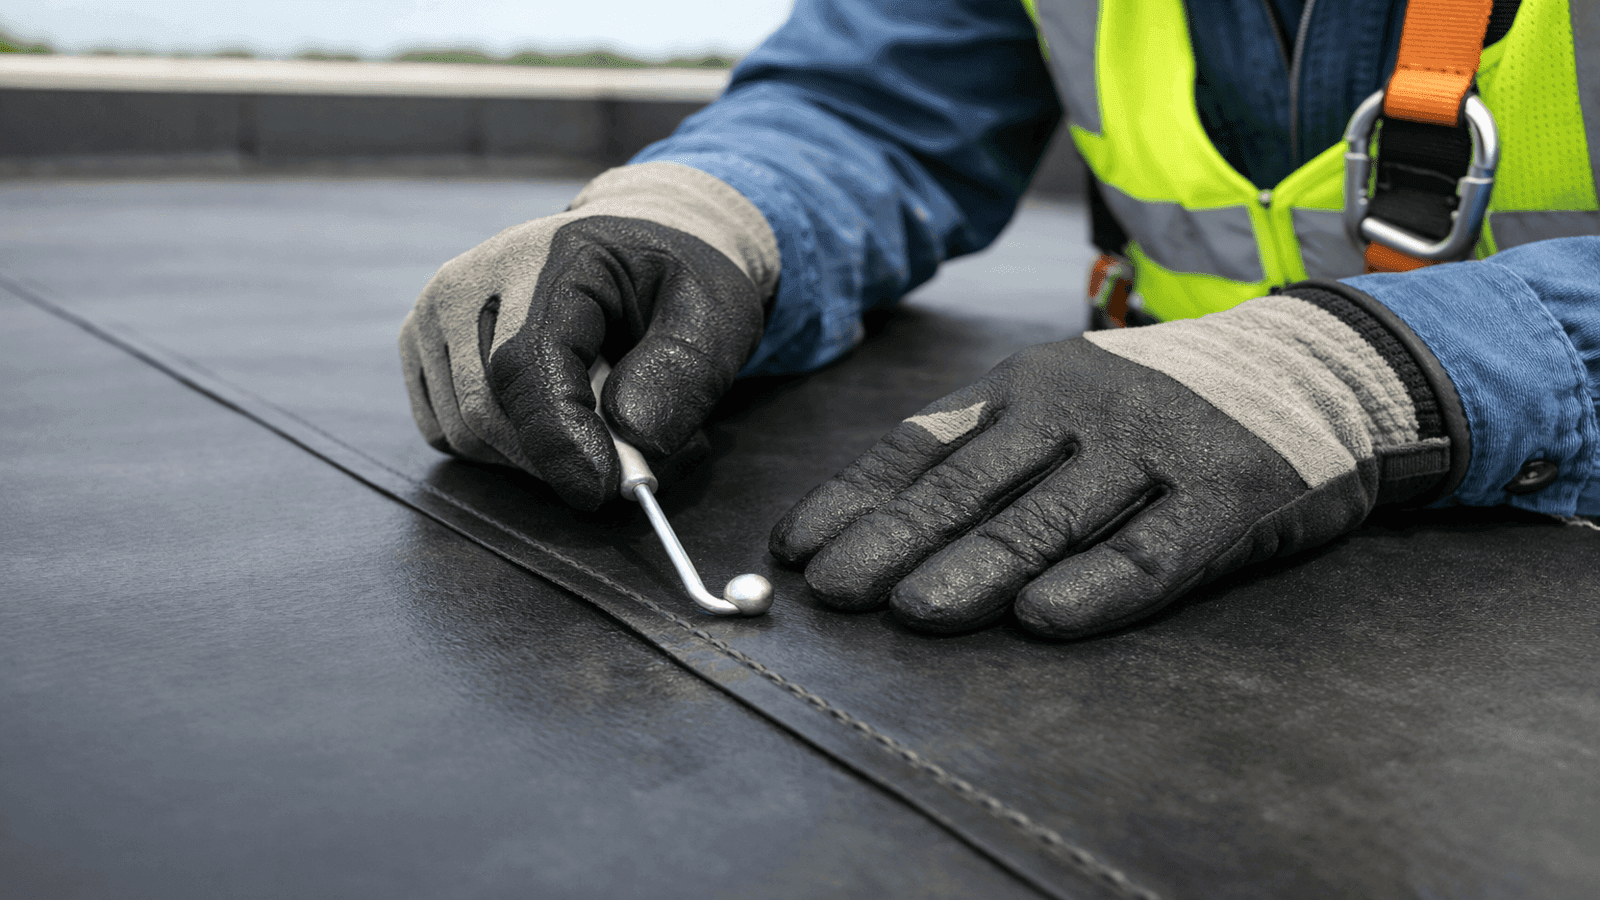
- Never anchor with ropes through grommets alone -- use 2x4 boards to secure edges; ropes cut through tarp material in high wind and grommets tear out.
- DIY tarping costs $50-$150 in materials versus professional emergency tarping services that charge $300-$1,500 depending on roof size and access.
- Secondary water damage from delays costs 5 to 10 times more than the original roof repair; acting within 24 hours prevents the most expensive outcomes.
- Never tarp at night, during rain, or on steep pitches above 6:12 -- these conditions make the job dangerous regardless of experience level.
A tree limb through the sheathing. A wind-driven blow-off of 40 square feet of shingles. A hailstorm that leaves exposed decking on a Tuesday when the earliest contractor cannot arrive until Friday. In any of these situations, putting a tarp on that roof correctly is the single most important thing you can do in the next few hours.
The difference between a tarp that holds through three additional storm events and one that peels off in the next 40-mph gust is entirely in the installation method. This guide covers exactly how to do it right: the right materials, the 2x4 anchoring system that actually holds, the mistakes that fail under load, and the safety rules that prevent a roof emergency from becoming a medical emergency.
For a broader look at DIY roofing repairs, including when patching and re-shingling make more sense than tarping, see our complete guide on roofing how-to and DIY repairs.

Get quotes from top-rated pros.

Photo: Storm-damaged roof with large section of missing shingles showing exposed decking, emergency blue tarp properly anchored with 2x4 boards over the ridge
When You Need to Tarp a Roof (And When You Don't)
Not every storm damage situation requires a tarp. Applying a tarp incorrectly to a roof that did not need one can create new penetration points and complicate the insurance claim. Use this framework to decide.
Tarp immediately if:
- A hole or missing section exposes the decking (typically anything larger than 2 square feet)
- A tree limb or structural debris has penetrated the roof
- A significant section of shingles has blown off, leaving felt paper or bare wood visible
- Interior water intrusion is already occurring
Do not tarp -- use targeted repair instead -- if:
- Only 1 to 3 shingles are missing with no decking exposure (apply roofing cement or a shingle patch)
- A flashing gap is small and localized (seal with roofing cement temporarily)
- Damage is exclusively to ridge cap with intact underlayment below
The decision factor is simple: will rain reach your interior through this opening before repairs happen? If yes, tarp it.
Safety rule: Never get on the roof at night, during active rainfall, or any time the surface is wet. A slick decking surface with loose or missing shingles is the maximum-hazard scenario for a fall. Wait for dry daylight conditions even if it means a brief interior exposure with buckets and towels.
The risk calculation I run on every emergency call is whether the potential interior water damage outweighs the personal injury risk on that specific roof. I have seen homeowners attempt tarping on wet roofs at dusk because they were panicking about the interior, and the outcomes of those falls are far worse than the water damage they were trying to prevent. If you are not working in safe conditions, the correct answer is to place buckets, protect valuables, and wait for daylight.
Tarp Sizing and Selection
Buying the right tarp before you get on the roof prevents the most common mistake: a tarp that is too small and leaves edges of the damaged area exposed.
Sizing formula: Measure the damaged area length and width. Add at least 8 feet to each dimension -- 4 feet of overlap on each side. If the damage is anywhere near the ridge, the tarp must also reach over the ridge by at least 4 feet on the opposite side, which typically adds another 4 to 8 feet to the length.
Example: A 6 x 8-foot damaged section on a roof where the ridge is 10 feet above the damage needs a tarp that is at least 14 x 24 feet after accounting for all margins and ridge coverage.
Thickness matters more than color
| Tarp Type | Thickness | Lifespan in Sun | Cost (20x30 ft) | Best For |
| Standard blue poly | 3-5 mil | 30-60 days | $25-$45 | Short-term, under 30 days |
| Heavy-duty poly (silver/silver) | 6-8 mil | 90-120 days | $60-$95 | Standard emergency use |
| Woven poly tarp | 10-12 mil | 120-180 days | $90-$150 | Extended coverage, harsh climates |
| Contractor-grade reinforced | 14+ mil | 6+ months | $150-$250 | Large damage, high wind exposure |
Standard blue tarps are typically 3 to 5 mil polyethylene. They will degrade in 30 to 60 days of direct UV exposure, which is well short of the 90-day window you need. A 6 mil silver polyethylene tarp is the minimum for a proper emergency installation [1]. UV resistance is the performance variable, not color.
Tools and Materials You Need
Gather everything before climbing. Making trips up and down for forgotten items is one of the leading causes of ladder-related falls on residential roofs [2].
- Heavy-duty polyethylene tarp (6 mil minimum, correctly sized)
- 2x4 lumber cut to the width of the tarp (at least 4 boards needed)
- 3-inch deck screws (box of 50 minimum)
- Cordless drill
- Rope or bungee cords (secondary holding only, not primary anchoring)
- Stable extension ladder with standoff stabilizer
- Roof safety harness with ridge anchor
- Utility knife (trimming excess tarp)
- Safety glasses and work gloves
- Partner on the ground (essential, not optional)
The 2x4 boards are the critical item. The entire holding system depends on sandwiching tarp material between boards and wood, not on pulling ropes through grommets.
Get quotes from top-rated pros.
Step-by-Step: How to Tarp a Roof Correctly
Follow these steps in order. Skipping or reordering steps is how installations fail.
Step 1: Assess from the ground.
Walk the perimeter and identify the full extent of damage before climbing. Use binoculars if needed. Determine tarp size required and note the roof pitch. If pitch exceeds 6:12 (rises more than 6 inches per 12 horizontal inches), reconsider whether professional tarping is safer.
Step 2: Set up the ladder safely.
Position on stable, level ground. Use a standoff stabilizer to keep the ladder off the gutter. The ladder must extend at least 3 feet above the eave. Have your partner hold the base while you climb.
Step 3: Carry materials up separately.
Never carry the tarp or boards while climbing the ladder. Use a rope to hoist materials once you are on the roof, or have your partner hand items up when you are stable on the surface.
Step 4: Position the tarp.
Unroll the tarp over the damaged area. Center it so that it extends at least 4 feet beyond the damage on every side. The top edge must go over the ridge by at least 4 feet. Pull it as flat as possible before securing anything.
Step 5: Secure the ridge.
At the ridge, fold the tarp over the peak so it lies flat on both sides. Place one 2x4 board flat against the tarp on each side of the ridge, parallel to the ridge line. Drive 3-inch deck screws through both boards, through the tarp, sandwiching the tarp material between the two boards. Space screws every 12 inches along the board length. This ridge sandwich is the primary anchor point of the entire installation.
Step 6: Secure the lower edge.
At the lower (eave) edge of the tarp, fold the tarp back over itself twice around a 2x4 board to create a thick roll. This roll acts as a cleat. Screw the board through the tarp into the roof deck every 18 inches. The fold creates multiple layers of material around the screw points, preventing pull-through.
Step 7: Secure the side edges.
Use the same fold-and-screw technique on both side edges. The tarp should now be anchored at all four perimeters with 2x4 boards.
Step 8: Pull taut and check.
Before finalizing any edge, pull the tarp drum-tight. Loose sections catch wind and act as sails. A tarp that billows even slightly in moderate wind will fail in a storm.
Step 9: Inspect from the ground.
Climb down and check from multiple ground-level positions. No sections should be billowing. The ridge must be visibly covered. All edges should lie flat against the roof surface.

Photo: Diagram showing 2x4 board sandwich technique at roof ridge: tarp folded over peak, boards placed on both sides and screwed together through tarp material, with 4-foot overlap measurements labeled
The 2x4 sandwich at the ridge is everything. I have pulled off tarp jobs where contractors used ropes laced through the grommets and tied to the chimney or to weights on the other side. Every one of those fails the same way -- the rope cuts through the tarp at the grommet under wind load, or the grommet tears out, and then the entire tarp is gone within one storm cycle. The 2x4 distributes the load across 10 to 12 feet of tarp material instead of concentrating it at six grommet holes. Across 1,800-plus residential roofing projects and 200-plus storm damage emergency calls, I have not seen a properly installed board sandwich fail under wind conditions a homeowner would realistically face.
What NOT to Do When Tarping
These are the errors documented across hundreds of failed tarp installations.
Do not use ropes through grommets as the primary anchor. Grommets are designed for light-duty applications. A tarp under wind load concentrates enormous force at each grommet point. The rope cuts into the tarp material at the grommet edge, and once one grommet tears, the tarp unravels progressively.
Do not nail directly through the tarp without boards. Roofing nails and screws pull through single-layer tarp material under sustained load. Without a board to distribute the force, the tarp will tear at each fastener point.
Do not skip ridge coverage. Rain runs toward the ridge on both sides of a roof in certain wind-driven conditions. A tarp that covers the damaged area but terminates below the ridge leaves a gap that channels water directly onto the exposure.
Do not leave any loose sections. A 10 x 10-foot area of loose tarp behaves like a parachute in a 50-mph wind. The leverage it creates can tear out all the fasteners simultaneously.
Do not use a tarp that is too small. The most common field error. Homeowners underestimate the damaged area and undercount the required overlap. When in doubt, go one size larger.
The worst tarp failure I have personally assessed was a homeowner who tied a single rope from a grommet at the tarp center to a chimney, with the rest of the tarp loose on the roof surface. In the next wind event, the tarp became a 20-foot sail anchored at one point. It tore a 6-foot section of gutter off the fascia board on its way off the roof. The original damage was about $800 of missing shingles. By the time we assessed everything after the tarp failure, the total repair was $4,200 -- including the gutter damage the tarp itself created.

Photo: Three-panel illustration of common roof tarping mistakes: rope tied through torn grommets, undersized tarp leaving shingle damage exposed at edges, and tarp ending below ridge leaving gap for water entry
Working Safely on a Damaged Roof
Storm-damaged roofs present hazards that an intact roof does not. The decking may be partially detached, waterlogged, or structurally compromised in ways that are not visible from the surface above.
Probe before trusting each step. Place your foot on a new area and apply weight gradually. If you feel any flex or movement in the decking, do not transfer full weight to that spot.
Use a harness. Attach to a roof anchor point on the opposite side of the ridge from your work area. The ridge acts as a fulcrum -- a fall toward the work side means the rope catches before you go over the edge. A harness attached on the same side as a fall provides no meaningful protection.
Work with a partner. Your partner stabilizes materials, can call for help if you fall, and can observe conditions you cannot see from the roof surface. Solo roof work on damaged decking is the highest-risk category in residential DIY.
Steep pitch cutoff: If the roof exceeds 6:12 pitch and the damage area is larger than a few square feet, the professional route is the safer choice. Walk boards help professionals work on steep roofs; most homeowners do not have them or the experience to use them safely.
After the Tarp Is in Place
Installation is not the end of the job. A tarp requires active maintenance to remain effective through its 90-day protection window. For what to expect when contractors do arrive, see our guide on how to find and hire a roofing contractor.
Check daily for the first week. Wind and temperature cycling loosen boards and shift tarp position. A 2x4 that was tight on day one may have moved by day three. Re-tighten any loose boards immediately.
Document damage before covering it. Before the tarp goes on, photograph everything from ground level and from the roof surface: the hole, the missing material, the deck condition, any interior water staining visible from the attic. Insurance adjusters need this documentation, and covering the damage with a tarp removes direct access to the evidence.
Notify your insurance company. Most homeowners insurance policies require notification within 24 to 72 hours of a storm event. Delayed notification can complicate or reduce your claim. Emergency tarping itself may be a covered mitigation expense -- ask your adjuster specifically about this.
Schedule permanent repairs within 90 days. A 6 mil tarp in direct sun begins degrading at the 90-day mark. Heat cycling and UV radiation weaken polyethylene even when the tarp appears intact from below. Do not treat the tarp as a permanent solution.
Get quotes from top-rated pros.
Real-World Case Study
Angela T., Tulsa, OK contacted James Carver after a tornado passed within a mile of her home in spring 2024, tearing a 40-square-foot section of shingles from her south slope and leaving bare decking exposed. Her regular contractor could not schedule emergency work for three weeks due to widespread storm damage across the Tulsa metro.
She applied a 20 x 30-foot silver poly tarp using the 2x4 ridge sandwich method, with boards secured along both side edges every 4 feet. The installation took approximately 90 minutes working with one helper. Over the following three weeks before repairs began, her area received two additional thunderstorm events with measured wind gusts above 45 mph.
The tarp held through both events without any re-anchoring needed. Interior inspection after the repair crew arrived confirmed zero water penetration during the entire coverage period. The tarp cost $78 in materials. The delay to schedule a qualified contractor cost nothing in additional damage.
The NearbyHunt network tracked a similar pattern across storm damage cases in Oklahoma and Texas during 2024: homeowners who correctly applied tarps within 24 hours of damage averaged significantly lower total repair costs compared to those who waited for contractor availability before protecting the exposure.
Professional Tarping Services: When to Call
Some situations make professional tarping the correct choice regardless of skill level or tool availability.
| Scenario | DIY Appropriate? | Professional Cost Range |
| Hole under 100 sq ft, roof pitch 4:12 or less | Yes, with partner and harness | N/A |
| Hole 100-200 sq ft, pitch 4:12 to 6:12 | Marginal -- assess carefully | $300-$600 |
| Hole over 200 sq ft, any pitch | Recommend professional | $600-$1,200 |
| Steep pitch over 8:12, any damage size | Professional recommended | $500-$1,500 |
| Structural damage (fallen truss, decking failure) | No -- professional only | $800-$1,500+ |
| Multiple tarps with overlapping installation | Professional recommended | $600-$1,200 |
Professional emergency tarping crews have walk boards, proper ridge anchors, and experience with large-format installations [3]. For widespread storm events, professional crews book within hours and waits of 1 to 3 weeks are common for repairs -- which is exactly when knowing the correct DIY tarping method matters most.
Find licensed storm damage specialists in your area through the NearbyHunt roofing contractor network to get quotes and verify credentials before a storm season.

Photo: Properly installed roof tarp viewed from below with labeled callouts: 2x4 boards on all four edges, 4-foot ridge overlap on opposite slope, 4-foot damage margin on each side, deck screw spacing every 18 inches
Conclusion
A roof tarp that holds is the product of the right materials (6 mil minimum), correct sizing (4-plus feet beyond damage on all sides and over the ridge), and the right anchoring method (2x4 boards, never ropes through grommets). The steps in this guide -- ridge sandwich first, edge fold-and-screw second, drum-tight installation throughout -- produce installations that hold through wind events and multiple storm cycles.
The 90-day protection window a proper tarp provides is enough time to schedule qualified repairs without panic decisions. What eliminates that window is waiting to install, installing incorrectly, or failing to maintain the tarp after it goes up. Act within 24 hours, install using the board-anchor method, check it weekly, and document everything for your insurance claim before the tarp covers the damage.
If the pitch is steep, the damage is large, or the conditions are not safe, call a professional. The cost of professional emergency tarping is a fraction of the secondary water damage that an unprotected roof produces over even one week of exposure.

James is a licensed roofing contractor with 20 years of experience in roof installation, inspection, and repair across the U.S. South and Midwest. He specialises in asphalt shingles, metal roofing, and storm damage restoration. On NearbyHunt, James offers practical advice on roof maintenance, insurance claims, and selecting the right materials for long-lasting protection.

Jacob is a licensed roofing contractor with over 18 years of experience in roof inspection, installation, and restoration. Based in Texas, he has led hundreds of successful roofing projects across residential and commercial properties. Jacob is also a certified storm damage specialist, ensuring that all NearbyHunt roofing content meets industry best practices and safety standards.