- Starter strips are non-negotiable: skipping them is the single most common cause of eave-edge blow-off and the first thing an inspector checks on a failed roof
- Nail placement rules differ between 3-tab and architectural shingles — 4 nails standard, 6 nails required in wind zones above 110 mph; nails must fall within the printed nailing zone or the shingle effectively has zero holding power
- Valley method matters for longevity: open valleys with W-metal flashing outperform closed-cut and woven valleys in high-rainfall and high-debris environments; architectural shingles should never be installed as woven valleys
- Proper shingle exposure for architectural shingles is typically 5.5 inches — exceeding this reduces the overlap that protects the headlap and voids most manufacturer warranties
- James Carver has overseen shingle installation on 1,800-plus residential projects across the U.S. South and Midwest, 68% of premature failures trace to three preventable errors at installation

Get quotes from top-rated pros.
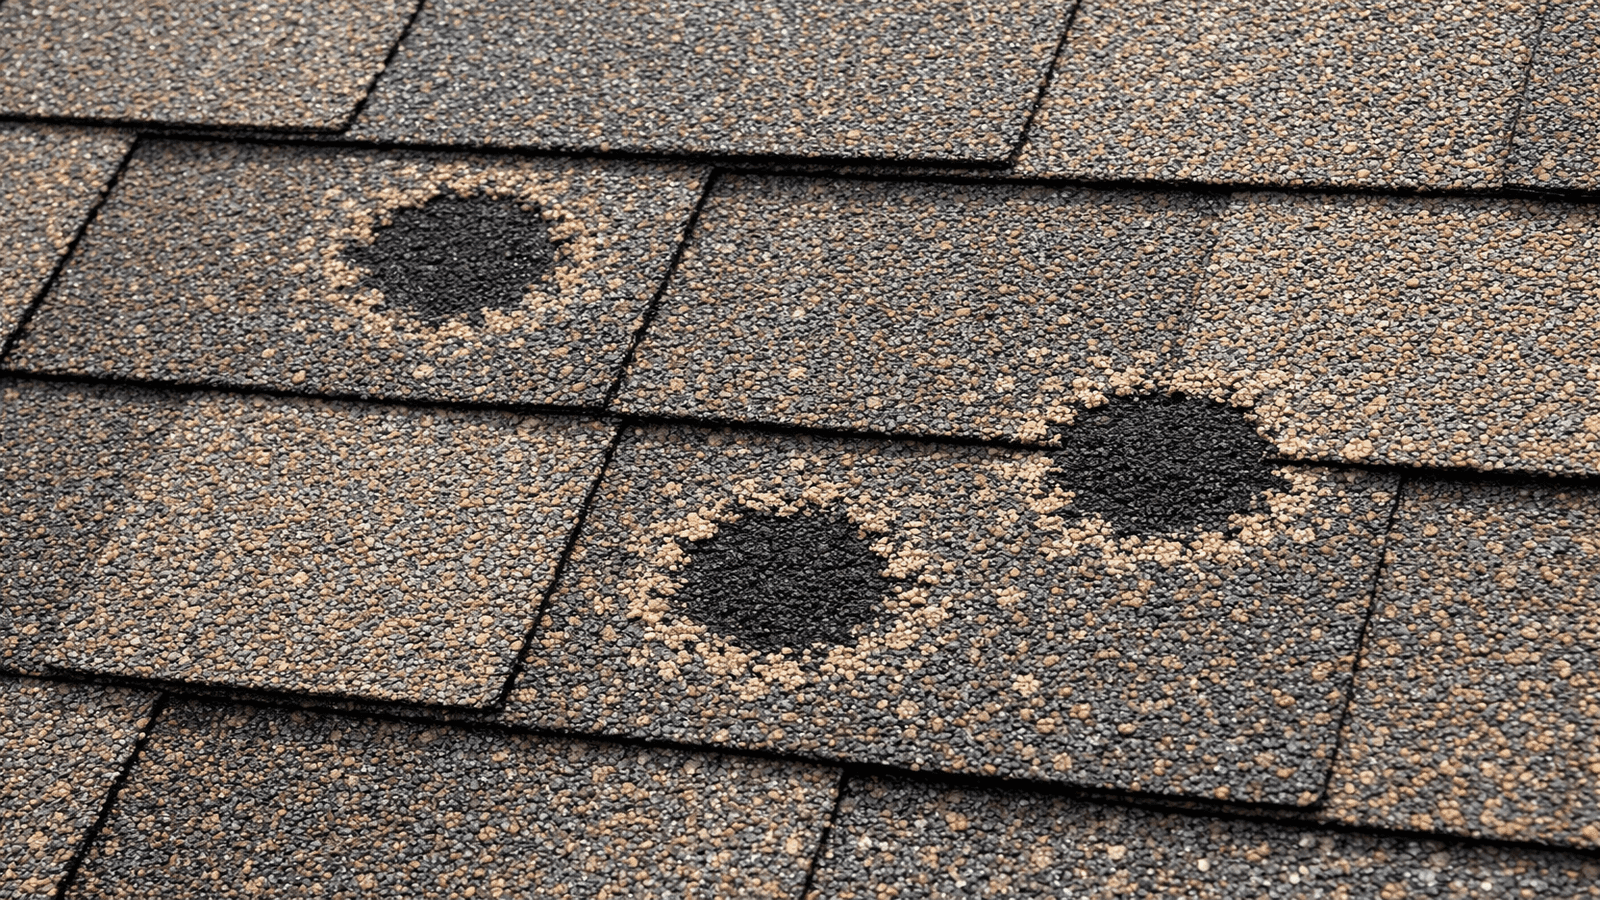
Asphalt shingles are the dominant roofing material in the United States — and the most often installed incorrectly. The product itself is reliable; the installation technique is where roofs fail. A shingle system installed without starter strips, with nails in the wrong position, or with an improper valley method will fail years before its rated life — sometimes in the first significant storm.
This guide covers the complete professional installation sequence for architectural asphalt shingles: starter strip requirements, nail placement for both shingle types, valley methods compared side by side, step flashing at walls, ridge cap installation, wind resistance ratings, and cost benchmarks. It is part of our complete Roofing Installation Guide for homeowners planning a full roof replacement. For related guidance, see our Roof Inspection Checklist and How to Fix a Roof Leak.
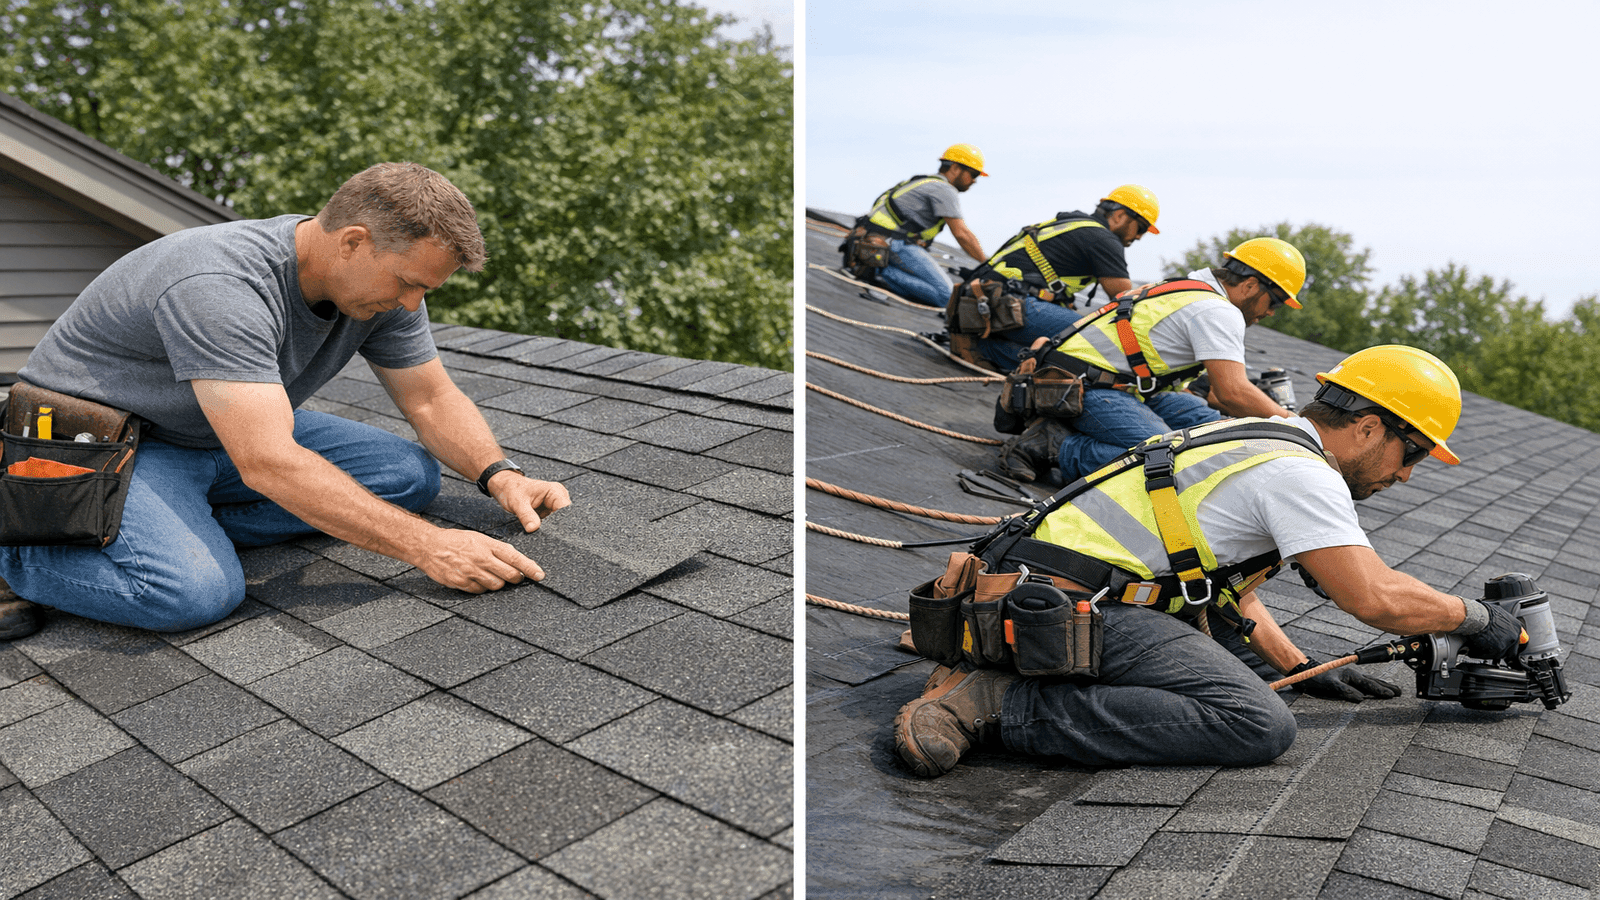
Data from licensed roofers in the NearbyHunt network shows that 68% of premature shingle failures diagnosed by our network contractors trace to three installation errors — missing starter strips, improper fastener placement, and insufficient valley protection [1]. All three are preventable with correct technique applied from the first course. James Carver, a Licensed Roofing Contractor with over 20 years of experience and more than 1,800-plus residential projects completed across the U.S. South and Midwest, walks through each critical step below.
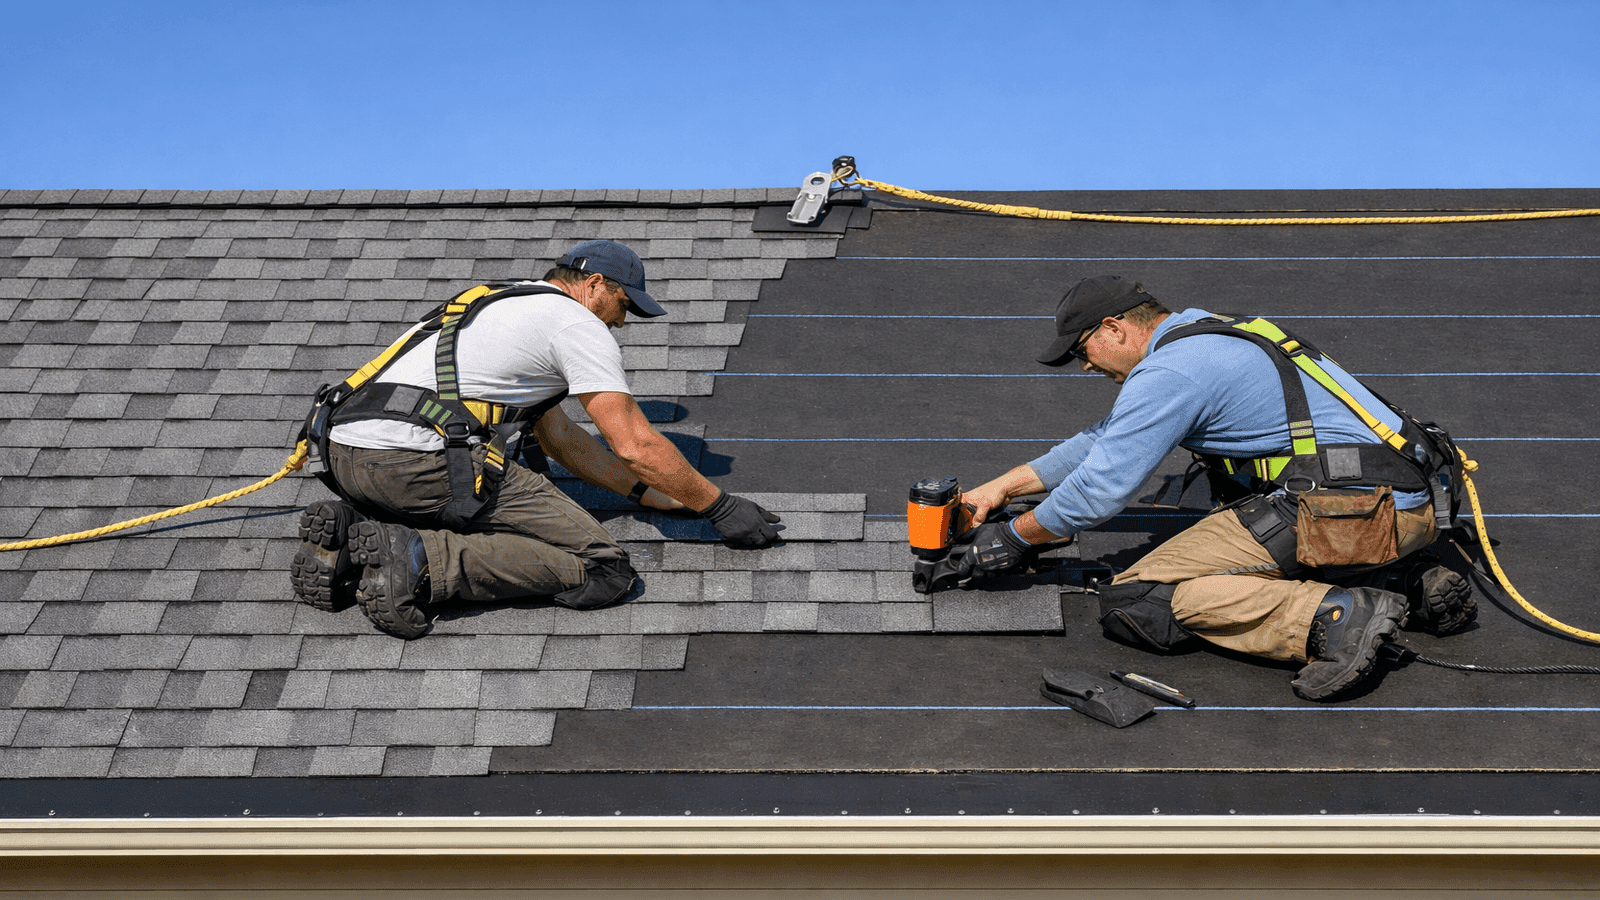
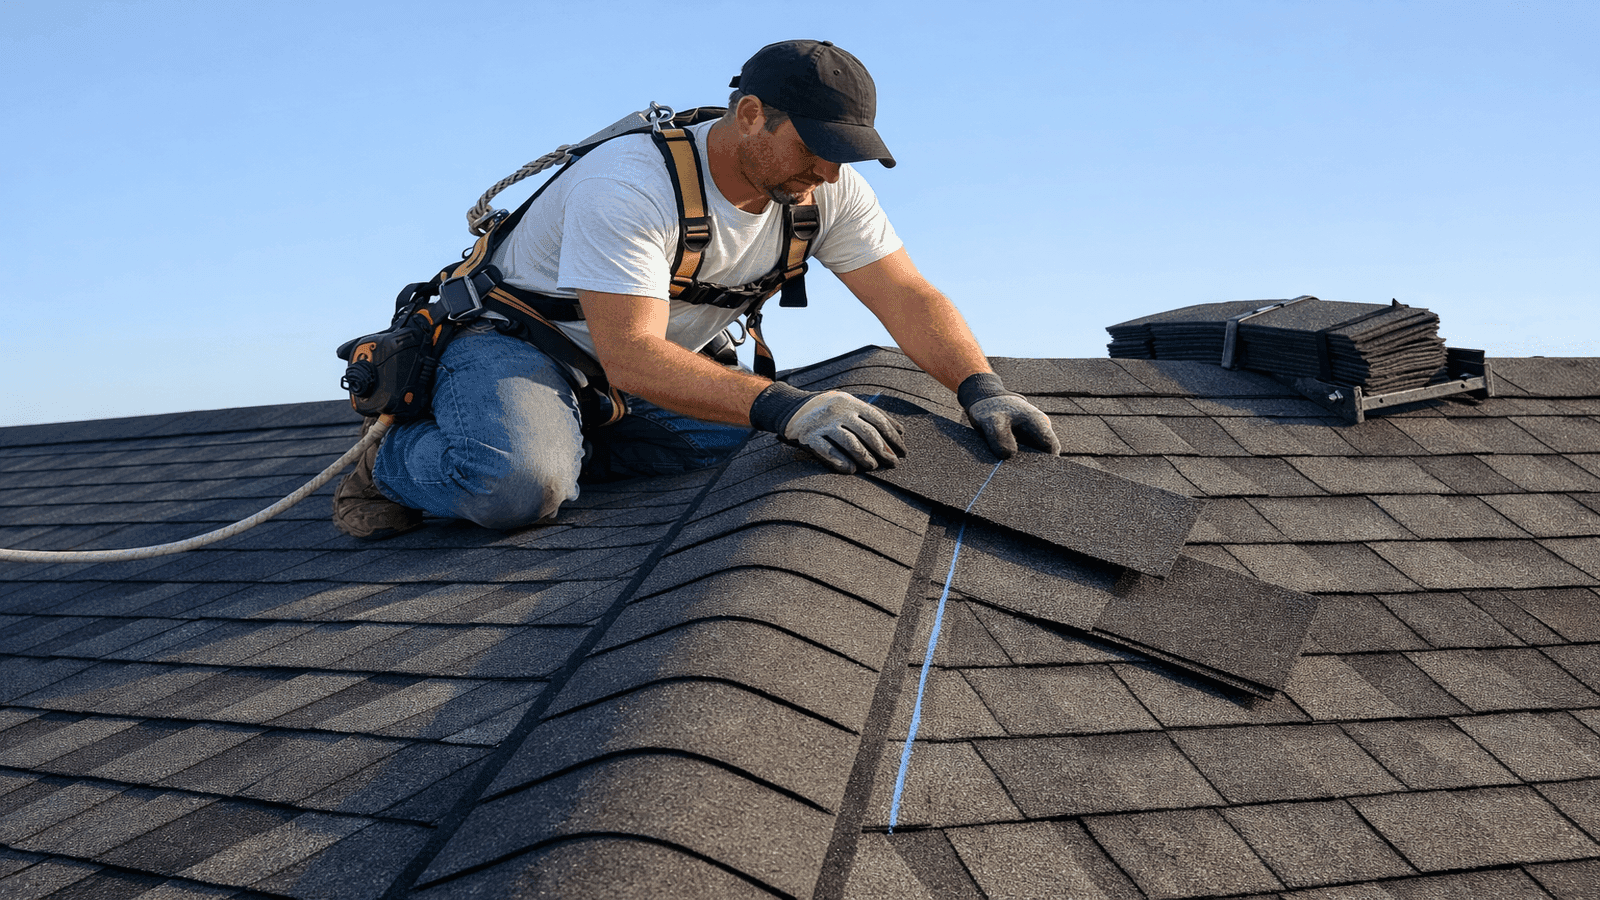
Photo: Roofing contractor installing architectural asphalt shingles on a residential home, showing proper course alignment, chalk lines, and starter strip at the eave edge on a sunny day
Starter Strip Requirements
The starter strip is the first component installed on a new roof — laid along the eave edge before any field shingles go down. It is not optional. Its function is to provide a solid backing layer of sealant material at the very point where the roof is most exposed to wind uplift: the eave edge.
What a starter strip is: a purpose-made strip of sealant-backed modified asphalt material, typically 7-9 inches wide, installed flush with the eave edge and rake edges. It may also be fabricated by reversing a course of standard shingles tab-side up and trimming the tab exposure away, leaving a solid sealant strip exposed at the eave.
Why it is critical: when the first course of field shingles is laid, the adhesive sealant strip on the underside of those shingles bonds to the starter strip beneath them. Without a starter strip, the first field shingle course has no bonding substrate. In a wind event, those eave-edge shingles lift from the bottom and peel. ARMA and NRCA joint installation guidelines explicitly require starter strips at all eave and rake edges [1][2].
Rake edge requirement: starter strips must also run up the rake (gable) edges, not just the eave. Rake edges are the first surfaces to receive wind pressure on a gabled roof. A starter strip at the rake ensures the outermost column of field shingles has a bonded backing surface.
Installation specifics:
- Overhang the eave edge by 1/4 to 3/4 inch to direct water into the gutter
- Butt joints in starter strip should be staggered from the butt joints of the first shingle course by at least 6 inches
- Nail starter strips 3 to 4 inches from the eave edge using roofing nails at 12-inch intervals
- At rakes, nail 1.5 to 3 inches in from the rake edge at 10 to 12-inch intervals
In 20-plus years and across more than 1,800 residential roofing projects, I have never seen a legitimate reason to skip starter strips. The material cost is $15-$25 per square. The cost when the eave-edge shingles blow off three years later is $2,000-$5,000. Every inspector I have worked with in Georgia, Tennessee, and Alabama treats a missing starter strip as an automatic re-inspection failure. There is no shortcut worth taking here.
Cost of skipping starter strips: Maria T. of Atlanta, Georgia hired a contractor who skipped starter strips entirely and fastened shingles with a staple gun rather than roofing nails. Three years after installation, a moderate windstorm peeled the eave-edge shingles on two slopes, exposing the underlayment. The resulting water intrusion damaged the decking and caused interior ceiling damage. Her total repair and re-roof cost was $4,200. The re-installation was done to code and passed the city inspection on first review.
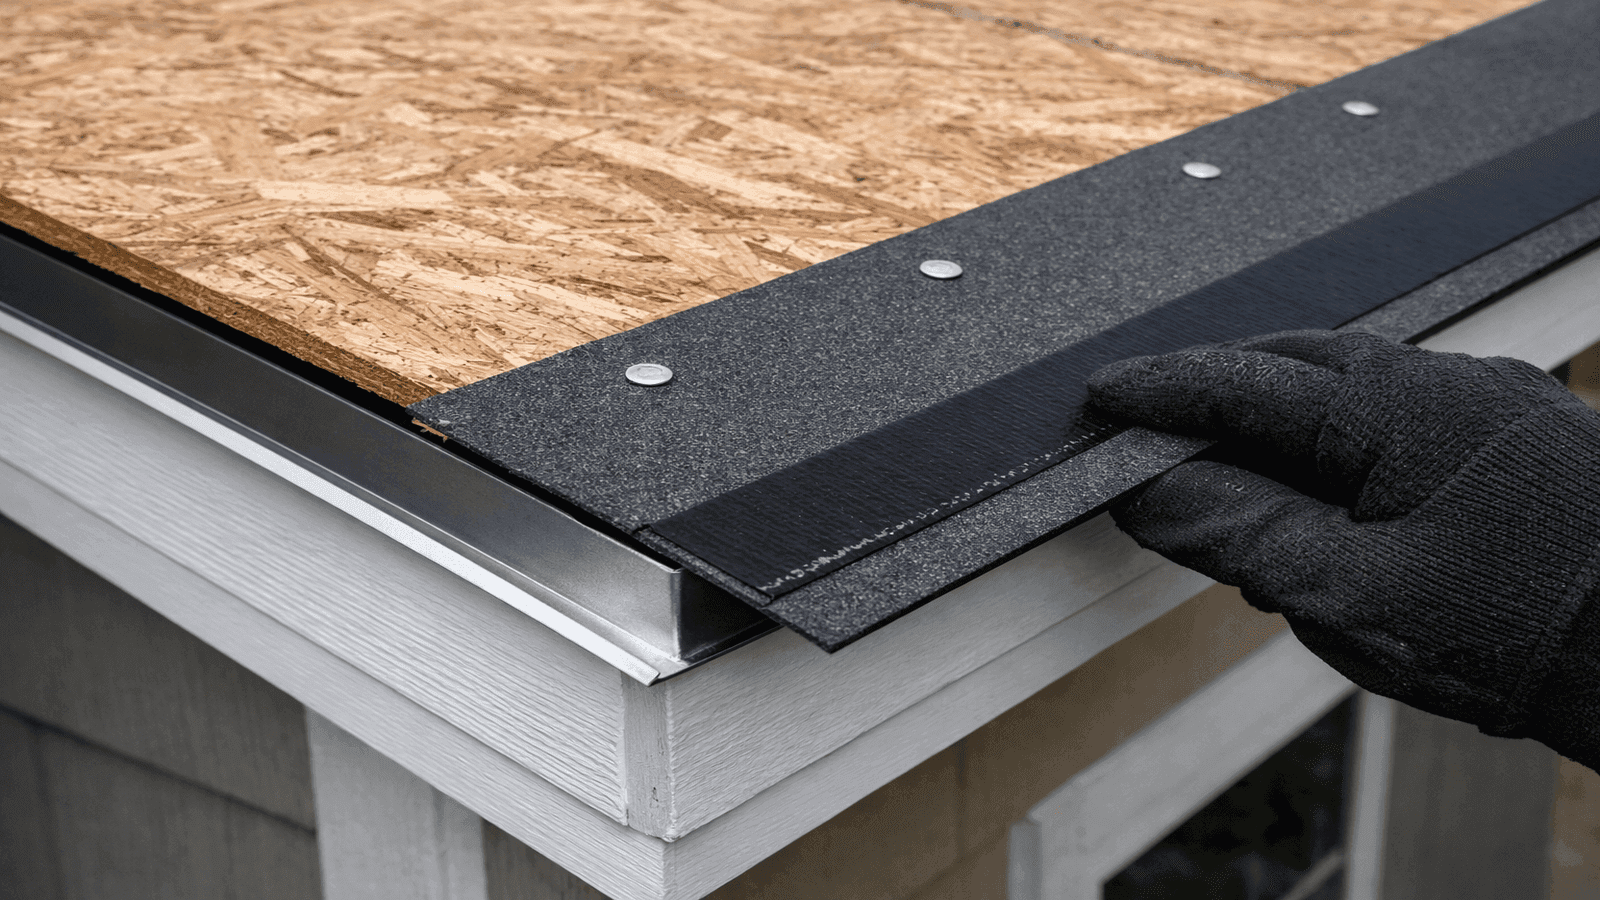
Photo: Close-up photograph of a roofer laying a purpose-made starter strip along the eave edge of a residential roof, showing the sealant strip orientation facing up and the overhang at the drip edge
Nail Placement
Fastener placement is where most shingle installations fail inspection — and where most wind-related shingle losses originate. Nails placed outside the printed nailing zone reduce holding capacity dramatically; nails placed with a staple gun instead of roofing nails fail at rates far exceeding nailed applications.
Nail specifications:
- Minimum: 12-gauge galvanized roofing nails with 3/8-inch diameter heads
- Minimum shank length: 1.25 inches for new decking; 1.75 inches for re-roofing over existing shingles (must penetrate through the existing layer and into the deck)
- Ring-shank nails are preferred for coastal and high-wind regions — pull-out resistance is significantly higher than smooth-shank
- Staples are not an acceptable substitute for roofing nails in most building codes and void nearly all manufacturer warranties
3-tab shingles — 4-nail pattern:
- 4 nails per shingle, positioned 1 inch above each cutout slot and 1 inch in from each end
- Nails must fall on the printed nailing line — typically 5/8 inch to 1 inch above the top of the cutout
- This places nails through the shingle being installed and through the top of the shingle in the course below, providing a double-layer fastened zone
Architectural (dimensional) shingles — 4-nail and 6-nail patterns:
- Standard installation: 4 nails per strip placed on the manufacturer's printed nailing line, typically 6 inches above the butt edge; positioned roughly 1 inch from each end and evenly spaced in between
- High-wind installation (design wind speeds above 110 mph per local building code): 6 nails per strip, with two additional nails placed between the standard four nail positions
- GAF Timberline HDZ and Owens Corning Duration both print the nailing zone directly on the shingle face in a contrasting color line — nails must stay within 1/2 inch of that line [2][3]
Critical errors to avoid:
- Nails too high: nails above the nailing zone enter only the headlap of the course below, providing near-zero holding power for the shingle being installed
- Nails too low: nails through the tab face split the shingle and create exposed nail heads that are chronic micro-leak points
- Overdriven nails: a pneumatic nailer set too hot punches the nail head through the shingle surface; that hole is a water entry point and creates a stress fracture in the fiberglass mat
- Underdriven nails: nail heads proud of the shingle surface prevent the course above from lying flat, break through that course's back surface, and create a visible ridge
Wind resistance ratings:
- Standard 4-nail application: most architectural shingles carry a Class F wind resistance rating (110 mph per ASTM D3161)
- 6-nail high-wind application: qualifies for Class H rating (150 mph per ASTM D7158) on products approved for that rating [1][2]
- IRC Section R905.2 requires 6 nails per shingle in HVHZ (High-Velocity Hurricane Zones) and in areas with design wind speeds above 110 mph [6]
The nail gun is where I see the most mistakes — not from careless workers, but from guns that are not adjusted for the shingle product. I calibrate the pneumatic pressure at the start of every job by driving a test nail into a piece of scrap shingle and checking the head. Flush means the gun is right. Dimpled means I reduce pressure. A nail that punches through the mat is a water entry point I now have to seal, and it weakens the fiberglass reinforcement under that nail head. Thirty seconds of calibration prevents that on every shingle for the next eight hours.
Get quotes from top-rated pros.
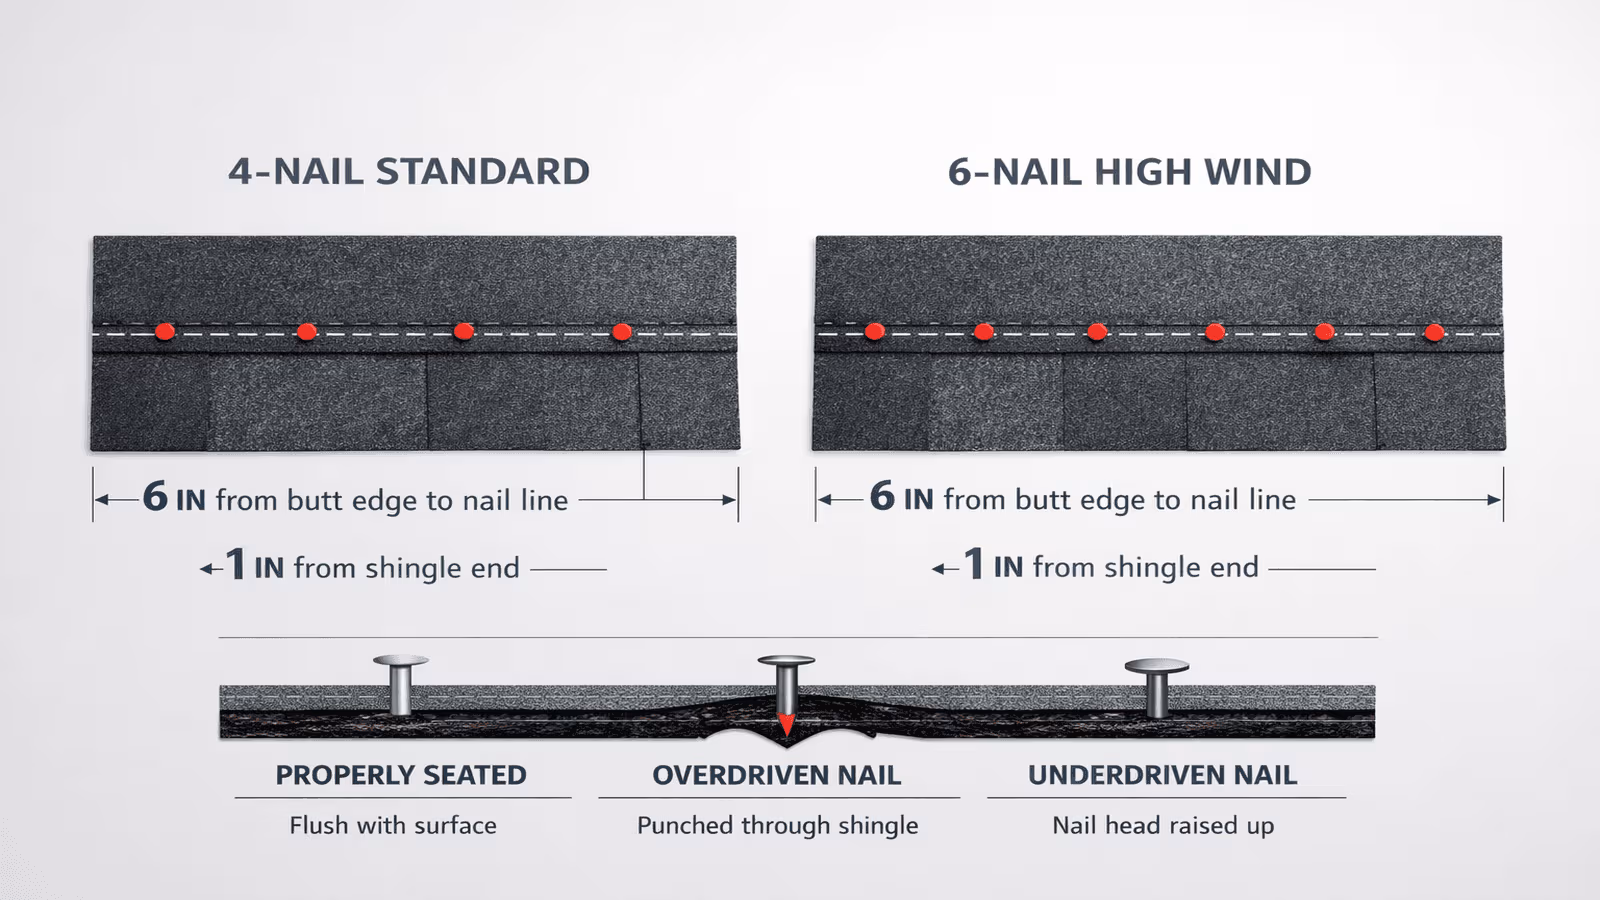
Photo: Technical diagram showing nail placement for 3-tab shingles (4-nail pattern with measurements) and architectural shingles (6-nail high-wind pattern), with a labeled detail of overdriven versus correctly seated nail heads
Valley Methods
Valleys — the internal angle where two roof planes intersect — concentrate more water flow than any other roof location. Getting the valley method right for the roof pitch, rainfall volume, and shingle type determines how long that vulnerable area lasts.
There are three primary valley methods for asphalt shingle roofs.
Open Valley
An open valley uses a metal liner — typically 24-inch wide W-profile or V-profile galvanized steel, aluminum, or copper — centered in the valley and left exposed. Shingles from each roof plane are trimmed at an angle 2 inches back from the valley centerline, leaving a visible channel of metal.
Advantages:
- Maximum water flow capacity — the unobstructed metal channel handles high-volume rain faster than any shingle-covered method
- Metal lasts significantly longer than shingles — a copper or aluminum valley liner can outlast two shingle replacements
- When the roof is eventually re-shingled, the valley liner often does not need replacement
- Easier inspection and maintenance access
- Works with all shingle types including heavier architectural and designer products
Disadvantages:
- Exposed metal is visible from the ground — some homeowners prefer an all-shingle appearance
- Metal expansion and contraction can create noise in temperature-extreme climates
- Higher material cost than closed methods
Installation notes: W-metal profile is preferred over V-profile — the center rib stops water from one plane from shooting across the channel and underneath shingles on the opposite plane. Nail only the very edges of the metal, never through the water channel. A bead of roofing cement under the shingle edges at the trim line prevents water from wicking under the cut edge [2].
Closed-Cut Valley
A closed-cut valley runs shingles from one roof plane all the way across the valley and up the opposite slope, then lays shingles from the second plane over them, stopping 2 inches short of the valley centerline. The overlapping shingles are then cut along a straight chalk line 2 inches from the center.
Advantages:
- All-shingle appearance with no visible metal
- Slightly lower material cost than open valley (no valley metal)
- Easier to install than woven valley method
Disadvantages:
- The cut edge of the top layer shingles is a potential water entry point if not properly embedded
- Shingles over the valley center wear faster than field shingles — more concentrated water flow, more UV exposure
- Not suitable for architectural shingles on pitches below 4:12 — water can back up under the overlap at low slopes
- Re-roofing requires careful attention — the underlapping layer must be continuous and undamaged
Installation notes: embed the cut edge of the top layer in a 3-inch-wide strip of roofing cement; never nail within 6 inches of the valley centerline on the top layer [2][3].
Woven Valley
A woven valley alternates shingles from each roof plane as the courses are installed — one course from the left plane, one from the right, weaving them together across the valley with each course overlapping the previous.
Advantages:
- Completely hidden — no cuts or exposed metal
- No additional material cost
Disadvantages:
- Not recommended for architectural (laminated) shingles — the staggered thickness of laminated products creates an uneven surface that disrupts water flow and holds debris
- Shingles in the valley center slow water flow, increasing debris accumulation and the likelihood of ice damming in cold climates
- Requires more precise coordination during installation
- Increasingly rare in professional roofing — most manufacturers now recommend open or closed-cut over woven
Installation notes: if used, shingles must extend at least 12 inches past the valley centerline onto the opposite slope. Nails must stay 6 inches from the valley center [1].
| Feature | Open Valley | Closed-Cut Valley | Woven Valley |
| Appearance | Metal visible | All-shingle | All-shingle |
| Drainage capacity | Highest | Moderate | Lower |
| Longevity | Longest (metal liner) | Moderate (20-25 yrs) | Shorter at center |
| Best for | All shingle types | Architectural, slope 4:12+ | 3-tab only |
| Material cost | Higher (metal flashing) | Standard | Standard |
| Recommended by NRCA | Yes (preferred) | Yes (acceptable) | Limited |
James Carver's recommendation: "For most residential roofs, I use open valley with W-metal. The drainage capacity is superior, the liner outlasts the shingles, and it's the method I trust in the heavy-rain markets I work in across Georgia and Tennessee. On a simple gable roof with equal pitches and a clean aesthetic requirement, closed-cut is my second choice — but only with architectural shingles and only on pitches above 4:12." [6]
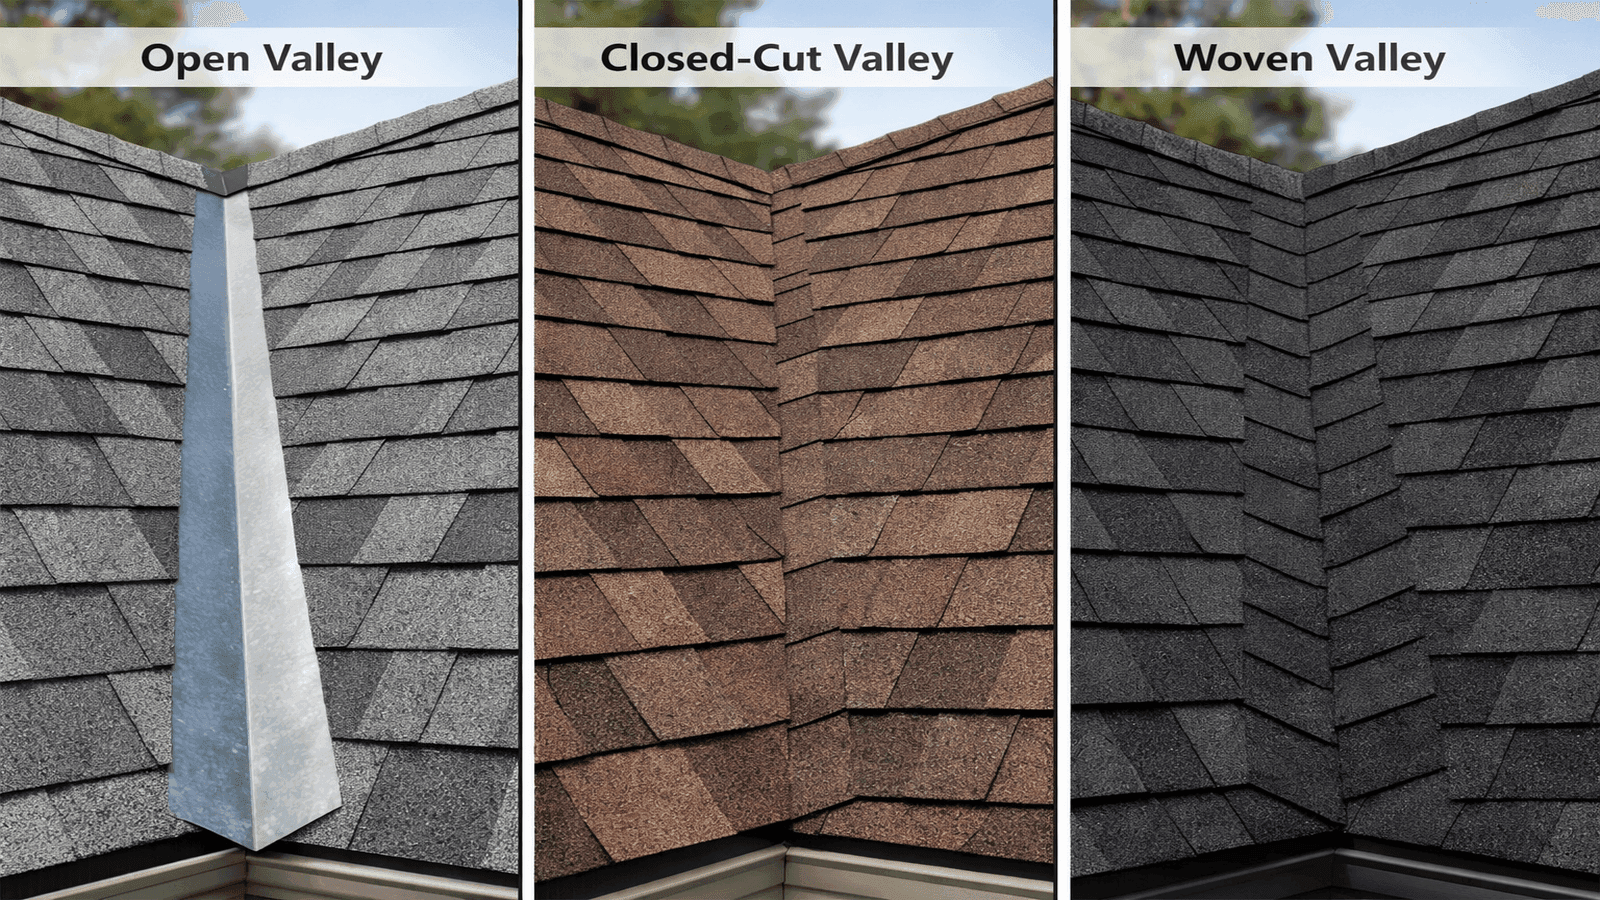
Photo: Three-panel comparison image showing open valley with visible W-metal flashing, closed-cut valley with straight-cut shingle line, and woven valley with interlocking shingle pattern on three sections of residential roofing
Step Flashing at Walls
Where a roof plane meets a vertical wall — at a dormer, addition, or sidewall — step flashing is the correct installation method. It is not caulk. It is not a single piece of bent metal. Step flashing is a series of individual L-shaped metal pieces, one per shingle course, that layer with the shingles like fish scales to shed water.
Why step flashing works: each L-shaped piece is 5 to 6 inches in both directions (5x7 is the most common). The horizontal leg slides under the shingle above it; the vertical leg runs up the wall behind the siding. Water that runs down the wall onto a shingle hits the step flashing piece in that course and is directed down-slope to the next step — never under the shingle.
Installation sequence:
- Apply a base of self-adhering underlayment (ice-and-water shield) in the flashing zone — minimum 6 inches up the wall, 6 inches onto the roof deck
- Install each step flashing piece: slide the horizontal leg under the next shingle course before nailing that shingle; the vertical leg should be at least 5 inches up the wall
- Nail the step flashing only at the top corner of the horizontal leg — one nail, kept high to avoid creating a leak point in the water plane
- Do not caulk step flashing in the field — the overlapping L-shapes shed water without sealant; caulk eventually fails and can trap water
Common mistakes: using a single continuous piece of bent metal instead of individual step pieces; nailing step flashing through the water plane; caulking the wall edge instead of tucking the vertical leg behind siding; omitting the self-adhering underlayment base layer [1][2].
Get quotes from top-rated pros.
Step flashing is not a caulking job. I have corrected more leaks at dormer walls caused by a contractor who ran a single piece of continuous bent metal and caulked the top than I can count. Caulk fails in 3-5 years. Properly installed step flashing — one piece per course, tucked behind the siding — lasts the life of the roof without any sealant. When I get a leak call at a dormer wall on a roof less than 10 years old, step flashing is my first inspection point.
Ridge Cap Installation
The ridge cap is the final element of a shingle roof — it covers the peak where the two highest roof planes meet. Done incorrectly, ridge cap blow-off is one of the most common storm damage calls.
Purpose-made hip and ridge shingles are the correct product — they are thicker, more flexible at cold temperatures, and carry their own sealant strips. Never cut standard field shingles for ridge cap use; they are too stiff, prone to cracking at the bend, and lack the sealant strip orientation needed for proper sealing.
Installation sequence:
- Snap a chalk line along the ridge 6 inches from the peak on each side to create a guide for alignment
- Begin at the end of the ridge opposite the prevailing wind direction — ridge cap nails and seams should face away from the direction wind commonly approaches
- Nail each ridge cap piece with two nails, 1 inch from each side and 5 to 6 inches from the exposed bottom edge, keeping nails in the top 3 inches of the piece and outside the exposure zone
- Overlap each successive piece by the exposure shown on the package (typically 5 inches for standard hip-and-ridge products, 4 inches for high-profile products)
- The final two pieces at the peak are a capped pair: one is nailed, the second is face-nailed and the nail heads covered with roofing cement
High-wind ridge cap: in areas with design wind speeds above 110 mph, use a 6-nail pattern for ridge cap pieces and apply roofing cement under each piece's sealant zone to supplement the adhesive [3].
Shingle Exposure and Headlap
Exposure is the portion of a shingle visible after the next course is installed above it. Headlap is the minimum overlap between the top edge of one shingle and the bottom edge of the shingle two courses above it — the zone that must be maintained for weathertightness.
For standard architectural shingles: the correct exposure is typically 5.5 inches. This provides the minimum required headlap of 2 inches per ARMA and most manufacturer guidelines [1][2].
Increasing exposure beyond manufacturer specifications — even by half an inch — reduces the headlap zone and increases the chance of water reaching the deck through the overlap. It also voids the product warranty in most cases.
Setting exposure: use a chalk line snapped across the deck at each course. For a 5.5-inch exposure, snap lines at 5.5 inches, 11 inches, 16.5 inches, and so on from the bottom edge of the first field course. Align the bottom edge of each shingle course to the chalk line. Do not rely on eyeballing the exposure course to course — accumulated error creates a visible wavy pattern by mid-roof and changes the headlap across the field.
Cost Per Square
The cost to install asphalt shingles in 2026 ranges from $150 to $450 per roofing square (100 square feet) installed, depending on shingle grade, region, and roof complexity [4][5].
| Shingle Type | Material Cost / Square | Installed Cost / Square |
| 3-tab (standard) | $80-$120 | $150-$250 |
| Architectural / dimensional | $100-$180 | $200-$350 |
| Impact-resistant (Class 4) | $160-$280 | $320-$450 |
| Designer / luxury | $200-$400 | $380-$600 |
Labor typically represents 60-70% of total installed cost. Factors that increase cost: steep pitch (above 8:12), complex roof with many valleys and dormers, tear-off of existing layers, and coastal or high-wind specifications requiring 6-nail patterns and enhanced underlayment.
Getting quotes: for a full roof replacement, obtain at least three quotes from licensed contractors. Specify the shingle product by manufacturer and SKU — not just "architectural shingles" — so quotes are comparing identical materials.
For licensed roofing contractors in your area who follow manufacturer installation specifications, find licensed roofers near you.
Real-World Case Study
Maria T. of Atlanta, Georgia hired a contractor through a referral who presented low-cost installation. The contractor skipped starter strips at the eave and rake edges and fastened shingles with a pneumatic staple gun rather than roofing nails — both clear violations of ARMA installation guidelines and local building code.
Three years after installation, a storm with sustained winds of 58 mph peeled back the eave-edge shingles on two slopes. Water entered through the exposed underlayment, damaged the roof decking on one slope, and caused interior ceiling damage in two rooms. The total cost of repair and complete re-installation was $4,200.
The re-installed roof was completed by a licensed contractor who pulled the required permit. The city inspection passed on first review. The inspector specifically confirmed starter strips at eave and rake edges, nail type and placement, and valley flashing — the three areas the original contractor had failed.
The cost difference between the original cut-rate installation and the code-compliant job was roughly $800. The failure cost $4,200 plus the homeowner's time and the interior repair costs on top of that.
Disclaimer: Installation specifications in this guide reflect general ARMA and NRCA industry standards for 2026. Local building codes, specific product requirements, and regional wind and climate conditions may require different specifications. Always consult your local building department and the specific shingle manufacturer's installation instructions before beginning a roofing project. Roofing work carries serious fall hazards — work at heights above 10 feet should be performed only by trained contractors with proper fall protection equipment.
Sources & References
- [1] Asphalt Roofing Manufacturers Association (ARMA). (2025). "Residential Asphalt Roofing Manual and Quality Control Guidelines." https://www.asphaltroofing.org
- [2] GAF. (2025). "Timberline HDZ Installation Instructions and Pro Field Guide for Steep-Slope Roofs." https://www.gaf.com
- [3] Owens Corning. (2025). "Duration Shingle Installation Instructions." https://www.owenscorning.com
- [4] This Old House. (2026). "Shingle Roof Cost Guide." https://www.thisoldhouse.com
- [5] Forbes Home. (2026). "How Much Does a Shingle Roof Cost?" https://www.forbes.com/home-improvement/roofing
- [6] National Roofing Contractors Association (NRCA). (2025). "NRCA Roofing Manual: Steep-Slope Roof Systems." https://www.nrca.net
- [7] Bob Vila. (2025). "Asphalt Shingle Roof Installation Guide." https://www.bobvila.com


James is a licensed roofing contractor with 20 years of experience in roof installation, inspection, and repair across the U.S. South and Midwest. He specialises in asphalt shingles, metal roofing, and storm damage restoration. On NearbyHunt, James offers practical advice on roof maintenance, insurance claims, and selecting the right materials for long-lasting protection.

Jacob is a licensed roofing contractor with over 18 years of experience in roof inspection, installation, and restoration. Based in Texas, he has led hundreds of successful roofing projects across residential and commercial properties. Jacob is also a certified storm damage specialist, ensuring that all NearbyHunt roofing content meets industry best practices and safety standards.