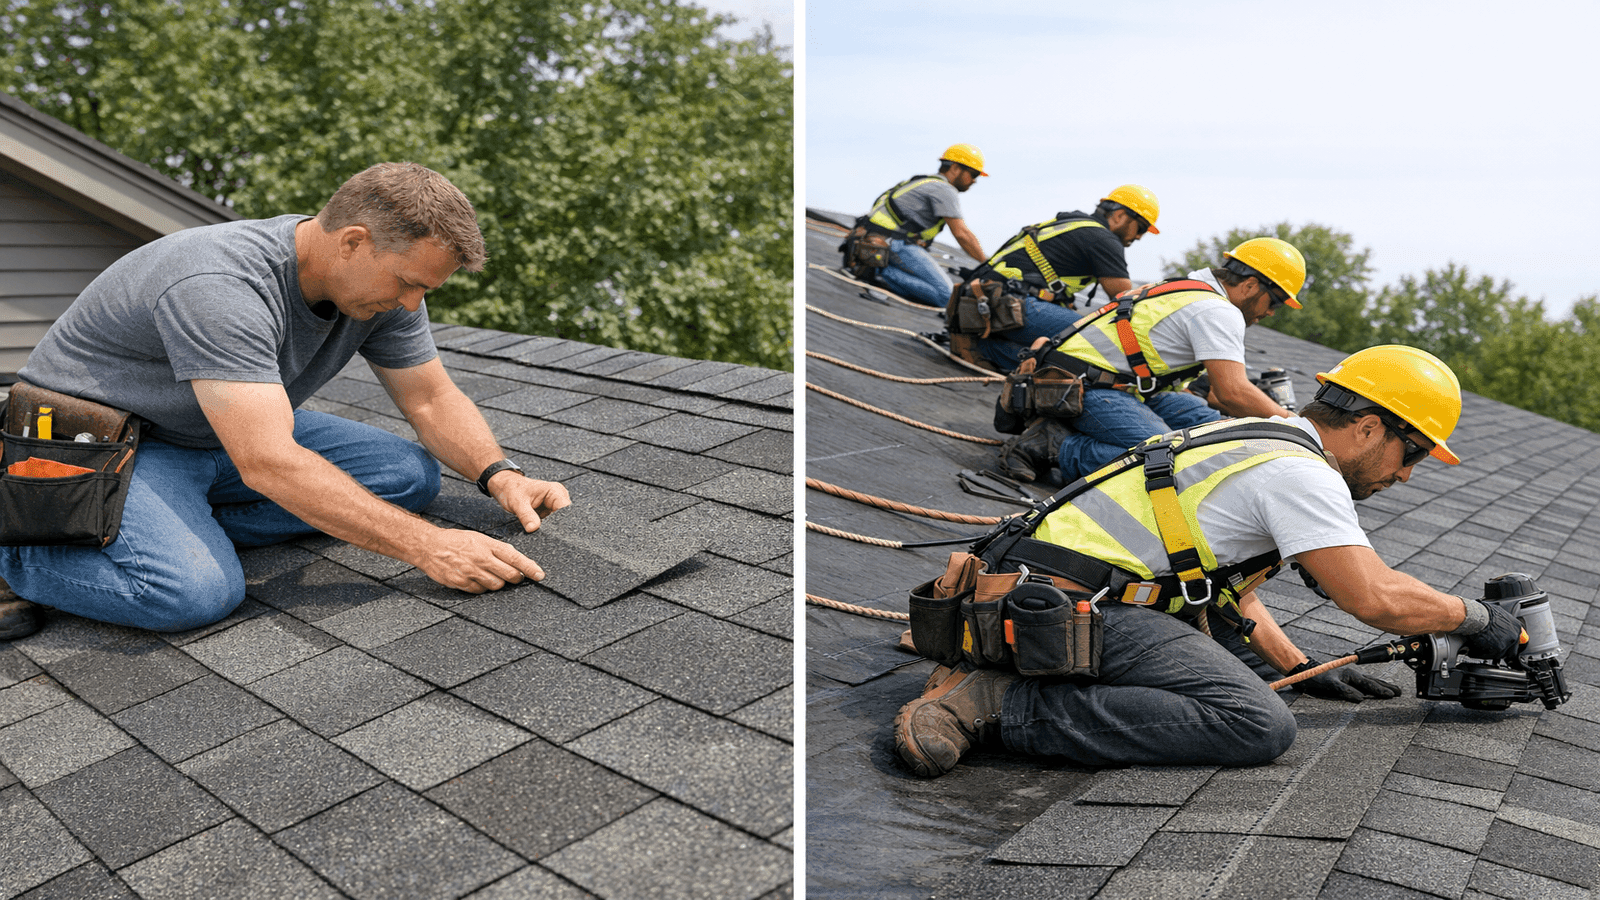
- Step flashing woven into each shingle course along the skylight curb, not surface-mounted tape, is the single most important factor in a leak-free installation
- Fixed skylights cost $1,500 to $4,500 installed for a standard unit; venting skylights run $3,500 to $8,500, depending on manual or motorised operation
- Minimum slope for a standard deck-mounted skylight is 15 degrees (roughly 3:12); flat-glass units rated for low-slope require a curb mount and a minimum 2 degrees of slope for drainage
- Tubular skylights are the most cost-effective option for small spaces: $600 to $1,100 installed, no structural framing required in most cases
- Never hire a general contractor who is not also a licensed roofer for skylight installation — improper flashing is the source of 70%+ of skylight leak callbacks in the NearbyHunt contractor network
A skylight transforms a dark interior room into a sun-filled living space, reduces daytime electricity costs, and — when properly installed — adds measurable value to a home without compromising the roof system that protects everything beneath it. The critical phrase in that sentence is "properly installed." More than most roofing penetrations, a skylight installation that cuts corners on flashing detail will leak, sometimes immediately and sometimes years later, when the real financial damage has already been done.
This guide covers the full skylight installation process: choosing among fixed, venting, and tubular options; understanding deck-mounted versus curb-mounted attachment; rough opening sizing; the step-flashing and counter-flashing sequence that determines whether your skylight stays watertight for 20 years; interior light shaft finishing; and realistic cost expectations. For a broader roofing context, material comparisons, and how skylights fit into a re-roofing project, see the complete roofing installation guide on NearbyHunt.
James Carver is a licensed roofing contractor with 1,800-plus residential projects across the U.S. South and Midwest. Jacob Hollis, a Certified Storm Damage Specialist with 15 years of insurance claim and roofing inspection experience, reviewed this article for technical accuracy.

Get quotes from top-rated pros.
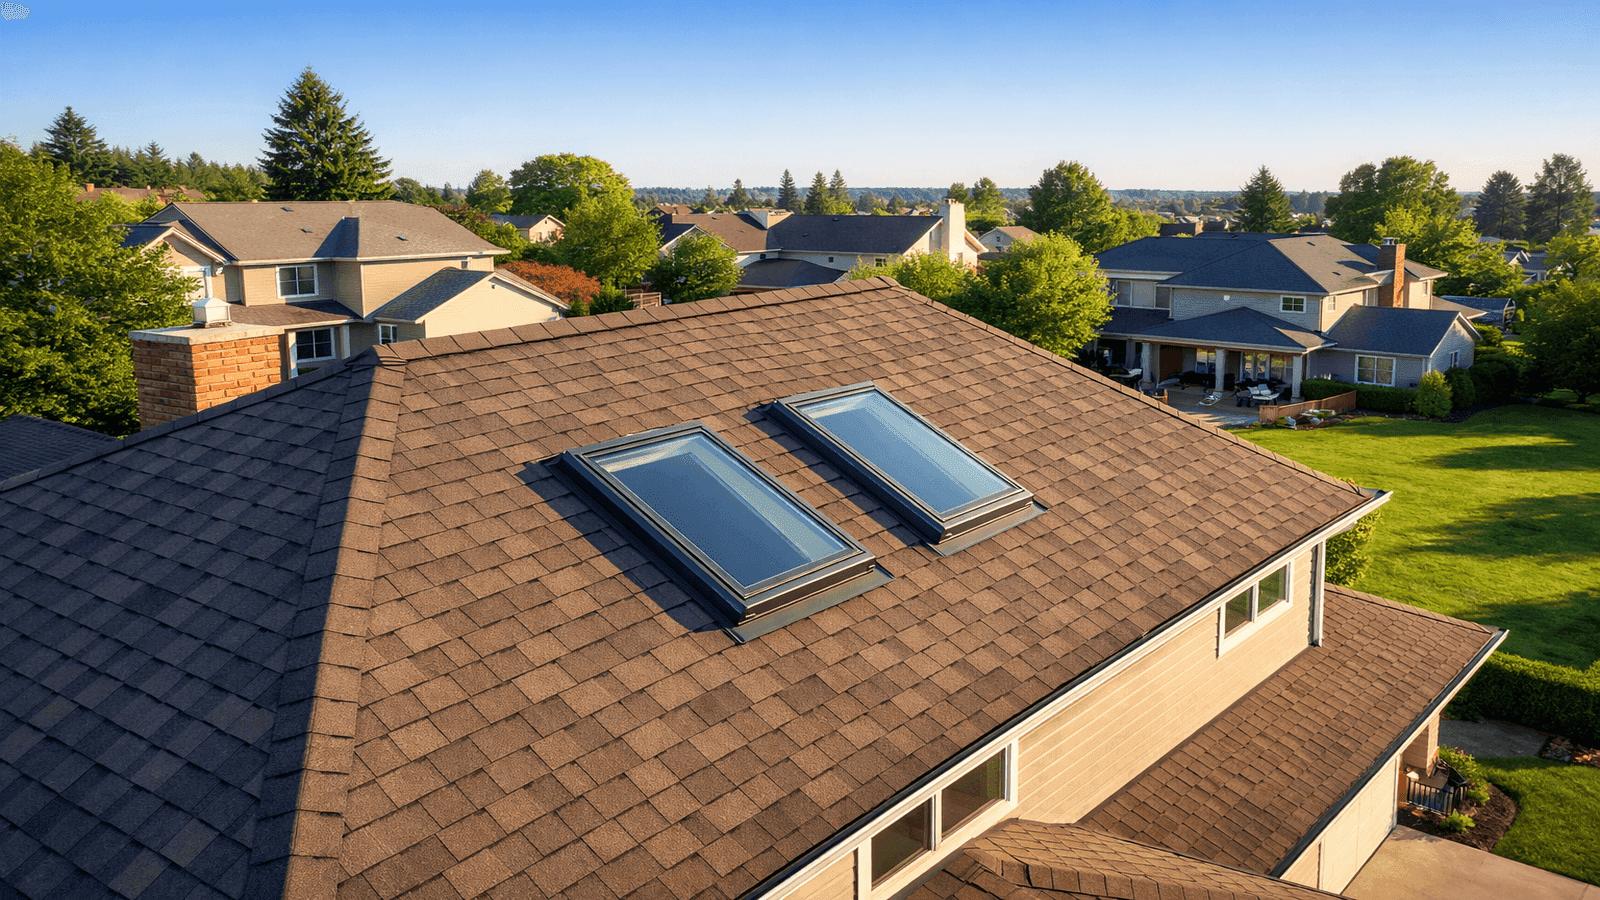
Photo: Wide aerial view of a suburban home with two VELUX-style skylights installed on an asphalt shingle roof, morning light
Skylight Types
Three distinct skylight categories exist, and each serves a different purpose, fits a different budget, and involves a different installation complexity.
Fixed Skylights
Fixed skylights are sealed, non-opening units. They admit light but provide no ventilation. Because there are no moving parts, no gaskets that compress and wear, and no mechanical operators to maintain, fixed units are typically the most durable and the least likely to develop operational leaks over time.
Best applications include living rooms, dining rooms, hallways, stairwells, and any space where daylight is the goal and air movement is handled by HVAC. Fixed skylights are available in sizes ranging from 14 inches by 14 inches (a small accent light) up to large architectural units exceeding 4 feet by 8 feet for dramatic effect.
Cost range: $1,500 to $4,500 installed for a standard residential unit (approximately 2 feet by 4 feet) on an asphalt shingle roof, including the unit, flashing kit, rough opening framing, and labor.
Venting Skylights
Venting skylights open, either by manual hand crank or electric motor (often solar-powered). When open, they create a stack-effect draft: hot air rises and escapes through the roof while cooler exterior air is drawn in through the windows below. This passive ventilation effect significantly reduces cooling loads on humid summer evenings without running mechanical systems [1].
Best applications include kitchens (venting cooking odours and steam), bathrooms (exhausting shower humidity to prevent mould growth), and bonus rooms or converted attics where HVAC coverage is limited. VELUX solar-powered venting skylights include rain sensors that automatically close the unit if precipitation begins — a standard feature worth verifying on any venting model you consider.
Cost range: $3,500 to $7,000 installed for manual venting; $4,500 to $8,500 for electric or solar-powered venting. The price premium over fixed units reflects the more complex unit cost, additional weatherstripping, a motorised operator, and rain-sensor wiring.
Venting skylights are more prone to condensation on the glass and along the frame than fixed units, particularly in climates with high indoor humidity. Proper ventilation (briefly opening the skylight to exhaust moisture rather than leaving it open during rainfall) significantly reduces condensation.
I've installed over 200 venting skylights across the South and Midwest, and the number one mistake I see homeowners make is choosing a fixed unit for a bathroom to save $300, then calling me back 18 months later because mould is growing on the ceiling around the frame. In a wet room, spend the extra money for a venting unit. That $300 savings turns into a $900 mold remediation job fast.
Tubular Skylights
Tubular skylights — also called solar tubes, sun tunnels, or light pipes — are not traditional window-style skylights. A small dome collector (10 to 21 inches in diameter) on the roof captures daylight and reflects it down a highly polished aluminum tube into a diffuser lens in the ceiling below. The tube can angle around obstructions in the attic, making tubular skylights the correct solution for rooms where a full skylight would require cutting through an attic that is too congested or offset from the room below.
Tubular skylights require no structural framing modification in most installations. The roof opening is small (10 to 21 inches), the dome has its own integrated flashing system, and total installation time is typically three to five hours for an experienced installer. They provide no view of the sky and limited ventilation (some models offer an optional exhaust fan attachment), but they deliver surprisingly bright diffuse light to bathrooms, hallways, closets, and laundry rooms where a conventional skylight is impractical.
Cost range: $600 to $1,100 installed for a standard 10- or 14-inch tubular unit.
| Skylight Type | Best For | Ventilation | Installed Cost | Maintenance |
| Fixed | Living areas, hallways | None | $1,500–$4,500 | Minimal |
| Venting (manual) | Kitchens, bathrooms | Yes | $3,500–$7,000 | Annual seal check |
| Venting (electric) | All rooms with moisture | Yes, automated | $4,500–$8,500 | Annual seal check |
| Tubular | Small rooms, hallways | Limited | $600–$1,100 | Minimal |
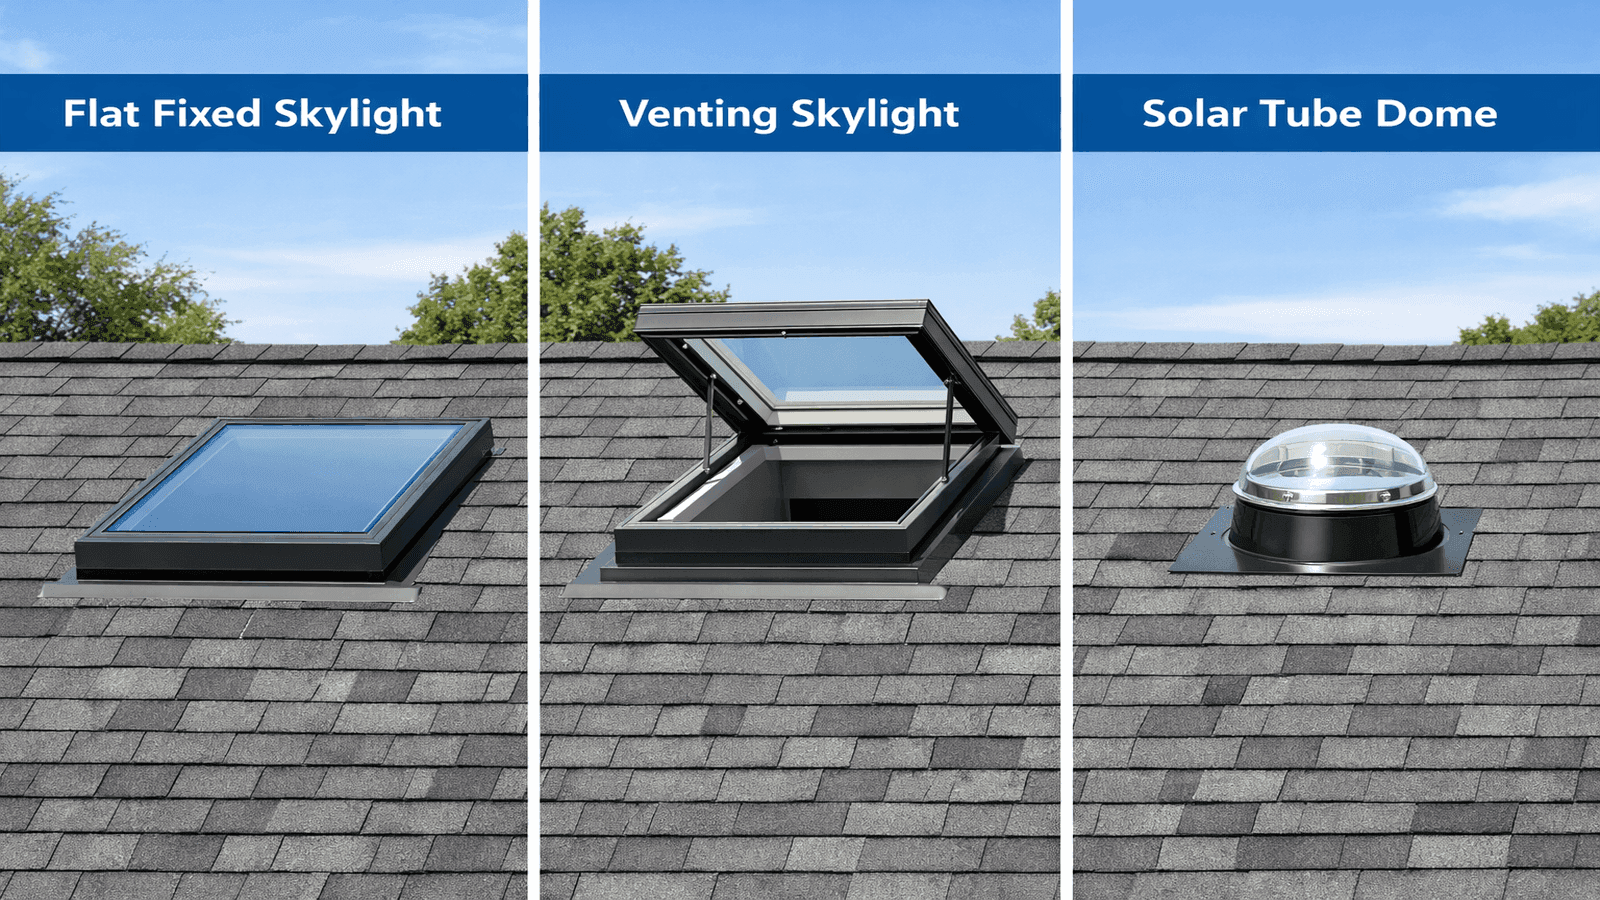
Photo: Side-by-side comparison illustration showing a fixed skylight, venting skylight, and tubular skylight (solar tube) installed on residential roofs, labeled diagram style
Deck-Mounted vs. Curb-Mounted Installation
Before ordering your skylight, you need to understand how it attaches to the roof. The attachment method determines which flashing system you use, which units you can buy, and — critically — whether the installation is correct for your roof's slope.
Deck-Mounted Skylights
Deck-mounted skylights have an integral flange that lays directly on the roof decking beneath the shingles. The flange integrates with a step flashing and counter flashing system to create a watertight seal. Deck-mounted units are sleeker in profile, typically sitting lower against the roof surface than curb-mounted alternatives.
Minimum slope requirement: 15 degrees, which corresponds approximately to a 3:12 pitch (3 inches of rise for every 12 inches of horizontal run). Below this slope, water drains too slowly across the glass, and the risk of water infiltration under the flashing increases substantially. Do not install a standard deck-mounted skylight on a roof below 3:12.
VELUX's deck-mounted "No Leak" series integrates a proprietary self-adhesive underlayment system around the unit before the step flashing goes on, creating a waterproof membrane backup behind the flashing [2]. This underlayment system is a meaningful improvement over older installations that relied on step flashing alone as the primary barrier.
Get quotes from top-rated pros.
Curb-Mounted Skylights
Curb-mounted skylights sit on a raised curb — a rectangular wood frame typically built 4 to 6 inches tall above the roof decking surface. The skylight unit rests on top of the curb rather than sitting flat against the deck. Curb-mounted installation is the required method for low-slope roofs (between 2 and 14 degrees), for commercial membrane roofing systems, and for any replacement situation where an existing curb is already in place.
Advantages of curb mounting include easier unit replacement (the curb stays; only the glazing unit needs swapping), better performance on low slopes because the raised profile keeps the glazing edge well above any standing water, and the ability to use larger custom-size glazing units that are not available in deck-mount configurations.
The curb itself must be framed from pressure-treated lumber or with a moisture-resistant barrier applied, because it is a wood element sitting on a roof that sheds water around it rather than over it.
In my experience, half the skylight callbacks I investigate for leaks trace back to a rough opening that someone cut freehand without measuring off the actual framing. One inch of slop in a rough opening means the step flashing doesn't seat flat, and an unseated step flashing will leak. I always snap a chalk line and confirm rafter positions before I touch a saw blade.
Rough Opening Sizing
Proper rough opening sizing is non-negotiable. An opening cut too small causes the installer to force the unit, which stresses the frame and can compromise the seal at the flange. An opening cut too large leaves gaps that are difficult to flash correctly.
Standard practice for deck-mounted skylights is to frame the rough opening to the manufacturer's specified rough opening size — not the visible glass size, which is always smaller. For a VELUX FS M06 unit (the common 21-by-46-inch fixed skylight), the rough opening is 22.5 inches by 47.5 inches. Always confirm the rough opening dimensions in the installation instructions before cutting.
Rough opening framing uses doubled headers at the top and bottom of the opening and doubled trimmer rafters at the sides. In most residential roof framing, the opening will span one rafter bay (one rafter must be cut), requiring headers to carry the load to the adjacent uncut rafters. If the skylight spans two or more rafter bays, an engineer should review the header sizing before framing proceeds.
The rough opening should be cut with a jigsaw or reciprocating saw after the roofing is removed in that section. Never cut the rough opening with roofing material still in place — the material obscures the framing layout and makes it impossible to position headers correctly.
The Installation Process
With the unit selected, the flashing system ordered, and the rough opening framed, installation proceeds in a specific sequence. Deviating from this sequence — particularly by applying the wrong flashing component in the wrong order — is how leaks are introduced.
Step 1: Apply self-adhesive underlayment. For deck-mounted units using manufacturer flashing kits, the first step is wrapping the rough opening perimeter with the provided self-adhesive underlayment. This membrane goes on before any flashing piece, covering the sill (bottom), both sides, and the top of the opening, extending at least 4 inches onto the adjacent roof deck. This is the waterproof backup layer behind the flashing.
Step 2: Set the skylight unit. Lower the unit into the opening from outside (two people required for any unit larger than a small tubular). Confirm the unit is level, plumb in all directions, and properly centered in the opening. Fasten the flange or mounting tabs per the manufacturer's specifications.
Step 3: Install sill flashing. The sill (bottom) flashing piece goes on first because water runs downhill. The sill flashing directs water from beneath the skylight frame over the shingle course below it. This piece laps over — never under — the shingles at the bottom edge.
Step 4: Install step flashing. Step flashing is a series of individual L-shaped metal pieces that are woven between shingle courses along both sides of the skylight. One step flashing piece per shingle course. Each piece is nailed to the decking (never through the shingle), laps over the shingle below it, and is covered by the shingle above it. Step flashing is not optional and it is not replaceable with a single continuous L-shaped strip of metal — individual interlocking pieces are required because a continuous strip cannot flex with thermal expansion without eventually separating from the wall or curb.
Step 5: Install head flashing. The head (top) flashing piece goes on last among the primary flashings, directing water from above the skylight around and away from the top edge of the unit. The top shingle course laps over the head flashing.
Step 6: Install counter flashing (curb-mounted units). On curb-mounted installations, the step flashing laps against the curb sides. Counter flashing — a separate metal piece — then laps over the top edge of the step flashing and is mechanically fastened into the curb. Counter flashing is the element that prevents water from infiltrating behind the step flashing at the curb junction. It must overlap the step flashing by a minimum of 3 inches vertically.
Step 7: Replace shingles. Shingles are cut and installed around the unit, woven with the step flashing on the sides and lapping over the head flashing at the top. No caulk or roofing cement is applied to the primary flashing interfaces — these are shed-water systems, not sealed systems. Roofing cement applied to flashing is a warning sign that the flashing was not installed correctly.
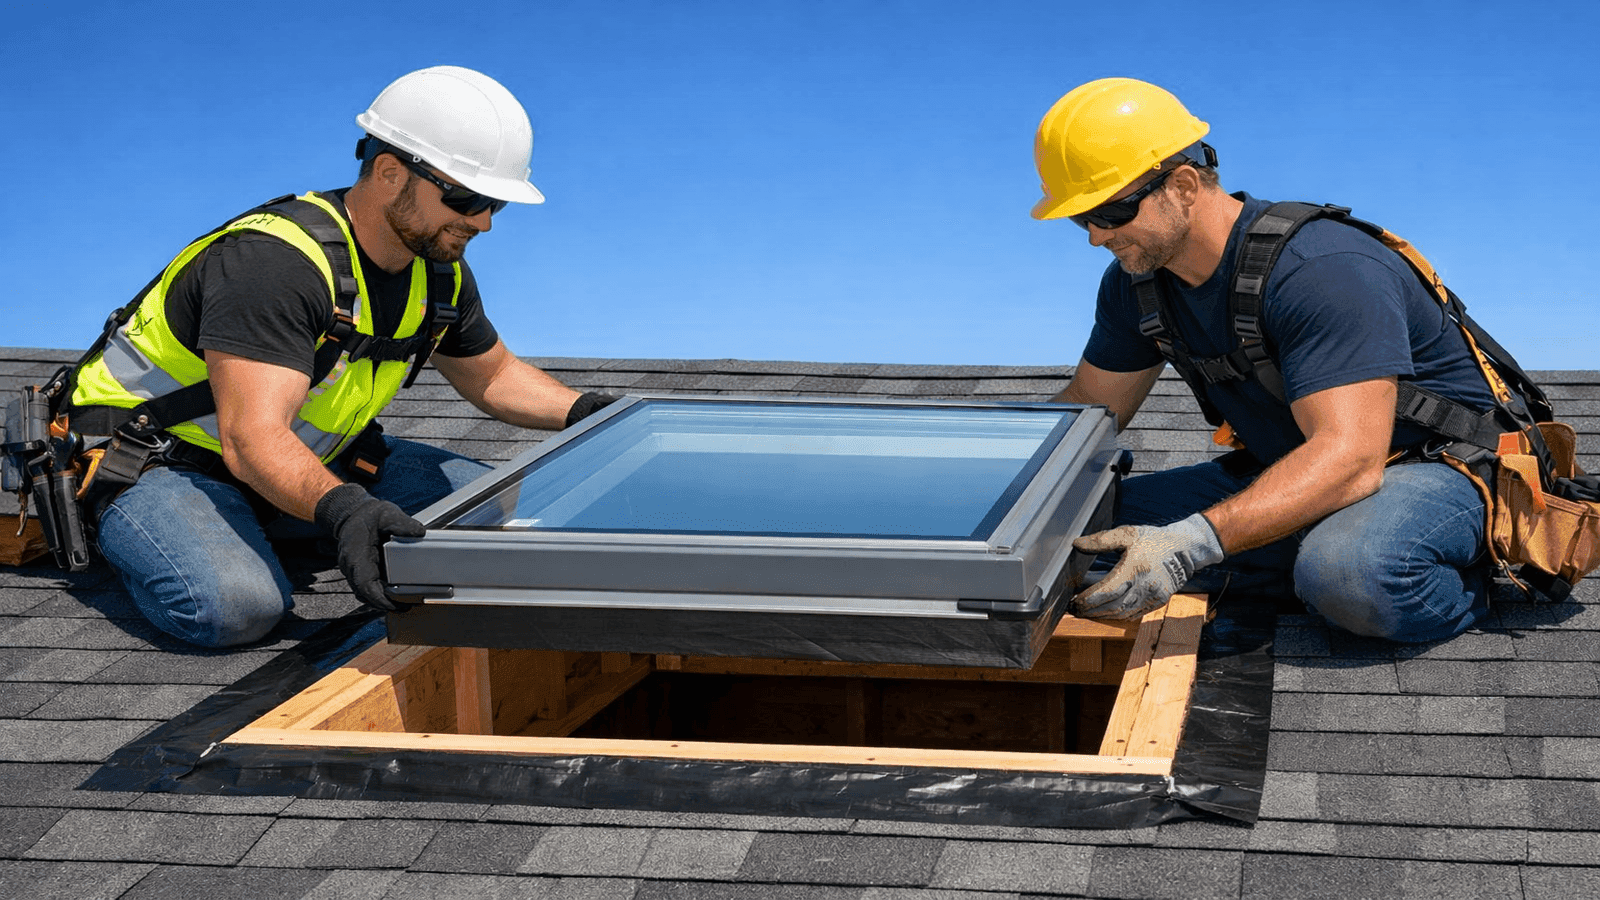
Photo: Two professional roofers in safety gear carefully lowering a skylight unit into a framed rough opening on an asphalt shingle roof with underlayment wrap visible, midday light
Flashing Detail and Why It Fails
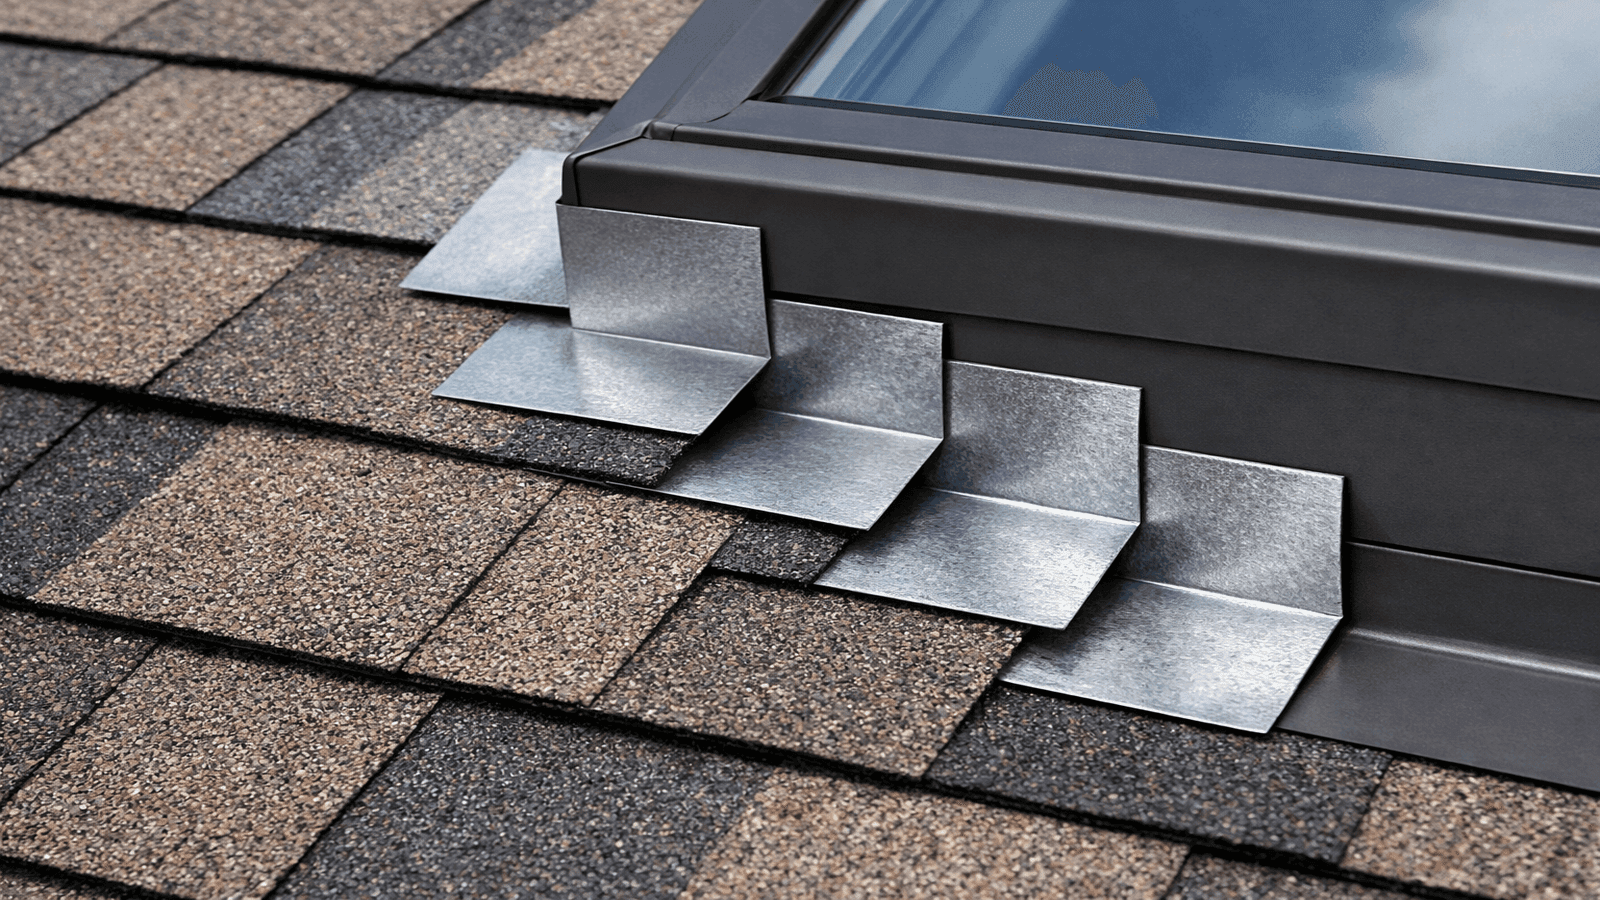
Photo: Close-up professional photograph of step flashing installed along the side of a skylight curb on an asphalt shingle roof, showing each L-shaped piece woven between shingle courses, natural light
The case of Jennifer L. in Charlotte, NC, illustrates how skylight flashing fails in practice. Jennifer hired a general contractor — not a licensed roofer to install a 2-by-4-foot fixed skylight in her master bedroom. The GC's crew used surface-mounted flashing tape applied over the existing shingles instead of proper step flashing woven into each course. The tape sealed the joint initially. Within six months, thermal expansion caused the tape to separate at the corners. The first heavy rain after that led to a $1,100 interior repair: damaged drywall, a stained ceiling, and saturated insulation. A licensed roofing specialist later re-flashed the skylight correctly, using individual step-flashing pieces woven into the replaced shingle courses. The leak stopped permanently.
Surface-mounted flashing tape is not an approved substitute for step flashing by any major skylight manufacturer, including VELUX and Andersen Windows. VELUX's "No Leak" installation warranty is explicitly voided if step flashing is replaced with tape, sealant, or any single-piece continuous flashing [2].
Data from the NearbyHunt contractor network confirms this pattern: more than 70% of skylight leak callbacks that licensed roofers in the network are called to investigate involve one issue — improper or incomplete step flashing at the skylight curb where it meets the surrounding roof. The flashing error is not always as obvious as surface-mounted tape. Common variations include:
- Step flashing pieces nailed through the shingle above rather than into the decking (the nail puncture is a water entry point)
- Step flashing is installed in a continuous piece rather than individual overlapping units
- Step flashing that runs only partway up the side of the curb, leaving the upper portion unprotected
- Counter flashing omitted entirely on curb-mounted units, leaving step flashing exposed at the top edge
- Roofing cement is used to seal the top of the step flashing against the curb, which becomes brittle and cracks within two to three seasons
Condensation Management
Condensation on a skylight is not a leak. Condensation forms on the interior glass surface when warm, humid interior air contacts cold glass. It appears as water droplets or foggy glass and can drip onto the window frame and sill if left unaddressed. Condensation is most common in bathrooms, kitchens, and humid climates during winter months.
Prevention measures:
- Choose double-pane or triple-pane glazing with low-E coating. A quality double-pane unit with low-E glass maintains a warmer interior surface temperature, reducing condensation frequency significantly [3].
- Use a venting skylight in bathrooms and kitchens rather than a fixed unit. Briefly opening the skylight after a shower or cooking exhausts moisture before it contacts the glass.
- Maintain interior relative humidity below 45%. A whole-house humidifier set above 50% will produce condensation on any glazing, including skylights.
- Verify that the light shaft (the interior framed tunnel from the ceiling opening to the skylight) is fully insulated. A poorly insulated light shaft allows cold attic air to cool the frame and glass from the edges, increasing condensation. Proper attic ventilation surrounding the shaft also reduces the cold-air exposure that drives condensation — see the NearbyHunt guide on attic ventilation and roof venting for details.
Condensation is not a warranty issue and is not a reason to call a roofer. If water appears at the skylight frame after rain, particularly at the corners, that is a leak, not condensation, and it requires a flashing inspection.
> James Carver — Licensed Roofing Contractor:
> "I get called to investigate 'leaking skylights' at least once a month that turn out to be condensation, not infiltration. You can tell the difference easily: condensation appears during or after cold overnight temperatures, shows up uniformly across the glass, and produces a small wet ring at the base of the frame. A real leak shows up specifically after rain events, appears at the corners or sides of the frame, and may stain the drywall below on the ceiling. If you're unsure, wipe the frame dry on a clear day and watch it for a week — condensation will return with the next cold night; a leak will not."
Minimum Roof Pitch Requirements
| Skylight Type | Minimum Slope | Notes |
| Standard deck-mounted (flat glass) | 15° (3:12) | Manufacturer minimum; most require 3:12–60:12 |
| Low-slope deck-mounted | 2° (approx. 0.5:12) | Specialized unit required; confirm with manufacturer |
| Curb-mounted | 2° (0.5:12) | Standard minimum when curb height is 4"+ |
| Tubular skylight | 5° (1:12) | Flexible tube accommodates most pitches |
| Domed curb-mounted | 0° (flat roof) | Requires positive drainage on roof membrane |
Installing a skylight below the manufacturer's minimum pitch requirement voids the warranty and virtually guarantees infiltration during heavy rain. If you have a low-slope roof and want a skylight, the conversation with your contractor must begin with confirming that the unit specified is rated for your actual roof pitch — not the pitch you think you have.
Get quotes from top-rated pros.
Interior Finishing and Light Shafts
The interior finish work is what most homeowners see and remember, but it is also where energy efficiency and aesthetics can diverge if the light shaft is framed carelessly.
A light shaft is the framed tunnel from the ceiling plane up to the skylight opening at the roof. On a vaulted ceiling where the skylight sits directly above the room, no light shaft is needed — the skylight is visible from inside without any tunnel. On a home with an attic between the roof and the ceiling, a light shaft must be framed.
Light shafts come in three configurations:
Straight shaft: The opening is the same size at the ceiling as at the skylight. Maximum light transmission with minimum interior brightness due to narrower ceiling opening relative to the skylight size.
Splayed (flared) shaft: The ceiling opening is larger than the skylight opening. Shafts splayed outward at 15 to 45 degrees from vertical produce significantly more interior illumination because the expanded ceiling opening captures and redirects more of the incoming light. A splayed shaft also reduces the "tunnel" appearance that a straight shaft creates.
Offset shaft: Used when the skylight is positioned at an angle or offset from directly above the target room — common in bathrooms where the skylight must avoid a ceiling fan or fixture. The shaft angles through the attic to deliver light where needed.
All light shaft walls must be drywalled, taped, and painted white or near-white. A dark-painted or unfinished light shaft absorbs the light rather than reflecting it into the room, defeating the purpose of the installation. Shafts should be insulated to at least R-15 on all walls to prevent condensation on the shaft walls and minimize thermal loss through the attic bypass.
Trim at the ceiling opening should be cased like a window — square-edge casing or simple picture-frame trim is standard. VELUX and Andersen sell prebuilt light shaft kits with pre-primed drywall panels sized to their skylight dimensions, which simplifies the finish work considerably.
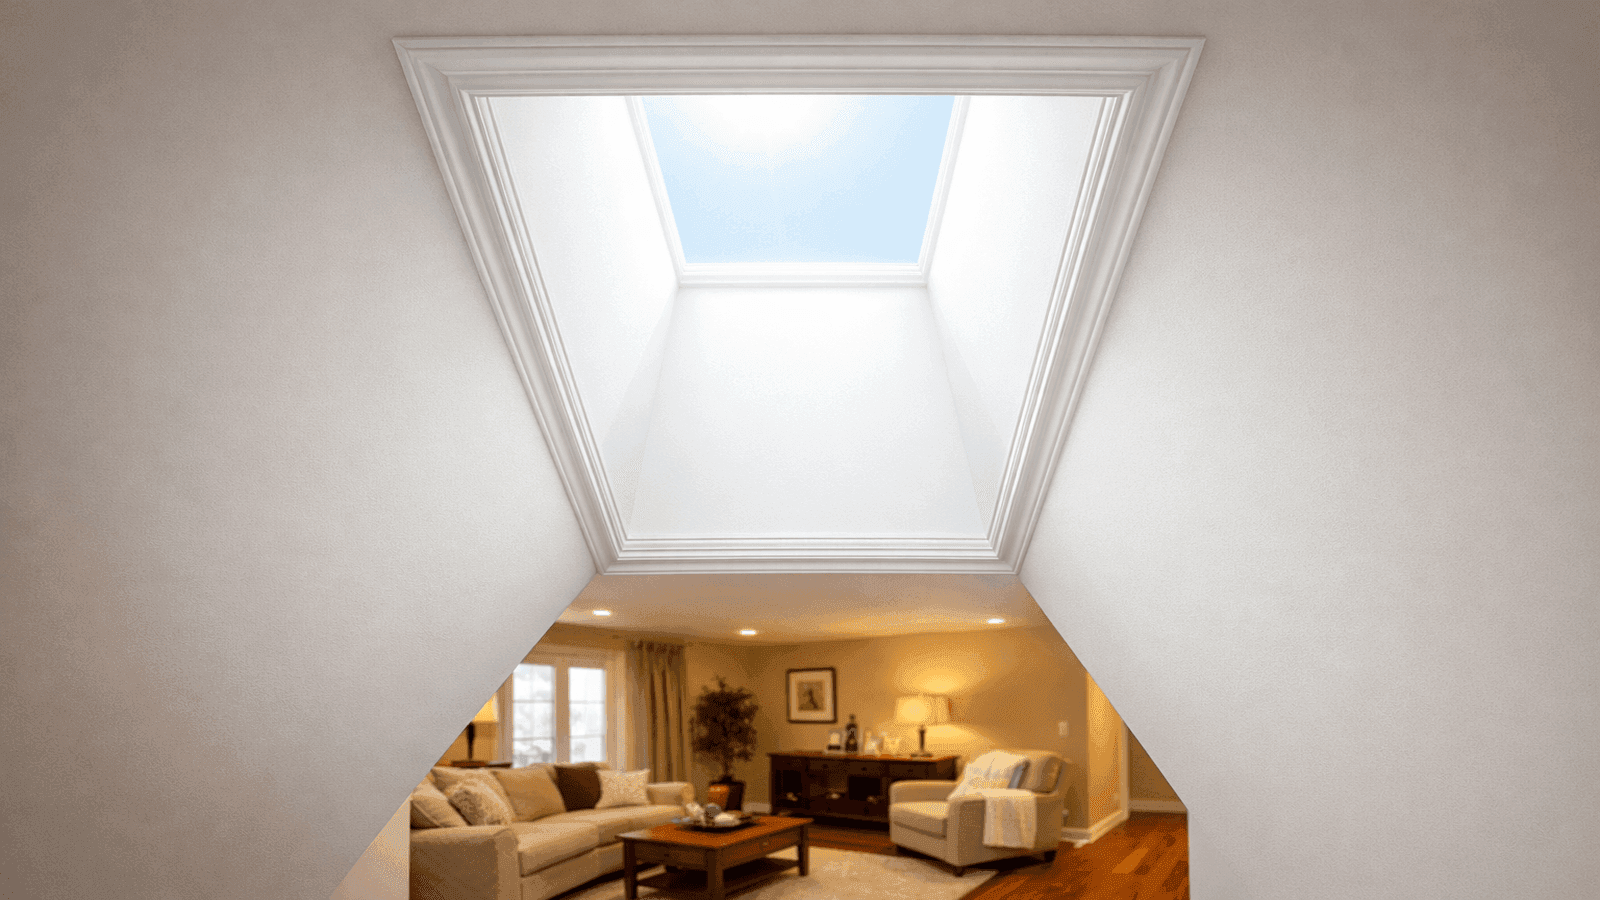
Photo: Interior view of a finished skylight light shaft with splayed walls painted white, bright daylight streaming through the ceiling opening into a residential living room
Skylight Installation Cost
A standard 2-foot by 4-foot fixed skylight on an asphalt shingle roof with a simple straight light shaft costs $1,500 to $4,500 installed in most U.S. markets. The range is wide because unit quality, roof complexity, shaft length, and regional labor rates all affect the total significantly.
| Project Type | Typical Cost Range | Notes |
| Tubular skylight (10–14 in.) | $600–$1,100 | No shaft framing required |
| Fixed skylight, standard size | $1,500–$4,500 | Includes flashing, shaft, trim |
| Fixed skylight, large (3×5 ft+) | $3,000–$6,500 | More structural work required |
| Venting skylight (manual) | $3,500–$7,000 | Includes operator hardware |
| Venting skylight (electric/solar) | $4,500–$8,500 | Includes motor, rain sensor |
| Skylight replacement (existing opening) | $800–$2,500 | No new rough opening required |
Labor typically accounts for $500 to $1,500 of the total project cost. Factors that increase labor cost include steep roof pitch (above 8:12), two-story height, tile or slate roofing (requires careful removal and reinstallation around the unit), long or complex light shaft framing, and the need to reroute electrical for a motorized unit.
The replacement case: If an existing skylight is leaking and you are deciding whether to repair or replace it, the decision usually comes down to unit age. If the existing unit is under 10 years old, a re-flash by a licensed roofer ($400 to $900) is often sufficient. If the unit is 15 to 20 years old, the glazing seal may be failing separately from any flashing issue — full replacement is usually the more cost-effective long-term choice because re-flashing a unit with a failing seal solves only one of two problems.
Repair vs. Replace: Decision Guide
| Condition | Recommended Action |
| Unit under 10 years, leak at flashing | Re-flash only ($400–$900) |
| Unit over 15 years, fogging between panes | Full replacement (sealed unit failed) |
| Unit over 15 years, leak at flashing | Full replacement |
| Condensation on interior glass | No repair needed — manage humidity |
| Cracked or broken glazing (any age) | Full replacement |
| Unit functional, no leaks, want upgrade | Optional replacement for better insulation |
In 20 years I've only seen three skylight flashing jobs that held up long-term when they were done wrong the first time," Carver says. "The homeowners who saved $200 by hiring a handyman instead of a roofer consistently ended up spending $800 to $1,500 fixing the interior before they spent another $600 to $900 on a proper re-flash. The math never works out in their favor.
Finding a Qualified Contractor
Skylight installation requires a contractor who is licensed specifically as a roofer, not a general contractor or a window installer. The critical competency is flashing — the ability to correctly integrate step flashing into each shingle course requires roofing knowledge that most general contractors lack. If you need a broader understanding of what a qualified roofer should provide, the roof inspection checklist on NearbyHunt outlines what professional-grade work looks like and which red flags disqualify a contractor before the project begins.
When interviewing contractors, ask the following:
- Are you a licensed roofing contractor (not just a general contractor)?
- Do you use the skylight manufacturer's specified flashing kit, or a generic alternative?
- How many skylights have you installed in the past year?
- Will you woven individual step flashing pieces into each shingle course, or use a continuous flashing strip or tape?
- Does your work include a separate roofing warranty from your company in addition to the manufacturer's warranty?
A contractor who uses the term "step flashing" correctly and can describe the weaving sequence without prompting has likely done this work correctly before. A contractor who talks about "caulking the edges" or "flashing tape" as the primary waterproofing method has not.
Sources & References
Disclaimer: This article is for general informational purposes only and does not constitute professional roofing or engineering advice. Skylight installation involves structural and waterproofing work that may require a licensed contractor and building permits in your jurisdiction. Always verify local code requirements and manufacturer specifications before beginning any roofing project.
- This Old House — Skylight Installation Guide: https://www.thisoldhouse.com/ceilings/21016521/how-to-install-a-skylight
- VELUX USA — Mounting and Flashing Requirements: https://www.veluxusa.com/mounting-and-flashing
- Fine Homebuilding — Skylight Flashing Best Practices: https://www.finehomebuilding.com/forum/proper-flashing-for-an-existing-skylight
- NRCA — Roofing Manual, Steep-Slope Roof Systems
- Bob Vila — Skylight Installation Cost Guide: https://www.bobvila.com/articles/skylight-installation-cost/
- Forbes Home — Skylight Installation Cost 2026: https://www.forbes.com/home-improvement/windows/skylight-installation-cost/

James is a licensed roofing contractor with 20 years of experience in roof installation, inspection, and repair across the U.S. South and Midwest. He specialises in asphalt shingles, metal roofing, and storm damage restoration. On NearbyHunt, James offers practical advice on roof maintenance, insurance claims, and selecting the right materials for long-lasting protection.

Jacob is a licensed roofing contractor with over 18 years of experience in roof inspection, installation, and restoration. Based in Texas, he has led hundreds of successful roofing projects across residential and commercial properties. Jacob is also a certified storm damage specialist, ensuring that all NearbyHunt roofing content meets industry best practices and safety standards.