- Underlayment is the moisture barrier between your roof deck and finish materials — its quality determines how well your home holds up when shingles are compromised.
- No. 15 felt suits mild climates with same-day shingle install; No. 30 felt handles low-slope and multi-day applications; synthetic is the strongest choice for durability and wind resistance.
- IRC R905.1.2 requires ice and water shield extending at least 24 inches inside the exterior wall line in cold climates, plus full valley and penetration coverage.
- Horizontal laps must be at least 6 inches; vertical end laps at least 12 inches — always with upper courses overlapping lower courses.
- Cap nails are required when underlayment will be exposed to wind before shingling; staples are only acceptable for immediate cover situations.
- Installed underlayment costs $1.50 to $3.00 per square foot; skipping ice and water shield in valleys can produce leak repairs costing 10 to 20 times the saved material cost.
Roof underlayment is the moisture barrier installed directly over the roof deck, beneath shingles or other finish materials. It is the layer standing between your home's interior and whatever water gets past the outer surface — and it fails far more often than homeowners realize. This guide covers every decision point in the underlayment installation process: material types, code-mandated ice and water shield placement, proper lapping, fastener selection, and real cost ranges for 2026. For a full overview of the roofing installation process, see the complete roofing installation guide.
James Carver is a licensed roofing contractor with over 20 years of experience and 1,800-plus residential projects across the U.S. South and Midwest. The guidance in this article reflects field-verified best practices, current International Residential Code (IRC) requirements, and manufacturer specifications from Owens Corning, GAF, Atlas Roofing, and IKO [1][2].
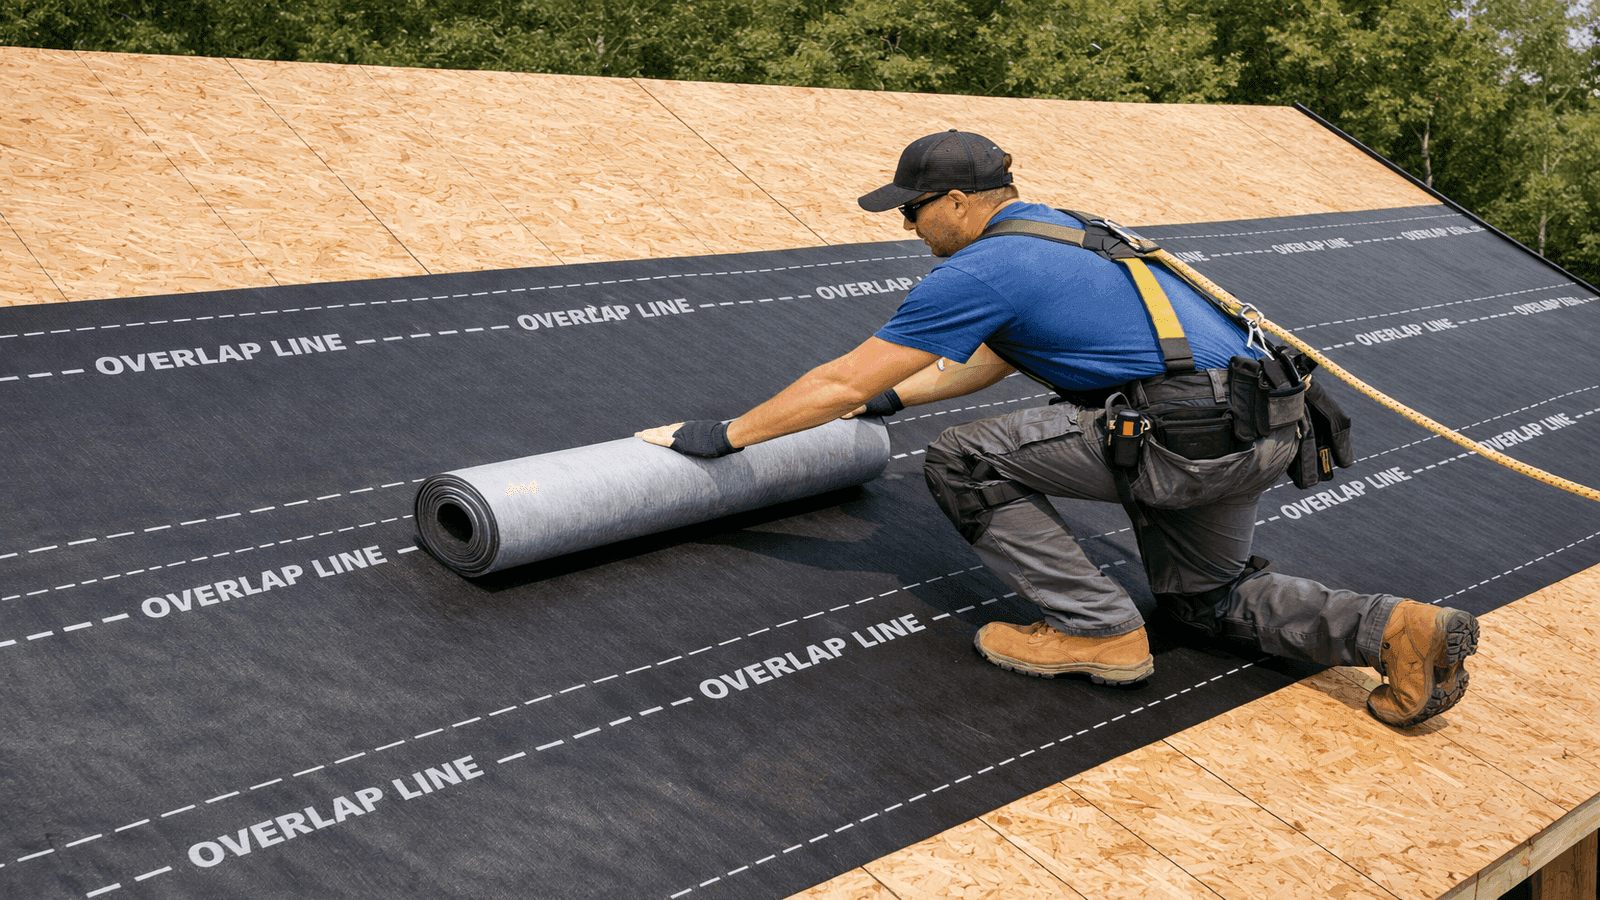
Photo: NearbyHunt
In more than two decades and 1,800-plus residential roofing projects across the South and Midwest, I can count on one hand the number of leak callbacks that turned out to be a shingle problem. The overwhelming majority trace back to underlayment — either the wrong product for the slope, skipped ice and water shield in valleys, or laps done backwards. Underlayment is not where you save money. It is where you buy insurance against every mistake the shingles cannot cover.

What you will learn:
- The three underlayment types and when to use each
- Where ice and water shield is legally required by the IRC
- Correct lapping distances for horizontal and vertical seams
- Staples versus cap nails — when each is appropriate
- Material and installed cost ranges for 2026
A roofer rolling out synthetic underlayment across a plywood roof deck on a residential home, showing overlap guides marked on the surface.
Synthetic underlayment being installed on a residential roof deck. Overlap guides printed on the surface help crews maintain consistent 6-inch horizontal laps.*
The Three Underlayment Types
Roofing underlayment falls into three categories. Knowing the differences helps you verify that your contractor is specifying the right product for your roof's pitch, climate, and finish material.
No. 15 Felt
No. 15 asphalt-saturated felt is the lightest and least expensive option, made from organic or fiberglass mat saturated with asphalt. It weighs roughly 8 to 12 pounds per square (100 sq ft) — considerably less than its designation implies. No. 15 felt costs approximately $0.08 to $0.12 per square foot for materials alone.
It is acceptable for standard-slope residential roofs (4:12 and above) in mild climates where the underlayment will not be exposed for more than a few hours before shingles are installed. Because No. 15 felt absorbs moisture readily, it wrinkles when wet and can buckle beneath shingles if left exposed. In high-humidity environments, this wrinkling creates telegraphed ridges visible through finished shingles.
Use cases: budget reroofs in dry climates, low-exposure-time installations, secondary layers under steep-slope tile where budget constraints apply.
No. 30 Felt
No. 30 felt is heavier — roughly 16 to 27 pounds per square — and more resistant to wrinkling than No. 15. It holds fasteners better, tears less during installation, and provides a more durable secondary weather barrier. Material cost runs $0.12 to $0.20 per square foot.
The IRC requires two layers of underlayment on roofs with slopes between 2:12 and 4:12 for asphalt shingles, and No. 30 is the minimum weight recommended for that application. On steeper slopes, many contractors specify No. 30 as a standard upgrade over No. 15, particularly when the roof deck will be exposed during multi-day installs.
Use cases: low-slope asphalt shingle applications, multi-day installs in humid climates, re-roofs where the existing sheathing is uneven.
Synthetic Underlayment
Synthetic underlayment is woven or spun-bonded polypropylene or polyethylene. It is dramatically lighter than felt — roughly 23 pounds per square versus 130 pounds for the felt equivalent — which translates directly into fewer labor-hours and easier handling on steep pitches. Material cost ranges from $0.15 to $0.50 per square foot depending on grade and manufacturer.
The performance advantages are substantial. Synthetic underlayment repels water rather than absorbing it, will not wrinkle from moisture exposure, and can remain exposed to UV for up to six months without degrading — a critical advantage when weather delays interrupt an install [1]. Tensile strength is significantly higher than felt: synthetic products resist tearing around staple and nail penetrations, which reduces the risk of fastener pull-through during wind events before shingles are applied.
Most synthetic products are printed with overlap guides and reference lines, reducing installation error. GAF's FeltBuster, Owens Corning's ProArmor, and IKO's RoofGard are widely used examples with wind ratings up to 200 mph when properly fastened.
Use cases: any residential roof where budget allows, all steep-slope work above 6:12, any install where the deck will be exposed for more than 48 hours, all metal roofing applications.
I switched my crews to synthetic underlayment exclusively about eight years ago. The weight difference alone is worth it — a crew can carry three rolls of synthetic up a 10:12 slope in the time it takes to wrestle one roll of No. 30 felt into position. But the real reason is the UV tolerance. When a storm rolls in at 2 p.m. and shuts us down, I can leave synthetic exposed overnight or across a weekend without worrying. With felt, you are racing the weather every single day.
| Feature | No. 15 Felt | No. 30 Felt | Synthetic |
| Material cost (per sq ft) | $0.08–$0.12 | $0.12–$0.20 | $0.15–$0.50 |
| Weight (lbs per square) | 8–12 | 16–27 | 3–5 |
| UV exposure tolerance | Hours | Hours | Up to 6 months |
| Moisture resistance | Absorbs | Absorbs (less) | Repels |
| Wrinkle risk | High | Moderate | Minimal |
| Tear resistance | Low | Moderate | High |
| Recommended slope (min) | 4:12 | 2:12 (double layer) | 2:12 |
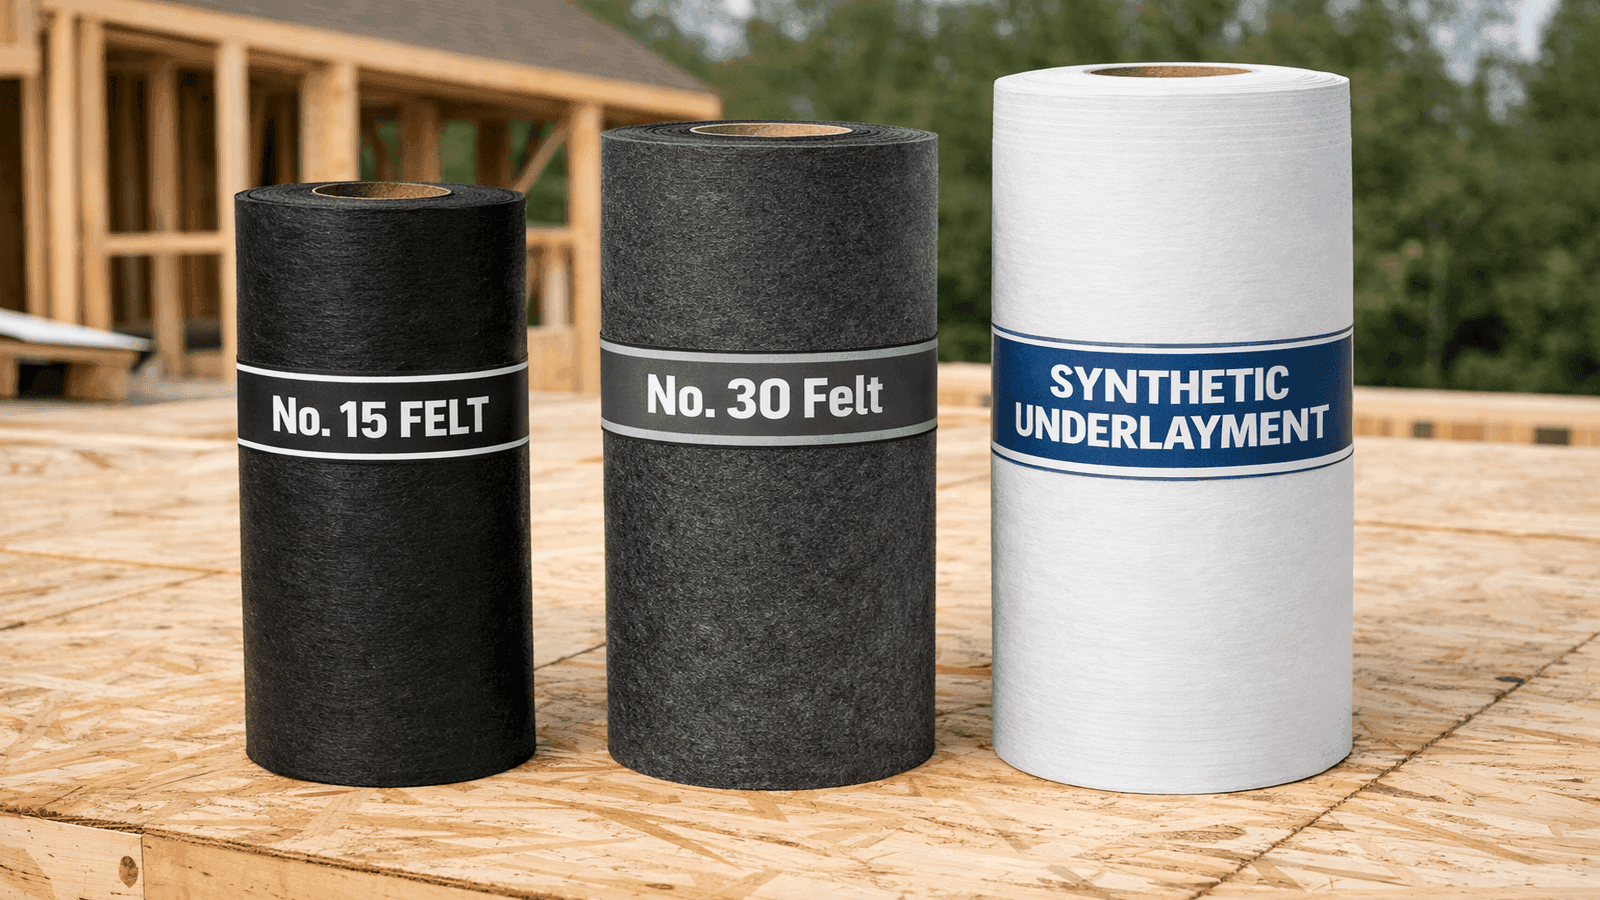
Photo: NearbyHunt
Ice and Water Shield Requirements
Ice and water shield is a self-adhering rubberized asphalt membrane, distinct from standard underlayment. It seals around fastener penetrations, resists wind-driven rain, and prevents water from backing up under shingles when ice dams form at the eave. It costs $0.30 to $0.65 per square foot for materials and is not optional in many jurisdictions.
What the IRC Requires
IRC Section R905.1.2 (ice barriers) mandates that in areas where the average January temperature is 25°F (-4°C) or below, an ice barrier must extend from the eave edge to a point not less than 24 inches inside the exterior wall line of the building. This means the membrane must run far enough up the slope that it covers the area over the exterior wall top plate — not just 24 inches from the physical eave edge.
On a roof with a 12-inch overhang and a standard wall plate location, the code-minimum installation typically requires 36 to 48 inches of ice and water shield measured from the drip edge [2]. Contractors in northern climates routinely run 6 feet of shield to account for severe ice dam years.
Beyond the eave requirement, industry best practice — and manufacturer warranty requirements for most major shingle brands — specify ice and water shield in the following additional locations regardless of climate:
Valleys. All open and closed valleys require ice and water shield. This is where two roof planes intersect and where water concentrates at high velocity. Valley flashing alone is not sufficient.
Around all penetrations. Pipe boots, skylights, chimneys, and HVAC curbs all require ice and water shield underlayment beneath the flashing. The membrane should extend a minimum of 6 inches in all directions from the penetration.
Dormers and wall intersections. Wherever a roof plane meets a vertical wall, ice and water shield should run up the deck and be integrated with the step flashing.
Low-slope sections. Any section of roof with a pitch below 4:12 benefits from full ice and water shield coverage rather than standard underlayment, regardless of climate zone.
The Cost of Getting It Wrong
Sandra K. of Birmingham, Alabama, hired a contractor who skipped ice and water shield in the valleys on a low-slope addition to her home. The slope was 2:12, the addition had two valleys, and the contractor used only standard felt. Two winters later, both valleys developed active leaks that went undetected until water stained the living room ceiling below. By the time the problem was diagnosed, the damage included rotted OSB decking in one valley, soaked insulation, and interior ceiling drywall requiring full replacement. Total interior repair cost: $1,400. The structural repair — complete valley tear-off, deck replacement, and reinstallation with properly integrated ice and water shield — added another $2,100. The original savings from skipping the membrane: roughly $180 in materials.
Approximately 68% of roofing leak calls that licensed roofers in the NearbyHunt network trace to the underlayment layer — specifically, missing or improperly lapped underlayment in valleys and around penetrations. The pattern holds across climate zones: the failure point is almost never the shingles themselves. Among those underlayment-related failures, valley installations account for more than half, consistent with James Carver's field experience across 1,800-plus projects, where valley-related callbacks outnumber all other underlayment issues combined.
Ice and water shield is being installed in a roof valley. The self-adhering membrane seals around fasteners and resists wind-driven rain, which standard felt underlayment cannot do.*
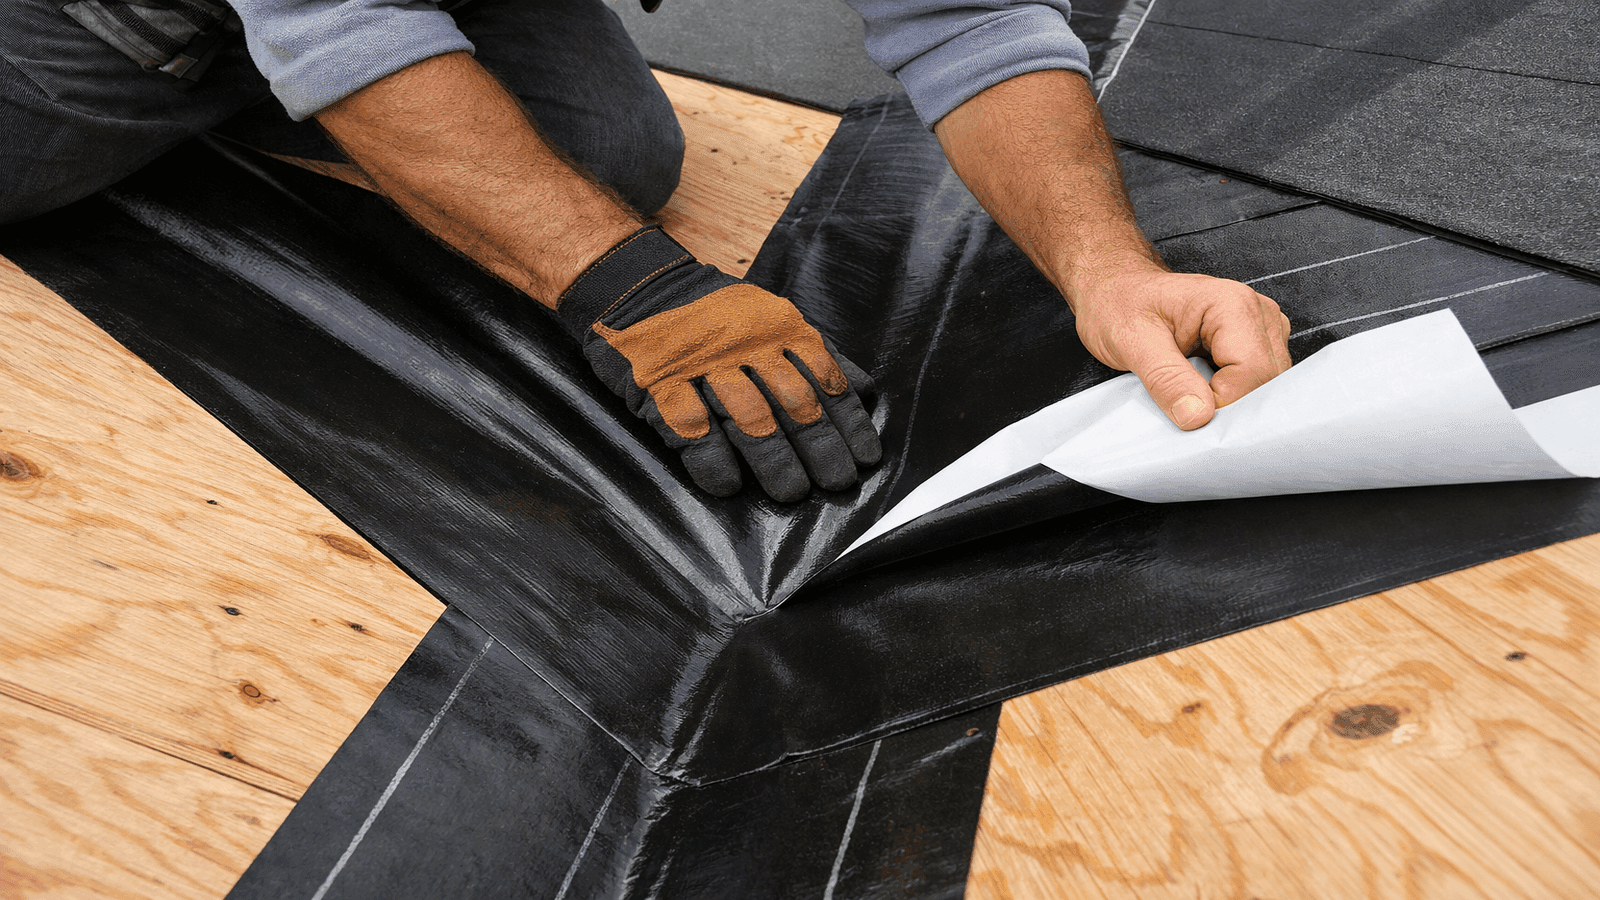
Photo: NearbyHunt
Installation Steps
Correct installation sequence and technique prevent the wrinkles, gaps, and lapping errors responsible for most underlayment failures.
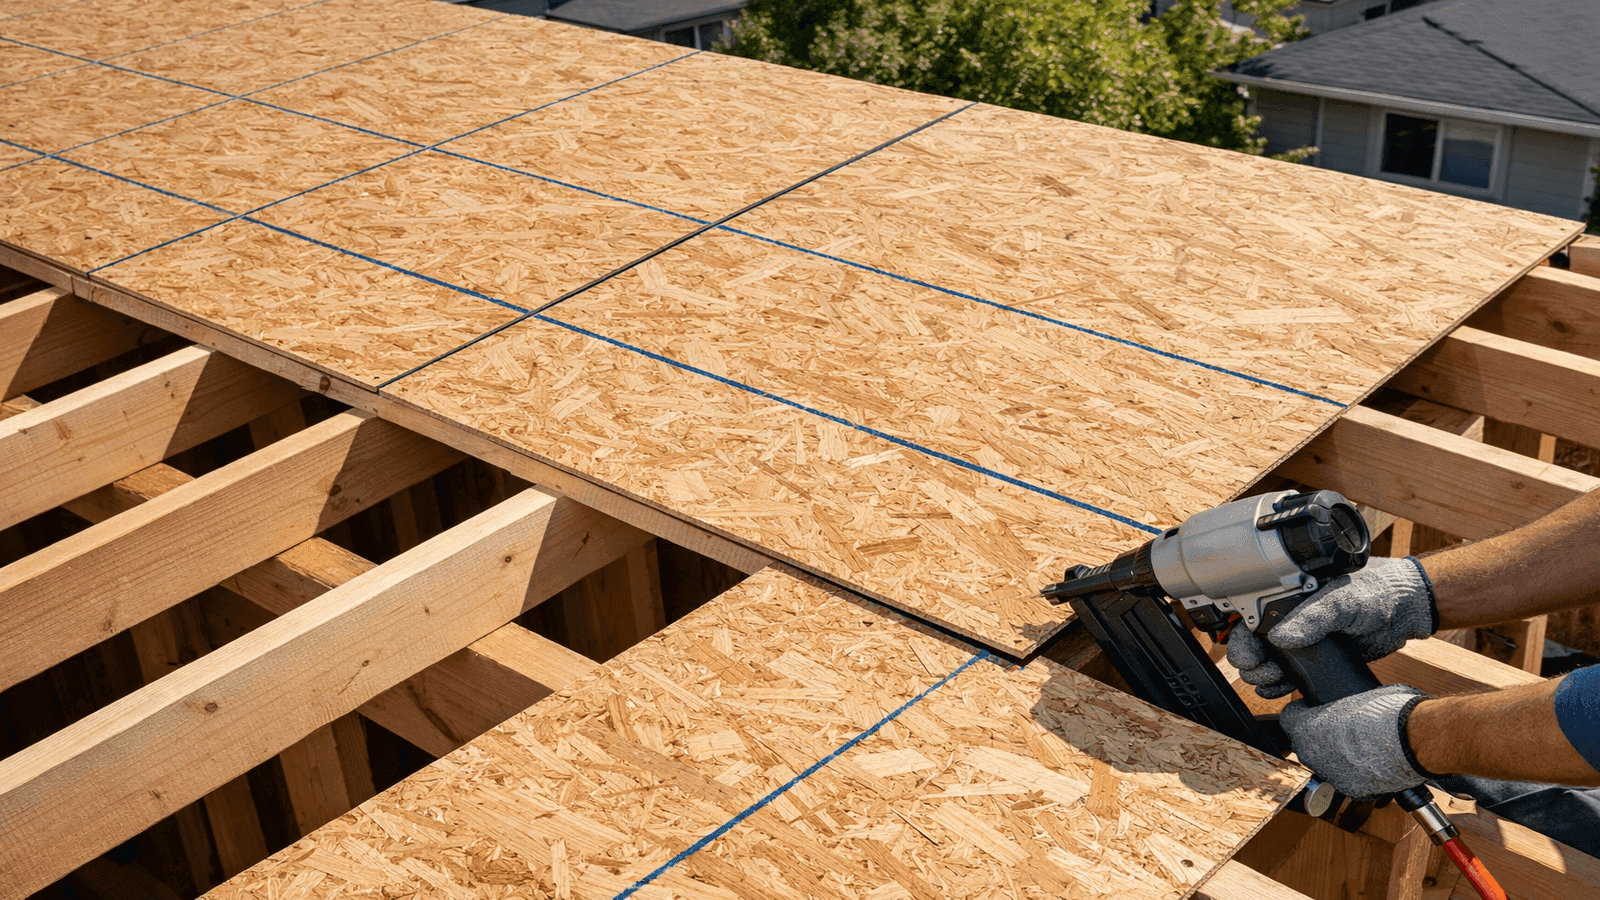
Prepare the Deck
The roof deck must be clean, dry, and structurally sound before any underlayment goes down. Nail any raised fasteners flush and replace any soft or rotted sheathing. Even a small ridge from a raised screw head will telegraph through felt and create a stress concentration point in the membrane.
Install drip edge on all eaves before underlayment. Rake (gable end) drip edge goes on after underlayment. This is the correct sequence per IRC R903.2.1: eave drip edge under underlayment, rake drip edge over underlayment.
Start at the Eave
Begin with ice and water shield if required. Press the membrane firmly against the roof deck starting at the drip edge, peeling the release liner gradually to avoid air pockets. Overlap ice and water shield panels by a minimum of 6 inches.
For standard underlayment, start the first course at the eave with the bottom edge aligned with the drip edge. Roll the material horizontally across the roof.
Maintain Proper Laps
Lapping requirements vary by underlayment type and roof pitch. The general standards for asphalt-shingle applications are:
- Horizontal laps (side laps): Minimum 6 inches where two courses overlap going up the slope
- Vertical laps (end laps): Minimum 12 inches where two rolls meet end-to-end along the same course
On low-slope roofs (2:12 to 4:12) using two layers of felt, the bottom layer is installed with 19-inch laps (half the 36-inch roll width plus a 1-inch exposure), providing full double-layer coverage across the entire deck surface.
Work up the slope, overlapping each successive course over the previous one. Never install underlayment so that water running down the slope would reach a seam edge before the seam material. Think of each lap the same way roof shingles work: upper course laps over lower course, always.
At hips and ridges, bring underlayment from each side to overlap by at least 6 inches across the peak.
Fasten Correctly
Staples are acceptable for felt underlayment that will be covered by shingles the same day. Standard roofing staples (7/16-inch crown, 7/8-inch to 1-inch leg) hold felt in place adequately when the shingle installation is immediate. However, staples can tear through felt in wind events if the roof is left exposed overnight, and many jurisdictions and manufacturer warranties prohibit staples for synthetic underlayment.
Cap nails (plastic or metal cap with 1-inch diameter, shanks 1 to 1.75 inches long) are the correct fastener for any underlayment that will be exposed to wind before shingling. The wide cap distributes holding force across a larger area of membrane, significantly reducing pull-through risk. Cap nails are mandatory on synthetic underlayment in most wind-exposure applications. Most manufacturers specify cap nails at 6 inches on center along laps and 12 to 24 inches on center in the field.
On steep slopes (above 7:12), increase fastening frequency. At 12:12 and above, some manufacturers require cap nails at 6-inch centers across the entire field, not just at laps.
Prevent Wrinkles
Wrinkles in underlayment create ridges visible through finished shingles and concentrate stress that can cause tearing. Synthetic underlayment is largely wrinkle-resistant by design. Felt requires more care:
- Do not unroll felt in cold weather and immediately take it to a hot roof — thermal expansion causes buckling
- Allow felt to acclimate for 30 minutes in ambient temperature before installation
- Do not stretch felt tight; let it lie relaxed
- If wrinkles form in installed felt before shingles go on, cut a diagonal slit in the wrinkle with a utility knife, flatten both sides, and seal the slit with roofing tape before proceeding
Handle Penetrations
Every pipe, vent, and curb requires individual attention. The correct sequence:
- Install standard underlayment up to the penetration
- Cut and press ice and water shield around the penetration, extending 6 inches beyond the penetration footprint on all sides
- Install the pipe boot or flashing over the membrane
- Continue overlapping standard underlayment over the top of the flashing where the slope carries water away from it
Never rely on caulk alone to seal penetrations. Caulk is a maintenance material, not a primary seal.
Connect with licensed roofing contractors in your area through the NearbyHunt network.
The penetration failures I see most often involve plumbing vents on additions — the original roofer laid felt right up to the pipe boot and called it done. No ice and water shield, no membrane integration. Five years later the boot shifts a quarter inch and water finds the gap. I always run ice and water shield six inches past the base of every penetration, then set the boot in roofing cement on top of that. Two layers of protection before the shingle ever gets nailed down.
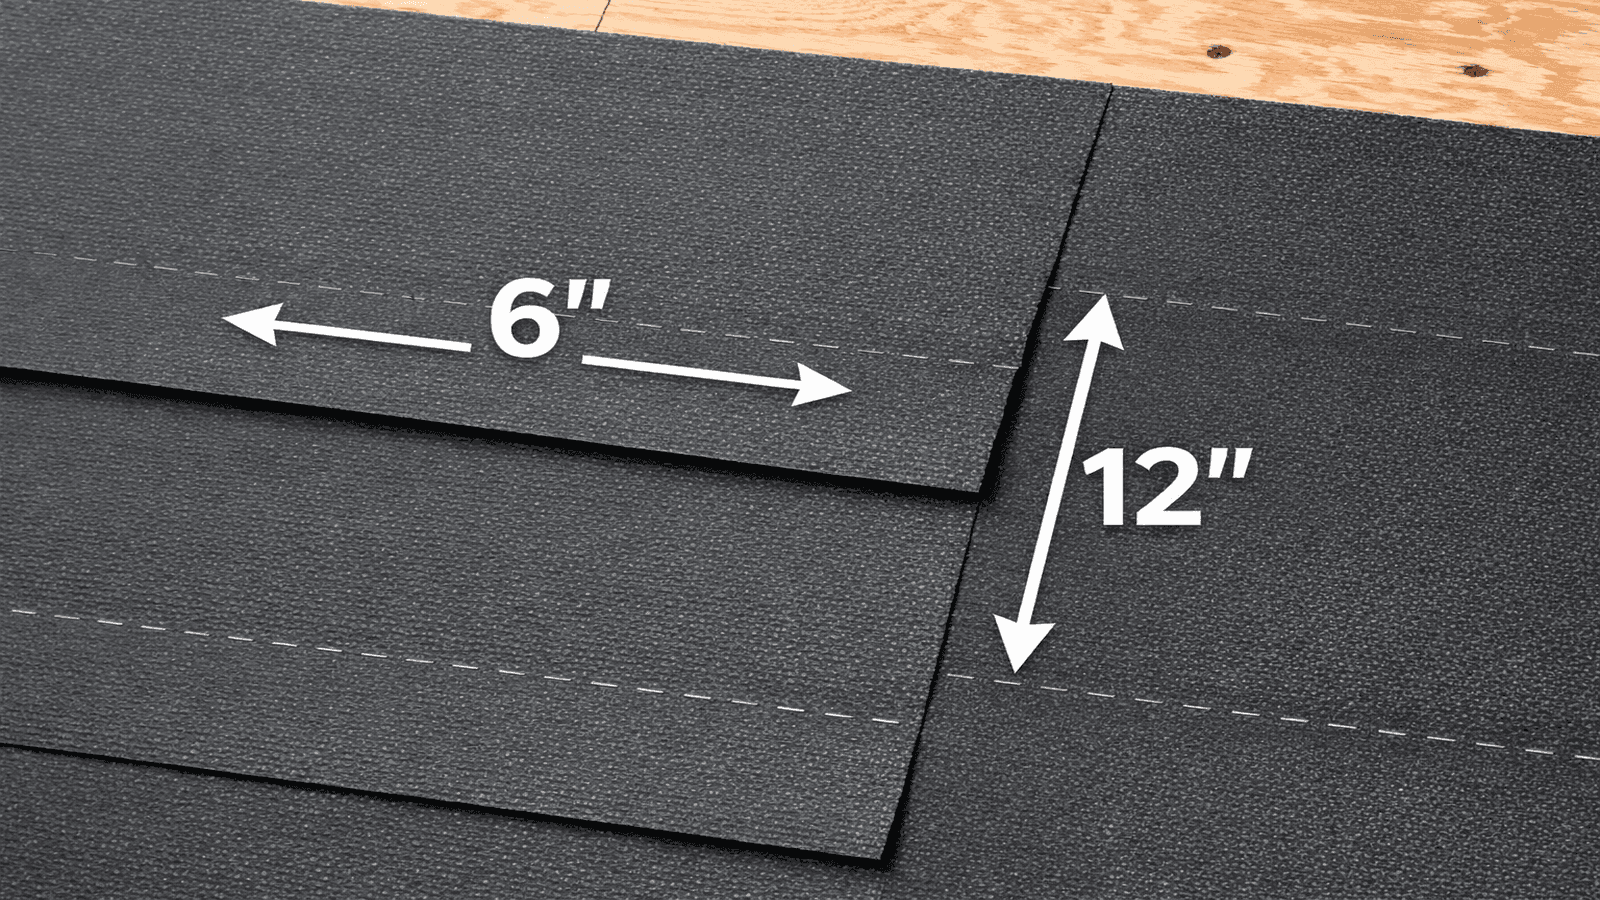
Photo: NearbyHunt
How Underlayment Protects When Shingles Fail
Shingles are the primary weather surface, but they are not the final defense. In a severe wind event, individual shingles or entire sections can lift, crack, or blow off. In a hail event, shingles may crack without immediate signs of water intrusion. In both cases, the underlayment becomes the active waterproofing layer.
No. 15 felt provides limited protection in this scenario — it absorbs water and can tear under prolonged exposure. No. 30 felt provides somewhat more resilience. Synthetic underlayment performs best in blow-off scenarios because it repels water, maintains structural integrity when wet, and resists the wind uplift that causes felt to tear away from fasteners.
This is a practical reason to specify synthetic underlayment even when budget is a consideration. If a major storm event causes shingle damage, the quality of the underlayment determines how much water enters the structure before repairs can be completed. A well-fastened synthetic underlayment can keep a home dry for weeks in a way that damaged felt cannot.
After the 2021 ice storm season in Tennessee and Kentucky, I did a lot of post-storm inspections. Every house where a tree limb or wind had lifted shingles, you could immediately see the difference between synthetic and felt. The felt roofs were saturated — water pooling on the surface, edges curling back, fasteners pulling through. The synthetic roofs were shedding water like a rain jacket. Some of those houses stayed completely dry for 10 to 14 days before we could get back on them to reshingle. That's the real value of specifying synthetic: it buys you time when the worst happens.
Roof Pitch and Underlayment Requirements
Underlayment requirements change with roof slope because low-slope roofs experience slower water runoff, longer water contact time, and greater vulnerability to wind-driven rain.
| Slope | Underlayment Requirement |
| Below 2:12 | Asphalt shingles not permitted; use roofing membrane system |
| 2:12 to less than 4:12 | Two layers felt or full ice and water shield |
| 4:12 and above | Single layer No. 15 felt, No. 30 felt, or synthetic |
| All slopes (cold climates) | Ice and water shield at eaves, valleys, and penetrations |
Most residential roofs fall between 4:12 and 9:12. Roofs above 12:12 require additional attention to fastening frequency because gravity pulls underlayment down before shingles provide holding force. For a detailed explanation of how pitch affects all aspects of roofing, see roof pitch explained.
Cost Breakdown
Underlayment is one of the least expensive components of a roofing project, but cutting corners here creates the most expensive failure points.
Material costs (2026 estimates):
- No. 15 felt: $0.08 to $0.12 per square foot
- No. 30 felt: $0.12 to $0.20 per square foot
- Synthetic underlayment: $0.15 to $0.50 per square foot
- Ice and water shield: $0.30 to $0.65 per square foot
Installed cost (material plus labor):
Full underlayment installation, including labor, ranges from $1.50 to $3.00 per square foot depending on product type, roof complexity, pitch, and regional labor rates. Ice and water shield installation in valleys and at eaves adds $0.75 to $1.50 per linear foot.
On a 2,000-square-foot roof, the total underlayment material cost typically runs $300 to $1,000 depending on product selection and the extent of ice and water shield required. This represents 5 to 10% of a full re-roof project cost — the component with the highest protection-to-cost ratio in the entire assembly. For full cost breakdowns across roofing material types, see the roofing costs guide.
When getting quotes, ask contractors specifically which underlayment product they plan to use, whether ice and water shield is included in valleys and at eaves, and what fastener type and spacing they will use. A quote that specifies "felt underlayment" without further detail may mean No. 15 felt with staples — acceptable only in limited circumstances.
If you need help vetting roofing bids in your area, Find Licensed Roofers Near You through the NearbyHunt network to connect with contractors who can provide itemized underlayment specifications.
![An aerial view of a completed roof underlayment installation on a residential home, showing synthetic underlayment covering the full deck with ice and water shield visible at the eaves and valleys in a darker color.]
- Completed underlayment installation before shingle application. The darker self-adhering ice and water shield is visible at the eaves and valley, while lighter synthetic underlayment covers the field areas.*
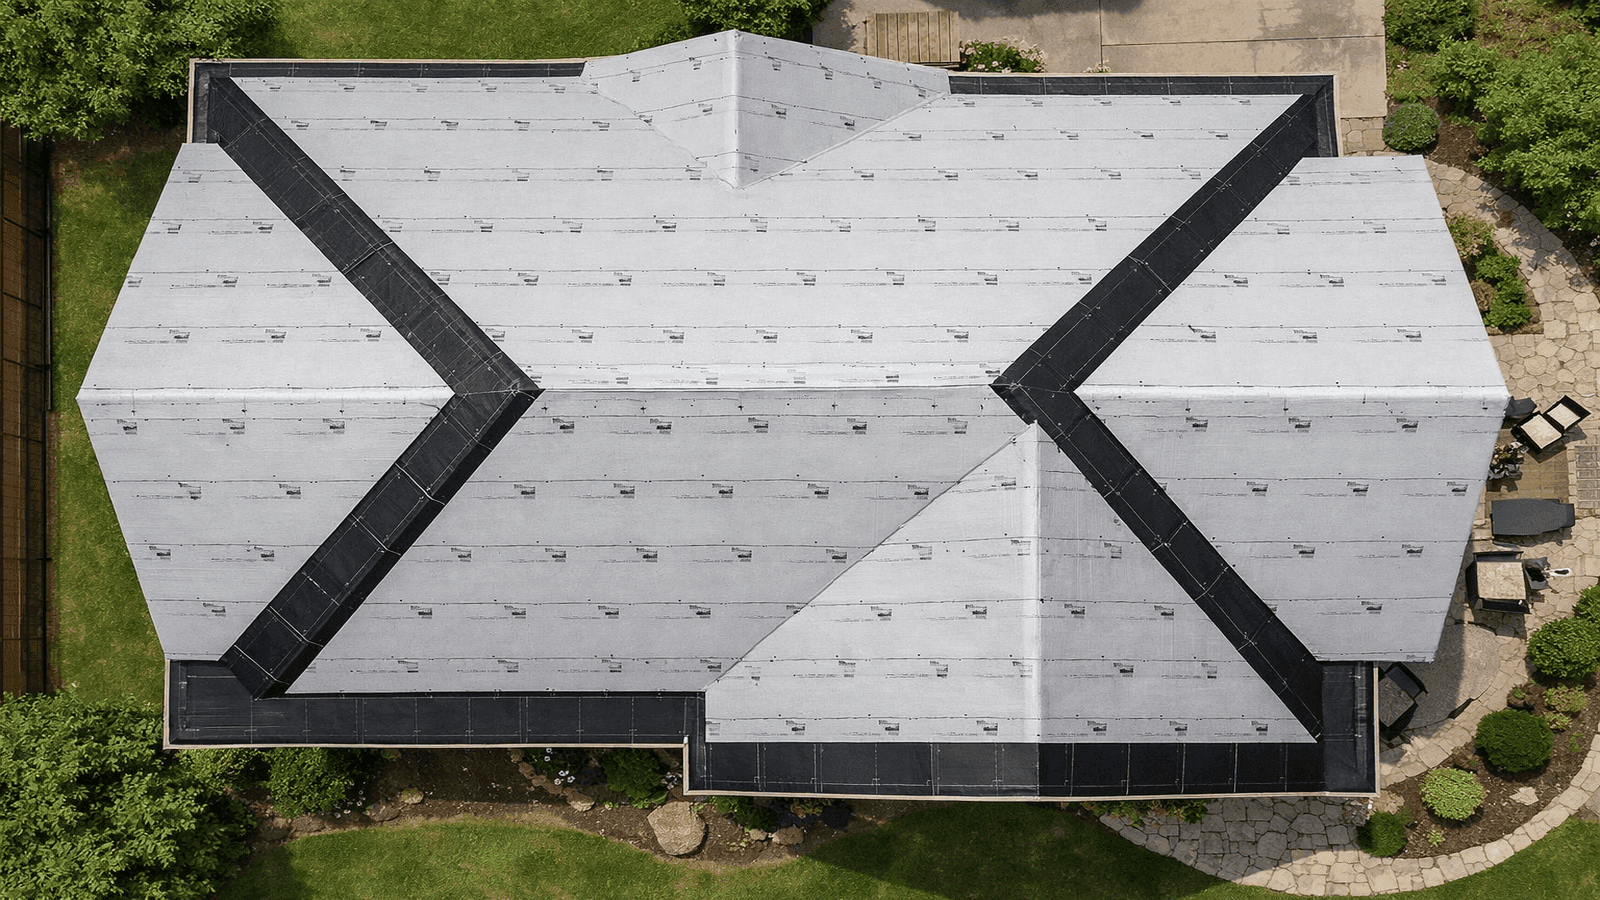
Photo: NearbyHunt
Sources and References
Disclaimer: Roofing codes and manufacturer requirements vary by location and product line. The information in this article reflects IRC 2021 requirements and general industry best practices as of 2026. Consult a licensed roofing contractor and your local building department for jurisdiction-specific requirements before beginning any roofing project.
[1] Owens Corning. "Synthetic vs. Felt Roofing Underlayment: Pros and Cons.
[2] International Code Council. "IRC R905.1.2 — Ice Barriers.
[3] Atlas Roofing Corporation. "Understanding Traditional Felt and Synthetic Roof Underlayment.
[4] National Roofing Contractors Association. "Roofing Manual: Steep-Slope Roof Systems." NRCA, 2023.
[5] GAF. "FeltBuster Synthetic Roofing Felt — Installation Instructions.
[6] IKO. "RoofGard-SBS Underlayment — Application Guidelines.
[7] Benjamin Obdyke. "Understanding Underlayment: A Contractor's Field Guide.

James is a licensed roofing contractor with 20 years of experience in roof installation, inspection, and repair across the U.S. South and Midwest. He specialises in asphalt shingles, metal roofing, and storm damage restoration. On NearbyHunt, James offers practical advice on roof maintenance, insurance claims, and selecting the right materials for long-lasting protection.

Jacob is a licensed roofing contractor with over 18 years of experience in roof inspection, installation, and restoration. Based in Texas, he has led hundreds of successful roofing projects across residential and commercial properties. Jacob is also a certified storm damage specialist, ensuring that all NearbyHunt roofing content meets industry best practices and safety standards.