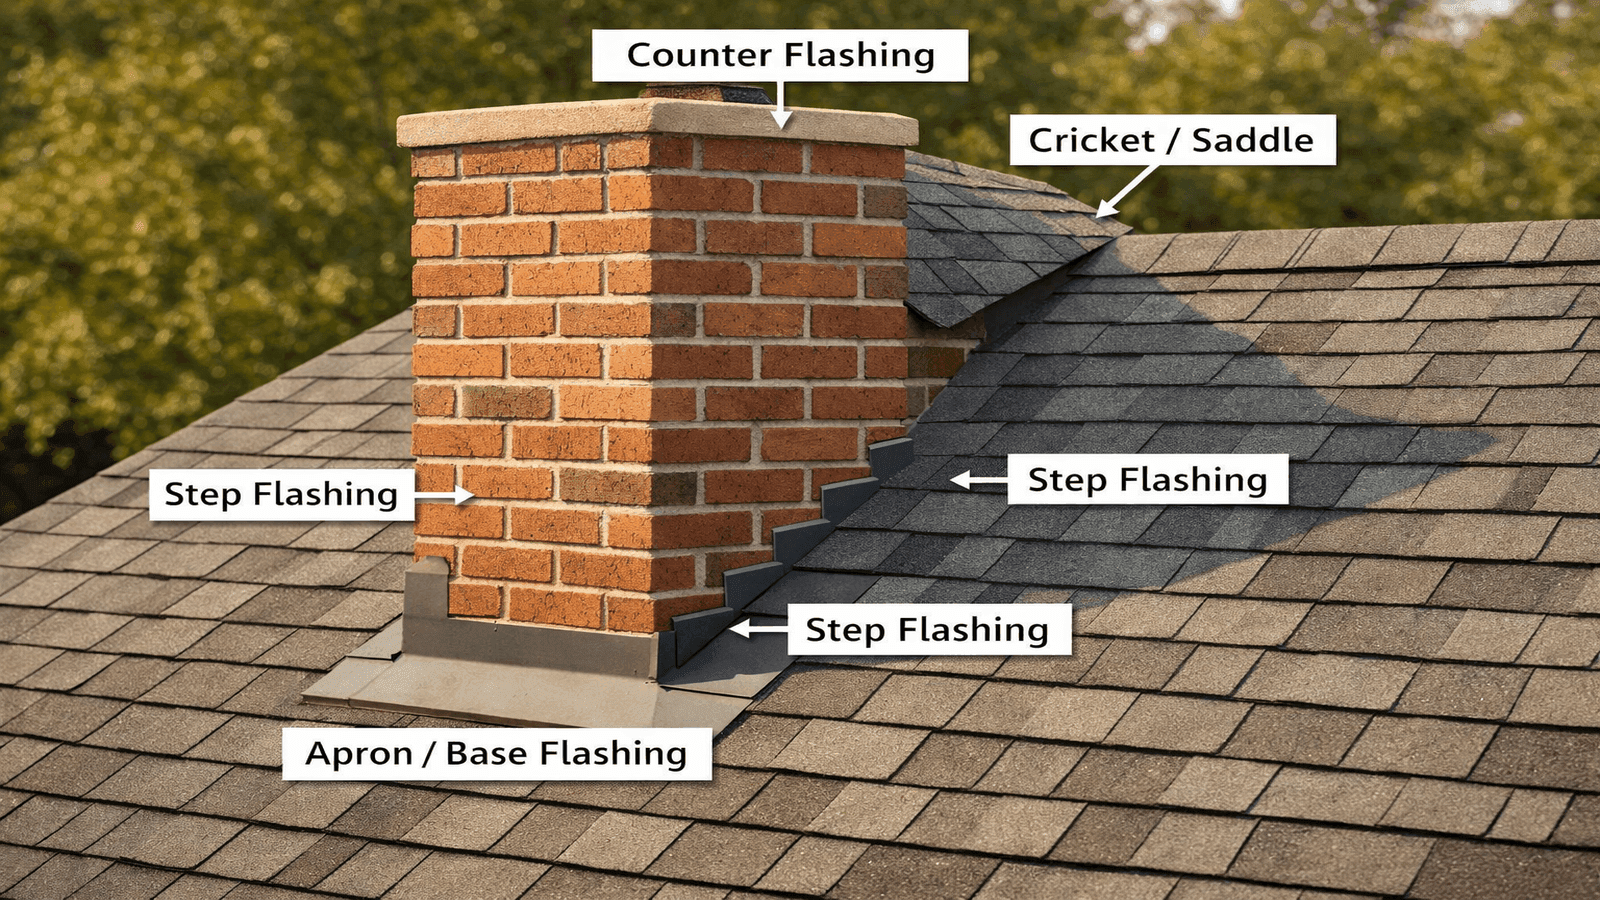
- Chimney flashing requires four components working together: apron/base flashing, step flashing, counter flashing, and a cricket on chimneys wider than 30 inches.
- Step flashing must be L-shaped pieces, at least 8 inches wide on the roof and 2 to 6 inches up the chimney, alternated one per shingle course and nailed only through the horizontal leg.
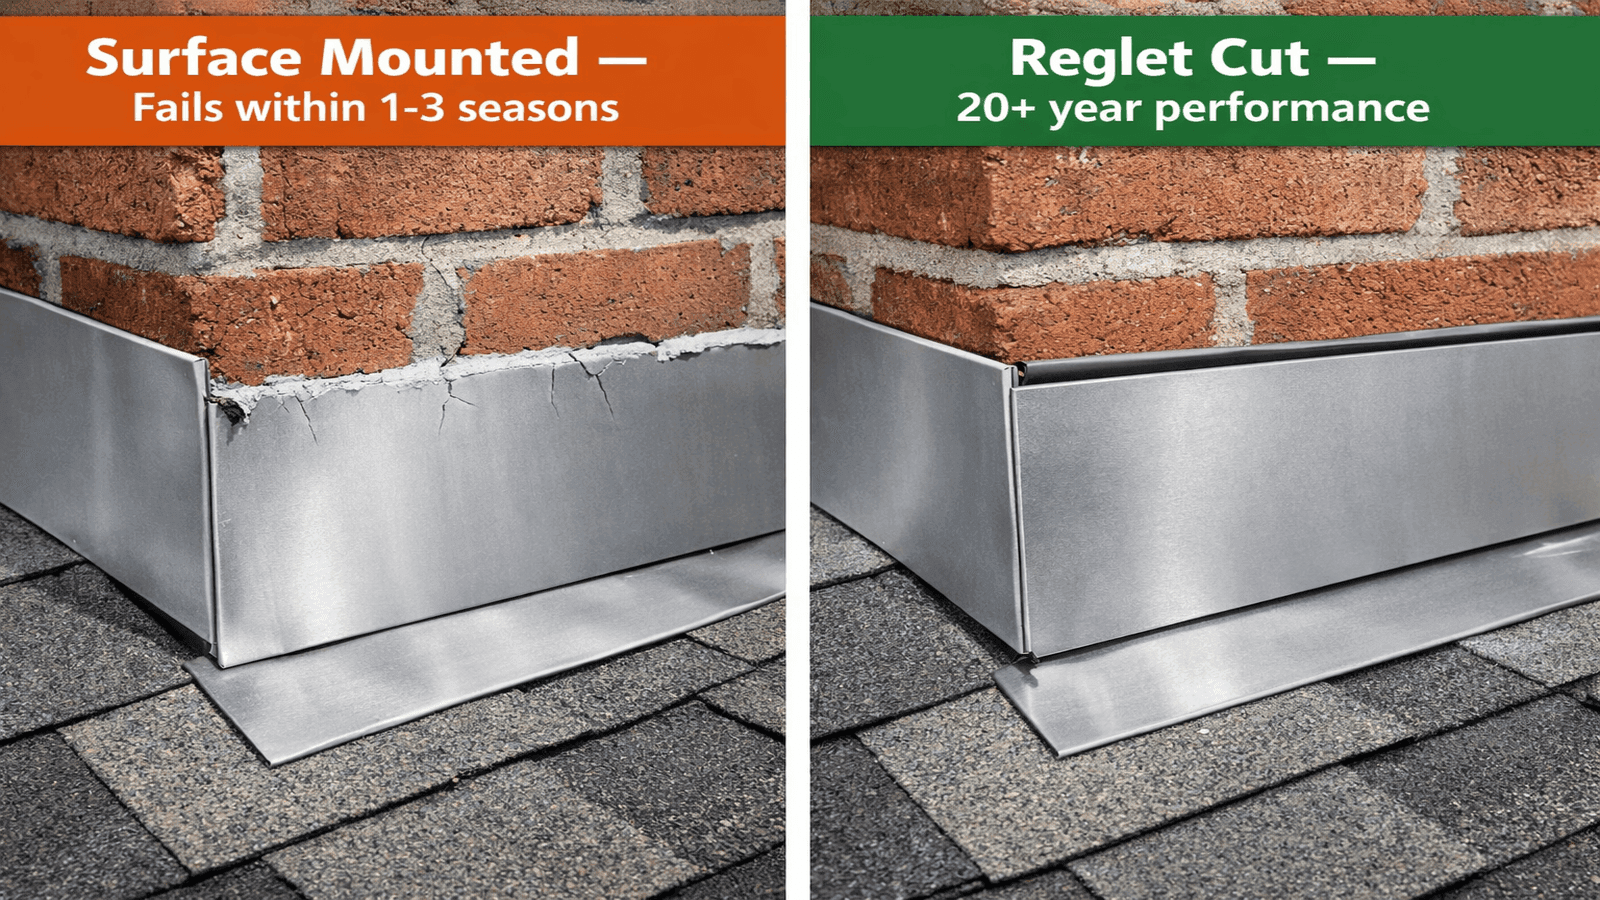
- Counter flashing must be embedded into cut mortar joints — surface mounting with caulk will fail within one to three seasons in most climates.
- IRC Section R905.6.6 requires a minimum 4-inch vertical leg and 4-inch horizontal leg on all chimney flashing; chimneys over 30 inches wide require a cricket.
- Copper lasts 50-plus years; galvanized steel lasts 15 to 25 years; aluminum lasts 15 to 20 years. Material choice depends on budget and access difficulty.
- Full professional reflashing costs $500 to $1,500 for a standard chimney; complex chimneys or premium materials run $1,200 to $2,500 or more.
Chimney flashing is the single most technically demanding detail in residential roofing. It demands precision metalwork, an understanding of water physics, and strict adherence to building code — yet it is one of the most frequently botched repairs on American homes. Whether you are replacing a worn-out system or building from scratch, mastering chimney flashing installation is essential to keeping water out of your home for decades. This guide covers the complete four-part flashing system, step-by-step installation technique, material selection, code requirements, and the cost of professional reflashing. For a broader context on how flashing fits into a full roofing project, visit the NearbyHunt Roofing Installation guide.
According to data from the NearbyHunt network, approximately 73% of chimney leak calls that licensed roofers investigate trace to three root causes: missing crickets on chimneys wider than 30 inches, improper step flashing where L-shape pieces are not properly interwoven with shingles, or surface-mounted counter flashing that relies on caulk instead of a cut mortar joint. All three of these failures are entirely preventable with correct installation technique.
James Carver is a licensed roofing contractor with more than 20 years of experience and 1,800-plus residential projects across the U.S. South and Midwest. This guide reflects the techniques he applies on every chimney flashing job.

Get quotes from top-rated pros.
Chimney flashing fails at the weakest link — and that weak link is almost always the counter flashing. If it is surface-mounted and sealed with caulk, it will leak. Caulk shrinks, cracks, and pulls away from masonry within a few freeze-thaw cycles. Cut it into the mortar joint, bed it with fresh mortar, and then add a bead of urethane sealant on top. That combination lasts 20 years.
The Four-Part Chimney Flashing System
A properly flashed chimney uses four distinct metal components that work together as a layered waterproofing system. No single piece can do the job alone. Understanding each component's role is the foundation of correct installation.
1. Apron Flashing (Base Flashing)
The apron flashing, sometimes called the front pan, is a single piece of sheet metal installed at the downslope face of the chimney — the side facing down the roof pitch. It is bent to run up the face of the chimney at least 4 inches and extends out onto the roof deck at least 4 inches, then tucks under the first course of shingles above it. The IRC Section R905.6.6 [1] requires a minimum 4-inch vertical leg and 4-inch horizontal leg on all chimney flashing components. The apron catches water sheeting off the chimney face and directs it onto the shingles below.
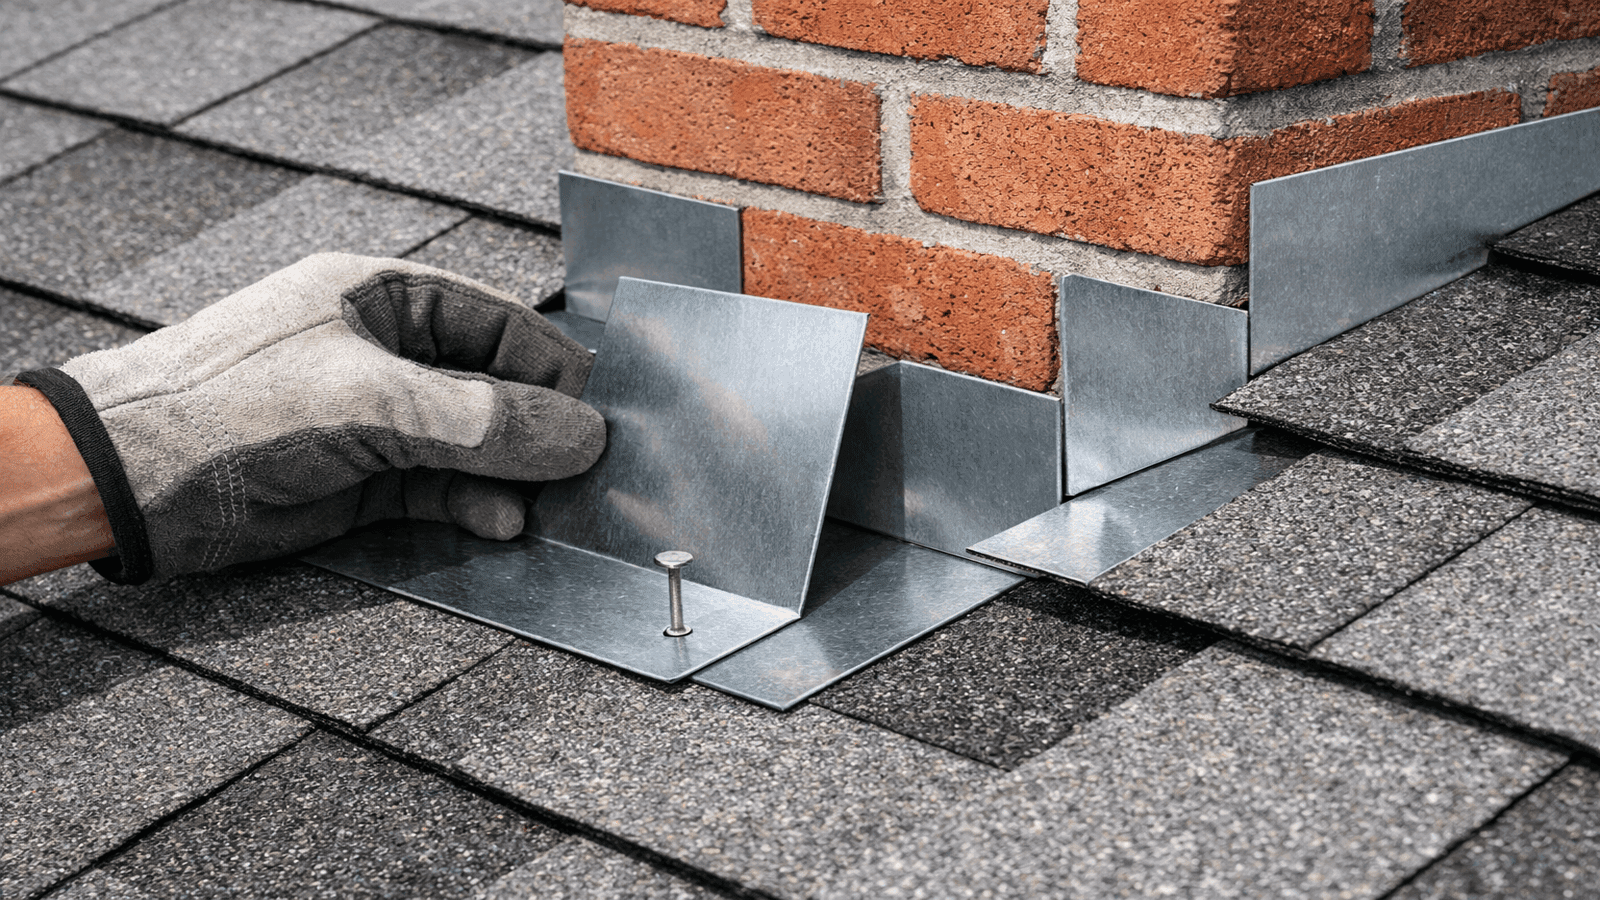
2. Step Flashing
Step flashing runs along both sides of the chimney. Each piece is L-shaped, with one leg lying flat on the roof deck and one leg running up the chimney face. The pieces are installed one per shingle course in a staggered, overlapping sequence — each step flashing piece overlaps the one below by several inches, creating a shingle-like drainage path down the side of the chimney. The NRCA recommends each step flashing piece be at least 8 inches wide on the roof and extend at least 2 inches up the chimney face, though most professional installers use pieces that extend 4 to 6 inches up the chimney for a wider safety margin.
3. Counter Flashing (Cap Flashing)
Counter flashing is the visible metal that covers the top edge of the step flashing and the apron. Its upper edge is embedded into the mortar joints of the chimney masonry — this is the defining feature of a correctly installed system. Counter flashing is typically installed as separate interlocking pieces on the sides, with a continuous piece across the front. The embedded edge is bent 90 degrees and driven 1 to 1.5 inches into a cut mortar joint, then packed with fresh mortar and finished with a bead of urethane sealant. This creates a mechanical lock that cannot be pulled away by thermal expansion or freeze-thaw cycling.
4. Saddle or Cricket
The cricket — also called a saddle — is a small ridge installed on the high side of the chimney, between the chimney and the roof ridge. It deflects water and snow around the chimney rather than letting them pond against the back face. The IRC [2] requires a cricket on any chimney wider than 30 inches as measured perpendicular to the slope. The cricket is typically framed with plywood and then flashed with sheet metal, following the same step-flashing and counter-flashing sequence as the chimney sides.
Step Flashing Installation
Step flashing is the heart of the chimney waterproofing system, and its installation must be perfectly integrated with shingle placement. Errors here create concealed leak paths that are nearly impossible to detect without removing shingles.
Material and Sizing
Each step flashing piece should be cut to at least 8 inches wide and long enough to cover one full shingle exposure plus a 2-inch overhang below. For standard 5.5-inch exposure shingles, that means pieces approximately 7 to 8 inches long. The vertical leg should extend at least 2 inches up the chimney — professional installers typically use 4 to 6 inches for added protection on the sides.
Galvanized steel, aluminum, copper, or lead-coated copper are all acceptable materials. Avoid thin aluminum under 0.019 inches — it tears during installation and degrades faster around masonry.
Installation Sequence
- Install the apron flashing at the base of the chimney, tucking it under the first course of shingles that will run above the chimney base. Nail through the horizontal leg only — never nail through the vertical leg.
- Install the first shingle course along the side of the chimney, running it to within 1 inch of the chimney face.
- Lay the first step flashing piece over the top of that shingle, positioned so the bottom edge aligns with the lower edge of the shingle and the vertical leg rests against the chimney face. Nail the horizontal leg to the roof deck only — do not nail into the chimney. Do not nail through the vertical leg.
- Install the next shingle course over the horizontal leg of the first step flashing piece. The shingle covers the nail and the horizontal leg of the step flashing.
- Lay the next step flashing piece over the top of that shingle, overlapping the previous step flashing piece by at least 2 inches.
- Repeat this alternating sequence — shingle, step flashing, shingle, step flashing — up both sides of the chimney until you reach the top.
- At the top corners, the step flashing ties into the counter flashing and, if required, into the cricket flashing.
One critical rule: each step flashing piece must be nailed only through its horizontal leg, and each shingle must cover that nail. If you can see a nail head, the sequence is wrong. Exposed nails will rust, allow water infiltration, and eventually pull away from the deck.
I have pulled off step flashing on re-roof jobs where a previous contractor had nailed right through the vertical leg — directly into the chimney masonry. That nail holds the flashing rigid. When the roof deck and the chimney expand and contract at different rates, that rigid nail point becomes a stress crack and a leak path. The vertical leg has to float free. That is not optional — it is how the physics of differential movement works.
Get quotes from top-rated pros.
Counter Flashing Installation
Counter flashing is where most DIY and inexperienced contractor installations fail. The correct method — embedding the counter flashing into the mortar joint — requires a circular saw with a masonry blade (or an angle grinder), mortar mix, and patience. The shortcut — surface mounting with caulk — looks identical from the ground but fails within one to three seasons in most climates.
Cutting the Reglet
A reglet is the groove cut into the mortar joint to receive the counter flashing. Identify the mortar joint that falls 1 to 2 inches above the top of the step flashing or apron flashing. Use a circular saw with a 4-inch diamond or carborundum masonry blade to cut a 1-inch-deep groove along that mortar joint, following the joint across the full width of the chimney face and up both sides to align with each step flashing piece. On the sides, the reglet follows the slope of the roof — each counter flashing piece aligns with the mortar joint above each step flashing piece.
Clean the cut groove with a wire brush and compressed air to remove all dust and loose mortar.
Bending and Setting the Counter Flashing
Bend the top edge of each counter flashing piece at 90 degrees so that it will seat fully into the reglet. Drive the bent edge into the groove. On a stepped system on the sides of the chimney, each counter flashing piece is a separate L-shaped tab that aligns with one step flashing piece below it. The tabs overlap each other downslope.
Once the bent edges are set, pack fresh mortar into the groove around and behind the flashing edge. Allow the mortar to cure. After the mortar is set — typically 24 to 48 hours — run a bead of high-quality urethane sealant (not silicone, not latex caulk) along the top of the mortar joint to provide a secondary moisture barrier. This two-stage seal — mortar plus urethane — is the industry standard for professional chimney flashing.
The Case for Cutting the Reglet
Patricia M. of Louisville, Kentucky, learned this lesson the hard way. She hired a general handyman to reflash her chimney after noticing water stains on her living room ceiling near the fireplace. The handyman applied surface-mounted counter flashing using roofing caulk instead of cutting into the mortar joints. Within one winter season, the caulk had cracked and pulled away from the brick face at multiple points. Water continued to enter the attic, eventually causing minor rafter damage and interior drywall staining.
A licensed roofing contractor then performed a complete reflash: proper step flashing interwoven with the shingles, lead counter flashing embedded in cut mortar joints, and a cricket installed on the high side of the chimney — the original job had omitted the cricket entirely, even though the chimney measured 34 inches wide. The total cost was $1,340. Three years later, the roof-chimney junction has remained completely watertight. The handyman's surface-mounted approach had seemed cheaper at the time, but it cost Patricia more in the end and caused additional interior damage.
Cricket Installation
A cricket is required by the IRC whenever a chimney measures more than 30 inches wide perpendicular to the slope [2]. Many chimneys — particularly those with multiple flue liners or decorative masonry — exceed this threshold. Without a cricket, water and debris accumulate on the high side of the chimney. In freeze-thaw climates, ice dams form at this exact location, forcing water under the counter flashing and into the structure.
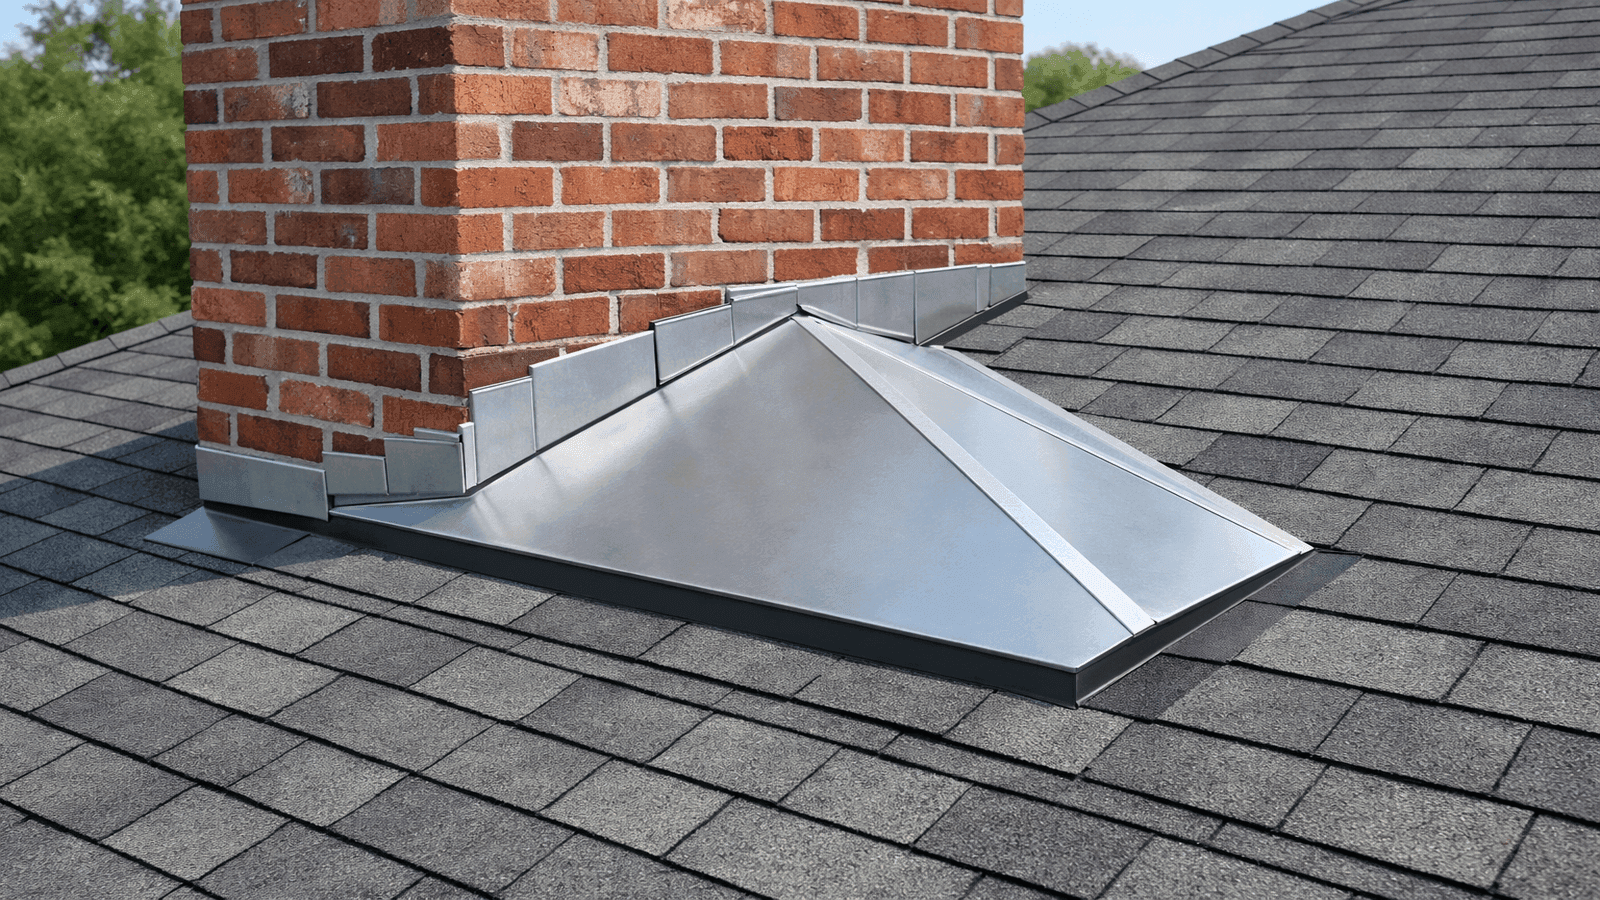
Framing the Cricket
The cricket is typically framed with two triangular pieces of plywood, each cut to form a small ridge that runs from the center of the chimney back toward the roof ridge at 45-degree angles on each side. The ridge height of the cricket should match the slope of the roof — a 6:12 roof pitch cricket rises about 3 inches per foot of run on each side. Fasten the plywood to the existing deck and to the chimney framing with appropriate structural fasteners.
Flashing the Cricket
The cricket surfaces are covered with self-adhering waterproof underlayment before the metal flashing is applied. Sheet metal flashing — typically 26-gauge galvanized steel or copper — is then formed to follow the cricket's two sloped planes. The intersection of each cricket slope with the chimney face is flashed with step flashing and counter flashing using the same cut-reglet technique used on the main sidewalls. The intersection of the cricket ridge with the roof surface is flashed with a continuous piece of sheet metal that extends at least 4 inches onto both surfaces.
The cricket covering material should match or be compatible with the main roof covering. Most professionals use sheet metal that is soldered at the cricket ridge and then counterflashed at the chimney face.
Flashing Material Comparison
The material you choose for chimney flashing affects both performance and long-term cost. Each material has meaningful trade-offs.
| Material | Cost per Linear Foot | Lifespan | Notes |
| Galvanized Steel | $6–$10 | 15–25 years | Budget standard; prone to rust at cut edges if not coated |
| Aluminum | $5–$9 | 15–20 years | Lightweight; can react with masonry alkalinity over time |
| Lead-Coated Copper | $18–$28 | 40–50+ years | Excellent conformability; malleable for complex shapes |
| Copper | $15–$25 | 50+ years | Best long-term value; develops protective patina; premium cost |
Galvanized steel is the most common choice in new construction and replacement work. It is inexpensive, easy to cut and bend, and widely available. The primary weakness is that cut edges are not galvanized and will rust unless coated with a zinc-rich primer. In humid climates, expect galvanized steel flashing to need replacement within 15 to 20 years.
Aluminum is slightly cheaper than galvanized steel and does not rust. However, aluminum can react with the alkaline environment of masonry mortar over time, weakening the material near the embedded reglet edge. Use a separation layer or coated aluminum in direct contact with mortar.
Lead and lead-coated copper are highly malleable and conform easily to irregular masonry surfaces, making them the traditional choice for complex chimney shapes. Lead's use has declined due to health and environmental concerns, though it remains legal for residential flashing in most jurisdictions. Lead-coated copper provides similar conformability with better environmental acceptance.
Copper is the premium choice. It is self-sealing at solder joints, develops a patina that inhibits further corrosion, and is essentially maintenance-free for 50 years or more. The higher upfront cost — roughly three times that of galvanized steel — pays off on chimneys that are difficult to access or on high-end homes where longevity and aesthetics matter.
Get quotes from top-rated pros.
On coastal jobs in the Gulf South, I specify copper or lead-coated copper exclusively. Galvanized steel in a salt-air environment goes from perfectly good to actively rusting in about eight years — you can watch it happen. The extra $400 to $600 in material cost for copper on a standard chimney is nothing compared to another reflash bill in a decade. Material choice matters most in the climates where it is hardest to get back on the roof.
Signs of Chimney Flashing Failure
Catching flashing failure early prevents interior water damage and structural deterioration. Watch for these warning signs.
Interior symptoms:
- Water stains on ceilings or walls near the fireplace or chimney breast
- Damp or musty odor from the attic or living spaces adjacent to the chimney
- Peeling paint or bubbling wallboard near the chimney
- Rust stains on the firebox or damper
Exterior symptoms:
- Visible gaps between the counter flashing and the chimney masonry
- Caulk that is cracked, peeling, or absent at the flashing-to-masonry joint
- Metal flashing that is rusted, bent, or has separated from the chimney face
- Staining on the chimney masonry directly below the roof line
- Missing step flashing pieces (sometimes visible from the eave with binoculars)
If you observe any of these signs, have a licensed roofing contractor evaluate the system before the next rain event. Small flashing failures escalate quickly — water that enters at the chimney junction travels along rafters and sheathing, causing rot and mold damage far from the original entry point.
Chimney Flashing Cost
Professional chimney flashing work falls into two categories: repair and full reflash.
Flashing repair addresses localized failures — a few cracked caulk joints, a single lifted counter flashing tab, or resealing a reglet. Repair costs typically range from $300 to $800 depending on extent and accessibility. A competent repair performed by a licensed roofer using proper materials and techniques can extend the life of an otherwise sound flashing system by five to ten years.
Full reflash replaces the entire four-part system — apron, step flashing, counter flashing, and cricket if required. A standard residential chimney (approximately 3 by 3 feet) reflash costs $500 to $1,500 using galvanized steel. Larger chimneys (5 by 5 feet or more), difficult roof access, or premium materials such as copper push costs to $1,200 to $2,500 or more. Labor typically accounts for 60% to 70% of total cost; the actual material cost of flashing metal is modest even for copper.
The table below breaks down typical professional costs by job type, chimney size, and material.
| Job Type | Chimney Size | Material | Typical Cost Range |
| Minor repair (reseal/patch) | Any | Caulk / urethane | $150–$400 |
| Counter flashing replacement | Standard (3×3 ft) | Galvanized steel | $300–$600 |
| Full reflash | Standard (3×3 ft) | Galvanized steel | $500–$1,000 |
| Full reflash + cricket | Standard with cricket | Galvanized steel | $800–$1,500 |
| Full reflash | Large (5×5 ft+) | Galvanized steel | $1,200–$2,000 |
| Full reflash | Standard (3×3 ft) | Copper | $1,000–$2,500 |
When full reflash is the right choice:
- The existing step flashing is surface-mounted or uses improper L-shapes
- Counter flashing is surface-mounted with caulk rather than embedded in a reglet
- The chimney is wider than 30 inches and lacks a cricket
- Flashing is 20 or more years old regardless of visible condition
- Interior water damage has already occurred
Attempting to re-caulk failed surface-mounted flashing is a temporary measure at best. A properly installed reflash using a licensed contractor is a one-time investment that should not need attention for 20 or more years.
Disclaimer: This article is intended for general informational purposes only and does not constitute professional roofing or construction advice. Chimney flashing installation involves working on a roof and cutting masonry — work that carries significant fall and structural risks. Building code requirements vary by jurisdiction. Always consult a licensed roofing contractor in your area before undertaking chimney flashing work. NearbyHunt does not assume liability for outcomes resulting from information presented in this guide.
Sources & References
[1] International Residential Code (IRC) Section R905.6.6 — Flashing requirements for chimney installations. International Code Council. https://codes.iccsafe.org/s/IRC2021P3/chapter-9-roof-assemblies/IRC2021P3-Pt03-Ch09-SecR905.6.6
[2] International Residential Code (IRC) — Crickets and Saddles requirement for chimneys wider than 30 inches. International Code Council. https://up.codes/s/crickets-and-saddles
[3] Fine Homebuilding — Time-Tested Approach to Chimney Flashing. https://www.finehomebuilding.com/project-guides/roofing/time-tested-approach-to-chimney-flashing
[4] Fine Homebuilding — Installing Chimney Flashing. https://www.finehomebuilding.com/project-guides/roofing/installing-chimney-flashing
[5] National Roofing Contractors Association (NRCA) — Roofing and Waterproofing Manual. https://www.nrca.net
[6] Copper Development Association — Chimney and Sidewall Flashings. https://copper.org/applications/architecture/arch_dhb/arch-details/flashings_copings/chimney.php
[7] Spring Hill Chimney — Chimney Flashing Materials and Installation. Technical reference for chimney-specific flashing data.

James is a licensed roofing contractor with 20 years of experience in roof installation, inspection, and repair across the U.S. South and Midwest. He specialises in asphalt shingles, metal roofing, and storm damage restoration. On NearbyHunt, James offers practical advice on roof maintenance, insurance claims, and selecting the right materials for long-lasting protection.

Jacob is a licensed roofing contractor with over 18 years of experience in roof inspection, installation, and restoration. Based in Texas, he has led hundreds of successful roofing projects across residential and commercial properties. Jacob is also a certified storm damage specialist, ensuring that all NearbyHunt roofing content meets industry best practices and safety standards.