- Ice dams form when attic heat melts roof snow, and the meltwater refreezes at the cold eaves, creating a ridge of ice that forces water back under shingles.
- Air sealing is the single most impactful fix: sealing gaps around recessed lights, plumbing stacks, and attic hatches stops warm air from reaching the roof deck.
- R-49 to R-60 insulation is now the recommended threshold in cold climates; anything below R-30 puts homes at serious risk.
- Heat cables are a short-term supplement, not a cure. They create melt channels but do not eliminate the root problem of inadequate insulation.
- The average ice dam water damage claim exceeds $30,000, making prevention the far more cost-effective strategy for any homeowner in a snow-prone region [1].

Get quotes from top-rated pros.
Winter's worst-kept secret is this: the roof that looks fine in October can become a liability by January. Ice dams are among the most common and expensive sources of structural damage in cold climates, yet most homeowners never address the underlying causes until water is already dripping from the ceiling. Understanding how to prevent ice dams before a harsh winter arrives is one of the most valuable steps you can take to protect your home's structure, interior finishes, and long-term value.
This guide covers every layer of ice dam prevention, from the building-science fundamentals of attic insulation and ventilation to the practical use of heat cables, roof rakes, and professional inspections. For a broader look at keeping your entire roof system in peak condition year-round, visit our roofing maintenance guide.
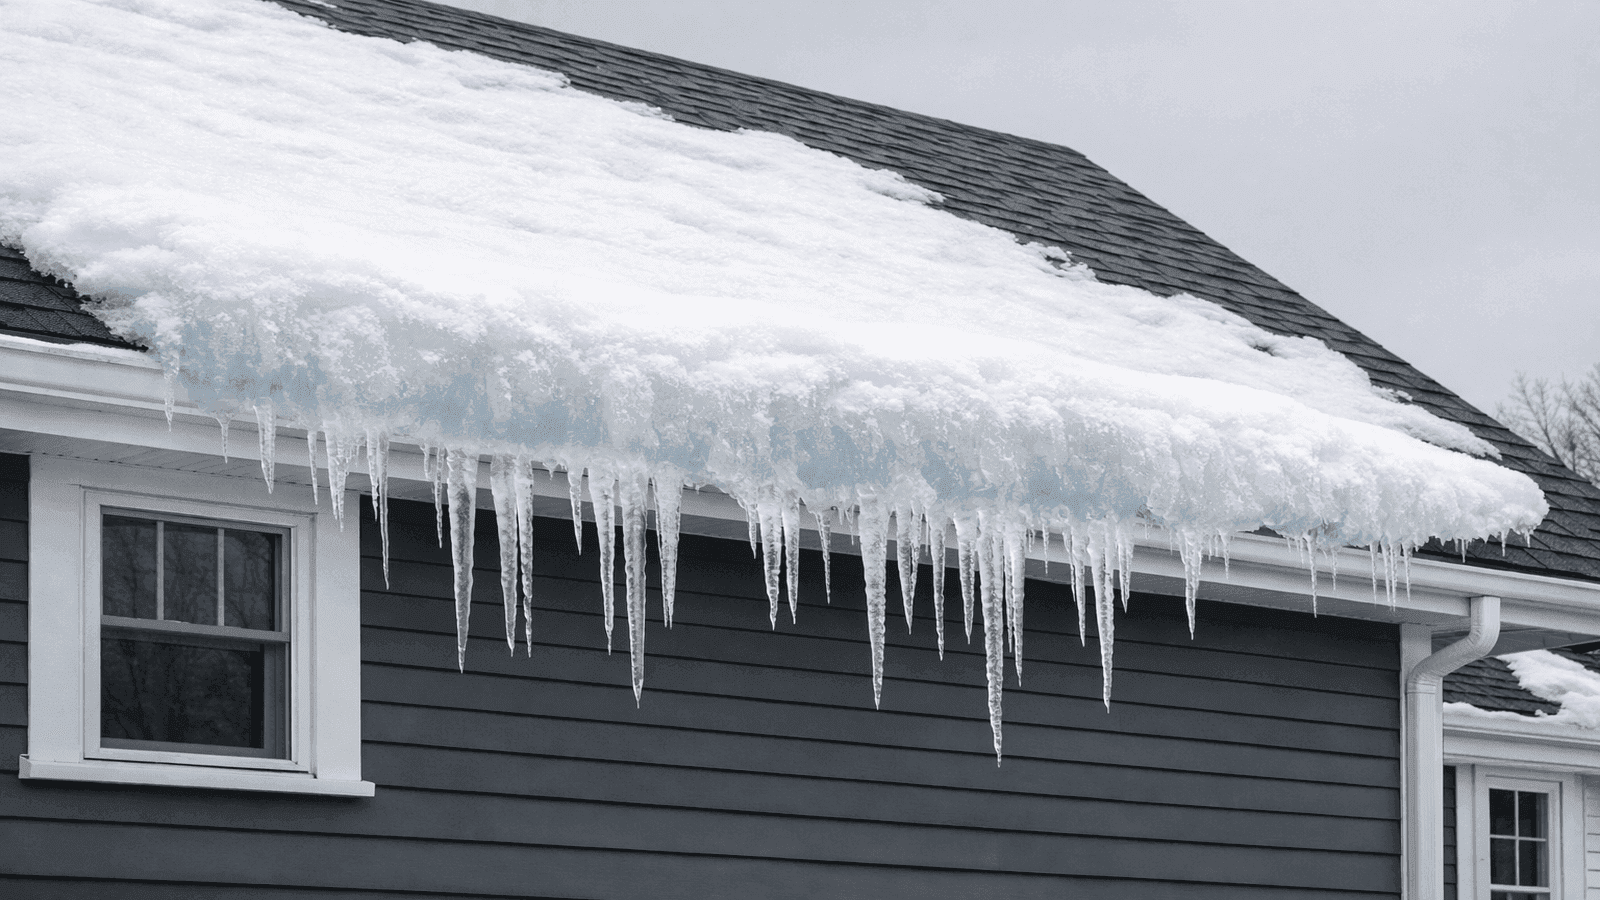
Photo: Large ice dam formation at the eave of a residential roof with thick ice ridge and icicles hanging from the gutter in winter
What Is an Ice Dam and How Does It Form
An ice dam is a ridge of ice that builds up along the lower edge of a sloped roof. It forms through a predictable three-step cycle: heat escapes from the living space into the attic, warms the underside of the roof deck, and melts the snow lying on the shingles above. That meltwater travels down the slope until it reaches the eaves, which overhang the exterior wall and have no warm attic space beneath them. At the cold eave, the water refreezes. Night after night, storm after storm, that frozen ridge grows larger.
Once the dam is thick enough, it acts as a wall. Water pooling behind it has nowhere to go except sideways: under shingles, through the decking, into the attic insulation, and eventually through ceiling drywall into living spaces below. The damage is rarely noticed until it is already extensive.
Three conditions must all be present for an ice dam to form:
- Snow accumulation on the roof surface
- A poorly air-sealed or under-insulated attic
- Outside temperatures at or below 32 degrees Fahrenheit
Remove any one of those three conditions and ice dams cannot form. That is the foundation of every prevention strategy covered in this guide.
The True Cost of Ice Dam Damage
Before diving into prevention, it is worth anchoring the financial stakes. Ice dam damage is not a minor inconvenience.
Insurance data from 2024 through mid-2025 shows that nationwide, more than 20,000 claims related to frozen pipes and ice dams were filed, with total paid losses exceeding $628 million. The average individual claim cost exceeded $30,000 [1]. In Connecticut alone, ice dam and winter water damage claims in that period totaled $5.6 million.
In my 20-plus years of inspecting roofs across the U.S. South and Midwest, I've watched homeowners spend $8,000 to $15,000 repairing water damage that could have been prevented by a $1,500 attic air-sealing and insulation upgrade. The math is straightforward once you see a collapsed ceiling or ruined hardwood floor.
James Carver, Licensed Roofing Contractor, more than 1,800 roofing projects across the U.S. South and Midwest
Consider this real example: Sandra K., a homeowner in Rochester, NY, discovered ice dams along her entire south-facing roof line during the winter of 2024. By the time she noticed the wet patches on her bedroom ceiling, water had been infiltrating for several weeks. Her final repair bill came to $11,400, covering ceiling drywall replacement, insulation removal and reinstallation, mold remediation in the attic, and shingle repairs at the eave. Her insurance deductible was $2,500. A pre-winter attic inspection that fall had quoted her $1,800 for air sealing and a partial insulation top-up. She did not schedule it.
The licensed roofing contractors in our NearbyHunt network report that approximately 68% of ice dam calls they receive in January and February involve homes where the attic insulation is below R-30, and nearly 80% of those homes have significant air leakage around recessed ceiling fixtures or attic access hatches.
Air Sealing: The Most Overlooked Ice Dam Fix
Building science researchers consistently identify air leakage as the primary driver of ice dam formation, ranking it above insulation levels in terms of impact [2]. A home can have R-38 insulation throughout the attic and still develop severe ice dams if warm, moist air from the living space is bypassing that insulation through gaps in the ceiling plane.
Common sources of attic air leakage include:
- Recessed (can) light fixtures, especially older non-airtight models
- Gaps around plumbing vent stacks and electrical wires penetrating the ceiling
- Attic access hatches and pull-down stair assemblies with no weatherstripping
- Open soffits above kitchen cabinets and bathroom vanities
- Top plates at interior wall-to-ceiling intersections
- Exhaust fan housings for bathrooms and kitchens
Sealing these penetrations is best accomplished from inside the attic, before insulation is installed or upgraded. Spray foam is used for most small gaps. Rigid foam board sealed with canned spray foam works for larger openings such as attic hatches and open soffits. The goal is a continuous, unbroken air barrier across the entire ceiling plane.
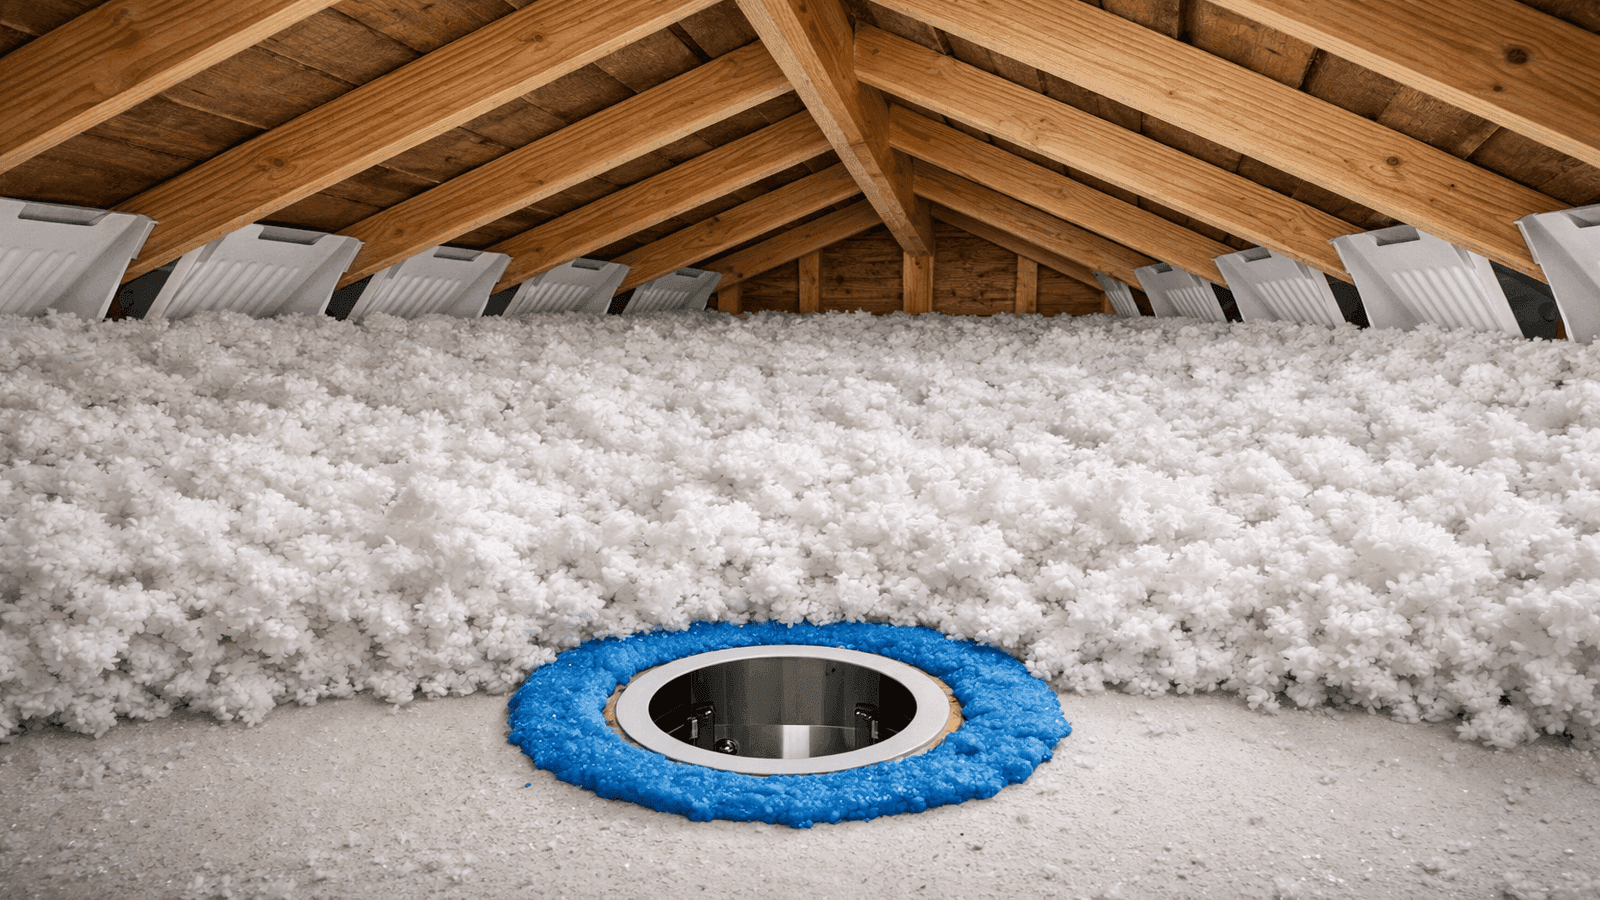
Photo: Attic interior showing deep blown-in insulation with foam baffle channels at eaves and air sealing around a recessed light fixture
Air sealing has to come first, always. I've seen contractors who added six inches of blown insulation over a leaky ceiling and the homeowner had ice dams the very next winter. Warm air bypasses insulation easily. It does not bypass a sealed gap.
Get quotes from top-rated pros.
For related guidance on how your attic system works together, see our article on attic ventilation maintenance.
Attic Insulation: R-Values That Actually Prevent Ice Dams
Once air sealing is addressed, insulation levels become the next critical variable. Insulation's role in ice dam prevention is straightforward: it reduces the amount of heat that escapes from the living space into the attic, keeping the attic cold and preventing the roof deck from warming above freezing.
R-Value Requirements by Climate Zone
The U.S. Department of Energy divides the country into climate zones 1 through 7. For ice dam prevention, the relevant zones are 5 through 7, covering the northern states from Minnesota to Maine and mountain regions.
- Zone 5 (Chicago, Denver, Indianapolis): Minimum R-49 recommended
- Zone 6 (Minneapolis, Detroit, Burlington VT): Minimum R-49 to R-60
- Zone 7 (Northern Minnesota, Alaska): R-60 and above
Homes built before 1980 frequently have only R-11 to R-19 of attic insulation, far below the threshold needed to prevent ice dams in these zones [3]. Even homes built in the 1990s may have R-30 attic insulation, which building scientists now consider the bare minimum rather than the target.
Insulation Types and Their Applications
Blown fiberglass or cellulose is the most common and cost-effective method for upgrading existing attic floors. A professional crew can bring most attics to R-49 in a single day. Cellulose has a slight edge in density and air resistance.
Spray polyurethane foam (closed-cell) applied to the underside of the roof deck in an unvented attic assembly provides both insulation and air sealing in one application. It is more expensive than blown insulation but delivers the highest air-tightness.
Rigid foam board added above the existing roof deck (during a re-roof) eliminates thermal bridging through rafters and can significantly improve the thermal performance of the entire roof assembly.
The key rule: always seal air first, then add insulation. Adding insulation over unsealed penetrations drives moist air deeper into the assembly, creating condensation problems in addition to ice dams.
I always tell homeowners to think of insulation as a blanket and air sealing as a windbreaker. The blanket keeps you warm on a still night. But without the windbreaker, a breeze cuts right through. Same physics apply in the attic.
Attic Ventilation: Keeping the Roof Deck Uniformly Cold
Proper attic ventilation serves a different function than insulation. While insulation keeps heat from escaping upward, ventilation continuously sweeps cold outside air through the attic space, ensuring that any heat that does make it into the attic does not linger long enough to warm the roof deck.
A balanced ventilation system requires two components:
- Intake vents at the soffits (low on the roof), which draw cold outside air in
- Exhaust vents at or near the ridge (high on the roof), which allow warm air to escape
The standard ventilation ratio is 1 square foot of net free ventilation area per 300 square feet of attic floor space, split equally between intake and exhaust [3]. In practice, many older homes have inadequate soffit ventilation because insulation has been pushed all the way to the eaves, blocking the soffits.
Baffle channels (also called rafter baffles or vent chutes) address this problem. Installed between each rafter pair at the eave, they create a clear airway from the soffit vent to the open attic above, even when the attic floor is deeply insulated. The Building Science Corporation recommends a minimum 2-inch clear air gap between the top of the insulation and the underside of the roof deck [2].
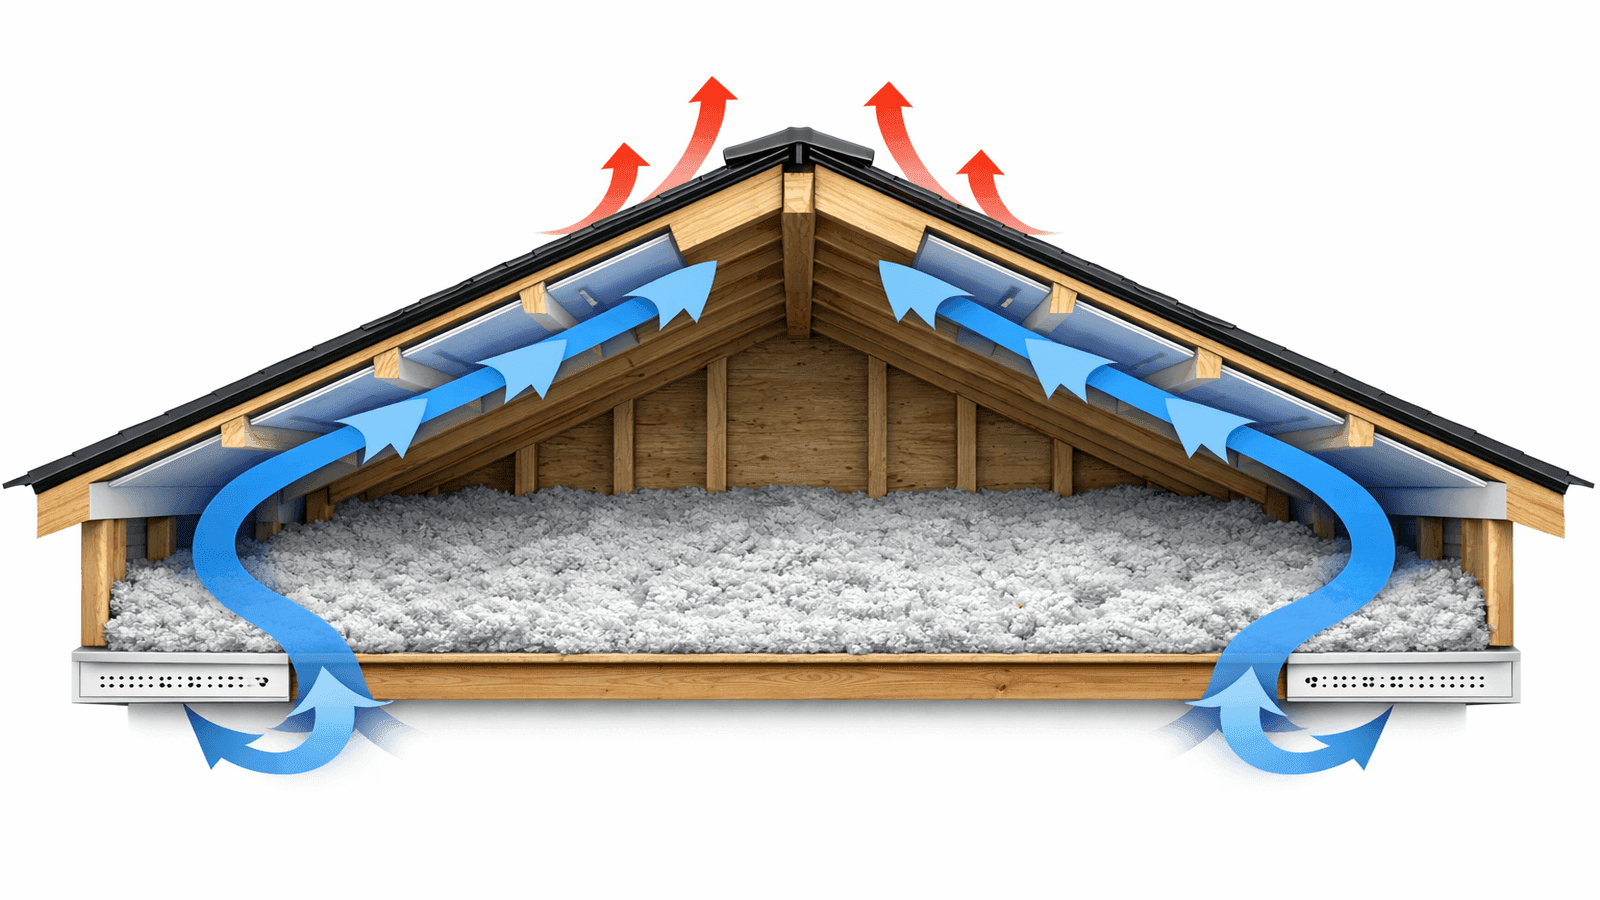
Photo: Cutaway view of attic showing airflow pathway from soffit intake vents through baffle channels to ridge exhaust vent for balanced ventilation
Common ventilation failures that contribute to ice dams:
- Blocked soffits: insulation piled against the eaves with no baffles
- Insufficient exhaust: no ridge vent, only small gable vents that create dead zones in the center of the attic
- Competing exhaust: multiple exhaust vent types (ridge plus gable) that short-circuit airflow
- Bath or kitchen exhaust fans vented into the attic: the single fastest way to create moisture and ice dam problems simultaneously
For more on how ventilation fits into your roof's overall health, see our roof components explained article.
Heat Cables: When They Help and When They Fall Short
Roof heat cables (also called heat tape or de-icing cables) are electrical resistance cables installed in a zigzag pattern along the eaves and sometimes routed through gutters and downspouts. They consume electricity to generate heat, melting narrow channels through ice so that water can drain.
Heat cables have a specific and limited role: they are a reactive mitigation tool, not a preventive one [4]. They do not stop ice dams from forming. They do not address the underlying cause of excess heat escaping through the roof. What they do is create drainage paths in ice that has already formed, reducing the depth of water that can back up under shingles.
When Heat Cables Make Sense
- Homes with complex roof geometry (multiple valleys, dormers) where meltwater naturally pools
- Older homes where full attic remediation is cost-prohibitive in the short term
- Rental properties or vacation homes that are not monitored continuously in winter
- Supplemental protection for north-facing eaves that receive minimal direct sunlight
Get quotes from top-rated pros.
Heat Cable Limitations and Risks
- Energy cost: A 120-foot self-regulating cable running through a typical Buffalo, NY winter can add $100 to $200 to electric bills.
- Installation quality matters: Improperly installed cables that cross over each other can melt through shingles.
- They do not protect walls or ceilings: Water can still infiltrate if the ice dam grows beyond the heated zone.
- Maintenance is required: Cables degrade over time and should be inspected annually.
Self-regulating cables (which adjust wattage based on ambient temperature) are worth the higher upfront cost over constant-wattage cables. They consume less energy during mild spells and deliver more heat precisely when temperatures are near freezing.
Roof Raking: Safe Snow Removal Practices
A roof rake is a long-handled tool used from the ground to pull snow off the lower portion of a sloped roof after a heavy storm. By removing the snow before the melt-refreeze cycle can begin, raking eliminates the raw material ice dams need to form.
Roof raking is most effective when done immediately after a storm, before any melting has occurred. It is most practical on single-story homes or lower roof sections accessible from the ground. Homeowners should remove the first 3 to 4 feet of snow from the eave edge, which is where ice dams initiate [3].
Safety rules for roof raking:
- Always work from the ground. Never climb on a snow-covered or icy roof.
- Keep the rake head flat against the roof surface to avoid dislodging or tearing shingles.
- Stay clear of the area where snow will slide off.
- Do not rake near power lines.
- Avoid metal rakes on asphalt shingles; use plastic or rubber-edged models.
Roof raking is a short-term tactic. In regions with frequent heavy snowfall, it becomes impractical as a sole strategy. It works best in combination with the long-term fixes of air sealing, insulation, and ventilation.
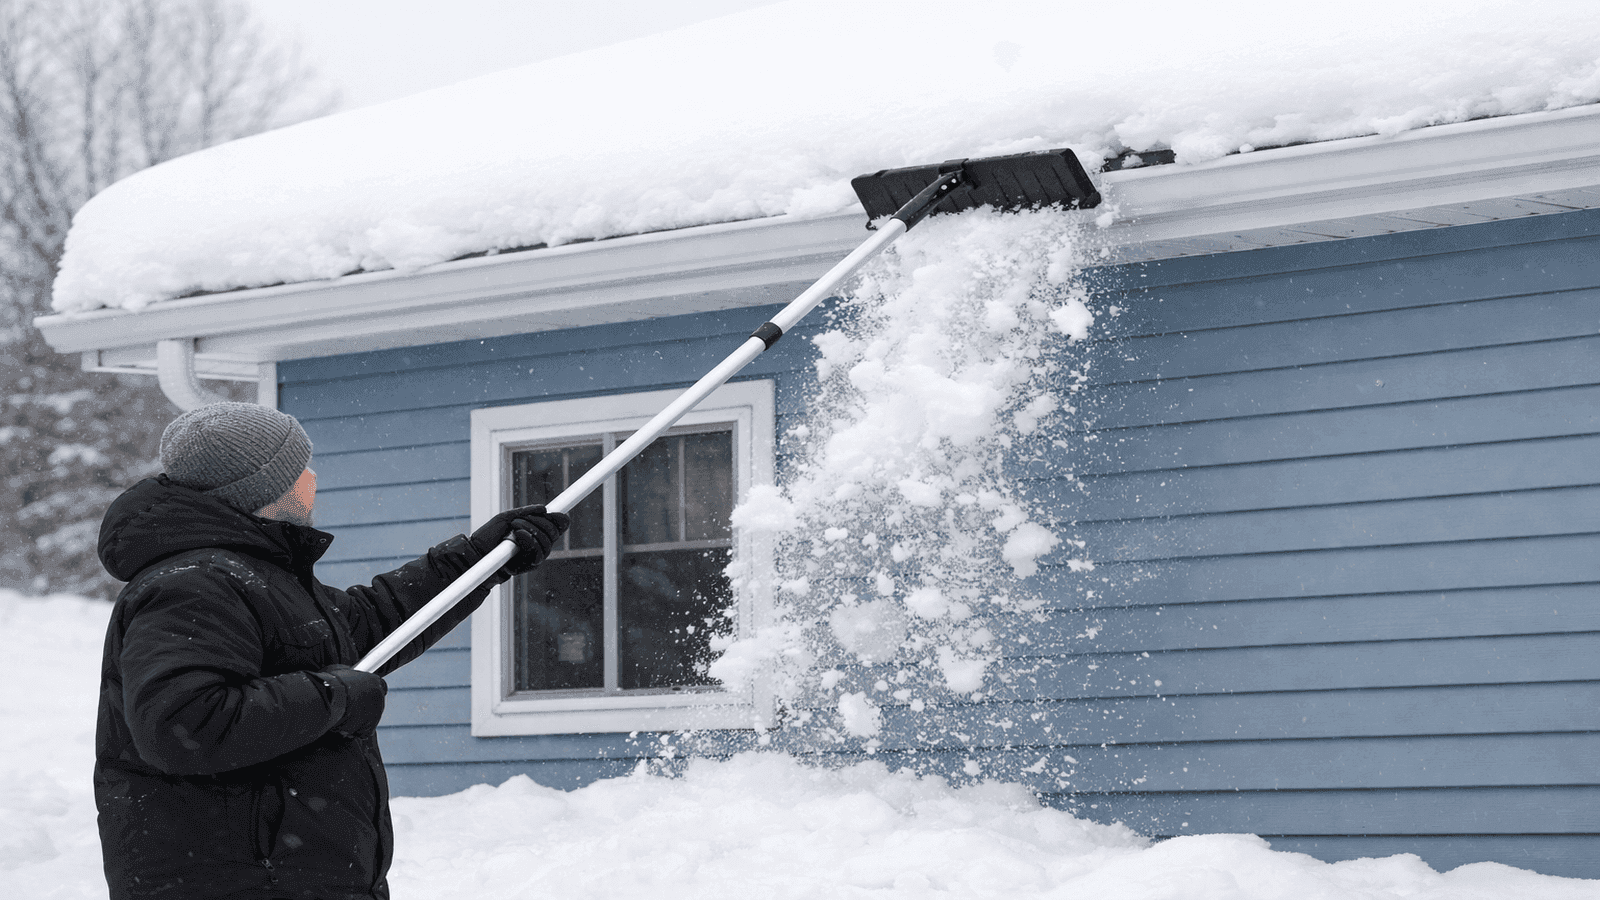
Photo: Homeowner standing on the ground safely using a long-handled roof rake to pull snow off the lower eave of a residential roof in winter
Ice and Water Shield Membrane: Last Line of Defense
Even with perfect attic insulation and ventilation, no system is infallible. Ice and water shield is a self-adhering, waterproof membrane installed beneath the shingles along the eave and in roof valleys. It serves as the last line of defense if meltwater does back up under the shingles.
Building codes in most cold-climate states require ice and water shield to extend from the eave edge to a point at least 24 inches inside the warm wall (the exterior wall line) [3]. In severe climate zones, extending this barrier 36 inches or covering the entire lower third of the roof is a sound practice.
Ice and water shield does not prevent ice dams. It prevents ice dam water infiltration from reaching the roof deck and structure. Homes without this membrane have no barrier between backed-up meltwater and the wood sheathing, making structural damage far more likely.
If your home is due for a re-roof, specifying a premium ice and water shield product at the eaves and all valleys is one of the highest-value upgrades for any northern climate home. See our guide on fall roof preparation for a complete pre-winter checklist.
Gutter Maintenance and Its Role in Ice Dam Prevention
Gutters do not cause ice dams. They are, however, where ice dams most visibly manifest and where much of the resulting damage occurs. Clogged gutters full of debris freeze solid, adding weight and giving the initial ice dam a foundation to grow on.
Keeping gutters clean before winter arrives reduces the mass of frozen material at the eave and improves drainage during periods of above-freezing temperatures. For a step-by-step approach to safe gutter maintenance, see our guide on how to clean gutters safely.
Gutter guards can help reduce debris accumulation but are not a substitute for cleaning. In ice dam situations, wide gutter guards can actually trap water and create a broader ice mass at the eave.
When to Call a Professional
Some ice dam prevention work is firmly in the DIY category: caulking around attic hatches, installing weatherstripping on access doors, adding baffle channels before blowing in insulation. Other tasks require professional expertise.
Call a licensed roofing contractor if:
- You discover active water intrusion through the ceiling or walls
- Ice dams are recurrent despite having insulated and sealed the attic
- You see sagging sections of roof or suspect structural compromise
- You need to assess whether ice and water shield is present and intact under existing shingles
- You want a thermal imaging inspection to locate hidden air leaks in the ceiling plane
If water damage has already occurred, prompt professional remediation prevents mold from establishing. Our guides on fixing roof leaks and emergency roof repair costs can help you understand what to expect if you need immediate help.
Contractors in our network who specialize in ice dam remediation can assess your attic assembly, identify the specific failure points, and provide a prioritized repair plan. Find a licensed roofing contractor near you through NearbyHunt.
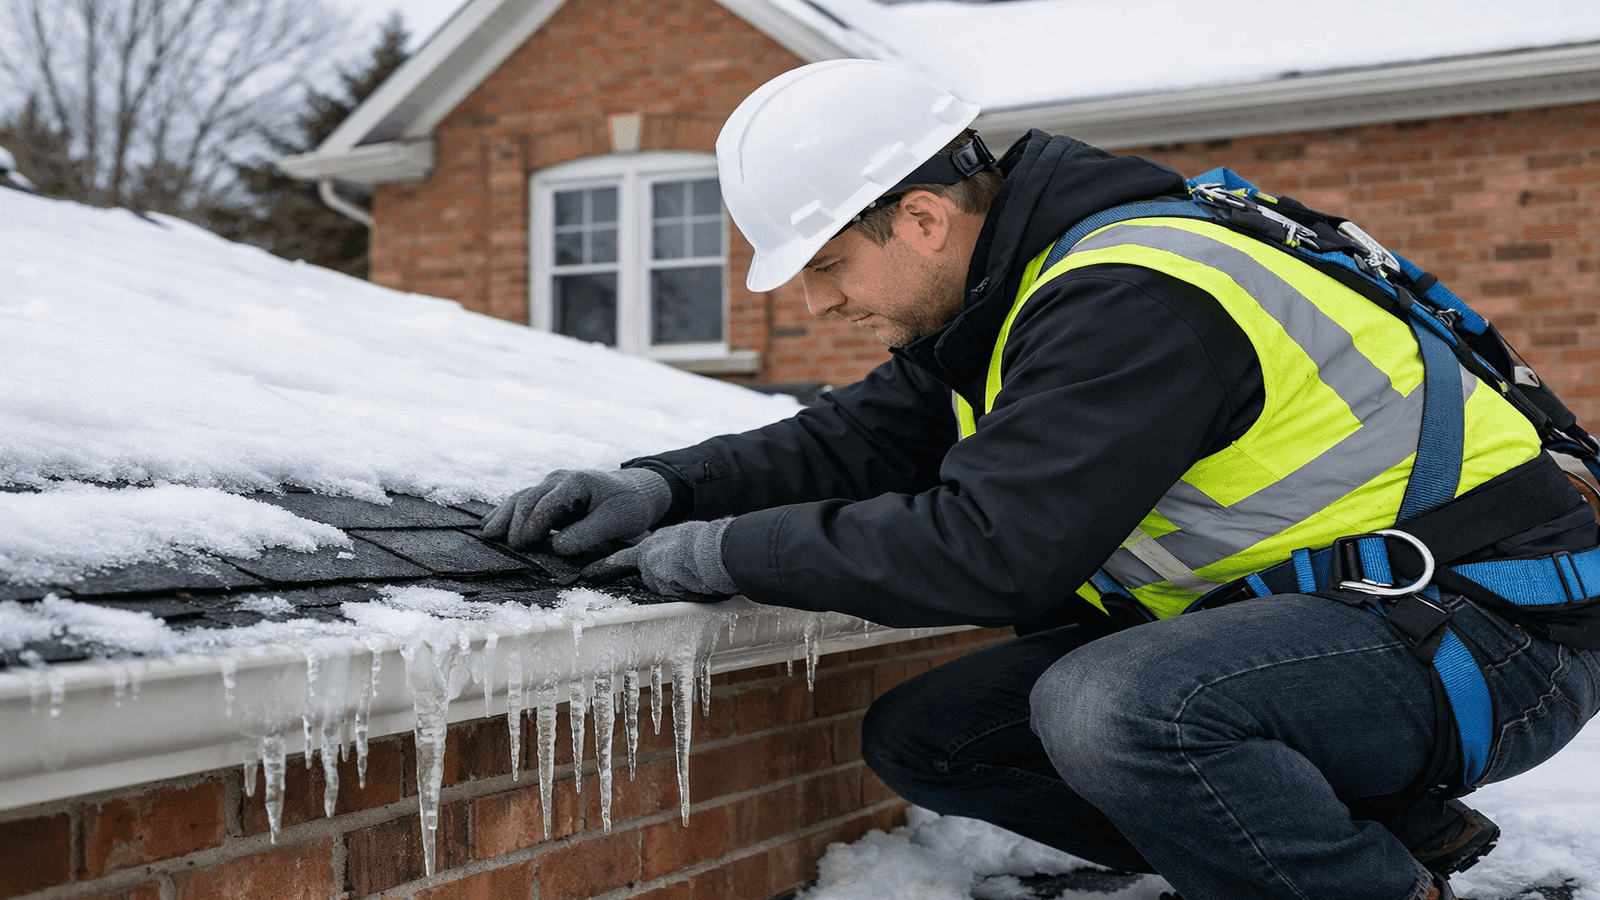
Photo: Licensed roofing contractor in safety harness inspecting the eave and shingle condition of a residential roof near an ice dam formation in winter
Prioritizing Your Prevention Plan
Not every homeowner can address every prevention layer simultaneously. Here is a practical hierarchy based on impact per dollar spent:
- Air seal the attic (highest ROI, often $500 to $1,500 for a professional job): stops warm air from reaching the roof deck and dramatically reduces ice dam risk even before insulation is upgraded.
- Upgrade attic insulation to zone-appropriate R-value ($1,000 to $3,500 depending on attic size): the structural fix that keeps the attic uniformly cold.
- Verify and improve attic ventilation ($300 to $1,500): install baffles at eaves, confirm ridge vent is functional, ensure bath fans vent to the exterior.
- Add ice and water shield at next re-roof ($200 to $800 in material cost): ensures passive protection even if ice dams form.
- Install heat cables as a supplement ($150 to $500 for materials, $300 to $600 for professional installation): appropriate for complex roof geometry or as a bridge solution while structural fixes are planned.
- Purchase a roof rake ($30 to $80): practical for single-story homes and immediate post-storm snow management.
For broader context on protecting your roof system year-round, see our guides on storm damage assessment and roof flashing maintenance.
Conclusion
Ice dam prevention is not a single product or a single fix. It is a layered system that starts with building science and ends with physical roof protection. The most impactful and most consistently overlooked step is air sealing the ceiling plane, which stops the warm air from ever reaching the roof deck in the first place. Combined with zone-appropriate insulation, balanced attic ventilation, and a properly installed ice and water shield membrane, these measures eliminate the conditions that produce ice dams.
Heat cables and roof rakes have their place as supplemental tools, but they treat symptoms rather than causes. Homeowners who invest in the structural fixes early, before a damaging winter, consistently come out ahead financially compared to those who defer action until water is entering the home.
If your roof or attic has not been evaluated in the last five years, scheduling a professional assessment this spring is the single most valuable step you can take to ensure winter 2026 does not bring an ice dam surprise. Use our roofing contractor finder to connect with licensed professionals in your area.
Disclaimer
The information provided in this article is for general educational purposes only. Ice dam prevention recommendations and building code requirements vary by climate zone, local jurisdiction, and specific roof assembly. Always consult a licensed roofing contractor, insulation professional, or energy auditor for assessments specific to your home. NearbyHunt does not perform roofing work and is not responsible for outcomes resulting from the application of information in this article. Costs cited are national averages and will vary by region and project scope.
Sources & References
[1] Hartford Courant / Insurance Industry Data — Ice dam claims statistics 2024–2025: https://www.courant.com/2026/02/04/ice-dam-claims-are-expected-to-climb-across-ct-heres-how-to-deal-with-them-and-avoid-them/
[2] Building America Solution Center, U.S. Department of Energy — Attic Air Sealing, Insulating, and Ventilating for Ice Dam Prevention: https://basc.pnnl.gov/information/attic-air-sealing-insulating-and-ventilating-ice-dam-prevention
[3] National Weather Service / NOAA — Preventing Roof Ice Dams: https://www.weather.gov/grr/roofIceDams
[4] Hedrick Construction — Do Heat Cables Prevent Ice Dams? Pros and Cons: https://www.hedrickconstructioninc.com/blog/do-heat-cables-prevent-ice-dams-pros-cons
[5] University of Minnesota Extension — Dealing with and Preventing Ice Dams: https://extension.umn.edu/protecting-home-rain-and-ice/dealing-and-preventing-ice-dams
[6] Insulation Institute — Attic Insulation, Air Sealing, and Ice Dam Solutions: https://insulationinstitute.org/im-a-homeowner/why-insulate/preventing-ice-dams/
[7] Brax Roofing — How Proper Attic Insulation and Ventilation Prevent Costly Ice Dams (2026): https://www.braxroofing.com/blog/2026/january/how-proper-attic-insulation-ventilation-prevent-/

James is a licensed roofing contractor with 20 years of experience in roof installation, inspection, and repair across the U.S. South and Midwest. He specialises in asphalt shingles, metal roofing, and storm damage restoration. On NearbyHunt, James offers practical advice on roof maintenance, insurance claims, and selecting the right materials for long-lasting protection.

Jacob is a licensed roofing contractor with over 18 years of experience in roof inspection, installation, and restoration. Based in Texas, he has led hundreds of successful roofing projects across residential and commercial properties. Jacob is also a certified storm damage specialist, ensuring that all NearbyHunt roofing content meets industry best practices and safety standards.