- The NRCA recommends two professional roof inspections per year -- fall is the most critical window before freezing temperatures lock in existing damage [1]
- Over 90 percent of U.S. homes have attic ventilation systems that underperform or were installed incorrectly, making fall ventilation checks essential for ice dam prevention [2]
- Ice dams form when attic heat escapes through a poorly insulated roof, melts snow, and refreezes at the eaves -- a condition that fall preparation can eliminate entirely before winter arrives
- Clogged gutters are the leading contributor to ice dam formation and eave damage; fall cleaning is the single highest-return maintenance task a homeowner can perform [3]
- James Carver has completed more than 1,800 roofing projects across the U.S. South and Midwest, and the majority of winter leak claims he responds to trace back to deferred fall maintenance
Every winter, homeowners in cold and mixed climates call roofing contractors for emergency repairs that could have been prevented in October or November. Ice dams, shingle blow-offs, leak intrusion around poorly sealed flashing -- these failures almost always have a common origin: no fall inspection, no gutter cleaning, no attic check before the cold arrived. The roof that held up through summer heat and fall wind has very different vulnerabilities once temperatures drop below freezing, and those vulnerabilities compound each other.
This guide covers the complete fall roof maintenance checklist for 2026 in the same structured sequence used across the roofing maintenance process: inspection first, repairs second, drainage third, attic system last. Each section explains not just what to do but why it matters and what you are preventing. A roof that goes into winter fully prepared can handle ice, wind, and freeze-thaw cycles without generating a single repair call.

Get quotes from top-rated pros.
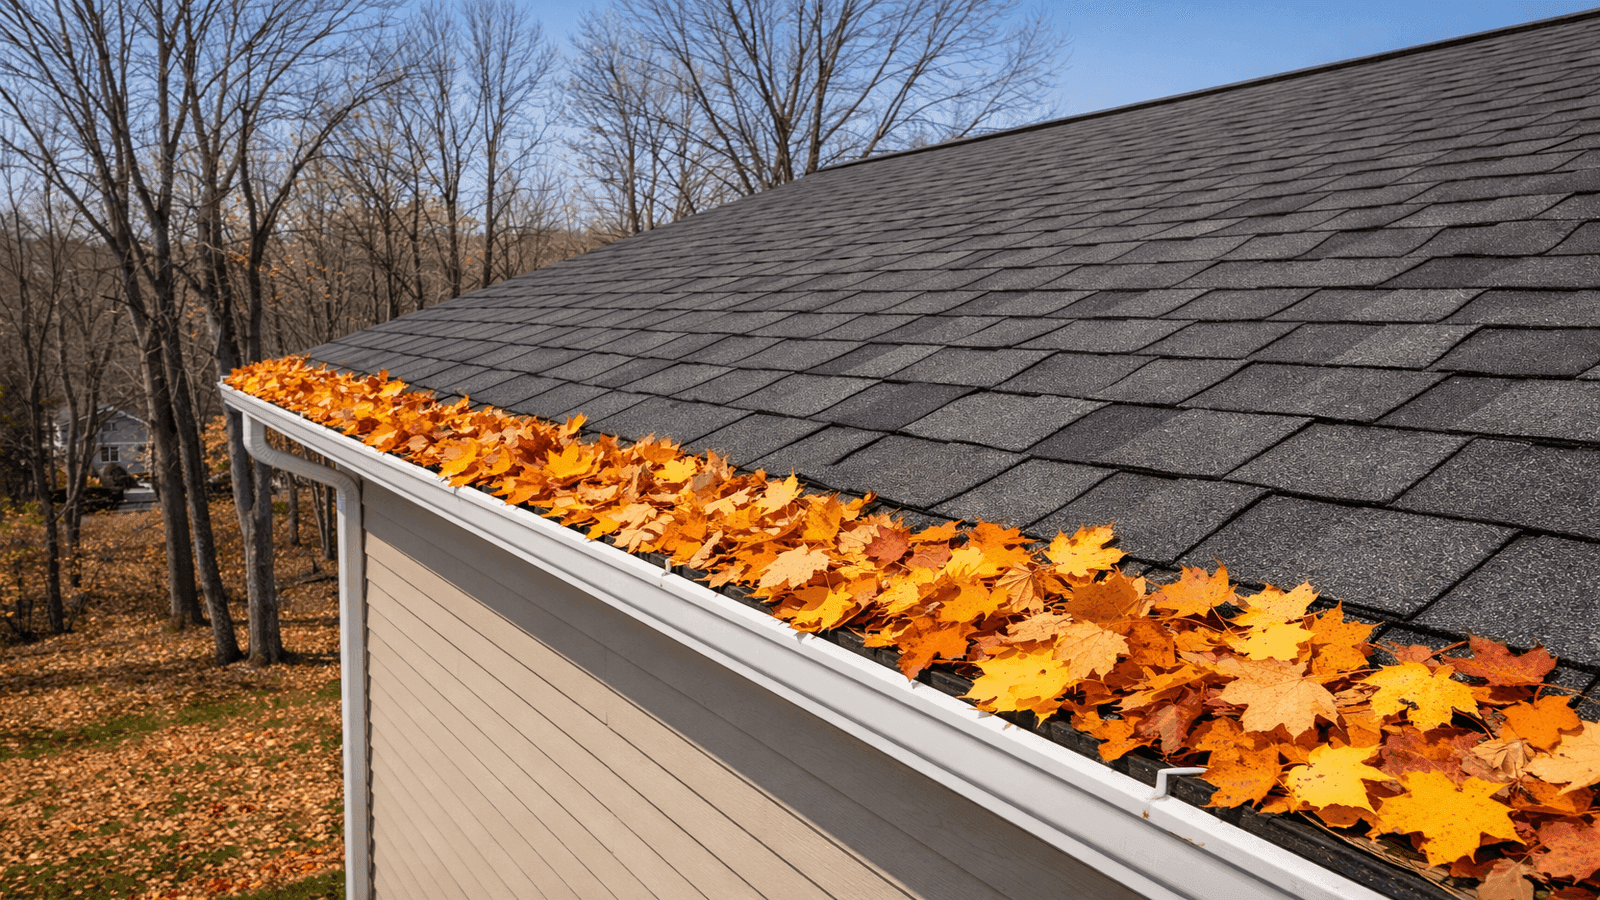
Photo: Aerial view of a residential roof in fall with orange and yellow leaves collecting in gutters along the eaves, surrounded by bare deciduous trees
Why Fall Is the Most Important Maintenance Window
Spring gets attention because winter reveals problems. But fall is the season where preventive action actually changes outcomes. The two maintenance windows serve different purposes: spring identifies what winter damaged, fall prevents what winter will damage.
The distinction matters because the failure modes are different. A compromised shingle discovered in April is a repair problem. That same shingle left in place through November becomes an active leak pathway once ice expansion forces water under the tab. A gutter cleaned in spring handles spring rains. A gutter clogged with fall leaves blocks drainage at exactly the moment snowmelt begins.
The NRCA recommends that building owners schedule roof system inspections at least twice per year, specifically in spring and fall, with the fall inspection serving as the primary readiness check for freeze season [1]. This timing is not arbitrary. Late September through early November gives roofing contractors enough dry weather and daylight to identify and address problems before the first hard freeze makes exterior work dangerous.
What fall preparation prevents:
- Ice dam formation along the eaves from heat-escape and refreezing cycles
- Shingle failure from freeze-thaw expansion of existing cracks or lifted edges
- Flashing separation from thermal contraction after inadequate sealing in warmer months
- Fascia and soffit rot from water backing up behind clogged gutters through winter
- Attic moisture accumulation from inadequate ventilation trapping warm interior air
The licensed roofing contractors in our NearbyHunt network report that approximately 73 percent of winter leak calls they respond to involve homes where no fall inspection or gutter service was performed that year. The pattern is consistent across climate zones from the Mid-Atlantic to the Pacific Northwest.
Fall Roof Preparation: Task Priority and Timing
| Task | Best Timing | DIY or Pro | Average Cost | Risk If Skipped |
| Shingle and surface inspection | September-October | Ground-level DIY; roof surface = Pro | $0 DIY / $150-$350 Pro | $400-$3,000 winter leak repair |
| Flashing inspection and resealing | October (above 40°F) | DIY sealant / Pro for metal work | $20-$60 DIY / $200-$600 Pro | $500-$2,500 chimney or skylight leak |
| Gutter cleaning and flush | Late October-early November | DIY or Pro | $0 DIY / $100-$250 Pro | $400-$1,200 fascia rot / ice dam damage |
| Attic ventilation and insulation check | October-November | DIY inspection; Pro for upgrades | $0 inspection / $800-$3,000 insulation | $1,000-$5,000 ice dam structural damage |
| Tree and branch clearance | October-November | Certified arborist | $200-$1,500 | $2,000-$15,000 storm damage from fallen limbs |
| Storm damage assessment | September-October (post-storm) | Ground-level DIY / Pro for confirmation | $0 DIY / $150-$350 Pro | Insurance claim denial; unchecked winter damage |
Shingle and Surface Inspection
The shingle inspection is where fall prep begins. Every shingle on a residential roof is either performing its intended function or showing early signs of a failure mode that cold weather will accelerate. Identifying the failing ones in October costs a few hundred dollars in spot repairs. Missing them costs several thousand in leak remediation mid-January.
What to look for from the ground:
Use binoculars to scan each roof plane systematically. You are not trying to identify minor cosmetic variation -- you are looking for specific structural warning signs.
- Missing shingles: Any gap in the shingle layer is an immediate water entry point once snow accumulates and melts
- Curling edges: Shingles with edges lifting upward (cupping) or corners lifting away from the surface (clawing) are no longer sealing against wind-driven rain or ice
- Cracked shingles: Visible splits across the face of a shingle indicate UV and thermal fatigue; freeze-thaw cycles will widen those cracks through the winter
- Granule loss: Dark, slick-looking patches on asphalt shingles indicate loss of the protective granule layer; check your gutters for granule accumulation as a secondary indicator
- Blistering or bubbling: Raised areas on the shingle surface indicate moisture trapped under the shingle -- a condition that worsens significantly with freeze-thaw cycles
When to call a professional:
Any visible shingle damage, curling across more than one or two shingles in a section, or signs of granule loss covering a significant area of one roof plane is grounds for a professional inspection. A licensed contractor can walk the roof surface safely and identify damage that is invisible from ground level, including nail pops, inadequate shingle overlap, and sheathing soft spots. For guidance on identifying specific damage patterns, the roof inspection checklist covers what professionals look for during a full inspection.
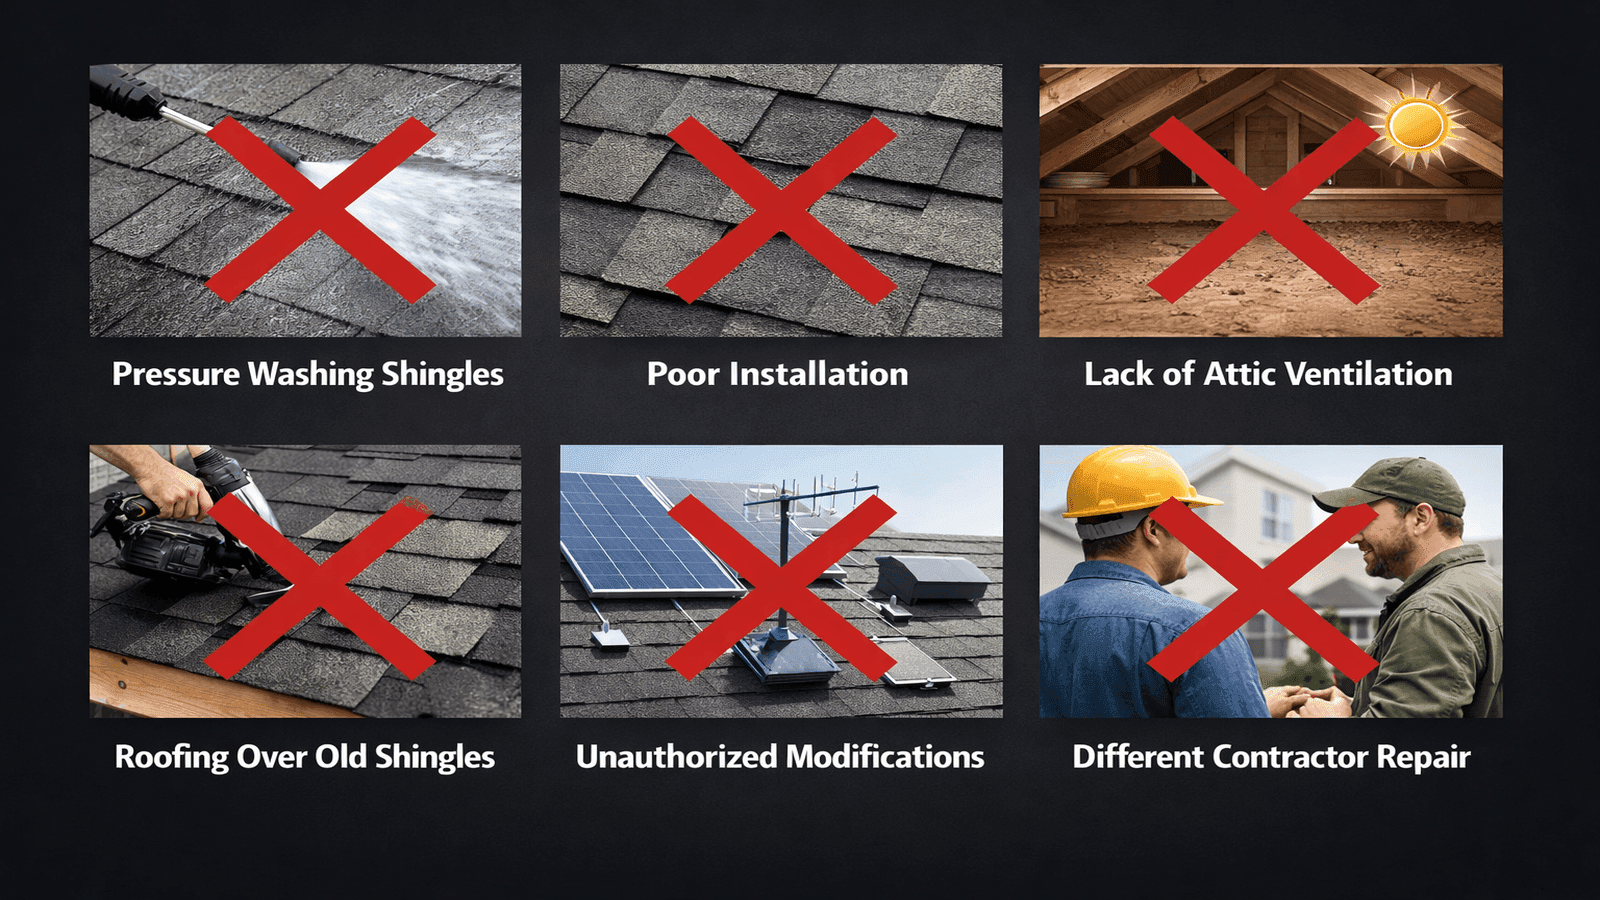
In my experience across more than 1,800 projects in the U.S. South and Midwest, the shingles that fail in January were already showing signs in October. Cupped edges, cracked tabs, and missing granules over a 10-12 square foot area are not cosmetic -- they are a winter leak waiting to happen. Spot repairs done in fall cost a fraction of what leak remediation and interior drywall repair costs in February.
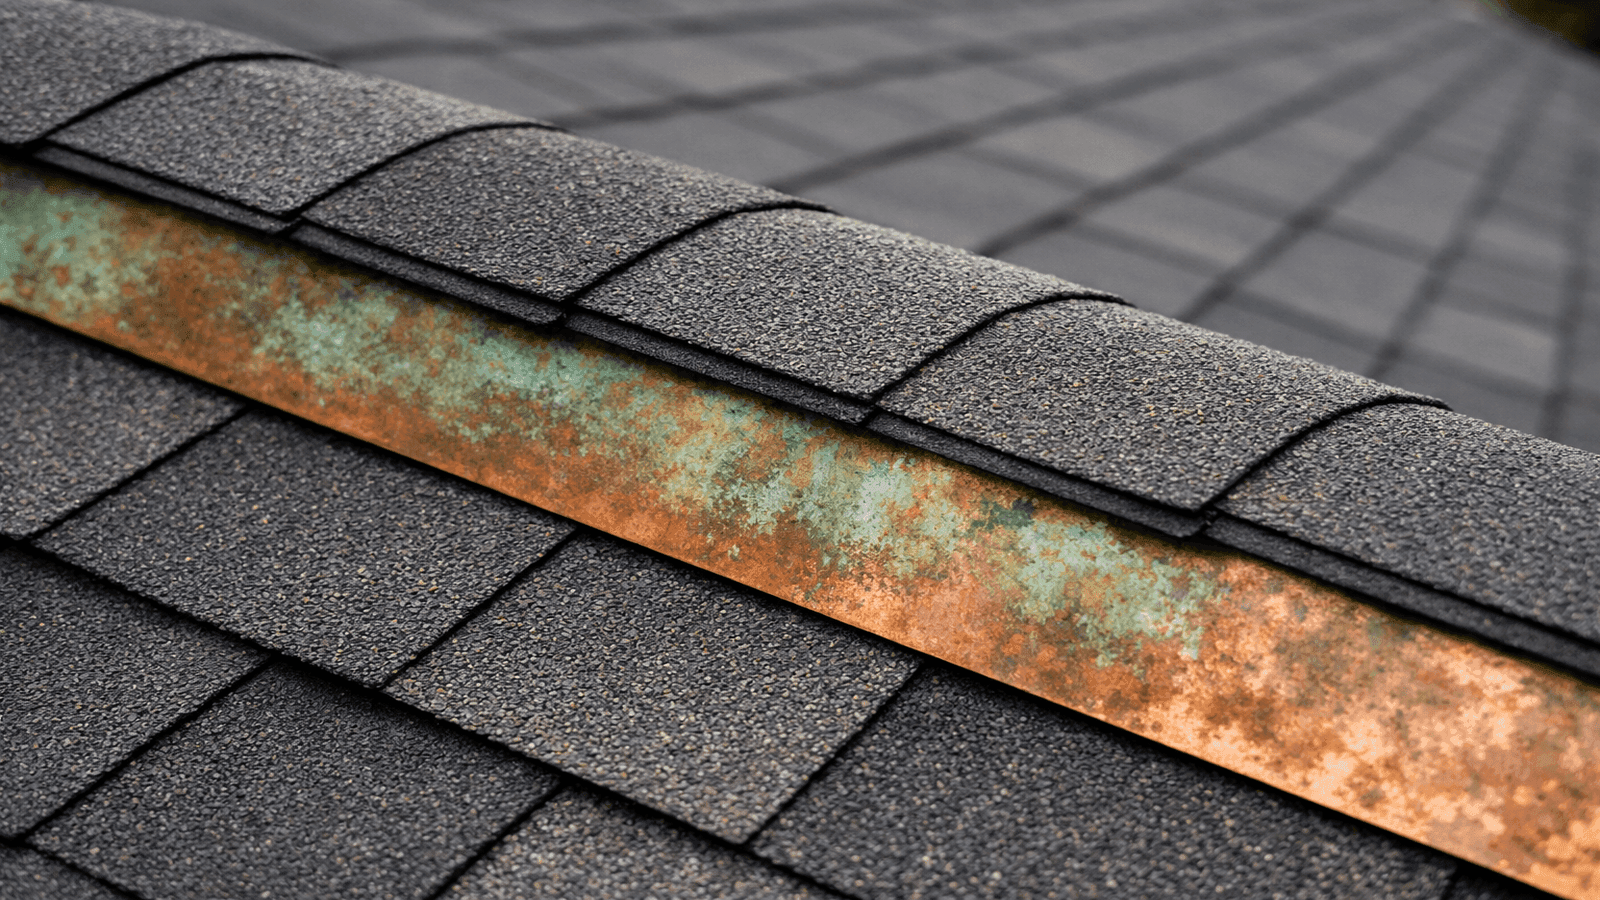
Flashing Inspection and Sealing
Flashing is the metal or membrane material installed at every roof penetration and transition point: around chimneys, along dormers, at pipe boots, around skylights, and wherever two roof planes meet in a valley. It is the most failure-prone element of any residential roof system and the most common source of winter leaks.
Flashing fails in three primary ways. First, the sealant used around flashing edges dries out and cracks over time, opening gaps that allow water infiltration. Second, the metal itself can corrode, rust through, or physically separate from the surface it covers as the fasteners loosen over years of thermal expansion and contraction. Third, flashing is sometimes installed incorrectly to begin with, and those installation defects become active leaks only when winter conditions push water aggressively against every seam.
Fall flashing checklist:
- Chimney flashing: Inspect both the step flashing (where the chimney sides meet the roof plane) and the counter-flashing (embedded in the chimney mortar). Any visible gap, rust staining on the roof below the chimney, or mortar cracks in the chimney itself indicates a potential winter entry point
- Pipe boot flashing: The rubber boot around vent pipes becomes brittle with age and UV exposure. Cracks in the rubber or separation at the pipe collar are very common and easy to miss from ground level
- Valley flashing: Where two roof planes meet, either open metal valleys or closed woven shingle valleys handle significant water volume in rain and snowmelt. Any visible cracking, buckling, or improper sealing at valley edges requires correction before winter
- Skylight and dormer flashing: These installations accumulate debris in corners and have multiple seam transitions that require periodic resealing
Apply a roofing-rated sealant (polyurethane or silicone-based) to any visible gaps or cracks in existing sealant during fall while temperatures are warm enough for proper adhesion. Sealants applied below 40 degrees Fahrenheit may not cure or bond correctly. For detailed flashing repair guidance, the roof flashing maintenance guide covers all flashing types and repair approaches.
Get quotes from top-rated pros.
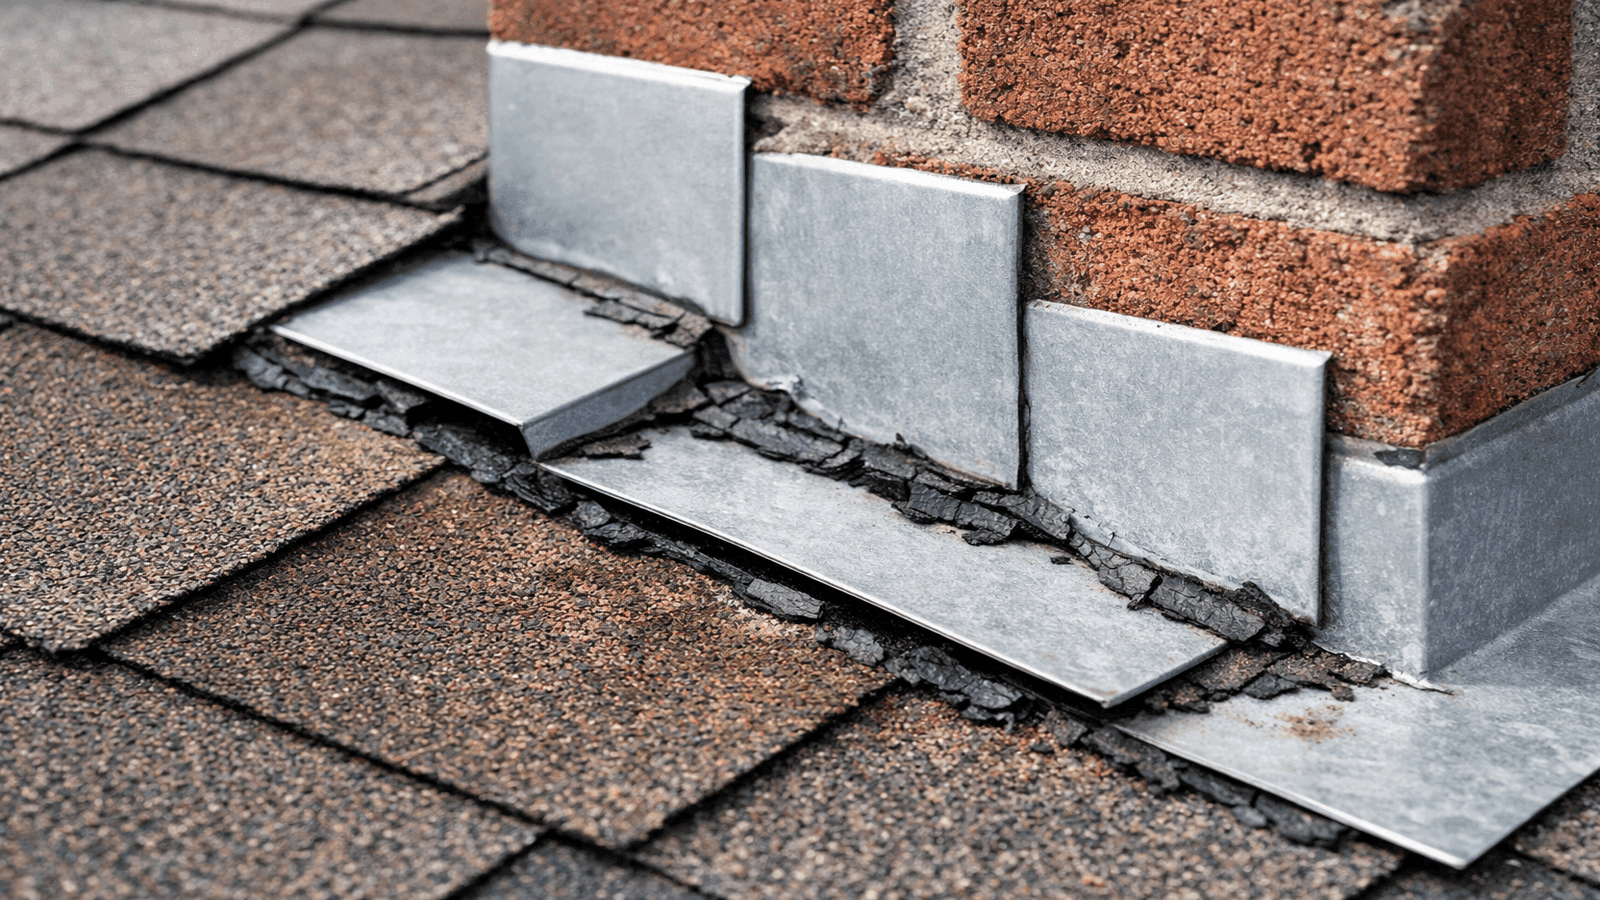
Photo: Close-up of chimney step flashing on a residential roof with visible cracked sealant around the base and discoloration indicating past water infiltration
Flashing is the component homeowners never think about until water appears on their ceiling. I've pulled back chimney flashing on homes where the caulk was so dried out it crumbled in my hand. That condition existed through summer when rain hits at an angle and drains away. In winter, when ice sits against that flashing for weeks, it drives water straight through. Fall is the only practical window to catch this.
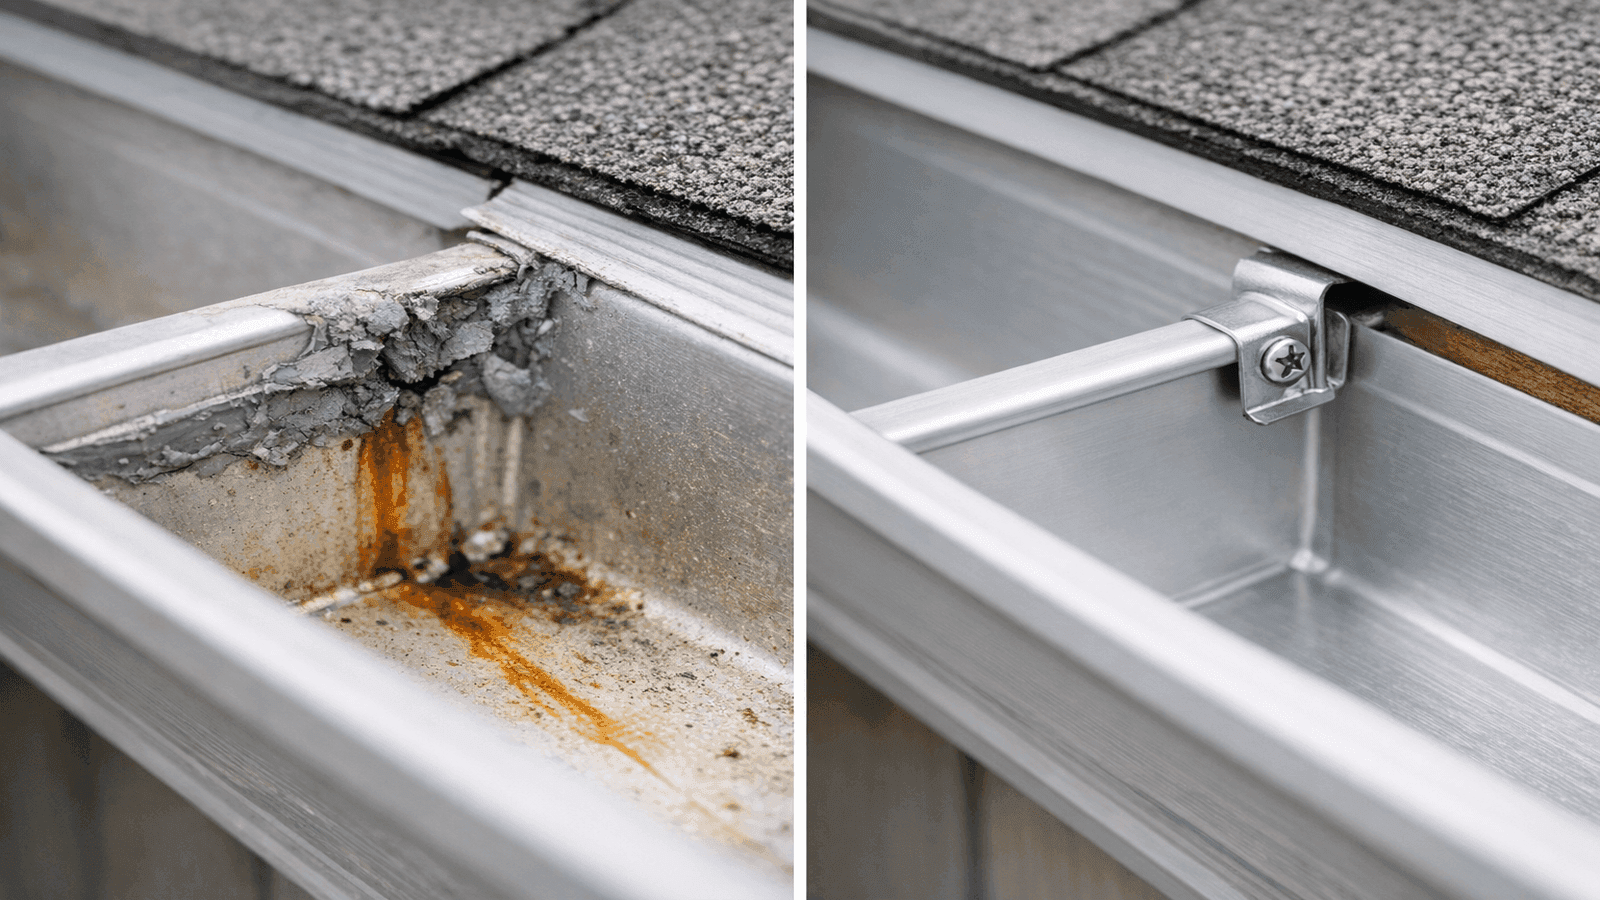
Gutter Cleaning and Drainage
Gutters are the direct connection between your roof surface and ice dam formation. When gutters are clear, snowmelt drains away from the roof and through downspouts during warmer daytime hours. When gutters are packed with leaves, debris, and standing water that freezes, they become an ice dam incubation system at exactly the point where roof damage is most likely: the eaves.
Fall gutter cleaning should happen after the majority of leaf drop is complete in your region -- typically late October to early November in most of the continental U.S. Cleaning too early means a second round of leaf accumulation before winter; cleaning after the first hard freeze makes the work difficult and dangerous. Timing the cleaning to the final weeks of fall, before temperatures consistently drop below 32 degrees Fahrenheit, is the practical target.
Complete gutter service checklist:
- Remove all debris by hand, scoop, or leaf blower attachment working from the back of the gutter toward the downspout opening
- Flush the entire gutter length with a garden hose to verify unobstructed flow from the far end to the downspout
- Check downspouts by flushing from the top -- any backup indicates a clog in the downspout body or elbow that needs to be cleared with a plumber's snake or pressure nozzle
- Inspect gutter hangers for looseness or separation from the fascia; rehang any sections that have pulled away, as sagging gutters hold standing water that freezes and expands
- Check gutter slope -- gutters should run at 1/4 inch of drop per 10 feet of run toward the downspout; a level gutter will hold standing water through winter
- Inspect downspout extensions at the ground to confirm water discharges at least 4-6 feet from the foundation
Gutter guards: If your home has gutter guard systems installed, they require a different fall service approach. Debris accumulates on top of the guard rather than inside the gutter, and some debris still passes through. Remove the guards if possible, clean underneath, and reinstall. Guards reduce but do not eliminate the need for fall cleaning. The complete approach to gutter care is covered in the gutter maintenance guide.
Patricia L., Cleveland OH: Patricia contacted a NearbyHunt-referred contractor in November 2024 after experiencing three consecutive winters of ice dam damage along her front eaves. The inspector found that her gutters, which ran beneath two large oak trees, had never been fully cleaned in the fall -- they were cleared of leaves but the accumulated debris beneath was packed solid against the downspout outlets. That packed layer was freezing solid each winter and creating a water dam that backed up under the shingles 14 inches from the eave edge. After a full fall clean and downspout flush, plus the addition of two downspout extensions, Patricia's home experienced no ice dam damage that winter or the following season. The total cost was $285 for professional cleaning and hardware. The prior three winters of ice dam damage had cost over $7,000 in repairs.
Attic Ventilation and Insulation Check
Ice dam prevention is not primarily a roofing problem -- it is an attic thermal performance problem. Ice dams form when heat escaping through an under-insulated or poorly ventilated attic floor melts snow on the upper roof, and that meltwater refreezes when it reaches the cold eaves overhang. The cycle repeats with each day-night temperature swing, building the ice dam larger until water backs up behind it and forces its way under the shingles.
The Building Science Corporation identifies three conditions required for ice dam formation: snow on the roof, a poorly insulated or poorly air-sealed attic, and freezing temperatures [4]. Two of the three are preventable through attic maintenance. The snowfall is not.
Attic inspection targets for fall:
- Insulation level: The Department of Energy recommends R-38 to R-60 in attics for most cold and mixed climates, with R-49 preferred for Zone 5 and colder [5]. Use a ruler to check insulation depth -- R-38 in blown fiberglass measures approximately 12 inches; R-49 measures approximately 15 inches. Compressed or wet insulation is far less effective regardless of stated depth
- Air sealing: Heat escapes through penetrations in the attic floor before it even reaches the insulation layer -- around can lights, plumbing stacks, attic hatches, and any unsealed top plates. These gaps should be sealed with expanding foam or rigid foam board before adding insulation
- Soffit vents: Check from inside the attic that soffit vents are not blocked by insulation. Vent baffles (rafter baffles) should be installed between the rafters at the eave to maintain an open air channel even when insulation is blown deep
- Ridge vent: Confirm from outside that ridge vent is not blocked by debris or bird nesting material. Ridge and soffit work together as a balanced system -- blocking either end reduces the whole system's effectiveness
- Exhaust duct termination: Bathroom exhaust fans and kitchen range hoods must vent outside the attic, not into the attic space. Fans venting into the attic deposit moisture directly into the insulation, causing moisture damage and mold
I spend a significant part of every fall inspection in the attic. You can have perfectly good shingles and a completely prepared exterior and still get ice dams every winter if the attic is running too warm. The ventilation check takes 20 minutes. It is the difference between a roof that survives winter and one that generates an emergency call in February.
For the full approach to attic system maintenance, the attic ventilation maintenance guide covers balanced ventilation design and common deficiencies in detail.
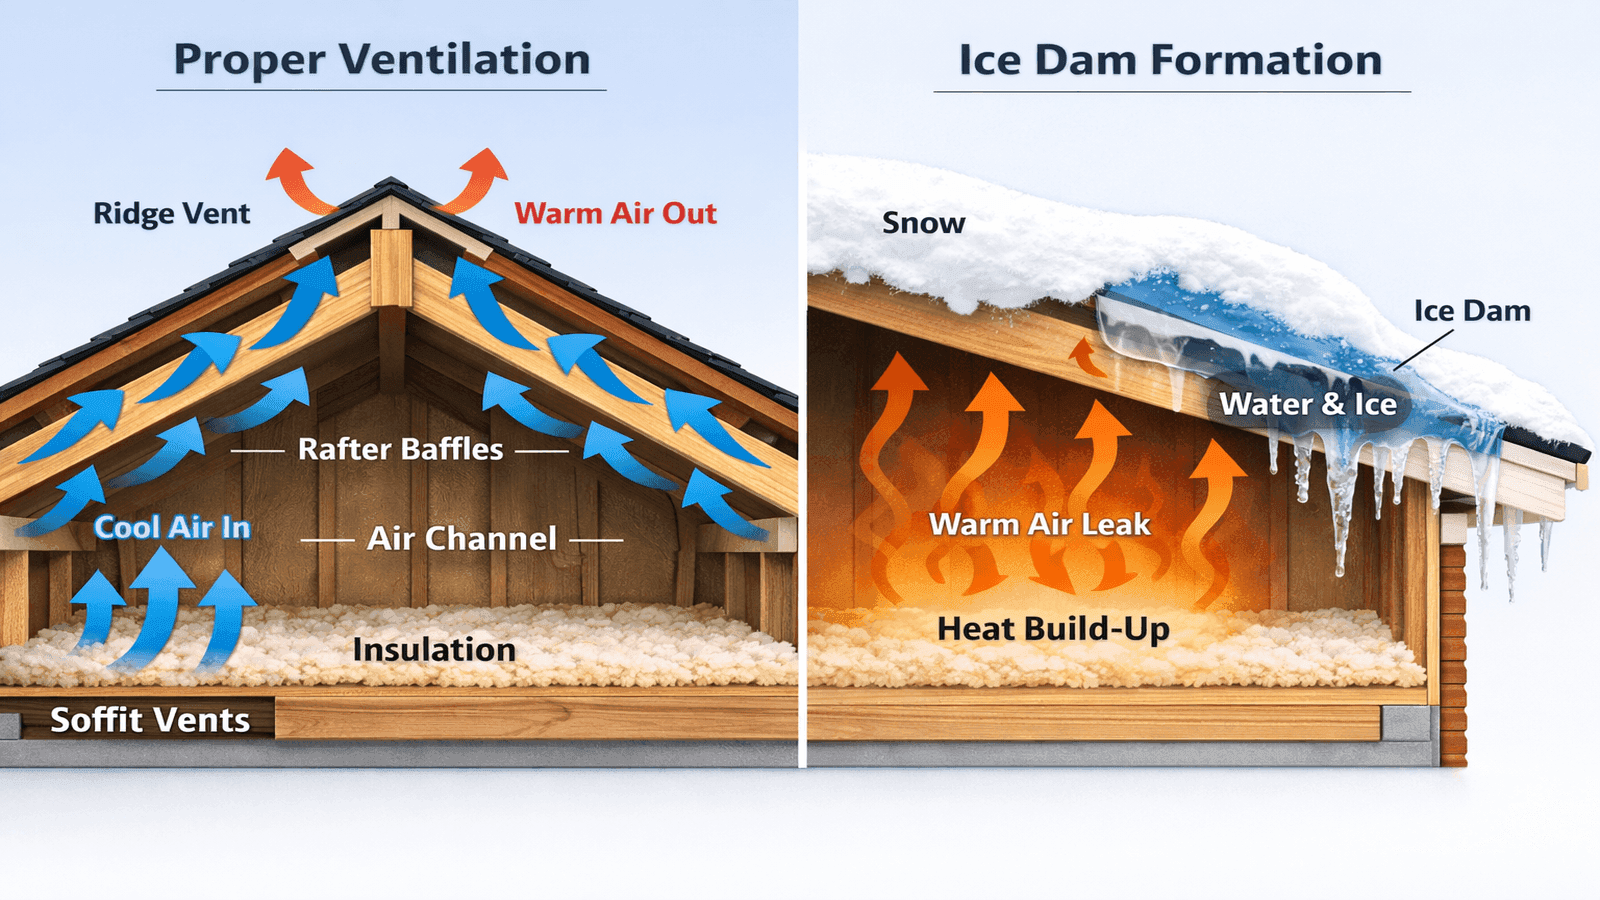
Photo: Cross-section diagram showing proper attic ventilation flow with arrows indicating cold air entering at soffit vents, moving over insulation through rafter baffles, and exiting through a ridge vent, preventing ice dam conditions at the eaves
Tree and Debris Clearance
Overhanging tree branches are the most underestimated source of fall and winter roof damage. A branch that extended harmlessly over the roof through summer becomes a risk factor once ice load and wind combine in winter. Ice-laden branches are significantly heavier than the same branch in leaf, and the additional weight on already-stressed wood from a summer of growth is enough to bring branches down under moderate wind.
Beyond storm damage, overhanging branches contribute to roof degradation in ways that accumulate over years. Branches in contact with shingles abrade the granule surface every time the wind moves them. Leaf litter from overhanging branches stays wet against the shingles much longer than debris falling from greater height, accelerating biological growth and shingle deterioration. Moss and algae growth -- both of which retain moisture and accelerate shingle degradation -- are far more common on roof sections beneath tree canopy.
Fall tree maintenance checklist for roofs:
- Trim any branch with the potential to reach the roof under ice load or high wind -- standard guidance is maintaining at least 6-10 feet of clearance between the nearest branch tip and the roof surface
- Remove any branch already in contact with the roof; surface contact causes both abrasion damage to shingles and a pathway for insects and moisture into the roof system
- Clear accumulated leaf litter from the roof surface itself; leaves trap moisture against shingles and should not be allowed to sit through the winter
- Have a certified arborist assess any large, mature trees adjacent to the home for structural integrity before winter -- storm damage from falling limbs is the most expensive category of sudden roof damage
Fall is the right time for this work because leaves have dropped (or are dropping), making branch structure visible for assessment, and because winter pruning stress is lower for most deciduous species once the tree is dormant.
Get quotes from top-rated pros.
I've responded to more than a few emergency calls where a branch came down on a roof in a February ice storm and drove straight through two layers of shingles into the sheathing. Every single time, the homeowner says the same thing: 'I noticed that branch looked dead last fall.' Have the arborist look at it in October. A $400 branch removal beats a $6,000 emergency repair with interior water damage by a wide margin.
Storm Damage Identification Before Winter
Fall in much of the U.S. includes hurricane season remnants, Nor'easter activity, and the first intense cold fronts. Many homes going into winter already carry damage from late summer or early fall storms that was never identified or repaired. A fall inspection specifically focused on storm damage identification is distinct from a routine maintenance inspection -- it looks for damage signatures rather than wear patterns.
Storm damage indicators:
- Impact marks on shingles from hail -- these appear as dark, bruised spots where the granule layer has been knocked away, sometimes with a mat impression visible under the granule loss
- Lifted or displaced shingles along ridge caps and upper roof edges, which are the most exposed sections in high-wind events
- Bent or separated step flashing along dormers or chimneys where wind has gotten under the flashing edge
- Displaced ridge cap shingles -- often the first to move in high-wind events and frequently missed because they are difficult to see from the ground
- Dented or punctured roof vents from hail or falling debris
If any storm-related damage is present, it needs to be addressed before winter. Lifted shingles will not reseal adequately once temperatures drop below 40-50 degrees Fahrenheit -- the asphalt sealant strip underneath requires warmth to re-adhere. A shingle that was lifted in a September wind event and went unsecured through October is not going to self-heal in November. The storm damage assessment guide covers the complete process for documenting and evaluating post-storm damage, including the steps involved in an insurance claim.
For insurance claims, documenting storm damage before winter is essential. Most homeowner policies require timely reporting of damage, and damage that is not identified until spring -- after additional winter exposure -- is frequently disputed on the basis that the winter damage cannot be separated from the pre-existing storm damage.
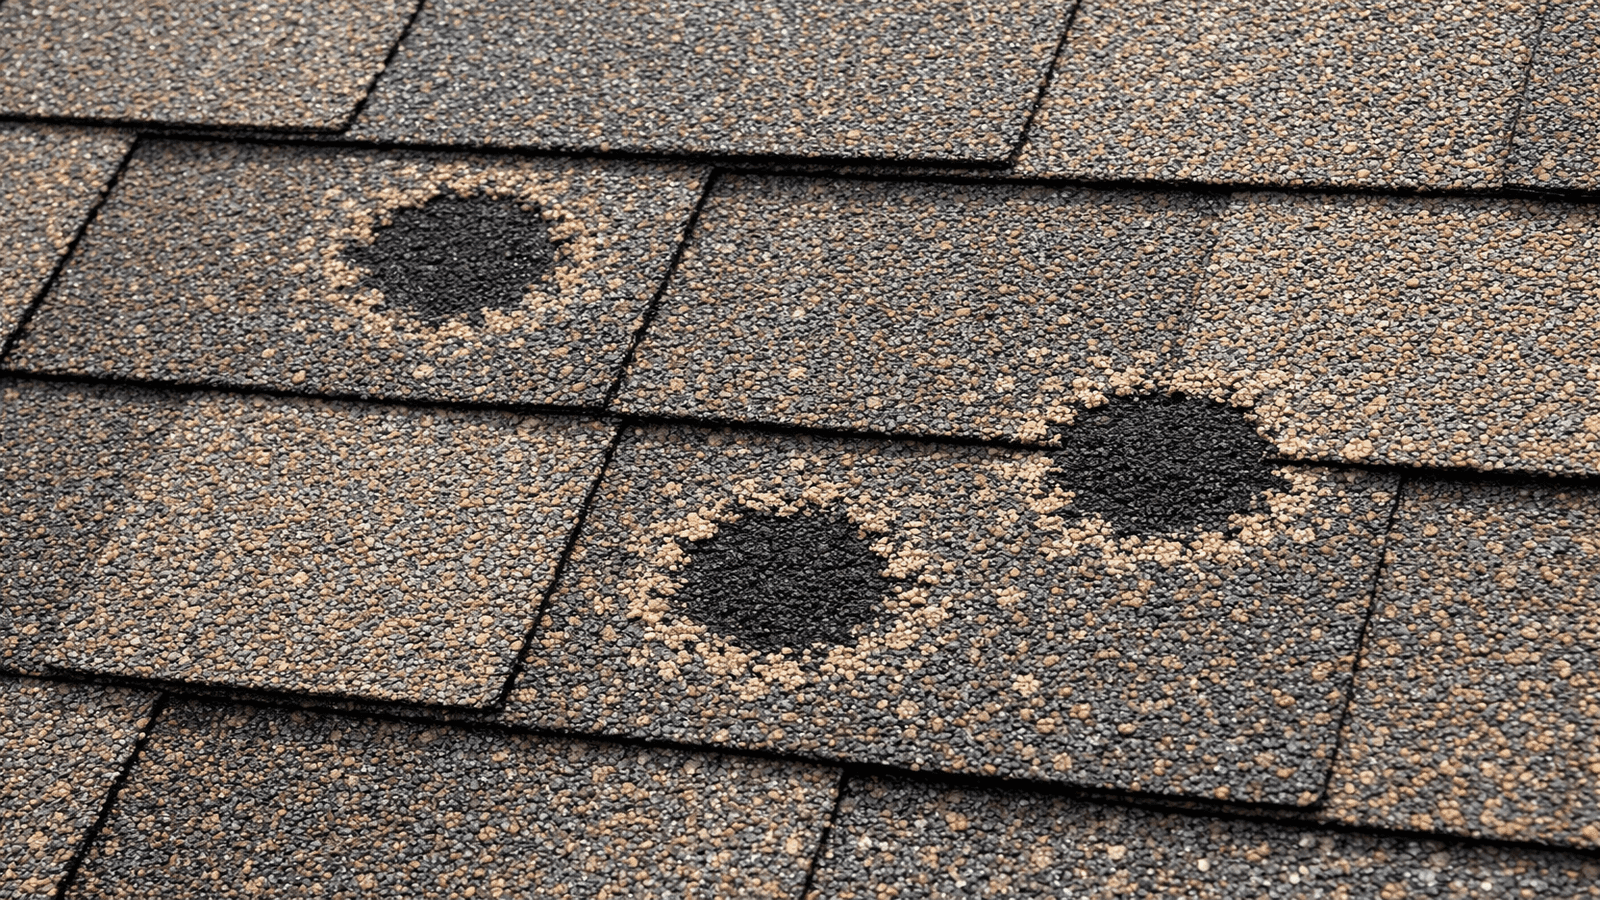
Photo: Asphalt shingle close-up showing hail impact bruising with darkened spots where granule layer has been displaced, surrounded by intact shingles for contrast
Professional Inspection and When to Call
The full fall maintenance checklist above covers everything a homeowner can observe and address. The professional inspection layer covers what cannot be safely assessed from the ground or through a basic attic access point. A licensed roofing contractor performs the fall inspection by walking the entire roof surface, checking each component category, and providing a written condition report that documents what was found.
What a professional inspection includes that self-inspection cannot:
- Walking every section of roof to identify soft spots in the sheathing beneath the shingles -- areas where the plywood has absorbed moisture and begun to delaminate
- Checking shingle sealing strips at the tabs by lifting edges to verify adhesion -- this cannot be done from the ground
- Inspecting all flashing in detail, including the condition of fasteners and the quality of existing sealant application
- Evaluating the overall remaining service life of the roof system, which matters for planning if the roof is approaching the end of its useful life before a major winter
When to prioritize a professional fall inspection:
- The roof is 10 or more years old and has not had a professional inspection in the last 2-3 years
- The home experienced any notable weather event in the preceding 12 months, including high winds, hail, or falling debris
- Any interior signs of water intrusion appeared during the past year, even if they appeared minor or have since resolved
- Visible shingle damage, missing shingles, or granule accumulation in gutters was observed during the homeowner's ground-level inspection
The NRCA also emphasizes that professional inspections should use proper safety equipment and access methodology -- roofing contractors have the training and equipment to perform roof surface inspections safely in a way that does not put homeowners at risk [1]. For homeowners dealing with active damage or leaks discovered during fall prep, tarp a roof covers emergency temporary protection until repairs can be made.
If the inspection reveals significant damage or wear, addressing it in fall while crews are available and weather allows exterior work is far preferable to an emergency call in January. The spring roof maintenance guide provides the corresponding checklist for the second annual inspection window.
To connect with a licensed roofing contractor in your area who can perform a complete fall roof inspection, Find Licensed Roofers Near You.
Conclusion
Fall roof maintenance is the single most effective use of a homeowner's roofing maintenance budget. The tasks covered in this guide -- shingle and flashing inspection, gutter cleaning, attic ventilation verification, storm damage assessment, and tree clearance -- each target a specific failure mode that winter conditions will activate. Performed systematically in the window between October and early November, they eliminate most of the conditions that generate emergency repair calls from December through March.
The homeowners who call for emergency roof service in winter almost universally skipped one or more of these steps the prior fall. The homeowners who never call for winter emergency service are the ones who did the checklist. That is not a coincidence -- it is the direct outcome of preventive maintenance done at the right time of year, before the conditions that reveal deferred problems arrive.
For problems discovered during fall prep that require immediate attention, the common roofing problems guide covers identification and repair options across the full range of residential roofing issues.
Disclaimer: This article is intended for informational and educational purposes only. Roofing work involves physical risk including falls and structural exposure. Always hire licensed, insured roofing contractors for any roof surface work. Building codes, climate requirements, and material specifications vary by region. Consult a licensed contractor familiar with your local code requirements before performing any repairs or modifications to your roof system.
Sources & References
[1] National Roofing Contractors Association. "Roof Repair and Maintenance." nrca.net. https://www.nrca.net/education/custom-education/roof-repair-maintenance
[2] Building America Solution Center. "Attic Air Sealing, Insulating, and Ventilating for Ice Dam Prevention." U.S. Department of Energy. https://basc.pnnl.gov/information/attic-air-sealing-insulating-and-ventilating-ice-dam-prevention
[3] National Weather Service. "Preventing Roof Ice Dams." weather.gov. https://www.weather.gov/grr/roofIceDams
[4] Building Science Corporation. "BSD-135: Ice Dams." Straube, J. buildingscience.com. https://buildingscience.com/documents/digests/bsd-135-ice-dams
[5] U.S. Department of Energy. "Where to Insulate in a Home." energy.gov. https://www.energy.gov/energysaver/where-insulate-home
[6] National Roofing Contractors Association. "NRCA Manual of Roof Inspections." nrca.net. https://www.nrca.net/roofing-guidelines/resources
[7] University of Minnesota Extension. "Dealing with and Preventing Ice Dams." extension.umn.edu. https://extension.umn.edu/protecting-home-rain-and-ice/dealing-and-preventing-ice-dams
[8] IKO Industries. "Seasonal Roof Maintenance Tips for Homeowners." iko.com. https://www.iko.com/blog/roof-maintenance-tips-for-homeowners

James is a licensed roofing contractor with 20 years of experience in roof installation, inspection, and repair across the U.S. South and Midwest. He specialises in asphalt shingles, metal roofing, and storm damage restoration. On NearbyHunt, James offers practical advice on roof maintenance, insurance claims, and selecting the right materials for long-lasting protection.

Jacob is a licensed roofing contractor with over 18 years of experience in roof inspection, installation, and restoration. Based in Texas, he has led hundreds of successful roofing projects across residential and commercial properties. Jacob is also a certified storm damage specialist, ensuring that all NearbyHunt roofing content meets industry best practices and safety standards.