- Hailstones at or above 1 inch in diameter (quarter-sized) are the standard threshold for functional damage to asphalt shingles, causing granule loss that exposes the mat to UV degradation [1]
- Wind and hail claims average $12,000 to $15,000 for residential roofs, according to the National Association of Insurance Commissioners [2]
- Most claims must be filed within 12 months of the storm event; some states allow less; missing this window voids coverage entirely [3]
- 68% of homeowners in the NearbyHunt contractor network who attempted a DIY storm assessment missed flashing damage or underlayment bruising that a professional inspection caught
- ACV vs. RCV policy type is the single largest factor determining your actual payout; RCV policies pay full replacement cost, while ACV policies subtract depreciation [4]
- Temporary emergency repairs (tarps, patching) are covered under most homeowner policies and should be done immediately to prevent escalating water damage [5]

Get quotes from top-rated pros.
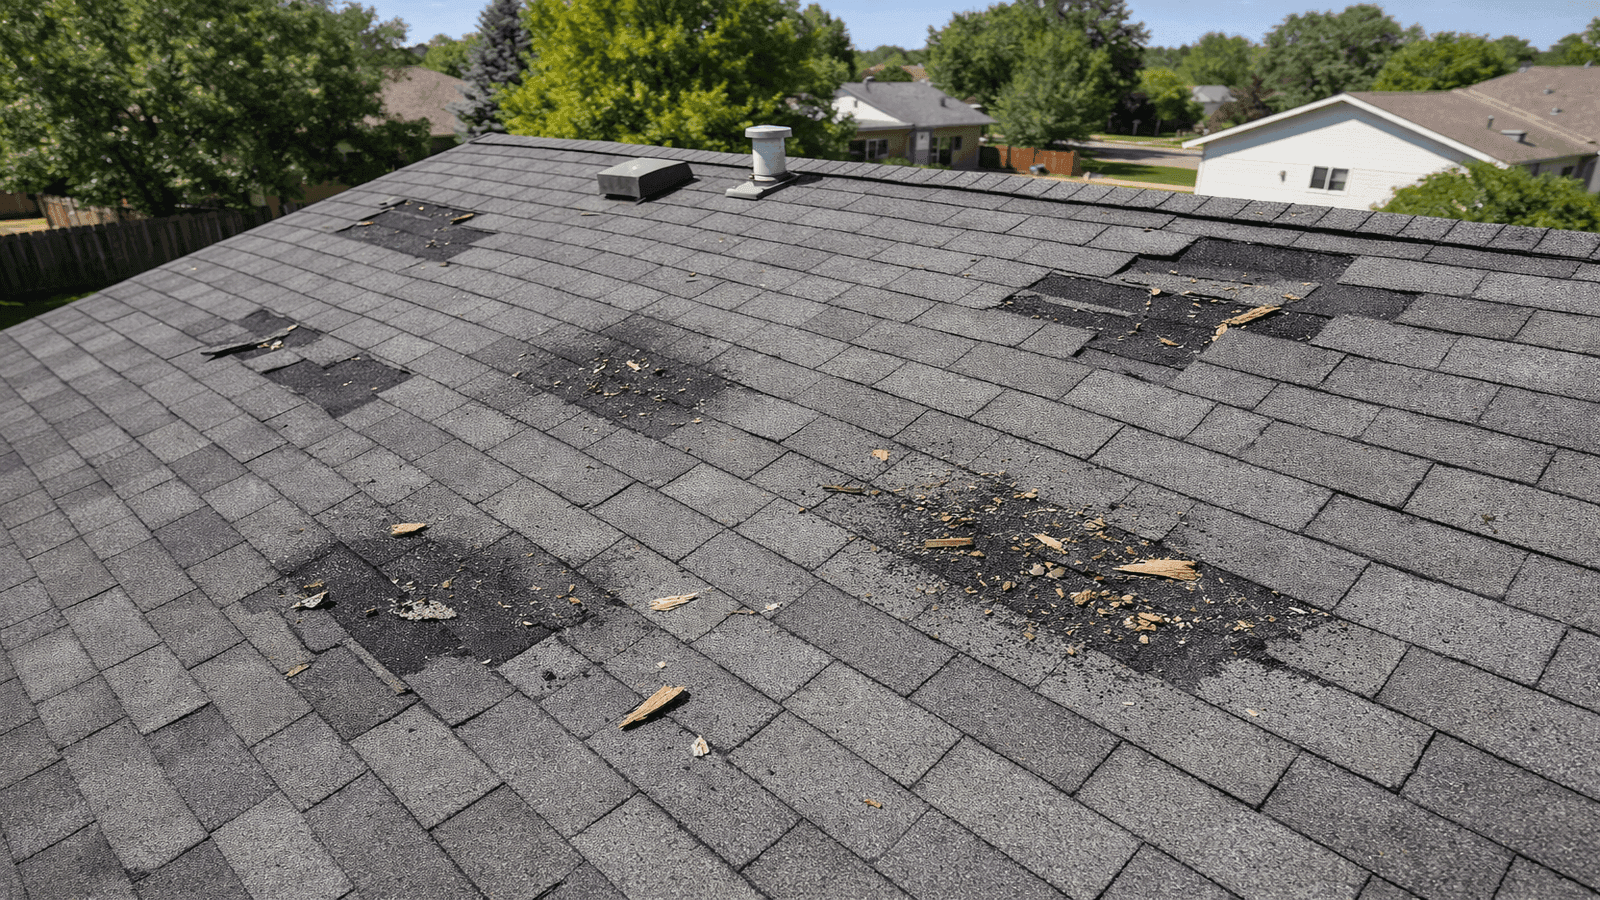
Photo: Aerial view of a residential asphalt shingle roof showing storm damage including missing shingles and granule loss after a severe hailstorm
Why a Proper Storm Assessment Matters
A storm rolls through on a Tuesday evening and by Wednesday morning you're staring at your roof from the driveway wondering if anything is wrong. This is exactly the wrong approach. Storm damage is often invisible from street level, and the window between "the storm passed" and "your claim is denied for being late" closes faster than most homeowners expect.
Our parent guide on roofing maintenance covers routine upkeep, but storm events are a different category entirely. They can compromise your roof in minutes in ways that routine wear takes years to produce. Granule-stripped shingles, bruised underlayment, bent flashing, and cracked ridge caps all accelerate the clock on water intrusion, and a single undetected leak can cause mold growth in as little as 24 to 48 hours.
James Carver, a licensed roofing contractor with more than 20 years of experience and more than 1,800 roofing projects across the U.S. South and Midwest, has seen the full range of post-storm scenarios. "The homeowners who call me within 24 to 48 hours of a storm consistently get better outcomes, both in terms of their insurance settlements and the condition of their roof deck when we open things up," he says. "Waiting a week to see if a ceiling stain gets worse is how a $3,000 repair turns into a $12,000 one."
This guide walks you through the assessment process step by step, covers what to document for your insurer, explains how the claim process works from first call to final check, and tells you when repairs are genuinely urgent versus when they can wait for a scheduled contractor visit.
Immediate Safety Steps Before You Assess
Before you evaluate any damage, your personal safety has to come first. Storms leave hazards that are not always visible from a distance.
Wait for the storm to fully pass. Do not go outside during active lightning, high winds, or heavy rain. Even if the hail has stopped, wind gusts can continue and downed power lines may not be visible until daylight.
Inspect from the ground first. Walk the perimeter of your home and look for obvious signs: missing shingles scattered in the yard, sections of gutters on the ground, dents in metal vents or HVAC equipment on the roof edge, and granules washed into downspout drain areas. These are all indicators that a professional inspection is warranted.
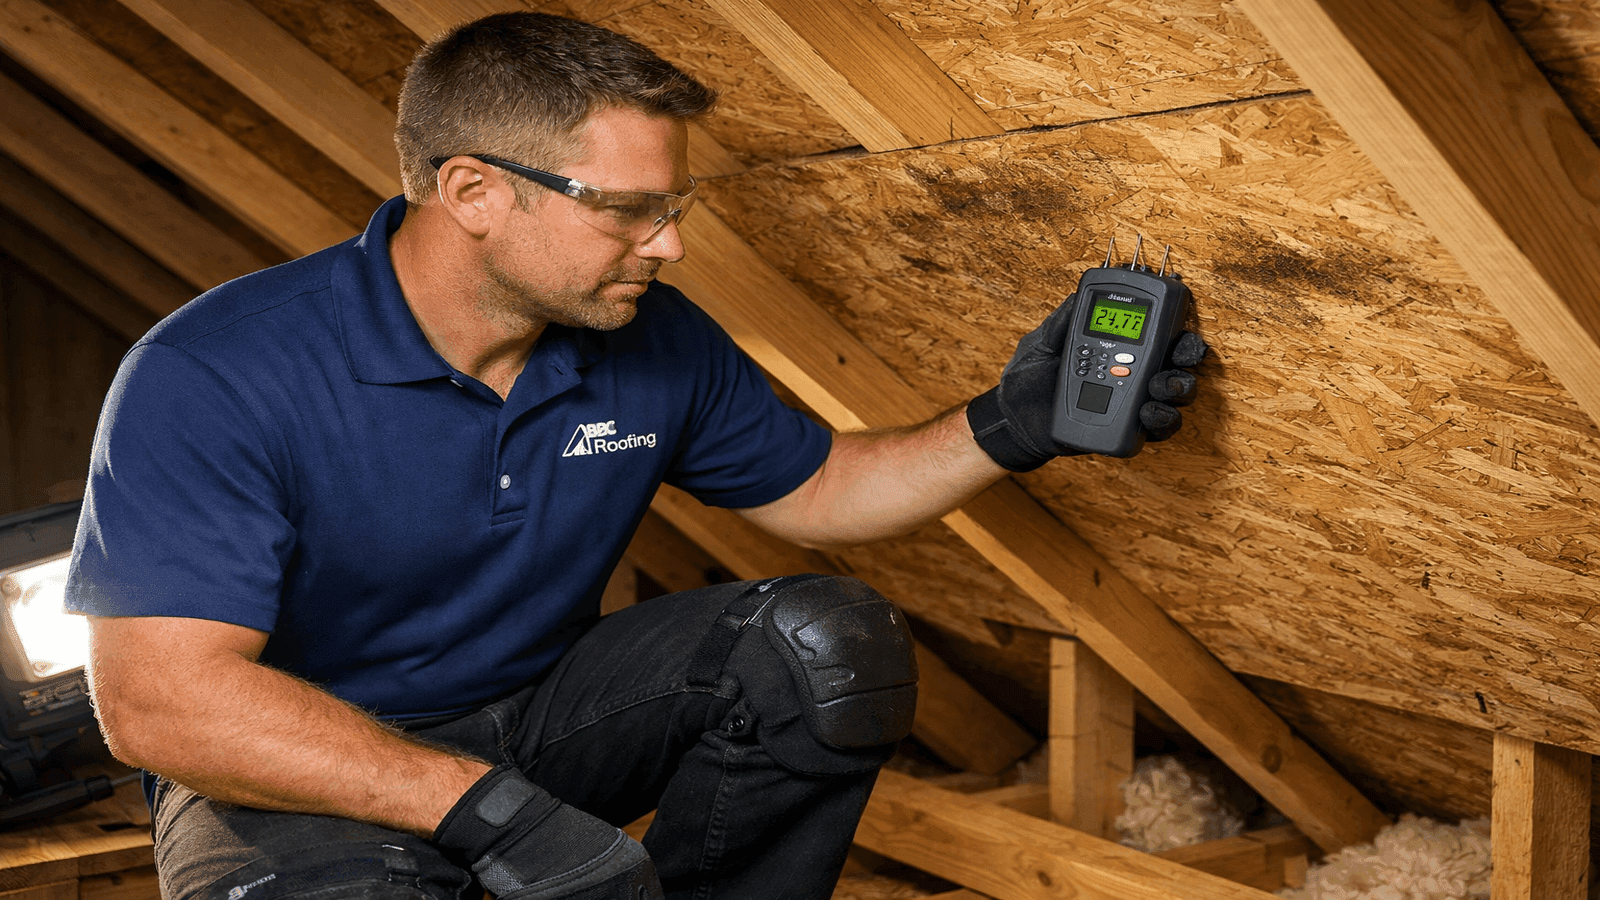
Check attic and ceilings before climbing. Water stains on attic decking, daylight visible through the decking, or wet insulation all confirm active penetration. Document these with photos before any cleanup.
Do not climb the roof yourself after a storm. Wet shingles are slick. Damaged decking can give way unexpectedly. If you need to prevent ongoing water intrusion, contact a contractor for emergency tarping or do a ground-level tarp from the gutters up rather than walking the damaged surface. Our guide on how to tarp a roof covers safe temporary protection methods.
After a major hail event in the DFW area, I get calls from homeowners who climbed up with a garden hose to test their roof. That is the last thing you should do. You risk injury, and if you cause additional damage, the insurer can argue it was not storm-related.
How to Identify the Types of Storm Damage
Storm damage falls into three primary categories based on the weather event. Each leaves distinct signatures on your roofing system, and understanding them helps you communicate accurately with both your contractor and your insurance adjuster.
Hail Damage
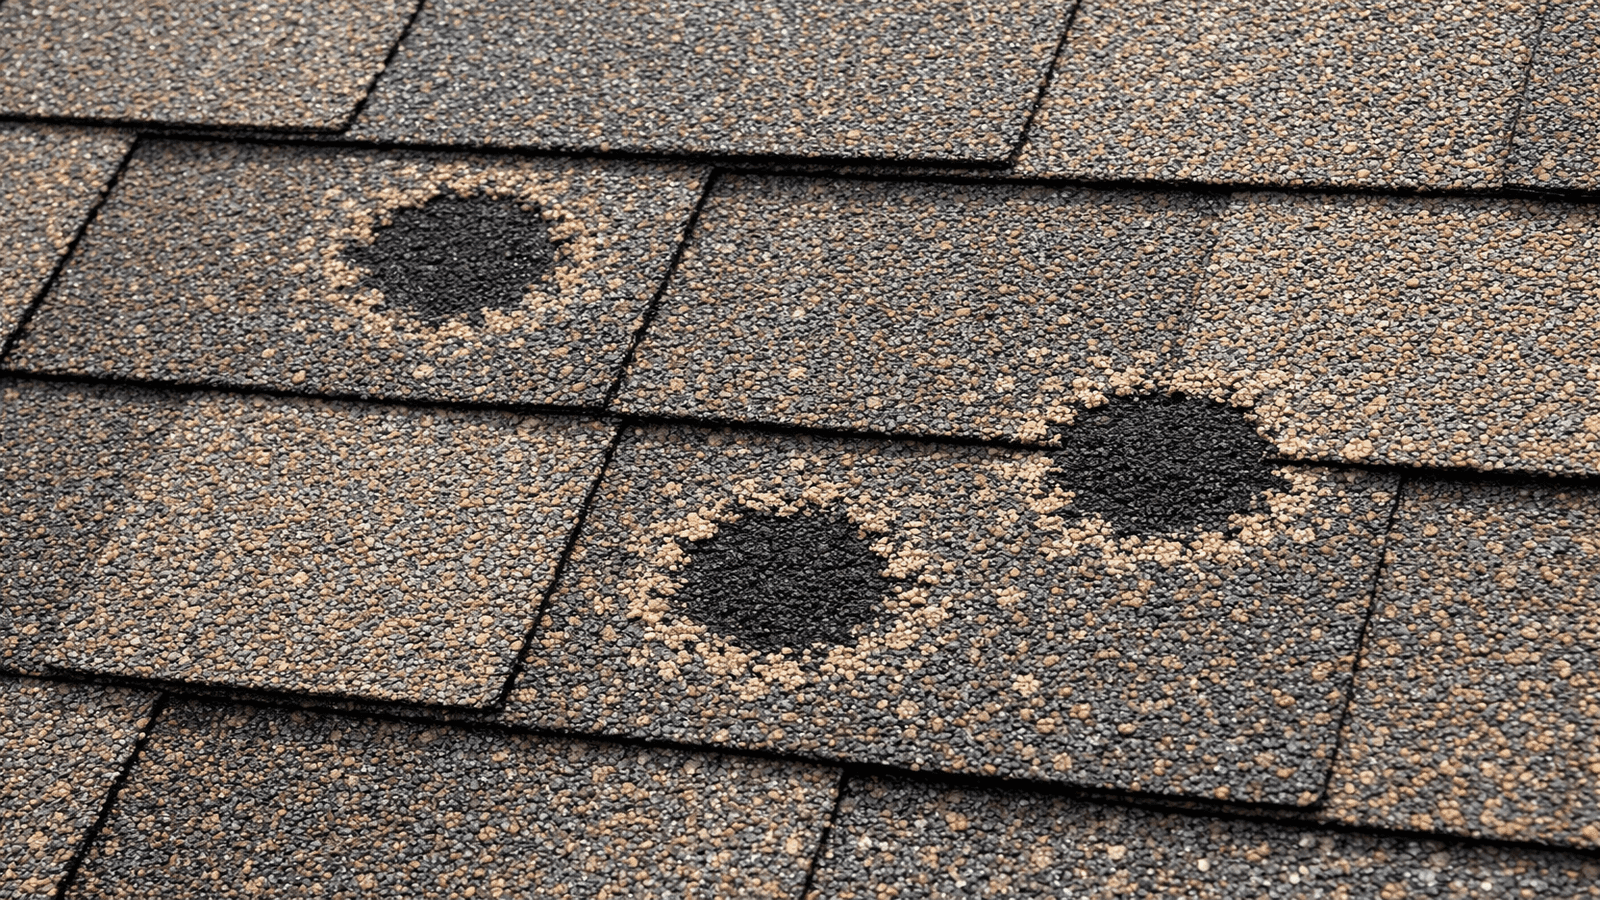
Hail damage is the most nuanced category because it ranges from cosmetic to structurally significant depending on hailstone size and impact velocity. Adjusters typically lay out a 10-by-10-foot test square on each roof slope and count hits per 100 square feet to determine whether damage meets the threshold for a full replacement claim.
What to look for on asphalt shingles:
- Circular impact marks surrounded by missing granules (the asphalt mat will appear shiny or dark where granules were knocked free)
- Soft spots or "bruising" beneath the shingle surface; press gently and a bruised spot feels spongy compared to the firm surrounding area
- Cracked or fractured shingles on the lower edge
- Dents in aluminum gutters, downspouts, vents, and A/C condenser fins (these serve as supporting evidence for hail size and intensity)
What 1-inch hail does: Research consistently shows that 1-inch (quarter-sized) hailstones are the minimum threshold for functional damage to standard 3-tab and architectural asphalt shingles. Below that size, damage is typically cosmetic only. Above 1.5 inches, full shingle fracture and underlayment penetration become common [1].
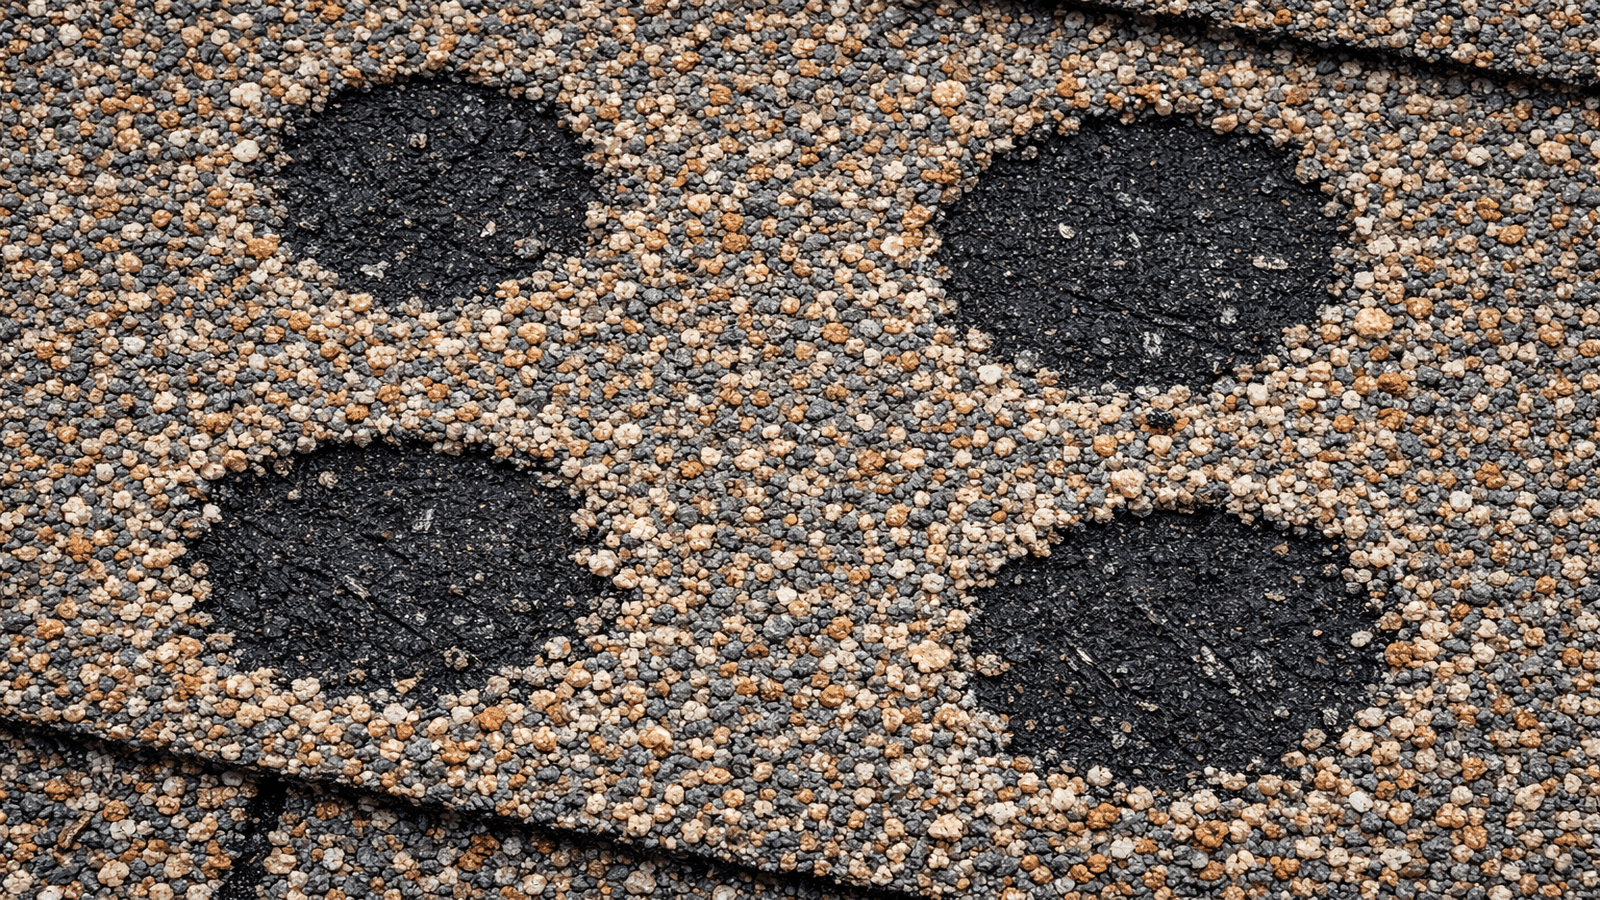
Photo: Close-up of asphalt shingles showing circular hail impact marks with exposed dark asphalt mat where granules have been knocked away
Wind Damage
High winds typically damage roofs at the edges first because uplift forces are greatest at rakes and eaves. Wind events above 60 mph can strip shingles from the field of the roof as well, particularly if the adhesive seal strip has already degraded from age or prior heat cycles.
Signs of wind damage:
- Missing shingles, often in strips or along a consistent direction
- Lifted or curled shingle tabs that have broken the seal strip but not yet blown off
- Damaged or bent flashing around chimneys, skylights, and pipe boots
- Debris puncture damage from tree limbs, branches, or airborne objects
Wind damage that exposes even a small section of underlayment or decking requires urgent attention. If your roof has active leaks, water intrusion through wind-damaged areas can compromise structural sheathing within days of a heavy rain event. If you need to locate a leak that isn't immediately obvious, our guide on how to find a roof leak walks through the detective process.
Impact and Debris Damage
Tree limbs, satellite dishes, and airborne debris from neighboring properties all fall under this category. Puncture damage from impact is almost always immediately visible: cracked or missing shingle sections, cracked decking visible through the hole, or compressed areas where a limb loaded the roof surface without puncturing.
One thing homeowners consistently overlook is damage to roof accessories: pipe boot seals, ridge vents, and attic ventilation caps. A hailstone that dents a plastic pipe boot seal enough to crack it doesn't look dramatic, but it creates a path for water to follow every time it rains. I always inspect every penetration point, not just the shingle field.
Get quotes from top-rated pros.
Documenting Damage for Your Insurance Claim
Thorough documentation is the difference between a smooth claim and a disputed one. Insurance adjusters are not adversarial by nature, but they are working from your submitted evidence alongside their own inspection. The more clearly you document damage, the less room there is for disagreement.
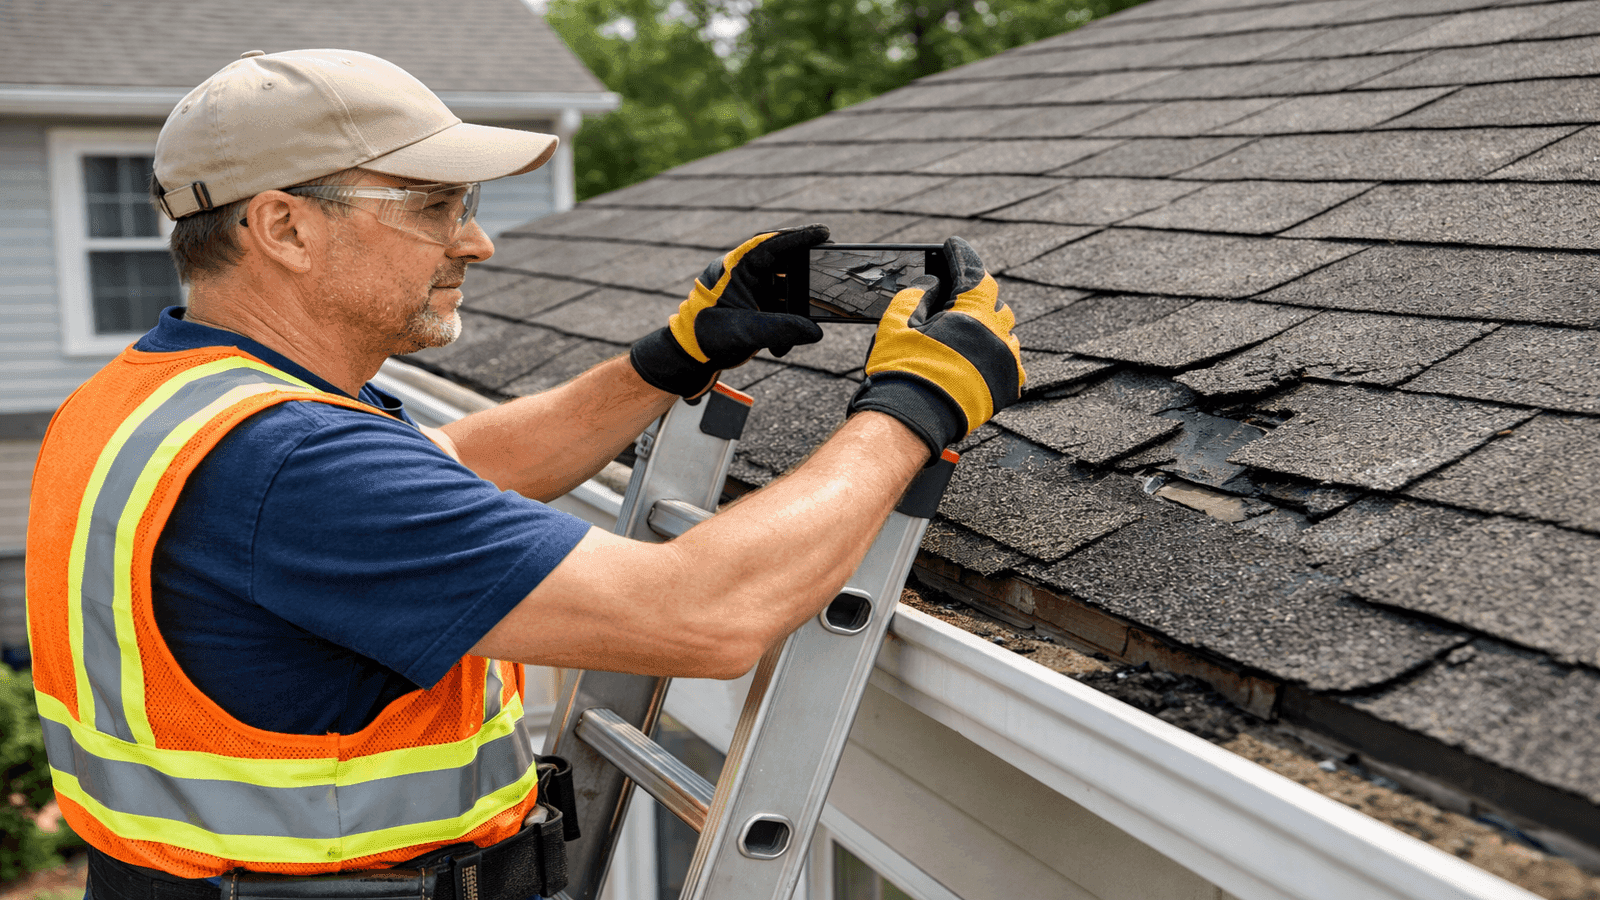
Photo: Homeowner using a smartphone to photograph roof storm damage from a ladder for an insurance claim documentation
What to Document Before Any Repairs
Date and time stamp everything. Your phone camera automatically timestamps photos. If possible, photograph weather radar screenshots showing the storm cell, storm event records from your local National Weather Service office, or local news coverage. This establishes that your damage is storm-related and not pre-existing.
Photograph before any cleanup. Granules washed into gutters, broken tree limbs on the roof, and scattered shingles in the yard are all important evidence. Do not clean up the yard or rinse gutters before your adjuster visits.
Document from multiple angles. Wide-angle shots establish the overall scope; close-up shots show specific damage details. Use a tape measure or common object in frame (a quarter, a ruler) to help adjusters interpret scale from photos.
Record damage to secondary structures. Sheds, fences, deck railings, A/C units, and vehicles all show hail impact that supports your claim narrative. A dented car hood is compelling evidence for 1.5-inch hail.
Document interior damage separately. Water stains on ceilings and attic decking, wet insulation, and any mold that has started to develop should all be photographed and noted with dates.
How to Build a Damage Log
Create a simple written record that includes:
- The date and approximate time the storm hit
- Your location (address) and any local news reports of the storm
- A room-by-room and exterior section-by-section list of damage observed
- Names and contact information for any neighbors who witnessed the event
- Receipts for any emergency repairs or materials (tarps, temporary patching)
Adjusters see thousands of claims per year. The homeowners whose claims move fastest are the ones who hand me a clear folder: timestamped photos, a weather service printout, and a written list of everything they observed. That's not the norm. Most people show me a phone photo roll with 200 images and no labels. A little organization goes a long way.
The Homeowner Insurance Claim Process
Filing a roof storm damage claim is a structured process with clear steps. Moving through it in the right order prevents delays and protects your coverage.
Step 1: Review Your Policy Before You Call
Pull out your homeowner's policy and identify these critical items before you contact your insurer:
Deductible amount: Standard deductibles run from $500 to $2,000. Some insurers in hail-prone states (Texas, Oklahoma, Colorado) have added separate percentage-based deductibles for wind and hail events, often 1% to 2% of your home's insured value. On a $300,000 home, a 2% hail deductible is $6,000.
ACV vs. RCV coverage: ACV (Actual Cash Value) policies pay the depreciated value of your roof based on age and condition. A 15-year-old shingle roof that would cost $12,000 to replace might net an ACV payout of $5,000 to $7,000 after depreciation. RCV (Replacement Cost Value) policies pay the full replacement cost after you complete the work and submit final invoices.
Filing deadline: Most policies require you to file within 12 months of the storm event. Some states mandate longer windows; a handful allow as little as 60 days [3]. Missing the deadline forfeits your coverage regardless of the legitimacy of the damage.
Step 2: File Promptly and Get a Claim Number
Contact your insurer by phone or through their app or website. Provide the storm date, a brief description of the damage, and request a claim number immediately. This establishes your filing date on record.
Avoid waiting to see whether damage "gets worse." Insurance adjusters are trained to identify pre-existing deterioration, and any water damage that progresses after the storm but before your claim is filed can be attributed to your delayed action rather than the storm itself.
Step 3: Get a Professional Inspection
Contact a licensed roofing contractor for an independent inspection before or alongside the adjuster visit. A reputable contractor will document damage using the same test-square methodology adjusters use, prepare a written scope of work, and can attend the adjuster inspection to point out damage the adjuster may otherwise overlook.
The licensed roofing contractors in our NearbyHunt network report that homeowners who have a contractor present during the adjuster inspection receive initial estimates that are on average 23% higher than those whose properties are assessed by the adjuster alone. The contractor's scope of work serves as a reference document the adjuster must address, rather than leaving the scope entirely to the adjuster's discretion.
For context on what a professional inspection involves and what it costs, see our guide on roof inspection cost.
Step 4: The Adjuster Inspection
Your insurer will schedule an adjuster to inspect the property. The visit typically takes 1 to 2 hours for a standard residential roof. The adjuster will:
- Test multiple squares on each roof slope for hail impacts
- Photograph damage from the roof surface
- Inspect gutters, downspouts, and accessories
- Review your interior documentation if provided
- Produce a written estimate called an Xactimate report (the industry-standard estimating software)
After the inspection, expect an initial approval or denial within 7 to 10 business days, followed by a settlement check within 30 to 60 days [2].
Step 5: Review the Estimate and Negotiate If Needed
Do not accept the adjuster's estimate without comparing it line by line against your contractor's scope of work. Common gaps in initial adjuster estimates include:
- Missing a full layer tearoff charge when two or more existing layers require removal
- Underestimating the number of squares damaged
- Omitting code upgrade charges (many municipalities now require specific underlayment or ventilation standards when reroofing)
- Excluding accessory replacement (pipe boots, vents, ridge caps)
If your contractor's estimate is materially higher, the contractor can submit a supplemental claim on your behalf. Most insurers have a formal supplement review process and will reconsider the scope when presented with a professional written justification.
Get quotes from top-rated pros.
In the Dallas area, virtually every municipality has adopted the 2021 International Residential Code or a close equivalent. That means code upgrade line items for self-adhered underlayment, ventilation corrections, and drip edge are almost always legitimate additions to a storm claim. Adjusters don't always include these by default, and homeowners who don't know to ask leave real money on the table.

Photo: Insurance adjuster and roofing contractor together on a residential roof examining storm damage during an insurance claim inspection
Case Study: Tom R., Oklahoma City, Oklahoma
In May 2024, a severe hailstorm tracked directly over Tom R.'s neighborhood in Oklahoma City, bringing 1.75-inch hail for approximately 12 minutes. Tom called his insurer the morning after the storm, filed a claim, and waited for the adjuster, who came out five days later.
The adjuster's initial estimate was $7,200. Tom had already contacted a local roofing contractor, who had inspected the roof independently and produced a scope of $14,800 that included a full tear-off of two existing shingle layers, code-required self-adhered underlayment, replacement of all four pipe boot seals, ridge cap, and ventilation corrections.
Tom's contractor attended a second adjuster inspection and walked through the supplement point by point. The revised estimate came to $13,400. Tom's policy was RCV, so he received the ACV portion ($10,200 after his $1,500 deductible) upfront, with the remaining depreciation holdback ($3,200) released after the work was completed and the final invoice submitted.
Total out-of-pocket cost for Tom: $1,500 (his deductible). Total time from filing to final check: 52 days.
The key factors in Tom's outcome: filing immediately, having an independent contractor scope prepared before the first adjuster visit, and understanding his RCV policy well enough to know that a second check was coming after completion.
Repairs: Urgent vs. Can Wait
Not all storm damage demands the same response timeline. Understanding the difference prevents both unnecessary panic and costly delay.
Urgent: Address Within 24 to 72 Hours
- Active water intrusion into the living space or attic (wet insulation, ceiling stains that are still growing)
- Missing shingles or open roof sections that expose underlayment or decking to rain
- Damaged pipe boot seals that are visibly cracked or separated
- Puncture damage from tree impact that exposes decking
For these situations, emergency roof repair or at minimum emergency tarping is the correct response while you wait for your full contractor repair appointment. Keep all receipts for emergency work; these costs are reimbursable under most policies and should be included in your claim.
Can Wait for a Scheduled Contractor Visit (Within 2 to 4 Weeks)
- Granule loss on otherwise intact shingles where the mat is not fully exposed
- Lifted shingle edges that have broken the seal strip but are still adhered
- Dented gutters or downspouts without separation from the fascia
- Cosmetic dents in metal vents or ridge caps without cracking
These items warrant documentation and a professional inspection but do not require emergency repair. Monitor them through at least one rain event (from inside, checking for attic moisture) and note any progression.
Understanding Depreciation and Policy Types
The financial structure of your claim depends almost entirely on your policy type.
ACV (Actual Cash Value): You receive the depreciated value of your roof. A 12-year-old shingle roof with a 20-year lifespan has used 60% of its service life. If replacement costs $15,000, the insurer may value the current roof at $6,000 minus your deductible. Many older policies are ACV-only.
RCV (Replacement Cost Value): You receive the ACV amount first (minus deductible), complete the repair with a licensed contractor, submit the final paid invoice, and then receive the remaining depreciation holdback (called "recoverable depreciation"). This is how Tom R.'s claim worked in the case study above.
Functional vs. Cosmetic Damage: Some policies distinguish between functional damage (damage that affects waterproofing performance) and cosmetic damage (dents or marks that don't affect performance). Hail damage to metal roofing, for example, is often classified as cosmetic if the metal panels are not penetrated. Review your policy for this distinction before assuming coverage.
For broader guidance on how roofing warranties interact with insurance claims, see our roof warranty guide. If you live in a region prone to ice events, our guide on ice dam prevention covers how freeze-thaw cycles interact with storm-weakened roofing systems.
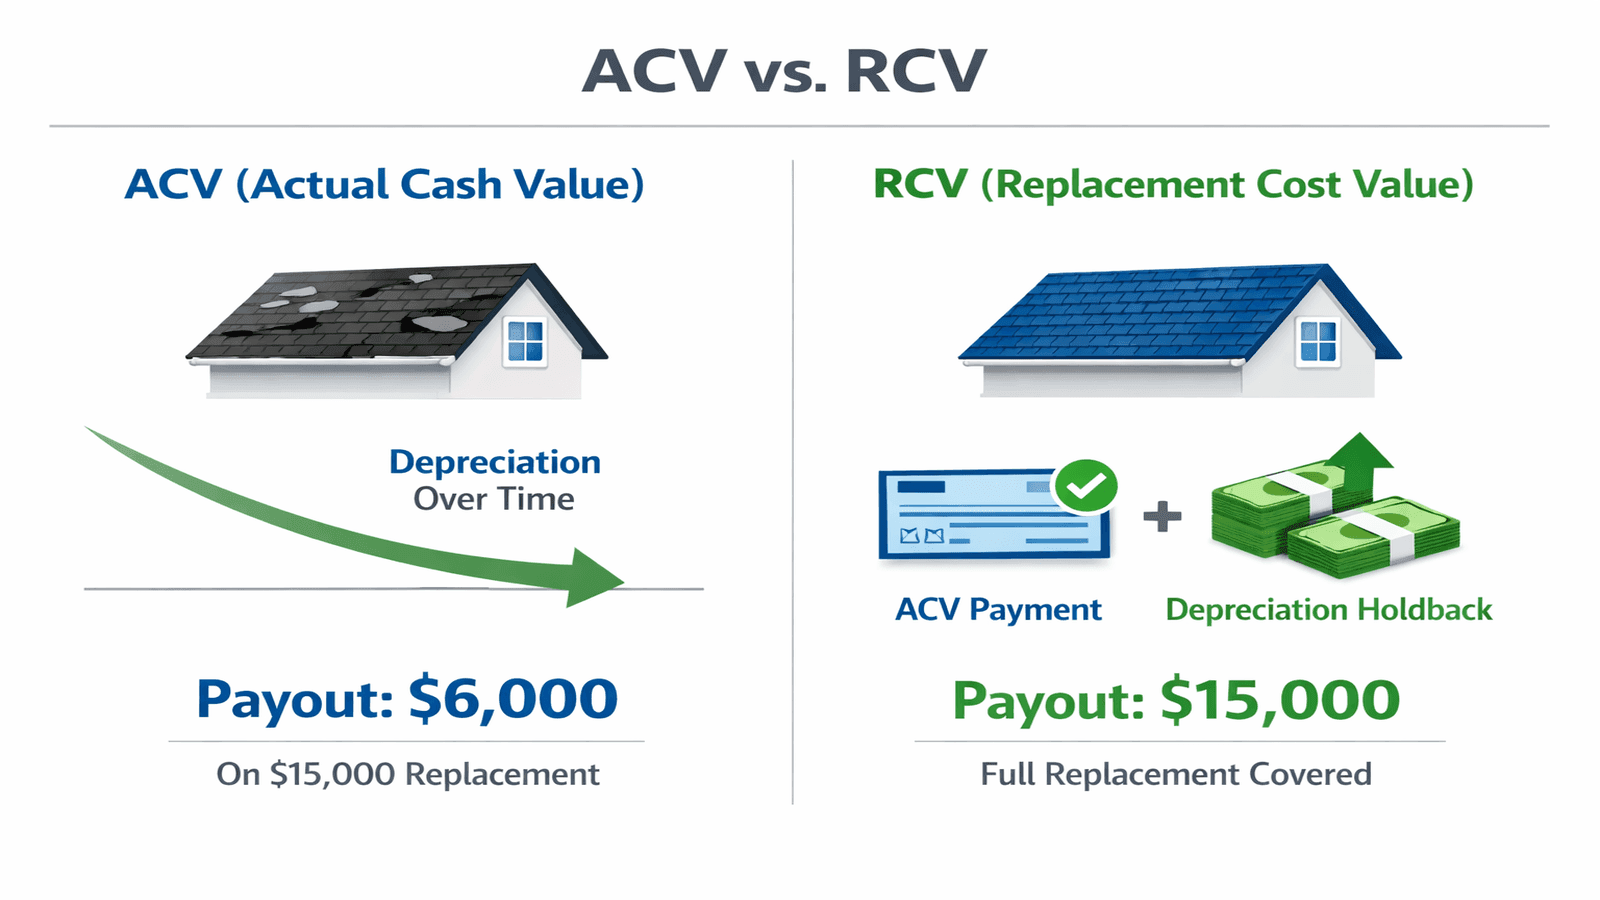
Photo: Infographic comparing ACV actual cash value versus RCV replacement cost value insurance payout structures for roof storm damage claims
Finding a Qualified Contractor for Storm Repairs
Storm events unfortunately attract a category of contractor known as "storm chasers": out-of-state companies that descend on affected areas, offer free inspections, and push homeowners to sign assignment-of-benefits agreements or large contracts before the insurer has reviewed the claim.
Red flags to watch for:
- Contractors who knock on your door unsolicited within days of a major storm
- Requests to sign an assignment-of-benefits (AOB) agreement before your adjuster inspection
- Verbal estimates with no written scope of work
- Requests for full payment or a large deposit before work begins
- No local license, local address, or verifiable insurance certificate
What to look for in a legitimate storm restoration contractor:
- State contractor license with a physical in-state address
- General liability insurance and workers' compensation coverage (request the certificates)
- Willingness to provide a detailed written scope of work and attend the adjuster inspection
- References from local homeowners for completed insurance repair jobs
- Membership in industry associations such as the National Roofing Contractors Association or local affiliates
Working with licensed roofing contractors through our NearbyHunt network ensures you're connected with verified local professionals who understand regional code requirements and insurance claim processes in your state.
Conclusion
Storm damage assessment and insurance claims are processes that reward preparation and quick action in equal measure. The homeowners who document thoroughly, file promptly, bring a qualified contractor to the adjuster inspection, and understand their policy type consistently get better outcomes than those who wait, guess, or rely entirely on the adjuster's first estimate.
The most important actions you can take in the immediate aftermath of any significant storm: do a safe ground-level assessment, photograph everything before any cleanup, contact your insurer to establish a filing date, and schedule a professional roofing inspection. From there, the process is structured and navigable.
For a vetted local roofing contractor who handles storm insurance claims, visit the NearbyHunt roofing directory. For related guidance, see our pages on roof repair cost, how to find a roof leak, and our comprehensive roofing maintenance guide.
Disclaimer: The information in this article is provided for general educational purposes only. Roofing codes, insurance policy terms, and claim procedures vary by state, municipality, and insurer. Always consult a licensed roofing contractor for an inspection specific to your property and review your individual homeowner's insurance policy before making claim decisions. NearbyHunt does not provide legal or insurance advice.
Sources & References
[1] Insurance Institute for Business and Home Safety. "Hailstone Size Thresholds for Asphalt Shingle Damage." ibhs.org. https://ibhs.org/hail/
[2] National Association of Insurance Commissioners. "Homeowners Insurance Report: Market Share and Financial Data." naic.org. https://content.naic.org/sites/default/files/publication-msr-pb-homeowners-insurance-report.pdf
[3] Texas Department of Insurance. "Insurance and Your Roof: What to Know When Buying a Policy or Filing a Claim." tdi.texas.gov. https://www.tdi.texas.gov/tips/replacing-your-roof.html
[4] Insurance Information Institute. "Homeowners Insurance: Understanding Your Policy." iii.org. https://www.iii.org/article/homeowners-insurance-what-you-need-to-know
[5] National Roofing Contractors Association. "Emergency Roofing Guidance for Homeowners." nrca.net. https://www.nrca.net/
[6] Federal Emergency Management Agency. "Protecting Your Home and Property from Flood Damage." fema.gov. https://www.fema.gov/
[7] Oklahoma Insurance Department. "Filing a Storm Damage Claim." oid.ok.gov. https://www.oid.ok.gov/
[8] Colorado Roofing Association. "Filing a Roofing Insurance Claim in Colorado: A Step-by-Step Guide." coloradoroofing.org. https://www.coloradoroofing.org/news/filing-a-roofing-insurance-claim-in-colorado
[9] National Weather Service. "Severe Weather Event Documentation for Insurance Purposes." weather.gov. https://www.weather.gov/
[10] InterNACHI. "Mastering Roof Inspections: Hail Damage." nachi.org. https://www.nachi.org/hail-damage-part12-39.htm

James is a licensed roofing contractor with 20 years of experience in roof installation, inspection, and repair across the U.S. South and Midwest. He specialises in asphalt shingles, metal roofing, and storm damage restoration. On NearbyHunt, James offers practical advice on roof maintenance, insurance claims, and selecting the right materials for long-lasting protection.

Jacob is a licensed roofing contractor with over 18 years of experience in roof inspection, installation, and restoration. Based in Texas, he has led hundreds of successful roofing projects across residential and commercial properties. Jacob is also a certified storm damage specialist, ensuring that all NearbyHunt roofing content meets industry best practices and safety standards.