- NRCA recommends twice-yearly professional roof inspections, with spring as the highest-priority window after winter stress. [1]
- Water expands approximately 9 percent when freezing, making repeated freeze-thaw cycles one of the most damaging forces on roofing materials. [2]
- The NearbyHunt network reports 68 percent of post-winter inspections reveal at least one repair item homeowners had not noticed themselves, including cracked pipe boots and separated flashing.
- Spring repairs caught early average $300 to $900; the same issues left through summer storms commonly reach $4,000 to $8,000. [6]
- Homes with roofs 15 years or older in cold climates should schedule a professional spring inspection every year without exception, given reduced material flexibility and sealant brittleness.
- A four-week spring maintenance sequence (ground check, gutter cleaning, close inspection, contractor engagement) executed before May protects against the full summer storm season.
Winter is hard on roofing systems. Freeze-thaw cycles, ice dams, heavy snow loads, and wind-driven debris all take a toll that is not always visible from the ground. As temperatures climb in spring, a focused post-winter inspection is the single most effective action a homeowner can take to protect their roof and avoid expensive interior damage later in the year. This guide covers what to inspect, what to repair first, and when to call a professional. For a broader overview of year-round care, visit the roofing maintenance pillar page.

Get quotes from top-rated pros.
Why Spring Roof Maintenance Matters
Most roof failures do not happen suddenly. They develop from small, overlooked problems that compound over a single winter season. Water gets under a cracked shingle in November, freezes, expands, and forces the shingle further open. By April, what was a minor issue is a pathway for every spring rainstorm.
The National Roofing Contractors Association (NRCA) recommends scheduling a professional roof inspection at least twice per year, with spring and fall as the preferred timing [1]. Their guidance specifically identifies post-winter inspection as critical because winter weather accelerates wear across every component of the roofing system.
According to research on freeze-thaw cycles, water expands by approximately 9 per cent when it freezes [2]. That expansion, repeated through dozens of temperature swings each winter, acts like a slow wedge in any crack, gap, or failing seal on your roof. The result is that damage visible in spring often started as something minor in late autumn.
The biggest mistake I see homeowners make is waiting until they notice a stain on the ceiling before thinking about the roof. By then, water has already been moving through the system for months. A spring inspection after every winter season catches problems when repairs are still in the $300 to $800 range instead of the $4,000 to $8,000 range.

Photo: Homeowner performing ground-level spring roof inspection with binoculars on suburban home with asphalt shingles
Common Roof Damage Caused by Winter
Understanding what winter does to a roof helps you inspect more effectively. Each of the following damage types has a specific cause and a visual signature you can identify.
Freeze-Thaw Cycle Damage
Temperature fluctuations above and below freezing cause roofing materials to expand and contract repeatedly. Over a winter with multiple freeze-thaw cycles, this mechanical stress loosens nail heads, lifts flashing, separates sealant joints, and cracks shingles that are already brittle from age [3]. Look for shingles with fine surface cracks, raised nail heads visible through shingle surfaces, and flashing that appears to have pulled slightly away from vertical surfaces.
Ice Dam Formation
Ice dams form when heat escaping from a poorly insulated attic melts snow on the upper roof surface. That meltwater runs down to the cold eaves, refreezes, and builds up a ridge of ice. Water backs up behind the dam, sits in contact with sheathing and underlayment, and eventually forces its way inside. Signs of past ice dam activity include staining or watermarks on roof deck overhangs, granule deposits further down the driveway or yard than normal, and peeling paint on soffit boards [4].
Wind and Debris Damage
Late winter and early spring storms bring high winds that lift tab edges on three-tab shingles, break off brittle ridge cap pieces, and drive branches into roof surfaces. Inspect for lifted shingle tabs, missing ridge cap sections, and any punctures or scrapes that look like branch impact.
Granule Loss and Shingle Aging
Cold temperatures accelerate granule loss on aging asphalt shingles. Check gutters and downspouts for granule accumulation. A small amount of granules is normal; pockets of granules visible in gutters after winter indicate accelerating shingle deterioration and likely point to sections of the roof nearing end of service life.
Get quotes from top-rated pros.
Flashing Failures
Flashing seals the joints where roofing meets vertical surfaces such as chimneys, walls, skylights, and pipe penetrations. Temperature cycling is particularly hard on flashing because metal expands and contracts at a different rate than roofing materials. Separated or lifted flashing is one of the most common sources of spring leaks. For detailed guidance on this component, see the roof flashing maintenance guide.
Step-by-Step Spring Roof Inspection Process
A systematic inspection covers the exterior, the gutters and drainage, and the attic interior. Work through each area before deciding on repairs.
Ground-Level Visual Inspection
Start from the ground using binoculars. Walk the full perimeter of the home and look for:
- Missing shingles or visible gaps in coverage
- Shingles that appear buckled, curled, or lifted at edges
- Darker patches that may indicate saturated decking underneath
- Visible damage to ridge cap or hip ridges
- Any debris that landed on the roof and has not cleared naturally
Document anything suspicious with photos before getting closer.
Gutter and Drainage Inspection
Gutters bear the brunt of winter debris accumulation and ice dam drainage. Clear all gutters and downspouts of leaves, seed pods, and compacted debris before the first spring rain. While cleaning, look for:
- Granules accumulated in gutter channels
- Separated gutter joints or sagging sections
- Fascia boards that show staining or soft spots from water intrusion
- Downspout extensions that may have shifted during freeze cycles
Proper drainage is the first line of defense against foundation and siding damage. The gutter maintenance guide covers safe cleaning techniques in detail. For the physical process of working at height safely, see clean gutters safely.
I have completed more than 1,800 roofing projects across the U.S. South and Midwest. In nearly every case where spring water damage reached the interior, clogged or damaged gutters were a contributing factor. Gutters are not a glamorous maintenance item but they are critically important.
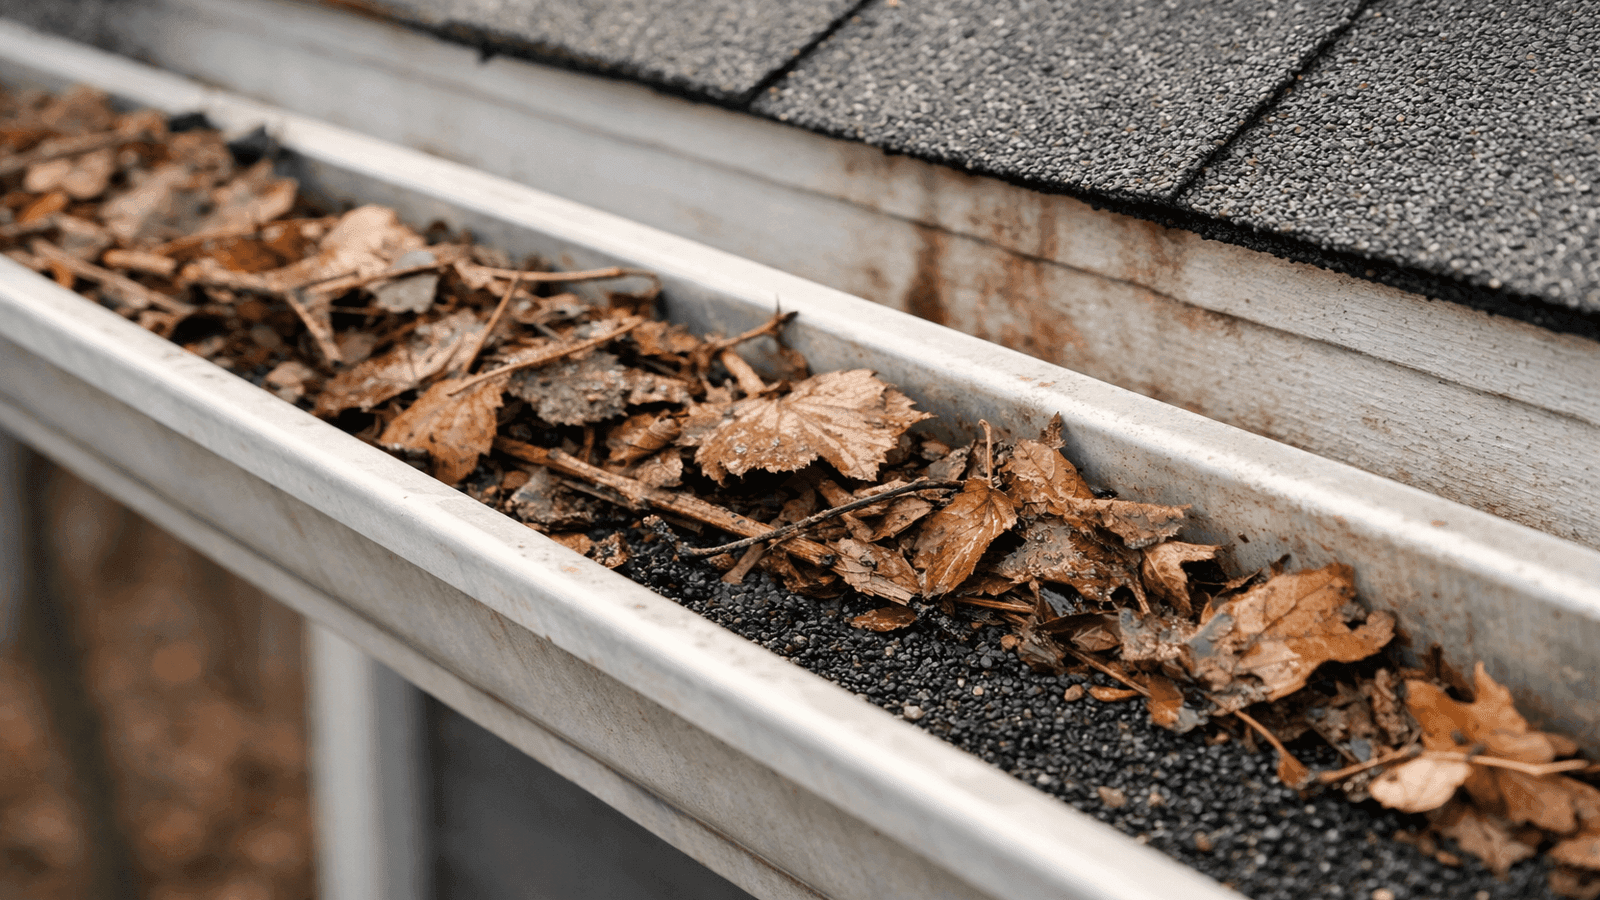
Photo: Close-up of residential gutter filled with winter debris and granule accumulation from deteriorating asphalt shingles
Roof Surface Inspection (Close Range)
If you choose to access the roof directly, follow all ladder safety protocols and wear soft-soled shoes. Walk on the roof only during dry conditions and only on sections where footing is secure. If you are not comfortable on a roof, hire a professional. A basic inspection costs $150 to $400 and identifies problems before they require major repairs [5].
On the roof surface, inspect:
- Shingles: Press down on any shingles that appear lifted. Healthy shingles lie flat. Look for cracking, curling, cupping, or tab separation.
- Ridge cap: Run your hand along ridge cap shingles checking for loose sections or broken pieces.
- Flashing: Check all flashing at chimneys, vents, skylights, and wall intersections. Look for rust, separation, or gaps in sealant.
- Pipe boots: The rubber collars around plumbing vents crack and split from UV exposure and temperature stress. Cracked pipe boots are a common source of hidden leaks.
- Valley metal: Inspect open metal valleys for rust, debris buildup, or separation at the edges.
Attic Inspection
Never skip the attic. This is where winter damage reveals itself most clearly before it reaches living spaces. In the attic, look for:
- Daylight visible through the roof deck (indicates gaps or missing shingles)
- Water staining or dark discoloration on rafters and decking
- Soft or spongy decking that deflects under hand pressure
- Frost residue that has melted and left staining
- Mold or mildew growth on framing (indicates prolonged moisture exposure)
- Insulation that appears wet or matted down
Also check that all soffit and ridge vents are clear and unobstructed. Blocked ventilation allows heat and moisture to build up in the attic, shortening shingle life and creating conditions for ice dams the following winter.
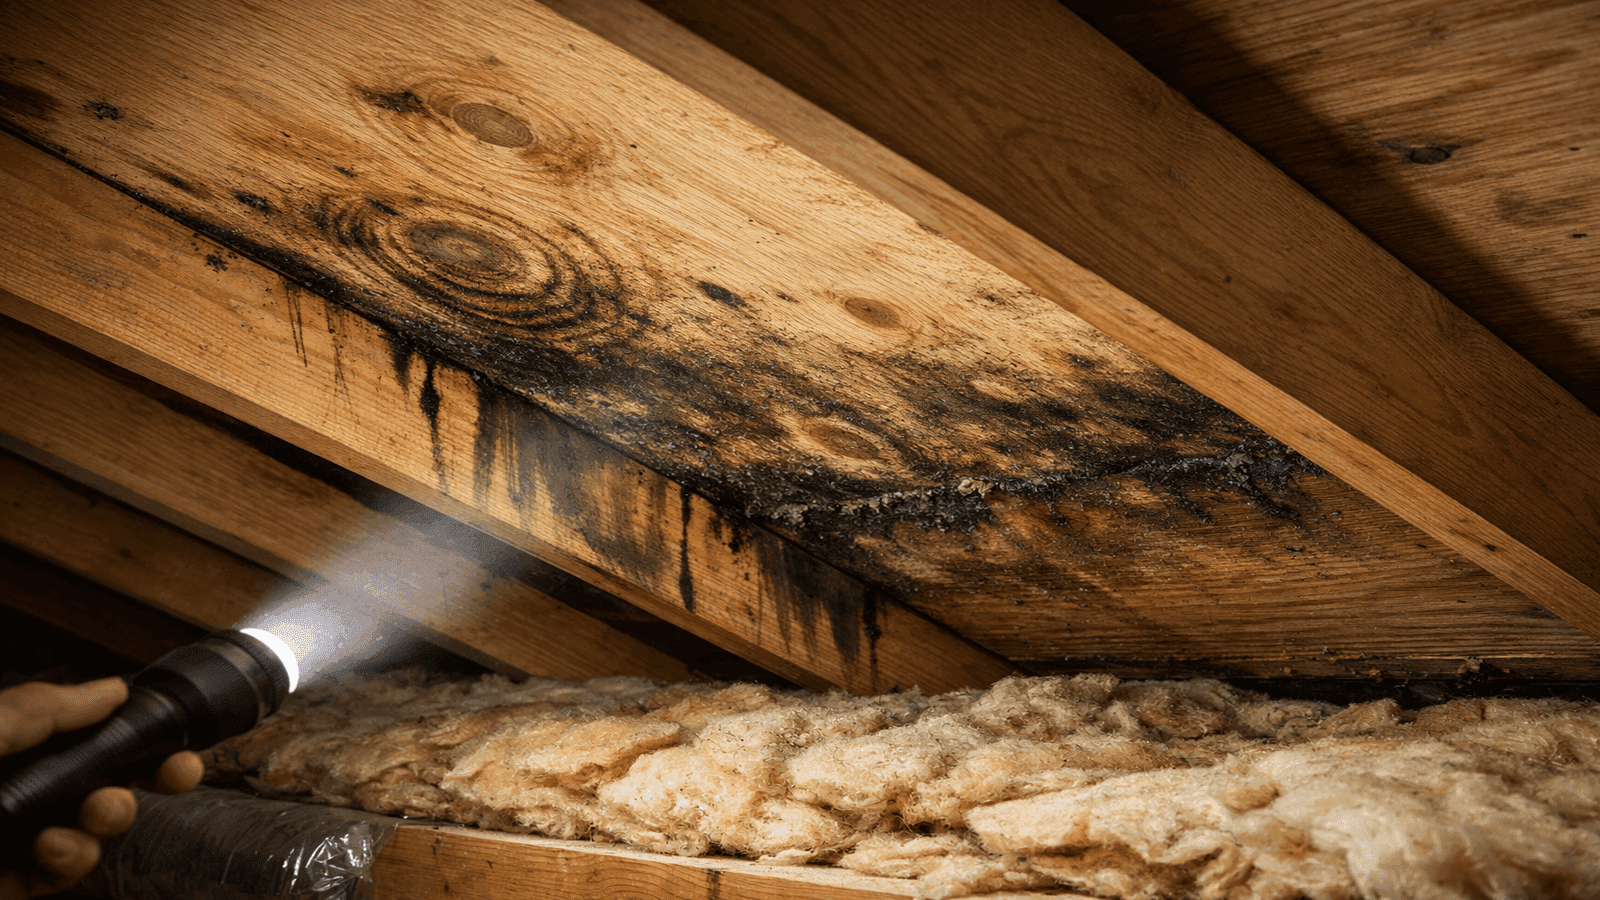
Photo: Attic interior showing water staining on roof decking and rafters near eave edge indicating winter moisture intrusion from ice dam activity
Repair Priority Ranking
Not every issue found in a spring inspection requires immediate action. Understanding which repairs are urgent and which can wait helps you budget and schedule work effectively.
Get quotes from top-rated pros.
Priority 1: Active Leak Pathways
Any damage that creates a direct path for water entry must be addressed immediately. This includes missing shingles, open flashing gaps, cracked pipe boots, and any area where you can see daylight from the attic. These repairs are time-sensitive because every rainstorm after discovery adds water damage to the interior. The typical repair cost for a localized leak source runs $300 to $900 depending on access and materials [6].
For guidance on finding the source of an active leak, see how to find a roof leak. For repair approaches once the source is identified, see how to fix a roof leak.
Priority 2: Structural or Ventilation Issues
Soft decking, significant moisture in insulation, or blocked ventilation pathways require attention before summer heat arrives. Wet insulation loses R-value and can become a mold source. Blocked ventilation accelerates shingle aging and creates conditions for ice dams next winter.
Priority 3: Accelerated Wear Areas
Sections showing advanced granule loss, multiple cracked shingles concentrated in one area, or lifting tabs that have not fully separated yet. These areas are candidates for localized repair now or targeted section replacement within the season. Addressing them before summer storm season reduces the risk of emergency repairs during severe weather. See replace roof shingles for the repair approach and roof repair cost for current cost benchmarks.
Priority 4: Maintenance Items
Gutter cleaning, trimming overhanging branches within six feet of the roof surface, re-sealing exposed fasteners, and applying moss treatment where biological growth is present. These items improve long-term performance but do not require emergency attention.
Regional Considerations for Post-Winter Inspection
Winter roof stress varies significantly by geography. Knowing the specific patterns for your region helps you focus inspection effort where damage is most likely.
Cold Climate Regions (Northeast, Midwest, Mountain States)
These areas see the highest number of freeze-thaw cycles and the greatest ice dam risk. Inspect attic ventilation and insulation quality carefully. Check all valley areas, eave edges, and any roof section over heated living space for ice dam evidence. Roof inspection is especially critical for homes 15 years or older because older shingles have less flexibility during temperature cycling and more brittle sealant strips.
In colder climates, the number of freeze-thaw cycles in a single winter can reach 80 to 100 at the roof surface. Each cycle is a stress event. An older shingle that was marginal going into winter often does not survive to spring intact. That is why I always recommend a professional inspection for any home with a roof older than 15 years in a freeze-thaw climate.
Coastal and High-Wind Regions (Gulf Coast, Atlantic Coast, Pacific Coast)
Winter storms in coastal regions bring high winds and wind-driven rain that test flashing seals and shingle adhesion. Inspect all roof penetrations, flashing joints, and sealant strips carefully. Check for shingle tab lifting on the windward side of the home. Salt air in coastal environments also accelerates metal flashing corrosion; inspect for rust or pitting on any exposed metal.
Southern Regions (Southeast, Texas, Southwest)
While winters are milder, thermal cycling still affects roofing materials. Focus inspection on UV-related wear: curling shingle edges, dried-out sealant, and cracked pipe boots. Spring also marks the beginning of severe convective storm season across the South and Southeast, making pre-season inspection particularly valuable. The transition from winter to summer storms in April and May catches unprepared roofs at their most vulnerable.
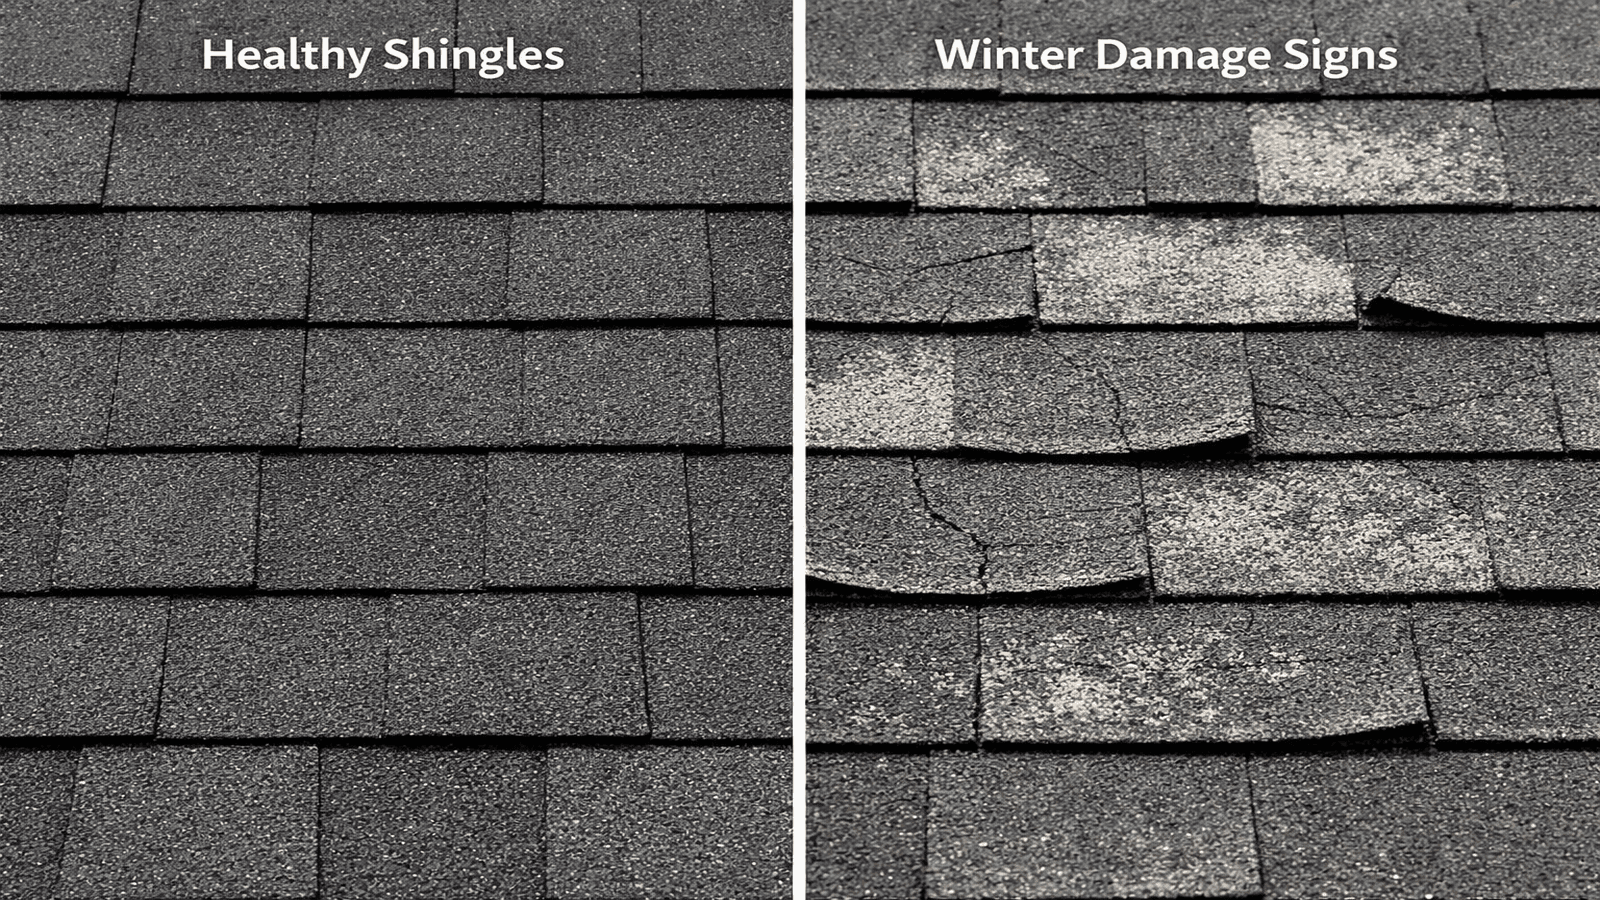
Photo: Side-by-side comparison showing healthy asphalt shingles on left versus winter-damaged shingles with curling edges and granule loss on right
When to Hire a Professional
Homeowners can safely perform ground-level visual inspection, gutter cleaning, and attic checks. Beyond those tasks, several situations call for a licensed roofing contractor.
Hire a professional when:
- You find evidence of active leaks or water intrusion in the attic
- Your roof is over 15 years old (reduced margin for DIY error)
- Roof pitch exceeds 6:12 (steep roofs require specialised safety equipment)
- You find multiple areas of damage suggesting systemic rather than localised problems
- Your home uses tile, slate, or metal roofing (these materials require different inspection and walking protocols than asphalt)
- You need documentation for an insurance claim
The licensed roofing contractors in our NearbyHunt network report that approximately 68 per cent of post-winter inspection calls in spring 2025 revealed at least one repair item that the homeowner had not noticed during their own visual check. The most common hidden finds were cracked pipe boots, separated chimney flashing, and early-stage decking rot at eave edges.
A professional inspection for a typical single-family home runs $150 to $400 [5]. When that inspection identifies a $500 repair, the return on investment is immediate. When it confirms a clean bill of health, that peace of mind heading into storm season is equally valuable.
For fall preparation guidance that complements this spring checklist, see fall roof preparation. For a printable inspection checklist format, see roof inspection checklist.
Get quotes from top-rated pros.
Case Study: Mark T., Cincinnati, OH
Mark T. owns a 19-year-old colonial in Cincinnati, Ohio. After the winter of 2024-2025, which included seven significant freeze-thaw cycles, he hired a licensed roofing contractor for a spring inspection.
The contractor found three issues Mark had not noticed: a cracked pipe boot on the main plumbing stack, a section of chimney step flashing that had lifted approximately half an inch on the north face, and a 4-by-6-foot area of sheathing near the rear eave edge that showed early-stage moisture staining from ice dam activity the previous two winters.
Total repair cost: $875. The contractor replaced the pipe boot ($150), re-secured and re-sealed the chimney flashing ($275), and treated the affected sheathing with a drying and antimicrobial process ($450) to prevent mould progression.
Mark's contractor told him that the sheathing section, if left another season, would likely have needed full replacement at a cost of $1,800 to $2,400, plus potential drywall repair inside the home if a subsequent winter pushed active leaking into the living space.
The $875 investment protected against an estimated $4,000 to $6,000 in cumulative damage. That kind of early intervention is exactly what spring inspections are designed to capture.
Spring Roof Maintenance Timeline
Use this timeline to sequence your spring roof maintenance across a four-to-six week window as winter ends.
Week 1 (Late March or Early April):
- Perform ground-level visual inspection using binoculars
- Inspect attic for water staining, daylight, and ventilation condition
- Document all findings with photos
Week 2:
- Clean gutters and downspouts
- Trim overhanging branches
- Clear all roof-level debris (pine needles, leaves, seed pods)
Week 3:
- Schedule professional inspection if any issues found in ground-level check, roof is 15-plus years old, or previous inspections have not been performed
- If performing own close-range inspection: check shingles, flashing, ridge cap, pipe boots
Week 4 to Week 6:
- Complete all Priority 1 repairs (active leak pathways)
- Schedule Priority 2 and 3 repairs
- Apply moss/algae treatment if biological growth is present
- Confirm all gutters are draining properly through the first spring rainstorms
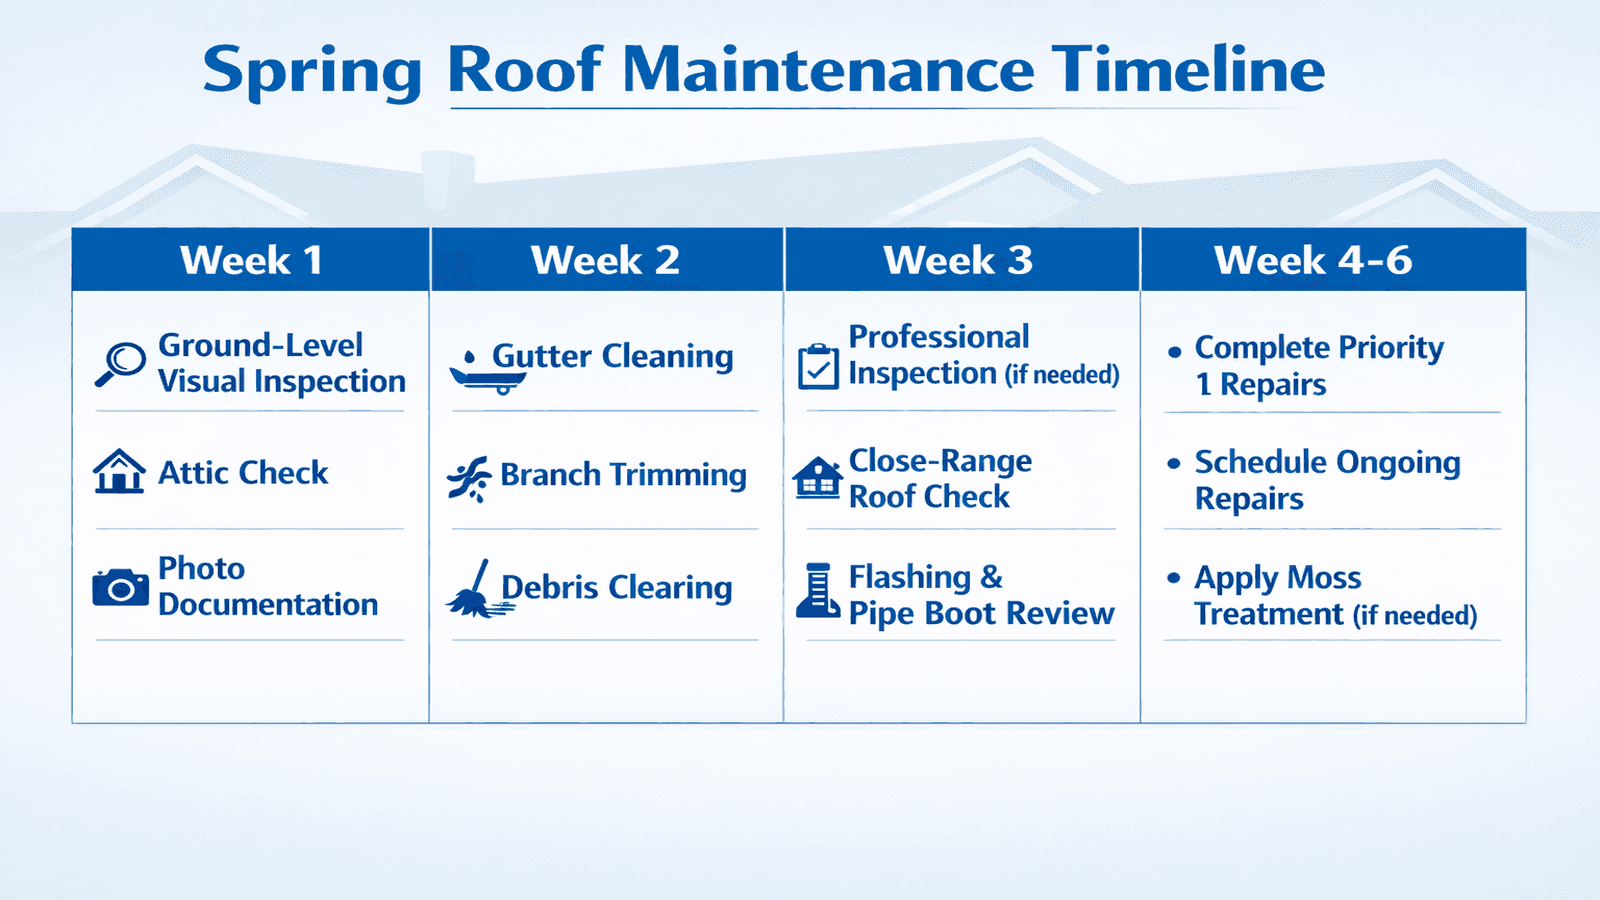
Photo: Spring roof maintenance four-week timeline infographic showing inspection, gutter cleaning, professional review, and repair sequence from late March through May
Finding Qualified Contractors for Spring Work
Spring is the highest-demand season for roofing contractors in most markets. Booking inspections and repairs in late March or early April, before the full rush of storm-season work, typically means better scheduling availability and more competitive pricing.
When selecting a contractor for spring roof work, verify:
- State contractor license (roofing license requirements vary by state)
- General liability insurance and workers' compensation coverage
- Written estimates with specific scope of work and materials
- References from local completed projects
Find Licensed Roofers Near You through the NearbyHunt network to connect with pre-screened, licensed roofing contractors in your area.
Spring is genuinely the best time to get roof work done. The weather is cooperative, contractors are scheduling before the summer storm rush, and any issues found get addressed before the most demanding season for your roof. Homeowners who invest in spring maintenance consistently see longer roof service life and fewer emergency calls.
Conclusion
Spring roof maintenance is not a luxury item. It is the most cost-effective window in the calendar year to identify and address damage before it compounds. A winter season produces multiple forms of stress on every component of the roofing system: freeze-thaw cycling, ice dam formation, wind and debris impact, and accelerated granule loss. A systematic spring inspection covering the roof surface, gutters, attic, and flashing catches the resulting damage when repairs are still manageable in scope and cost.
Work through the four-week timeline: start with a ground-level visual check and attic review, clean gutters and drainage systems, bring in a licensed contractor for any findings beyond your comfort level, and complete repairs before summer storm season begins. Homes with roofs 15 years or older in particular benefit from professional assessment every spring.
For year-round maintenance planning beyond spring, the roofing maintenance guide provides a complete seasonal framework. If you identify common roofing problems during your inspection, that resource covers diagnosis and repair approaches for each major issue type.
Disclaimer: The information provided in this article is for general educational purposes only. Roof inspection, maintenance, and repair work involves working at heights and requires proper safety equipment, training, and licensing where applicable. NearbyHunt recommends consulting a licensed roofing contractor before performing any repair work beyond ground-level observation. Local building codes, permit requirements, and material specifications vary by jurisdiction. Always verify contractor licensing and insurance before hiring. NearbyHunt does not provide roofing services directly and makes no representations regarding the outcome of any specific maintenance or repair project.*
Sources & References
[1] National Roofing Contractors Association. "Roof Repair and Maintenance." nrca.net. https://www.nrca.net/education/custom-education/roof-repair-maintenance
[2] GAF Roofing. "How the Freeze-Thaw Cycle Can Affect Your Roof." gaf.com. https://www.gaf.com/en-us/blog/your-home/how-the-freeze-thaw-cycle-can-affect-your-roof-281474980358669
[3] Lutgen Companies. "Understanding the Freeze-Thaw Effect on Roofs." lutgensco.com. https://lutgensco.com/understanding-the-freeze-thaw-effect-on-roofs/
[4] National Weather Service. "Preventing Roof Ice Dams." weather.gov. https://www.weather.gov/grr/roofIceDams
[5] ReconRoof. "2026 Roof Inspection Cost Guide." reconroof.com. https://reconroof.com/blog/roof-inspection-cost/
[6] Absolute Roofing Company. "The Essential Post-Winter Roof Inspection Checklist." absoluteroofingcompany.net. https://www.absoluteroofingcompany.net/spring-forward-the-essential-post-winter-roof-inspection-checklist/
[7] Brink Nano. "Spring Roof Inspection: What to Look For After Winter." brinknano.com. https://brinknano.com/post/spring-roof-inspection-what-to-look-for-after-winter
[8] Sun Vault Roofing. "Post-Winter Roof Inspection: Essential Tips." sunvaultroofing.com. https://www.sunvaultroofing.com/post/winter-roof-damage-why-a-post-winter-inspection-is-essential


James is a licensed roofing contractor with 20 years of experience in roof installation, inspection, and repair across the U.S. South and Midwest. He specialises in asphalt shingles, metal roofing, and storm damage restoration. On NearbyHunt, James offers practical advice on roof maintenance, insurance claims, and selecting the right materials for long-lasting protection.

Jacob is a licensed roofing contractor with over 18 years of experience in roof inspection, installation, and restoration. Based in Texas, he has led hundreds of successful roofing projects across residential and commercial properties. Jacob is also a certified storm damage specialist, ensuring that all NearbyHunt roofing content meets industry best practices and safety standards.