- Inspect your roof twice yearly (spring and fall) plus within 48 hours after any major storm
- 85% of roof problems are visible from the ground with a good pair of binoculars -- you don't always need to climb
- Early detection cuts repair costs by 60-80%: a $300 flashing fix caught early vs. $3,000 in water damage later
- Most homeowners miss ventilation issues, pipe boot cracking, and ridge cap blow-offs in self-inspections
- A professional inspection costs $150-$350 and is worth it every 3-5 years as a baseline -- or after hail or high-wind events
Your roof takes a beating year-round. Heat cycles, UV exposure, wind, rain, and hail work on materials that are designed to last 20 to 30 years -- but only when they receive consistent attention. The difference between a roof that reaches its design lifespan and one that fails at year 12 is almost always early detection.
Regular DIY inspections, done correctly and consistently, are the most cost-effective maintenance habit a homeowner can build. For a broader look at roofing projects you can approach yourself, see our complete roofing how-to guide. This guide covers the full process: safe ground-level assessment, attic inspection, on-roof checks for low-slope sections, post-storm protocols, and when to call a licensed contractor. Across 1,800-plus residential roofing projects in the U.S. South and Midwest, James Carver has consistently found that homeowners who inspect annually catch problems that -- left unchecked -- grow into five-figure repairs [1][2].
The process takes less than an hour and requires nothing more than binoculars and a smartphone. Start here.

Get quotes from top-rated pros.
Safety Before You Start
No inspection finding is worth an injury. Before you consider going anywhere near a ladder, complete a full ground-level pass. That ground-level inspection alone will reveal the majority of problems visible on any residential roof.
When you should not get on the roof:
- Pitch is steeper than 6:12 (more than 6 inches of rise per 12 inches of horizontal run)
- Surface is wet, frost-covered, or icy
- You are working alone without a spotter on the ground
- Wind is gusting above 20 mph
Required gear if you do go up:
- Fall-arrest harness anchored to a ridge strap or structural anchor rated for your weight
- Non-slip roofing boots (standard sneakers are genuinely dangerous on granule-coated surfaces)
- Ladder stabilizer to keep the ladder off gutters and steady against the fascia board
About 70 percent of what I need to see during an inspection, I can read from the ground with quality 10x binoculars. Ridge line, flashing flatness, shingle surface texture, granule condition -- all of that shows up clearly. The two things that genuinely require physical roof access are checking pipe boot rubber up close and walking the ridge to feel for movement. If you are not comfortable on a roof, skip the on-surface check and call a licensed contractor for that part.
Ground-Level Inspection (Do This Every Time)
A thorough ground-level inspection is not a shortcut -- it is the foundation of every assessment protocol. Walk all four sides of the house and spend time looking from each angle before moving on to anything else.
Tools required:
- Binoculars (10x magnification minimum)
- Smartphone with date-stamp enabled for documentation
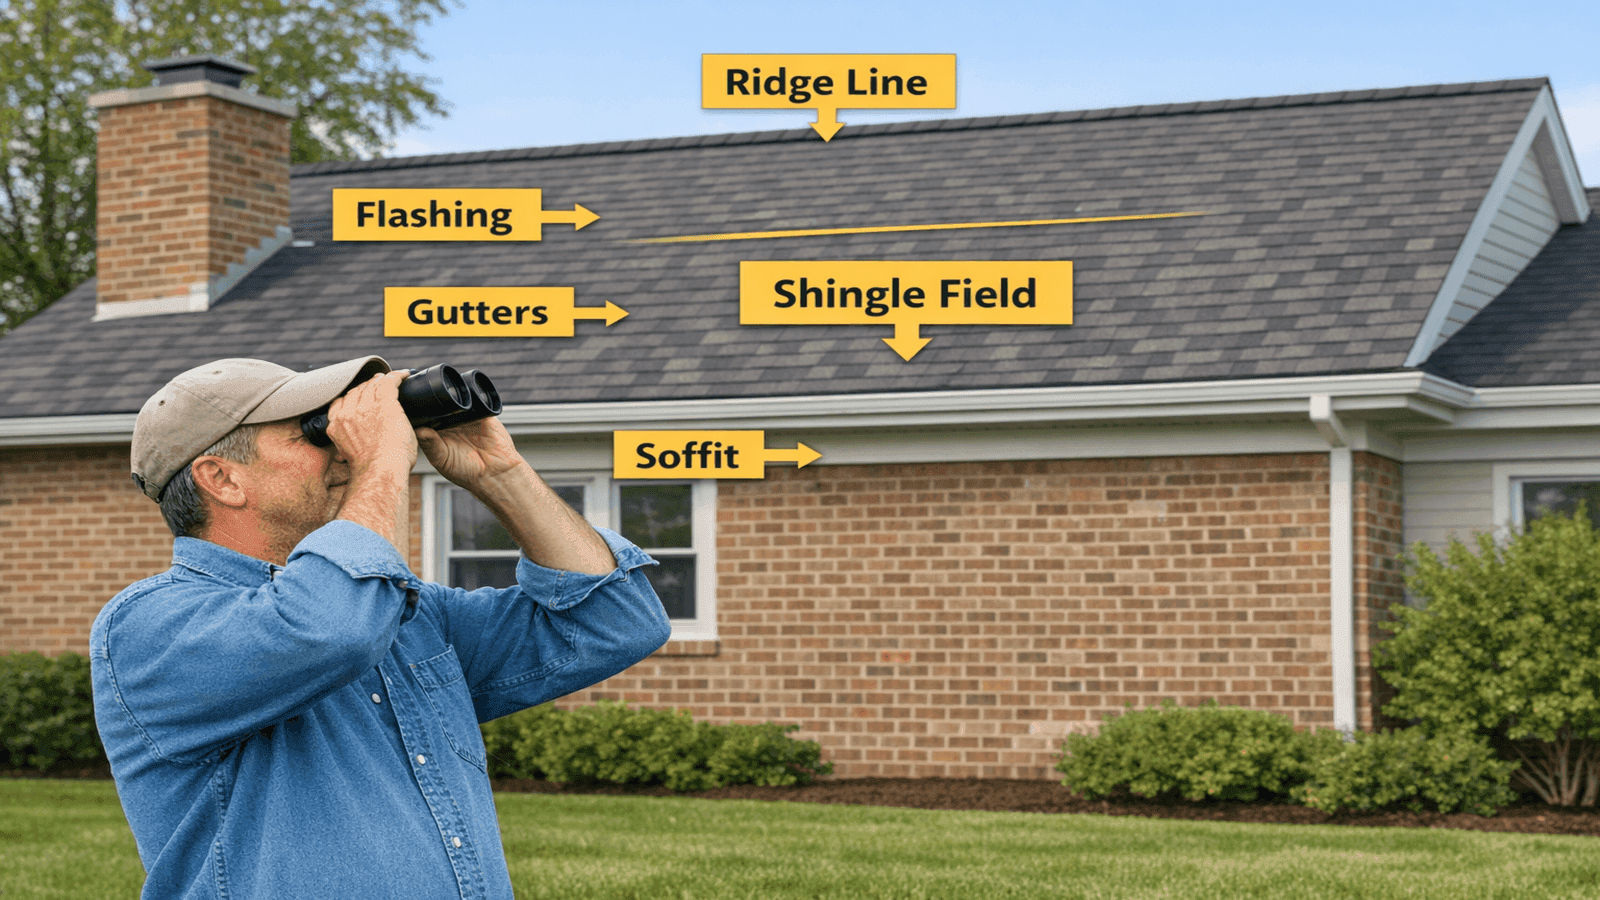
Photo: Homeowner using binoculars to conduct a ground-level roof inspection with labeled inspection areas visible on the roof
Shingles: Look for missing tabs, areas where shingles appear to curl upward at the edges (cupping), or sections that buckle in the middle. Curling shingles typically signal advanced age or inadequate ventilation. Missing shingles are an immediate repair priority because exposed decking deteriorates quickly [1].
Ridge line: Sight down the peak from one end. It should be perfectly straight and continuous. Any dip, sag, or wave points to a structural problem -- rafter damage or decking failure -- not just a surface material issue. Ridge sags require professional assessment before any surface repair.
Gutters: Sagging gutters pull away from the fascia and allow water to run directly behind the board rather than away from the foundation. Rust stains or dark streaking on siding below gutters indicate chronic overflow from blockages, which means water is sheeting back toward the fascia and potentially into the wall cavity.
Soffit and fascia: Peeling paint on the soffit or dark staining along the fascia board is frequently the first visible sign of water that has been getting under shingles at the eaves. These indicators are easy to miss during a quick walk-by but important to catch early.
Chimney: Look for a visible cap and intact mortar at the crown and joint lines. Missing chimney caps allow water and animals to enter. Spalling mortar is common after freeze-thaw cycles and needs repair before it creates an opening at the flue junction [3].
| Ground-Level Sign | What It Indicates | Urgency | Next Step |
| Missing shingles | Exposed decking, active leak risk | High | Repair within 1-2 weeks |
| Sagging ridge line | Structural rafter or decking failure | High | Professional inspection immediately |
| Curling shingle edges | Age, UV, or ventilation failure | Medium | Monitor; budget for replacement |
| Soffit discoloration | Water at eave, possible ice dam history | Medium | Check attic; identify source |
| Sagging or detached gutters | Water diversion failure at eave | Medium | Reattach; check fascia behind |
| Lifted flashing visible | Water entry point at transition | High | Repair before next rain event |
| Missing chimney cap | Water and animal entry | Medium | Replace cap; inspect flue |
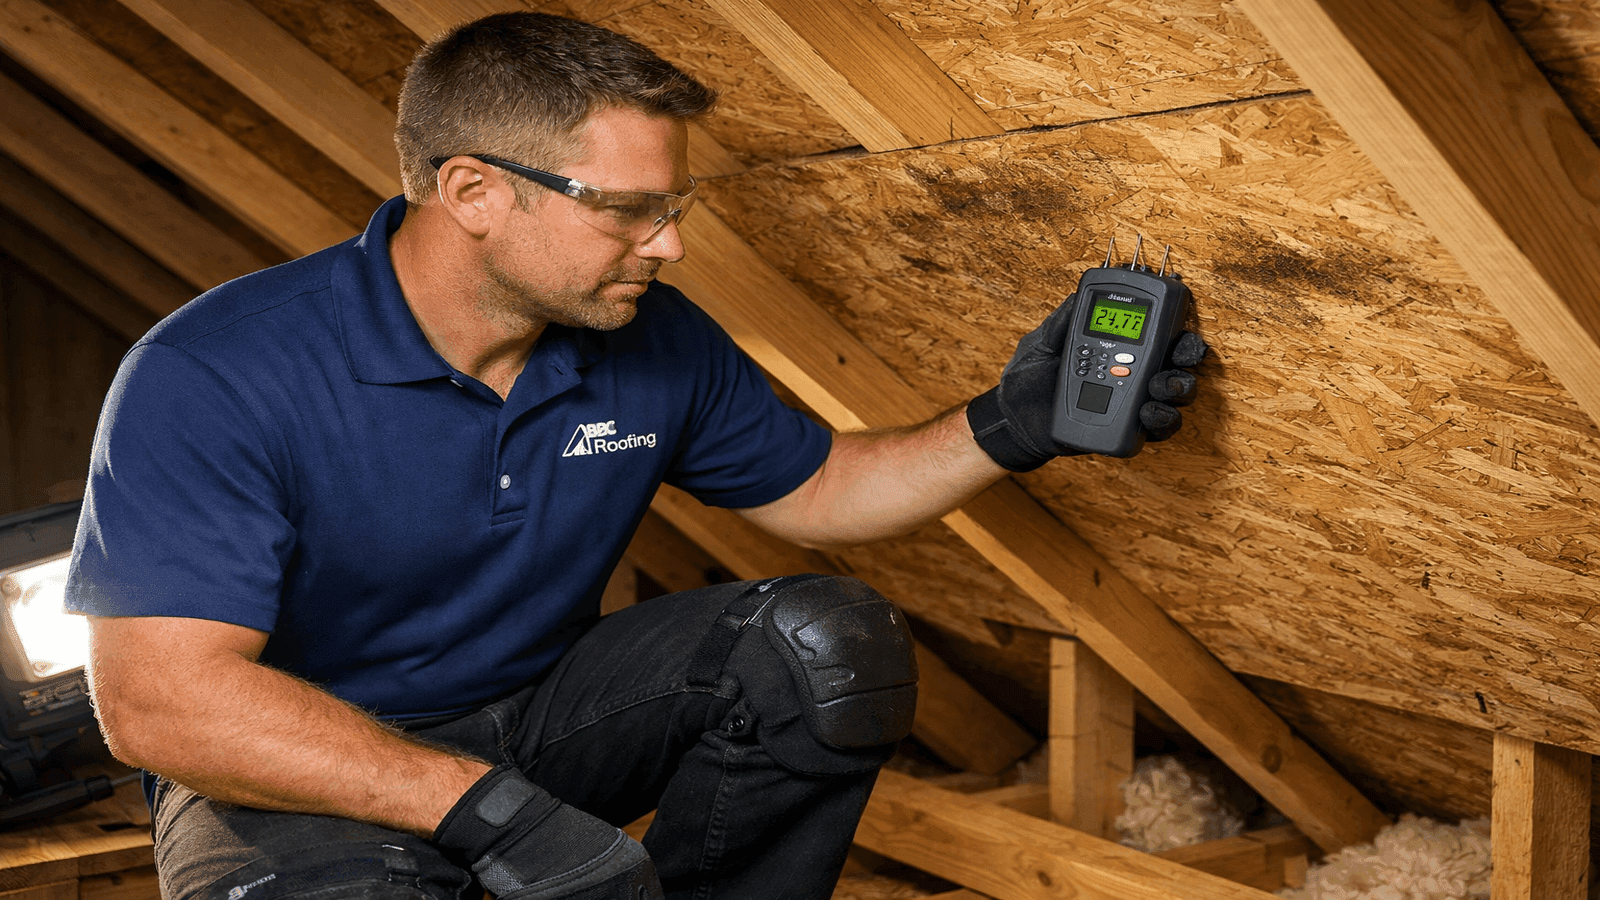
Attic Inspection Checklist
Before deciding whether to access the roof surface, spend 15 minutes in your attic. The attic is often more diagnostic than the roof surface itself because water follows gravity and leaves evidence along its entire path.
Daylight through deck: On a bright day, turn off the attic light and let your eyes adjust. Any pinpoints of light coming through the roof deck are potential water entry points. A gap that lets light through also lets wind-driven rain through [2].
Stained or darkened wood: Water staining on rafters or decking shows up as dark brown or gray streaking. Water can travel along a rafter for several feet before dripping, so follow stains toward the ridge to locate the actual source rather than the drip point.
Rust on nail tips: When the tips of deck nails rust, it means moisture has been present at that location repeatedly. This is a record of chronic moisture -- worth noting and investigating even if there is no active leak visible today.
Insulation condition: Compressed, matted, or discolored insulation means water has contacted it at some point. Wet insulation loses its R-value and can become a substrate for mold growth. Any discolored batts should prompt investigation of the source above.
Mold or mildew odor: A musty smell in the attic is not normal and is not acceptable. It indicates either poor ventilation allowing humidity to build, or a slow active leak. Both require identifying and addressing the source.
Frost in cold months: Frost on the underside of roof decking in winter indicates that warm, humid air from the living space is escaping into the attic and condensing on the cold deck. This is a ventilation failure that will damage decking over time if not corrected [4].
Start in the attic, not on the roof. The roof surface tells you what is happening right now. The attic tells you what has been happening for the past year or two. I have walked into attics where the shingles looked acceptable from the ground but the decking had been quietly rotting for two seasons because a pipe boot cracked and nobody caught it. The attic inspection is the one most homeowners skip, and it's the one that gives you the most information.
Get quotes from top-rated pros.
On-Roof Inspection Checklist (Low-Slope Sections Only)
Proceed with physical roof access only if the pitch is 6:12 or less, conditions are dry, and you have proper fall protection in place. Work methodically from one edge to the other rather than walking randomly across the surface.
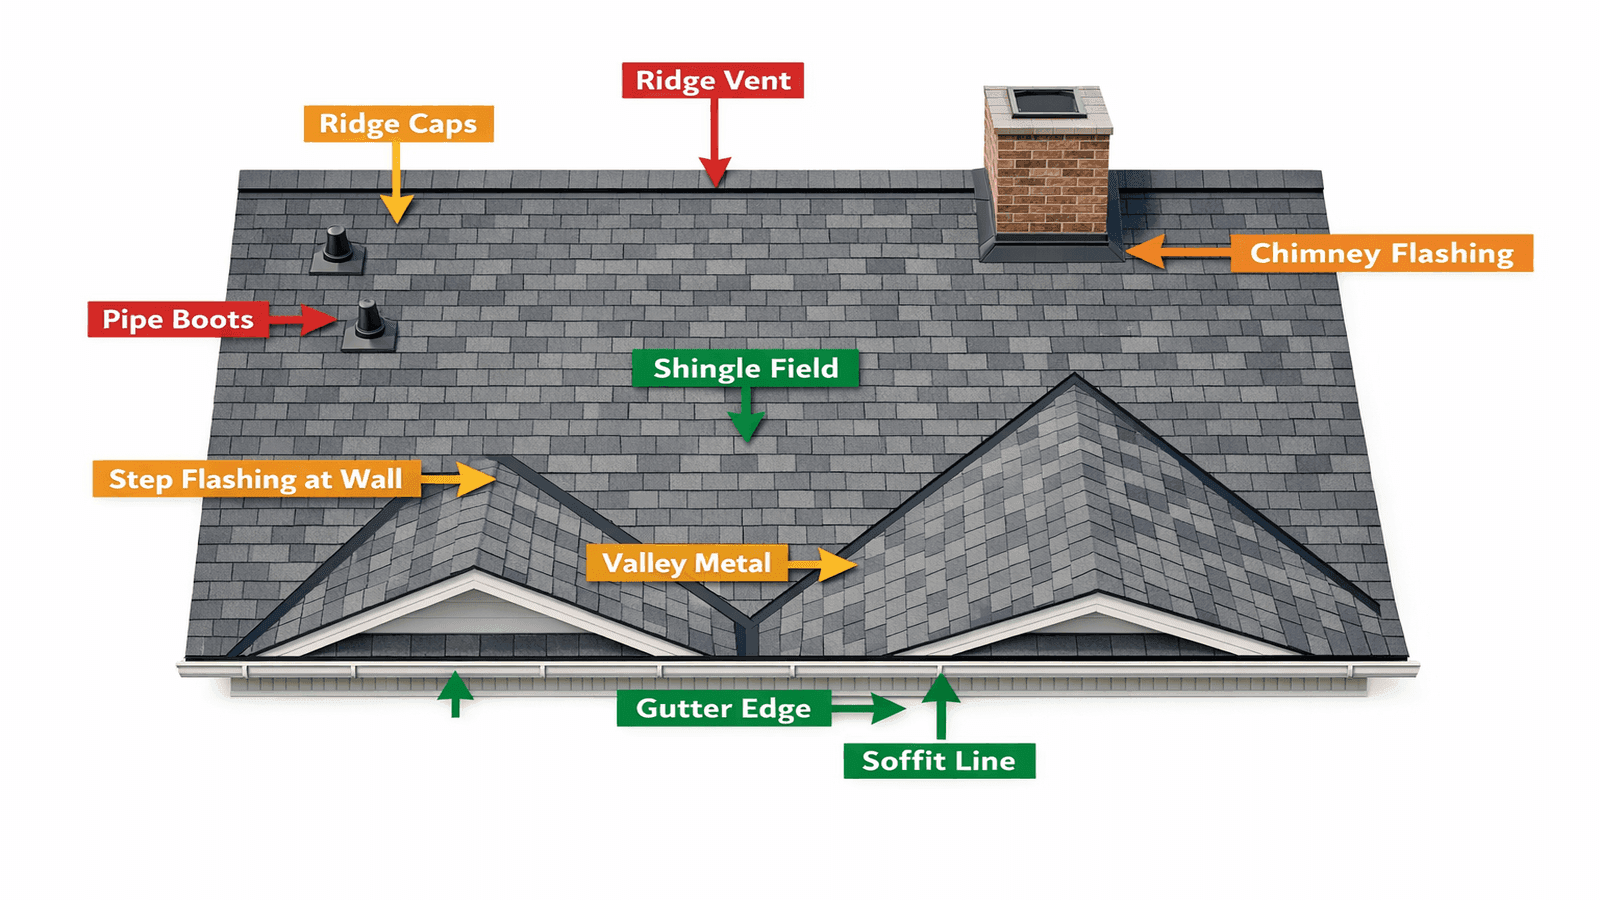
Photo: Overhead annotated diagram of residential roof showing all inspection checkpoints including ridge caps, pipe boots, step flashing, valley metal, and gutter edge
Shingle condition:
Granule loss: Bare spots where the granule coating has worn through expose the asphalt mat beneath to UV radiation. Check gutters for granule accumulation -- a heavy layer of granules after rain means the shingles are shedding significant material and aging quickly.
Cracking, curling, or cupping: Run your hand across a sample area of shingles at the middle of each slope. Shingles should feel slightly flexible. Brittle or rigid shingles are near end of life. Cupped edges (edges curling upward) are a ventilation-related failure in most cases.
Nail pops: Small bumps or raised spots on shingle surfaces indicate that a fastener has backed out of the decking. Nail pops create a small gap under the shingle that allows wind infiltration and water entry during driving rain.
Missing tabs: Walk each field section and verify that no tab shingles are missing, particularly along rakes and eaves where wind exposure is highest.
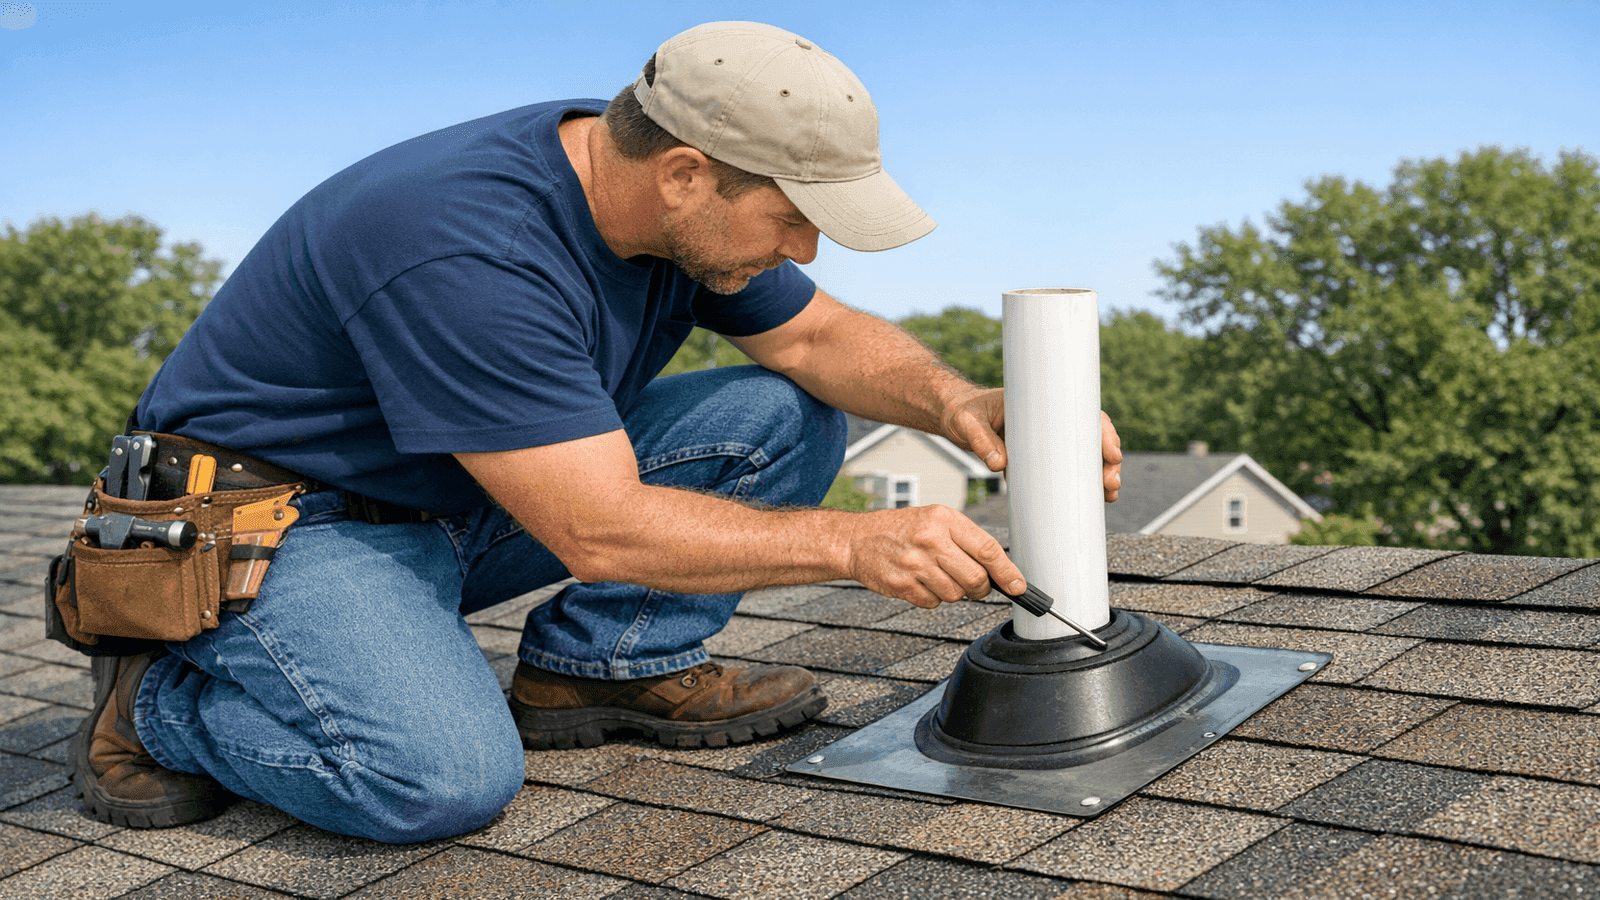
Flashing inspection -- the most critical component:
According to the NearbyHunt network of licensed roofing contractors, the three most commonly missed items in homeowner self-inspections are pipe boots, the final two ridge caps at each end of the ridge, and nail pops in field shingles located more than 8 feet from the eave.
Pipe boots: The rubber collar around every plumbing vent pipe is typically the first flashing component to fail on any roof. Rubber degrades with UV exposure and develops cracks around the collar neck, often invisible at rest but opening wide under flex. Physically flex the collar by hand -- if cracks appear under pressure, the boot needs replacement. Cracked pipe boots are a leading source of attic water intrusion on residential roofs [2].
Step flashing at walls: Where the roof meets a vertical wall -- dormer sides, additions, attached garages -- step flashing should be tight against the wall with no visible gaps or lifted edges. Push lightly on each piece; it should not flex or move.
Valley metal: Look for corrosion (red or orange streaking), lifted edges, or debris accumulation in the channel. Valleys carry concentrated water flow during any rain event and are prone to both corrosion and debris damming that redirects water under the roofing material.
Chimney counter-flashing: Check whether the counter-flashing is still seated in the mortar joint. Mortar erodes with age and weather cycles, and counter-flashing that has slipped down even half an inch allows water to run directly behind it into the wall cavity [3].
Ridge caps: Inspect each cap shingle along the entire length of the ridge. Lifted corners, missing caps, or cracked caps at the ridge ends are the most common findings in wind-exposed locations.
Ridge vent: If your home has a continuous ridge vent, verify that the screen is intact and that no debris or insulation is blocking it from below. A blocked ridge vent eliminates the thermal drive of attic ventilation and leads to moisture accumulation and accelerated decking deterioration [4].
Post-Storm Inspection Checklist
Storms require a targeted inspection protocol within 48 hours. Do not wait -- insurance documentation requires timely reporting, and delay can complicate or invalidate claims.
After hail: Hail impact marks on asphalt shingles appear as circular or irregular bruised spots where granules have been knocked away, leaving exposed asphalt mat in the center. This is distinct from granule loss from age, which is gradual and diffuse. Check metal components first -- gutters, flashing, AC unit housing, ridge caps -- because hail dents on soft metal are the clearest and most documentable evidence of a qualifying weather event [5].
After high winds: Check the ridge first. Caps at the ridge ends are the first to lift or blow off in high-wind events. Walk the perimeter and look for shingles on the ground or in neighboring yards. From the ground, look for any shingles with raised trailing edges along any slope.
After fallen trees or branches: Any impact from a tree or large branch must be assessed for puncture and decking damage. Even if the branch did not penetrate, impact weight can crack decking boards below the surface material. Access the attic immediately to check for new daylight points or cracked deck boards that were not present before.
After ice dam season: Ice dam damage appears at the eaves. Look for lifted shingles in the first two courses above the gutter line, staining on the soffit directly below, and evidence of water infiltration at the top plate of exterior walls visible from the attic.
Documentation for insurance: Before touching anything, photograph roof damage systematically from multiple angles with date-stamps active. Photograph reference points such as your street address and neighboring structures to establish location. Insurance adjusters rely heavily on photographic evidence, and documentation taken immediately after a storm carries significantly more weight than photos taken weeks later [5][6].
Hail damage that qualifies for an insurance claim is functional damage -- actual granule displacement and mat exposure that compromises the shingle's ability to shed water. Cosmetic dimpling on painted metal that does not affect function typically does not qualify. That distinction matters because filing claims for non-qualifying damage affects your renewal rates. Have a licensed contractor assess the damage before you file. Most contractors assess post-storm damage at no charge, and it tells you whether you have a real claim worth pursuing.
The Complete DIY Inspection Checklist (Printable Format)
Use this checklist at every inspection. Keep a dated copy with your home maintenance records and photograph every checked item where relevant.
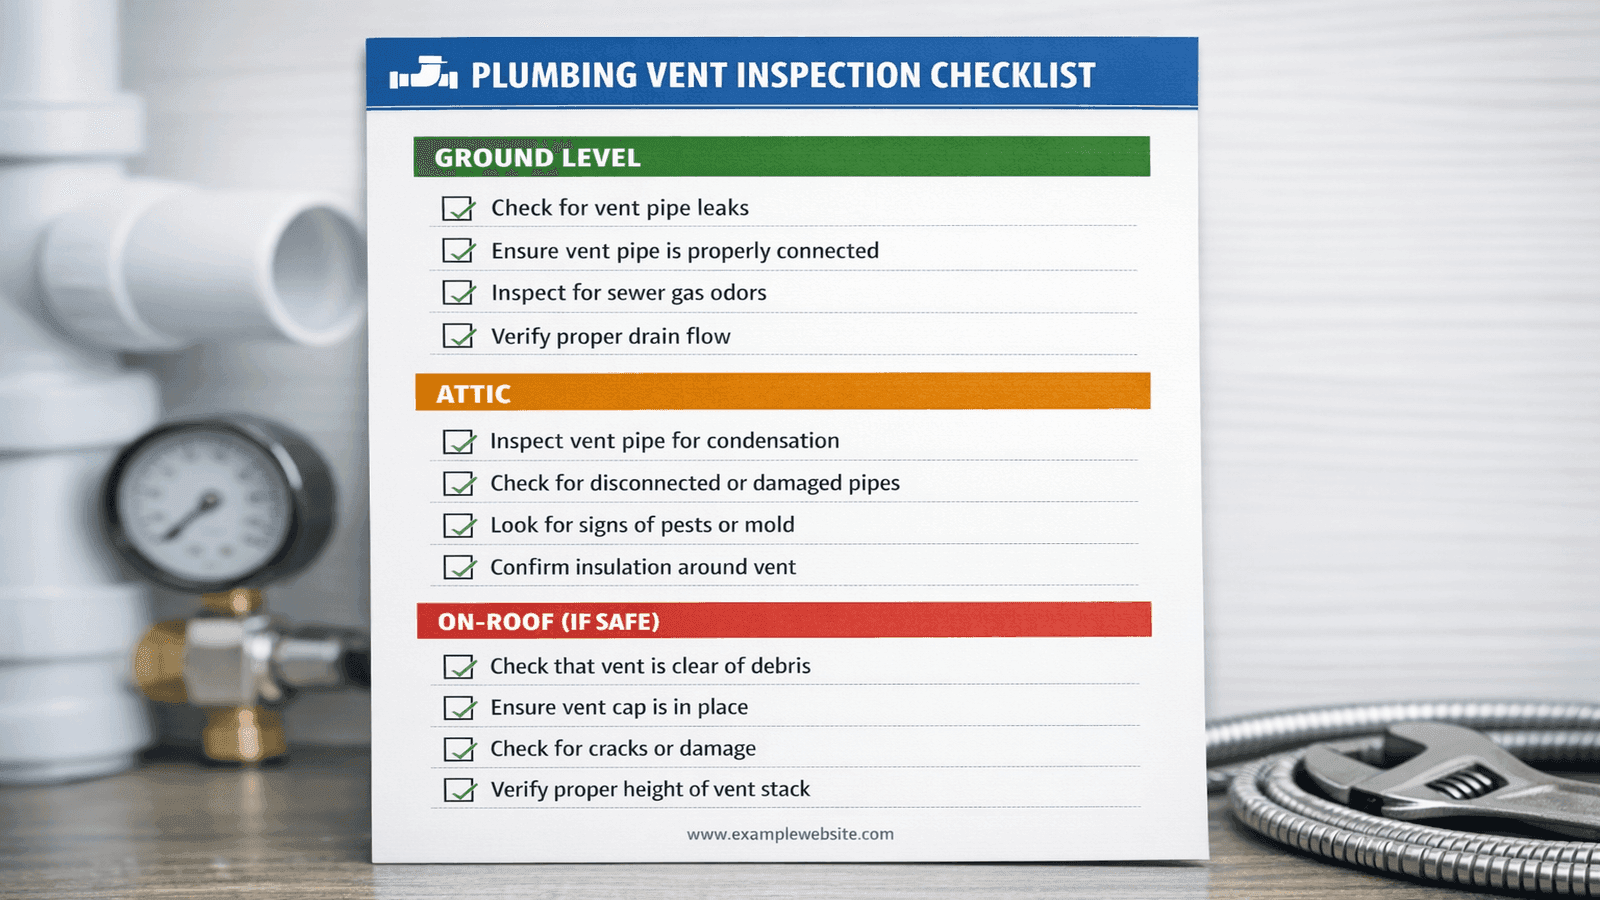
Photo: Printable roof inspection checklist with three sections: Ground Level, Attic, and On-Roof checks, each with checkbox items and brief descriptions
Ground Level
- [ ] Shingles: no curling, missing, or buckled visible from all four sides
- [ ] Ridge line: straight and continuous with no visible sag
- [ ] Gutters: securely attached, no overflow staining on siding
- [ ] Fascia and soffit: no discoloration or peeling paint
- [ ] Chimney cap present; mortar joints appear intact from ground
- [ ] All visible flashing appears flat and continuous at every transition point
Attic
- [ ] No daylight visible through deck with interior lights off
- [ ] No stained or darkened wood on rafters or decking
- [ ] No rust stains on exposed nail tips
- [ ] Insulation dry, fluffy, and not compressed
- [ ] No mold smell or visible mold growth on wood
- [ ] Vent baffles clear and not blocked by insulation
On-Roof (If Safe to Access)
- [ ] Full granule coverage on all shingles; gutters checked for accumulation
- [ ] No cracking, curling, or cupping at shingle edges
- [ ] No nail pops (raised bumps) in shingle field
- [ ] Pipe boots: rubber collar flexible with no visible cracks under flex test
- [ ] Step flashing tight at all wall-to-roof transitions, no movement
- [ ] Valley metal: no corrosion, lifted edges, or debris accumulation
- [ ] Ridge caps: all present and tight, including end caps at both ridge terminations
Get quotes from top-rated pros.
Documenting and Tracking Your Inspections
An inspection without documentation has limited value. For insurance purposes, for tracking deterioration trends over years, and for communicating condition clearly to contractors, a consistent documentation habit matters.
Photograph every problem area with date-stamp active. Capture wide-angle context shots first to establish location, then close-up detail. For attic findings, note the approximate position relative to a known landmark -- chimney location, plumbing stack, roof vent -- so the spot can be relocated on a future inspection.
Maintain a dated folder for each inspection. A Google Drive folder named by date (e.g., "Roof Inspection 2026-03-15") keeps records organized and accessible from anywhere. Keep records going back as far as you have them.
Log repair actions: Note what was repaired, who did the work, the date, the cost, and any warranty provided. This creates a maintenance history chain that is directly useful when filing a claim, selling the home, or evaluating whether a recurring issue has been properly resolved.
| What to Document | How | Why It Matters |
| Problem area photos | Dated smartphone photos, multiple angles | Evidence for claims; tracks progression over years |
| Repair receipts and contractor info | Digital folder with PDF receipts | Proves maintenance history; warranty records |
| Completed inspection checklists | Printed or digital with date signature | Demonstrates due diligence to insurer |
| Before-and-after repair photos | Side-by-side dated images | Confirms repair quality; baseline for next inspection |
Real-World Case Study: Jennifer W., Phoenix AZ
Jennifer W. purchased a 14-year-old home in Phoenix with a roof that appeared to be in reasonable condition. After hearing about high rates of thermal cycling damage in desert climates, she began doing semi-annual inspections using a ground-level checklist.
On her second inspection -- a routine spring walk-around with 10x binoculars -- she noticed that the northwest corner of the ridge had two cap shingles where the edge lines were not sitting flat compared to the rest of the ridge. The color match made them easy to dismiss, but the edges looked raised rather than flush.
She called a licensed contractor for a closer assessment. The contractor found that both end caps at the northwest corner had lost their adhesive seal and were held in place only by overlapping shingles. In Phoenix's summer monsoon season, a 40 mph wind gust -- common from July through September -- would have blown both caps off and exposed the ridge board to driving rain.
The repair cost $180. Based on James Carver's experience with similar roof conditions, a storm blow-off at that point, with subsequent water intrusion over a single monsoon season, would have resulted in $2,400 or more in decking replacement, insulation replacement, and drywall repair in the ceiling below.
The inspection-action-documentation loop worked exactly as intended: she found the problem early, acted on it, and documented the repair for her maintenance records.
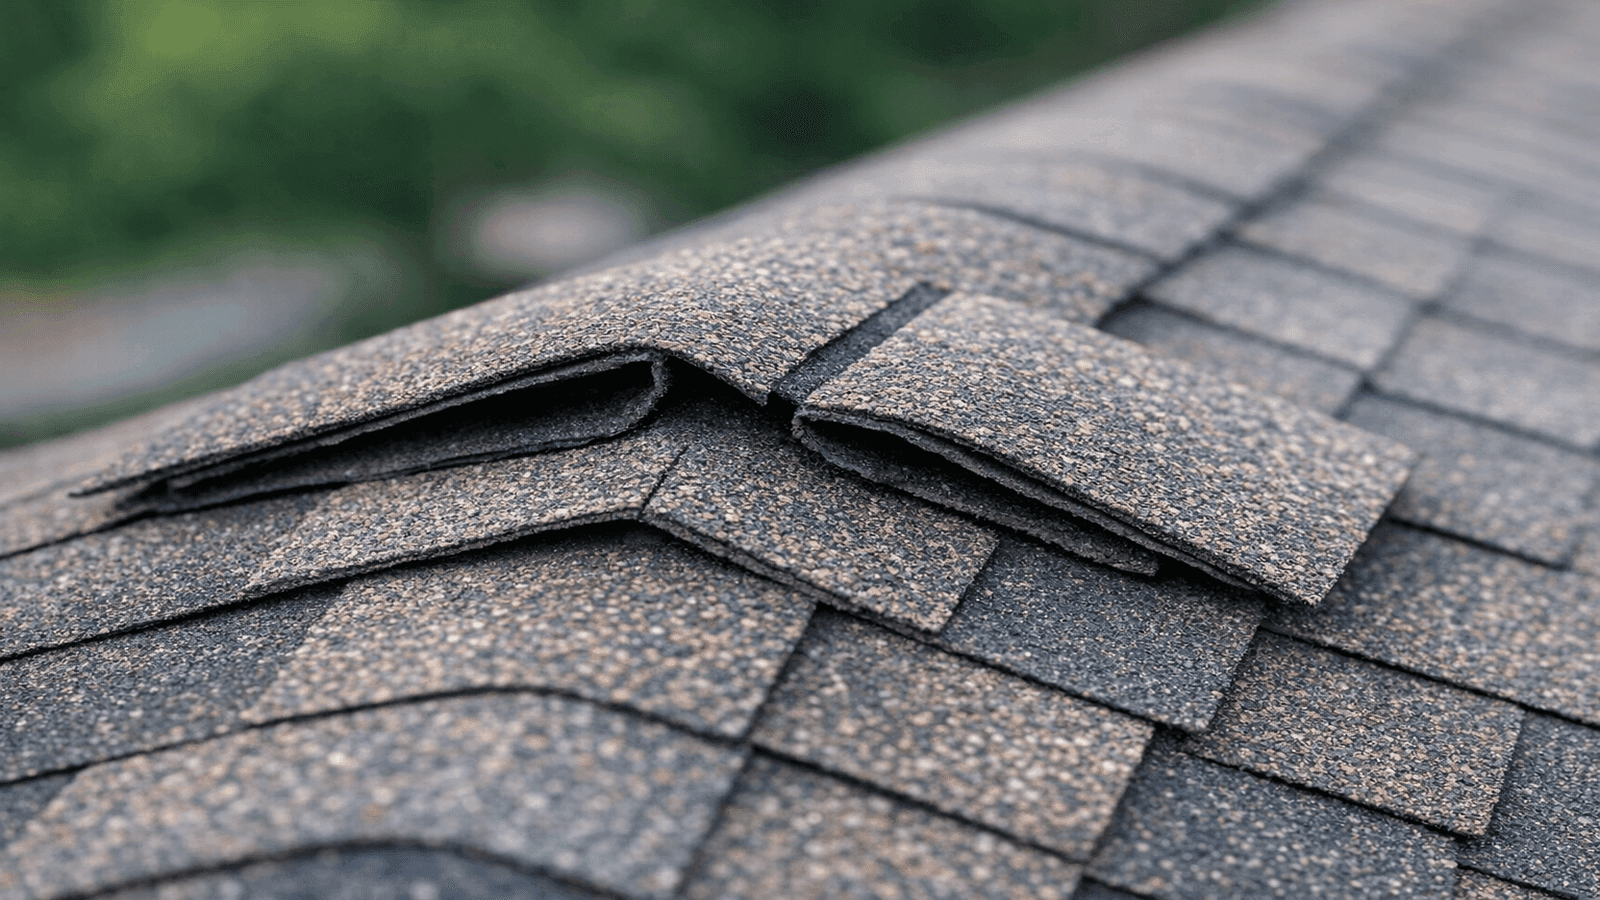
Photo: Close-up of lifted ridge cap shingles at roof ridge end showing raised edges and failed adhesive seal before repair
Professional Inspections: When and Why
DIY inspections are effective maintenance tools, but they have clear limits. There are specific situations where a professional inspection is the correct call regardless of your own thoroughness.
Every 3-5 years as a baseline: Even homeowners who inspect diligently should schedule a professional inspection every few years. Licensed roofing contractors see patterns across hundreds of roofs and identify issues that homeowners without roofing training consistently miss -- flashing integration problems, decking issues accessible only from structural vantage points, and ventilation deficiencies that require measurement rather than visual assessment [1].
After any major weather event: Hail and high-wind damage has technical parameters that affect insurance coverage. A licensed contractor can document damage with the specific terminology and measurements that insurance adjusters require. Professional documentation after a weather event is worth the inspection fee if you have any indication of damage [5].
Before buying a home: A standard home inspector provides a generalist assessment of roofing conditions. A dedicated roofing inspection by a licensed contractor ($150-$350) is far more detailed and can identify remaining shingle life, flashing condition, and hidden decking issues that a generalist assessment will miss. This investment before a purchase can support negotiation or the decision to walk away.
| Situation | DIY Inspection Sufficient? | Professional Inspection Cost |
| Spring or fall routine maintenance | Yes | N/A |
| After minor storm, no visible damage | Yes | N/A |
| After confirmed hail event | No -- professional documentation needed | $150-$350 |
| After high-wind event with any visible damage | No -- professional assessment required | $150-$350 |
| Before home purchase | No -- specialist inspection recommended | $150-$350 |
| Roof age 15 or more years | Supplement with professional every 3-5 years | $150-$350 |
| Before filing insurance claim | No -- professional assessment first | $150-$350 |
Find a licensed roofing contractor near you to schedule your professional inspection.
Conclusion
A consistent roof inspection routine -- twice a year and within 48 hours of any major storm -- is one of the highest-return maintenance habits available to a homeowner. The process costs nothing beyond binoculars and an hour of time, and the early detection benefit is clear: catching a cracked pipe boot or loose ridge cap before a weather event turns a $180 repair into several thousand dollars in avoided damage. Start from the ground every time, add an attic check before considering surface access, and document every finding with dated photos. When conditions or findings exceed what is safe or appropriate for a DIY assessment, schedule a professional inspection. A $300 professional inspection that confirms your roof is sound costs far less than discovering problems after the next storm.
Disclaimer: This article is for informational purposes only. Roof inspection and repair involves significant fall hazards and requires proper safety equipment and training. Always consult a licensed roofing contractor for professional assessment, diagnosis, and repair work in your area. Local codes, roof types, and conditions vary. Nothing in this article constitutes professional roofing advice for any specific structure or situation.
Sources & References
- National Roofing Contractors Association -- Consumer Guide to Roof Inspection
- International Association of Certified Home Inspectors -- Roof Inspection Standards of Practice
- Brick Industry Association -- Chimney and Flashing Maintenance Guidelines
- U.S. Department of Energy -- Attic Ventilation and Moisture Control in Residential Buildings
- Insurance Information Institute -- Filing a Homeowners Insurance Claim After Storm Damage
- Federal Emergency Management Agency -- Homeowner Guide to Wind Damage Documentation


James is a licensed roofing contractor with 20 years of experience in roof installation, inspection, and repair across the U.S. South and Midwest. He specialises in asphalt shingles, metal roofing, and storm damage restoration. On NearbyHunt, James offers practical advice on roof maintenance, insurance claims, and selecting the right materials for long-lasting protection.

Jacob is a licensed roofing contractor with over 18 years of experience in roof inspection, installation, and restoration. Based in Texas, he has led hundreds of successful roofing projects across residential and commercial properties. Jacob is also a certified storm damage specialist, ensuring that all NearbyHunt roofing content meets industry best practices and safety standards.