- 65% of roof leaks originate at flashing (valleys, chimneys, vents) -- start your search there, not where water drips inside
- The water entry point on your roof is almost always 3-10 feet uphill from where stains appear on ceilings
- The hose test method -- soaking one section at a time from the bottom up -- pinpoints most leaks within 30 minutes without removing any shingles
- Pipe boots are the single most common failure point on asphalt shingle roofs after 8-15 years -- check yours first
- Act within 48 hours of noticing a leak: water spreads through insulation rapidly, turning a $200 repair into a $2,000 job within weeks
Finding a roof leak sounds simple. The ceiling is wet, so the roof must be leaking somewhere above it, right? Unfortunately, water almost never enters your home directly above where you see it drip. It travels along rafters, decking, and insulation before finding somewhere to fall. A leak in your chimney flashing can produce a ceiling stain six feet away in a bedroom with no penetrations above it. That's what makes roof leaks genuinely hard to find without a system [1].
James Carver has located and repaired over 1,800 roof leaks across two decades of work in Texas and the Southeast. His approach is part of our complete DIY Roofing Guides: How-To Tutorials & Safety Tips, where you'll find the full range of roofing repair and maintenance guides. In this article, he walks through the exact detection method he uses on every service call, including how to do the hose test solo, where to look first, and when to call for a thermal imaging inspection.
The licensed roofers in our NearbyHunt network report that homeowners who find the source before calling typically save $150-$400 in diagnostic time, and more importantly, they get faster repairs because the contractor can go straight to work.

Get quotes from top-rated pros.
Interior Signs That Tell You a Leak Exists
Before you go anywhere near the roof, start inside. Interior signs tell you not just that a leak exists, but often give clues about its rough location.
Water stains on ceilings are the most obvious indicator. Fresh active leaks show as dark wet circles; older dried leaks leave brown rings with a chalky salt residue at the edge. If you see concentric brown rings (a ring inside a ring), that leak has been active and drying repeatedly for a long time [4].
Mold or mildew smell in the attic or upper rooms often precedes visible ceiling staining. By the time water is dripping into your living space, moisture has typically been accumulating in your attic for weeks or months. A musty smell in an upstairs bedroom warrants an immediate attic check.
Peeling paint or bubbling drywall near exterior walls, especially below roofline transitions, points to water running down the inside of the wall cavity -- usually from step flashing failures at dormers or additions.
Daylight visible through roof boards in the attic is an active emergency. Any gap you can see daylight through is a gap water can enter [1].
| Interior Sign | What It Usually Means | Urgency Level |
| Active drip from ceiling | Large opening or saturated insulation | Emergency -- act same day |
| Brown ceiling stain (dry) | Slow chronic leak, may have paused | High -- inspect within 3 days |
| Musty attic smell | Moisture accumulating without visible drip | Moderate -- inspect within 1 week |
| Peeling paint near eaves | Wall cavity moisture, often flashing | Moderate -- inspect this season |
| Daylight visible from attic | Active structural gap | Emergency -- act same day |
| Damp compressed insulation | Previous wetting, may be dormant | Moderate -- mark and monitor |
How to Do an Attic Inspection (The First Step)
The attic is where you gather evidence before ever setting foot on the roof. Done right, an attic inspection points you to within a 2-3 foot zone on the roof surface before you pick up a garden hose [4].
What to bring: a headlamp (both hands free), a piece of chalk, your phone for photos, and ideally a helper.
What to look for: Follow dark wood. Water traveling across decking leaves a brown or black stain on the OSB or plank boards. Trace that stain uphill (toward the ridge) as far as you can -- the leak entry point is almost always at the highest point of the stain, where it transitions from dark to normal wood.
Rust on nail shanks is a reliable indicator of chronic moisture at that exact spot. Nails that have rusted through the roof deck are dripping condensation or rain from above -- that is your zone.
Compressed or discolored insulation holds water long after the rain stops. Press it gently: wet insulation feels heavy and dense compared to dry material. Mark those areas with chalk on the deck above.
The first thing I do in every attic is turn off my headlamp for 30 seconds. Any daylight showing through is an immediate clue. Then I turn it back on and look for the trail of darkened wood -- water always leaves a mark, even if it dried out months ago. I've found leaks from stains that were three years old.
The Hose Test Method (Most Reliable DIY Detection)
The hose test is the gold standard for DIY roof leak location. It's slow and methodical, but it correctly identifies leak sources that visual inspection alone misses. You need two people: one on the roof with a garden hose, one in the attic with a flashlight watching for water [6].
Critical rule: always start at the lowest point of the roof, just above where the interior stain appears. Do NOT start at the top and work down. If you soak the whole roof at once, you'll never know which section is leaking.
The method:
- Have the attic person get positioned and signal when ready
- On the roof, soak a 2-foot section of roof just above the suspected zone for 2-3 minutes
- Wait 30-60 seconds after soaking, then ask the attic person if they see anything
- If no leak: move 2 feet uphill and repeat
- Continue until the attic person sees water -- that is your section
- Within the confirmed section: test individual features (pipe boot, nail pops, flashing edges) one at a time
- When found: mark the spot from the roof using chalk or painter's tape before descending
Safety: use a roof harness on any slope above 4:12. Never perform the hose test alone on the roof -- if you slip, no one can call for help.
Homeowners always want to start at the top and work down, which is backwards. The leak you see on the ceiling is the lowest point water can reach -- the entry point is uphill from there. Starting at the bottom and moving up methodically is how I find leaks in 20-30 minutes that contractors have missed for years.
Get quotes from top-rated pros.
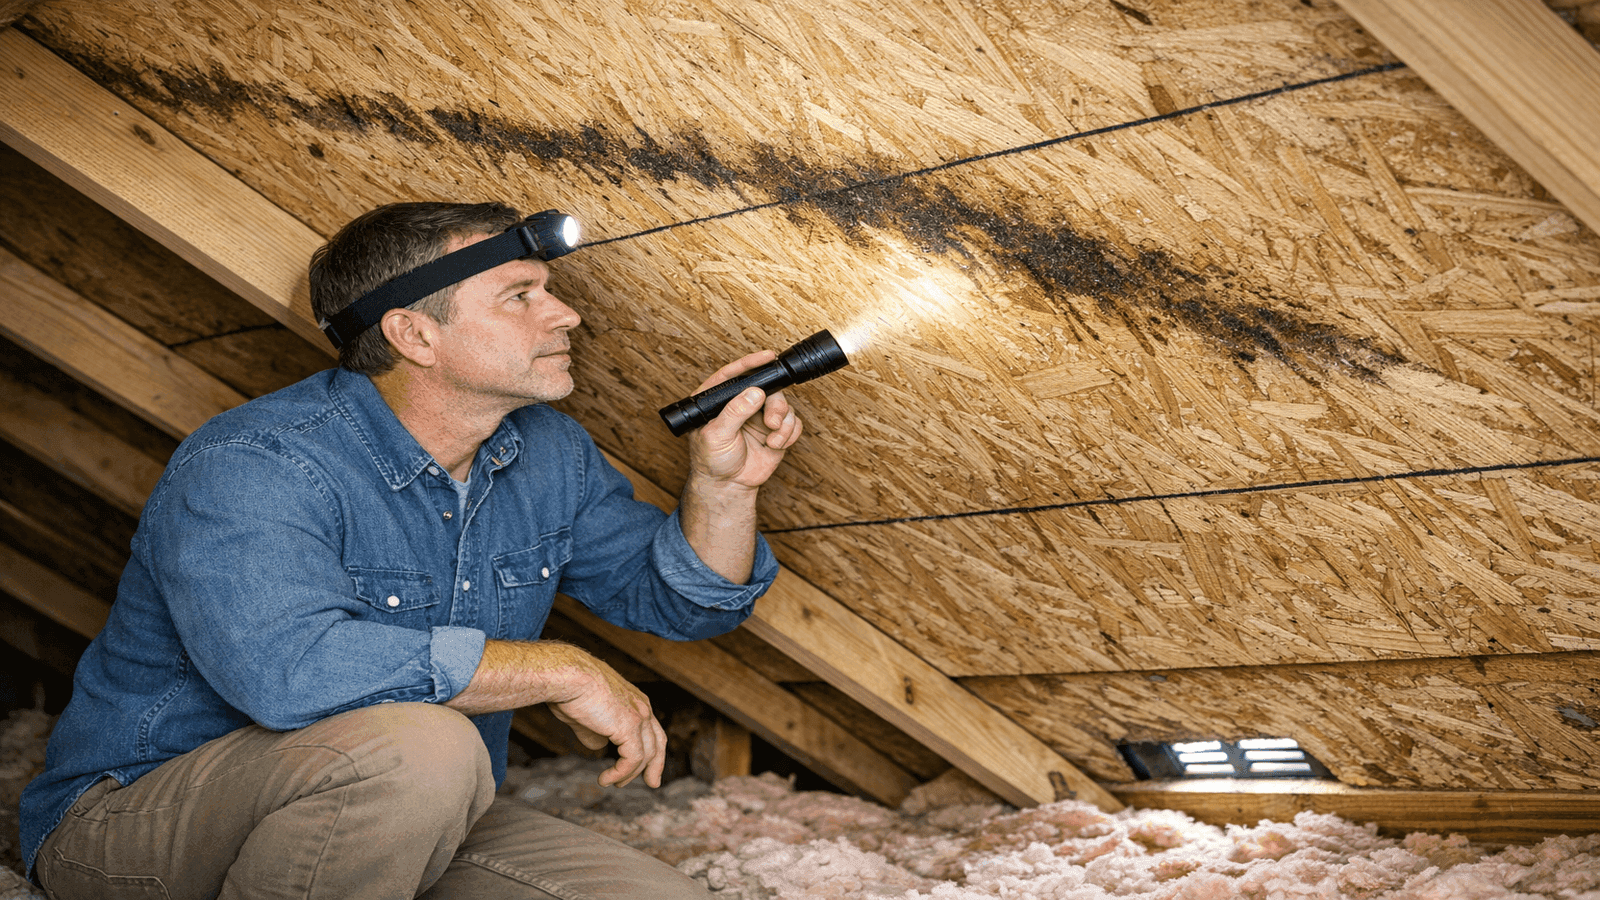
Photo: Homeowner with headlamp inspecting darkened moisture stain on OSB decking in residential attic to trace source of roof leak
The 7 Most Common Roof Leak Sources
Experienced roofers know that 85% of all residential roof leaks come from one of seven locations [1]. When you can't find the source through attic inspection alone, check these in order before moving to the hose test.
1. Pipe boots -- The rubber collar around vent pipes (plumbing stack, bath exhaust) cracks at the rubber-to-pipe junction at 8-15 years. The crack is usually on the south-facing side from UV exposure. This is the single most common roof leak James finds on homes over 10 years old. Cost to fix: $150-$300 per boot.
2. Step flashing at walls -- Z-shaped metal flashing where the roof meets a vertical wall (dormer, addition, chimney sides). Settlement and thermal expansion pull these away from the wall sheathing over time. Usually visible as a gap you can slide a finger behind. Cost to fix: $300-$800 for a section.
3. Valley flashing -- Open valleys collect leaves and debris that hold moisture. Closed valleys wear at the center seam where shingles overlap. Leaks often appear only during heavy rain when water backs up. Cost to fix: $400-$1,200 depending on length.
4. Chimney flashing -- The counter-flashing that inserts into the mortar joint separates as mortar cracks and spalls. Most common on chimneys over 20 years old. Check the mortar joint where the metal bends into the brick -- a gap there is your leak. Cost to fix: $400-$1,000.
5. Skylight perimeter -- Most skylights don't leak through the glass; they leak at the corner seals where the curb flashing meets the roof. Look for cracked butyl tape or separated flashing at the four corners. Cost to fix: $200-$600.
6. Ridge cap shingles -- Wind events at 50+ mph frequently lift or blow off ridge caps. Because they're at the peak, they're hard to see from the ground. A ridge cap that looks intact may have cracked sealant underneath. Cost to fix: $150-$500 depending on length affected.
7. Nail pops -- Over time, fasteners back out of the decking as wood expands and contracts. Each backed-out nail lifts the shingle above it and creates a water entry point. They're invisible from the ground but easy to spot from the roof. Cost to fix: $75-$200 for a section.
| Leak Source | Typical Failure Age | DIY Fix Possible? | Repair Cost Range |
| Pipe boot | 8-15 years | Yes | $150-$300 |
| Step flashing | 15-25 years | With experience | $300-$800 |
| Valley flashing | 20-30 years | No -- requires re-flashing | $400-$1,200 |
| Chimney flashing | 20-30 years | No -- mortar work required | $400-$1,000 |
| Skylight perimeter | 10-20 years | With care | $200-$600 |
| Ridge cap | After wind events | Yes | $150-$500 |
| Nail pops | 10-20 years | Yes | $75-$200 |
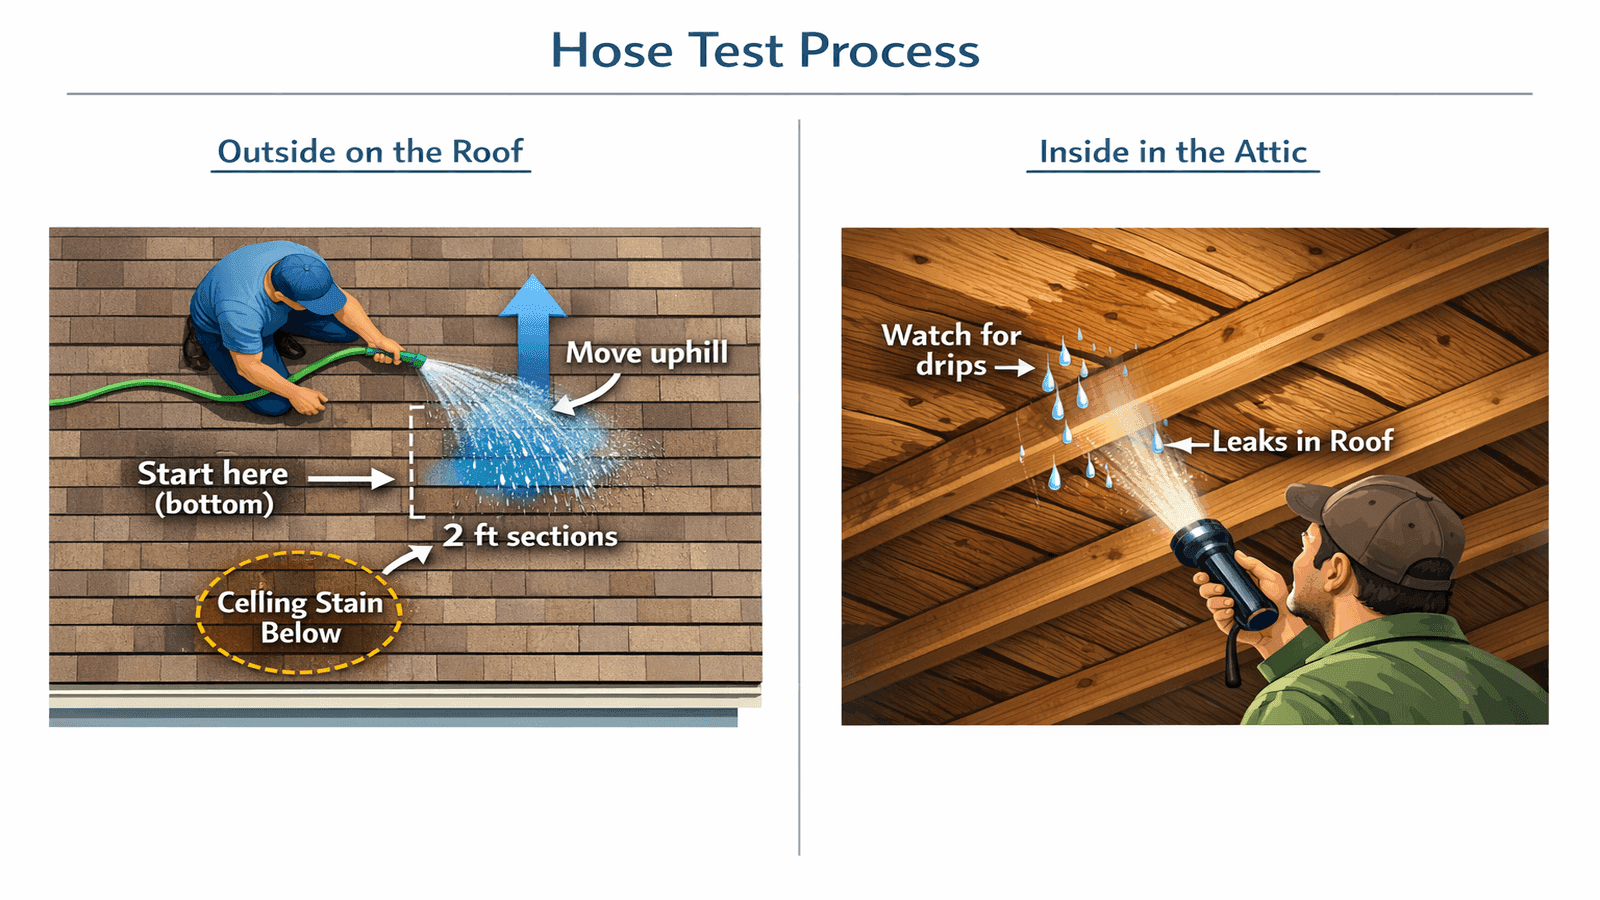
Photo: Diagram showing two-person hose test for roof leak detection with one person soaking sections from the bottom up on the roof and a partner watching from inside the attic
How to Find a Leak in a Flat or Low-Slope Roof
Flat and low-slope roofs leak differently than pitched roofs, and they're significantly harder to locate without professional tools. Because water barely moves on a flat surface, it can pool for hours before finding a seam or penetration to enter through. The leak you see inside may originate 10-20 feet away from the ceiling stain [7].
Visual inspection on flat roofs: Walk the membrane slowly, looking for blisters (air or water trapped under the membrane), open seams, cracked flashing at parapet walls, and debris accumulation around drains. Any standing water more than 48 hours after rain indicates a drainage slope problem.
Check penetrations first. The licensed roofers in our NearbyHunt network report that 80% of flat roof leaks originate within 3 feet of a penetration -- HVAC curbs, drain pipes, electrical conduits, and plumbing vents. Check the sealant around every penetration before investigating field membrane [5].
Thermal imaging is the most accurate tool for flat roofs. Wet insulation under a membrane retains heat longer than dry insulation, showing up as warm spots in an infrared image taken at dusk as the roof cools. Professional thermal inspection costs $200-$500 and pinpoints wet areas that visual inspection cannot find.
Flat roofs are why I tell homeowners not to guess. On a pitched roof, water travels uphill to source -- so you can trace it. On a flat roof, water travels sideways or pools, and I've found sources 20 feet from where a homeowner was certain the leak was. Thermal imaging is how I find flat roof leaks, not a garden hose.
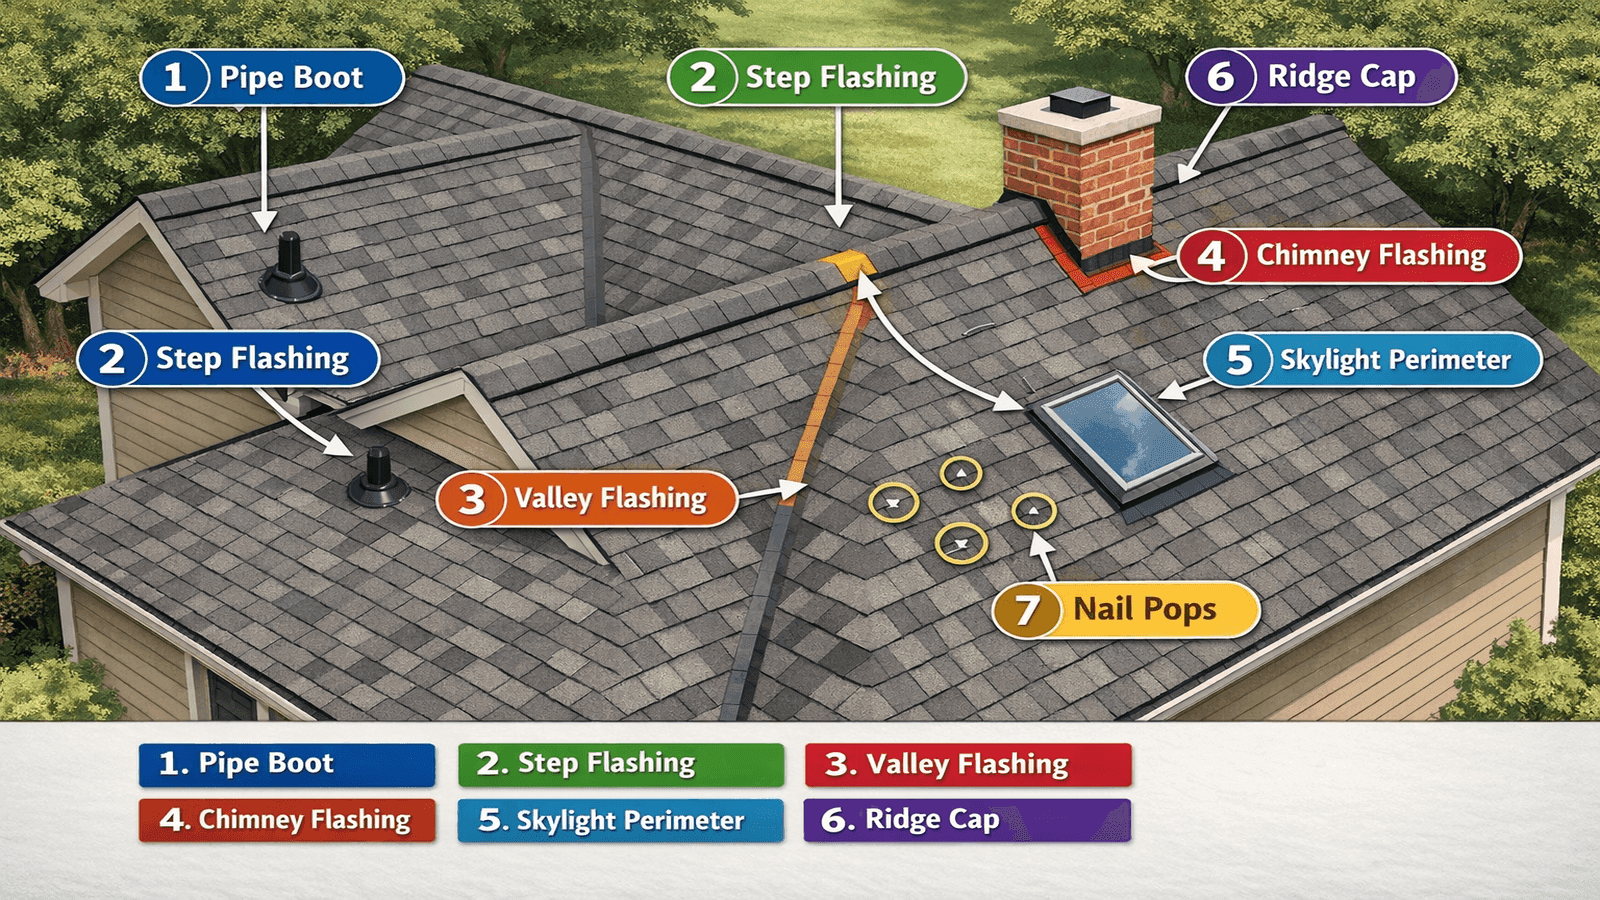
Photo: Annotated diagram of a residential asphalt shingle roof showing all 7 common leak source locations including pipe boots, step flashing, valley, chimney, skylight, ridge cap, and nail pops
Real-World Case Study: Tracking a Tricky Leak
David K. of Memphis, Tennessee had a ceiling stain in his upstairs hallway that appeared every heavy rain for two years. He'd had two contractors look at it -- one replaced three shingles, one resealed the chimney. Neither fixed it. When he called James, the ceiling stain was getting larger.
James started in the attic. He found a faint brown trail in the OSB decking that traced uphill past the chimney and ended at the intersection of a dormer wall. The step flashing on the east side of the dormer had separated from the wall sheathing by nearly 3/4 of an inch -- enough to let wind-driven rain enter, but not enough to leak during light rain. That's why it only showed up in heavy storms.
The fix took 45 minutes: remove three courses of shingles adjacent to the dormer, reset and re-nail the step flashing, apply butyl tape at the wall junction, reinstall shingles. Total repair cost: $380. After two years and two failed repairs, the problem was an attic trail no bigger than your palm.
The lesson: always follow the evidence in the attic before touching the roof.
Get quotes from top-rated pros.
When You Can't Find the Leak: Call a Professional
Some roof leaks resist DIY detection. These situations warrant a professional with specialized equipment [4]:
Intermittent leaks that only occur during specific wind directions, ice dams, or sustained driving rain are nearly impossible to replicate with a garden hose. A pro with thermal imaging can often find wet insulation that confirms where previous infiltration occurred, even without the leak actively running.
Inaccessible attics with full insulation covering the decking remove your ability to trace the water trail. Blown-in insulation is especially problematic because water can travel 10+ feet before you'd ever see it.
Soft spots without visible staining on the exterior indicate advanced deck rot -- the decking may need replacement before the source can even be accessed.
| Situation | DIY Detection Possible? | Professional Method | Approximate Cost |
| Stain near chimney or vent | Usually yes -- attic trace + hose test | Infrared scan if hose test fails | $200-$400 |
| Intermittent leak (only in storms) | Difficult | Thermal imaging post-rain | $300-$500 |
| Flat roof, no visible damage | No | Thermal imaging | $300-$600 |
| Inaccessible attic | No | Infrared scan + probe | $400-$700 |
| Leak with no ceiling stain | No | Electronic leak detection | $400-$800 |
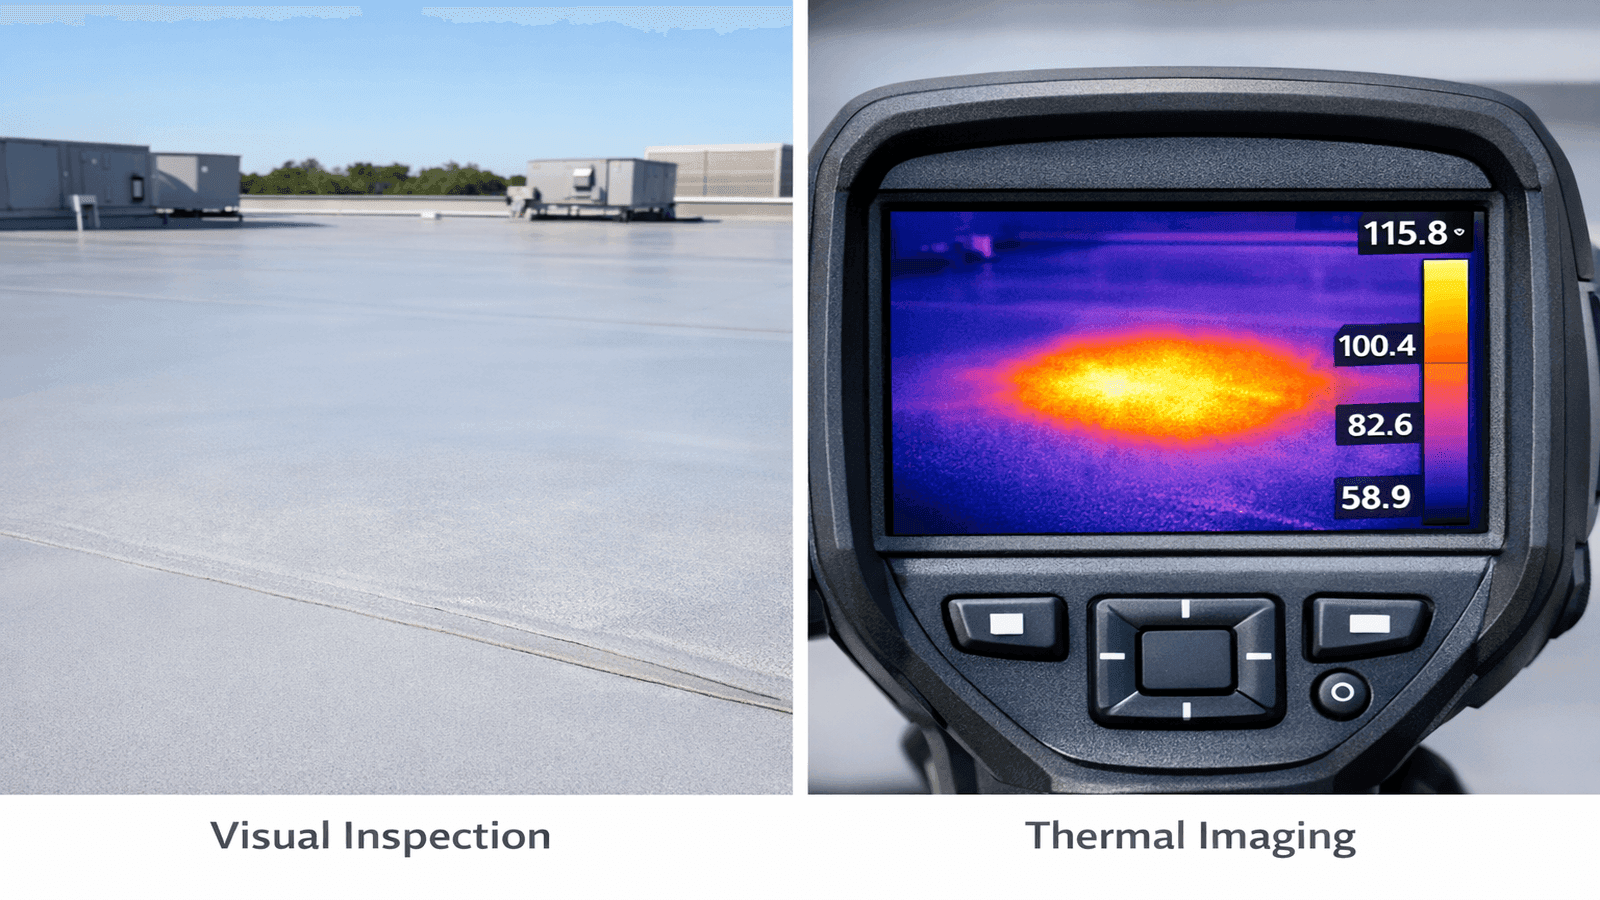
Photo: Side-by-side comparison showing a visually normal flat roof membrane on the left and the same area captured by thermal imaging camera revealing a bright hotspot of trapped moisture on the right
Conclusion
Finding a roof leak is a process of elimination, not guesswork. Start in the attic, follow the trail of darkened wood toward the ridge, and use the hose test to confirm the zone before touching anything on the roof. Check the seven most common failure points -- pipe boots, step flashing, valleys, chimney flashing, skylights, ridge caps, and nail pops -- before assuming the problem is anywhere else.
If you find the source, act fast. A small leak sealed within 48 hours is a $150 repair. The same leak ignored for three months is a $2,000 decking replacement.
For flat roofs or leaks you simply cannot locate, thermal imaging is worth every dollar. Find licensed roofing contractors in your area through NearbyHunt who specialize in leak detection and emergency repair.
Disclaimer: Roof leak detection and repair costs cited are national averages for 2026 and vary significantly by region, roof type, and contractor availability. DIY repairs carry inherent safety risks; always use appropriate fall protection on any roof slope. Obtain 2-3 written quotes from licensed roofing contractors before committing to repair work.
Sources & References
- [1] National Roofing Contractors Association. (2025). "Residential Roofing Maintenance Guide." https://www.nrca.net
- [2] International Code Council. (2024). "IRC Section R806 -- Attic Ventilation." https://www.iccsafe.org
- [3] FEMA. (2024). "Homeowners Guide to Retrofitting, 3rd Edition." https://www.fema.gov
- [4] InterNACHI. (2025). "Roof Inspection Standards of Practice." https://www.internachi.org
- [5] Forbes Home. (2026). "Roof Leak Repair Cost Guide." https://www.forbes.com/home-improvement/roofing
- [6] Bob Vila. (2025). "How to Find a Roof Leak." https://www.bobvila.com
- [7] This Old House. (2025). "Roof Repair: How to Fix Common Leaks." https://www.thisoldhouse.com

James is a licensed roofing contractor with 20 years of experience in roof installation, inspection, and repair across the U.S. South and Midwest. He specialises in asphalt shingles, metal roofing, and storm damage restoration. On NearbyHunt, James offers practical advice on roof maintenance, insurance claims, and selecting the right materials for long-lasting protection.

Jacob is a licensed roofing contractor with over 18 years of experience in roof inspection, installation, and restoration. Based in Texas, he has led hundreds of successful roofing projects across residential and commercial properties. Jacob is also a certified storm damage specialist, ensuring that all NearbyHunt roofing content meets industry best practices and safety standards.