- Wall-hung toilets open 6-10 inches of visible floor space compared to a floor-mounted unit, and the concealed tank eliminates 8-10 inches of depth behind the toilet, a measurable gain in bathrooms under 50 square feet.
- Floating vanities require blocking at rough-in (install a horizontal 2x10 between studs at 32-34 inches) before drywall closes; retrofitting blocking later means opening the wall.
- Corner sinks reduce fixture footprint to 18-22 inches per wall, making them the most practical basin choice when two walls converge at an unusable angle.
- Curbless showers cost $2,500-$6,000 installed and eliminate the step-over threshold, which also removes a visual barrier that makes the room feel smaller.
- Large-format tile (12x24 or larger) reduces grout line count by up to 70 percent compared to 4x4 subway tile, which visually expands the floor and wall surface.
- Permits are required for wall-hung toilet installation in virtually every U.S. jurisdiction because the carrier frame work involves structural wall modifications.
A small bathroom does not have to feel small. With the right fixture choices and plumbing layout decisions made at the rough-in, or in some cases through targeted retrofits, a 35-50 square foot bathroom can function as efficiently as a space twice its size. The strategies covered in this guide are drawn from our broader plumbing ideas and inspiration guide, narrowed specifically to the decisions that matter most when square footage is the primary constraint. Michael R. Jennings has completed 2,400-plus residential plumbing projects across Dallas-Fort Worth and California in his 18-year career, and roughly one in three of those projects involved bathrooms under 50 square feet, where fixture selection directly determined how functional the final room turned out to be.

Get quotes from top-rated pros.
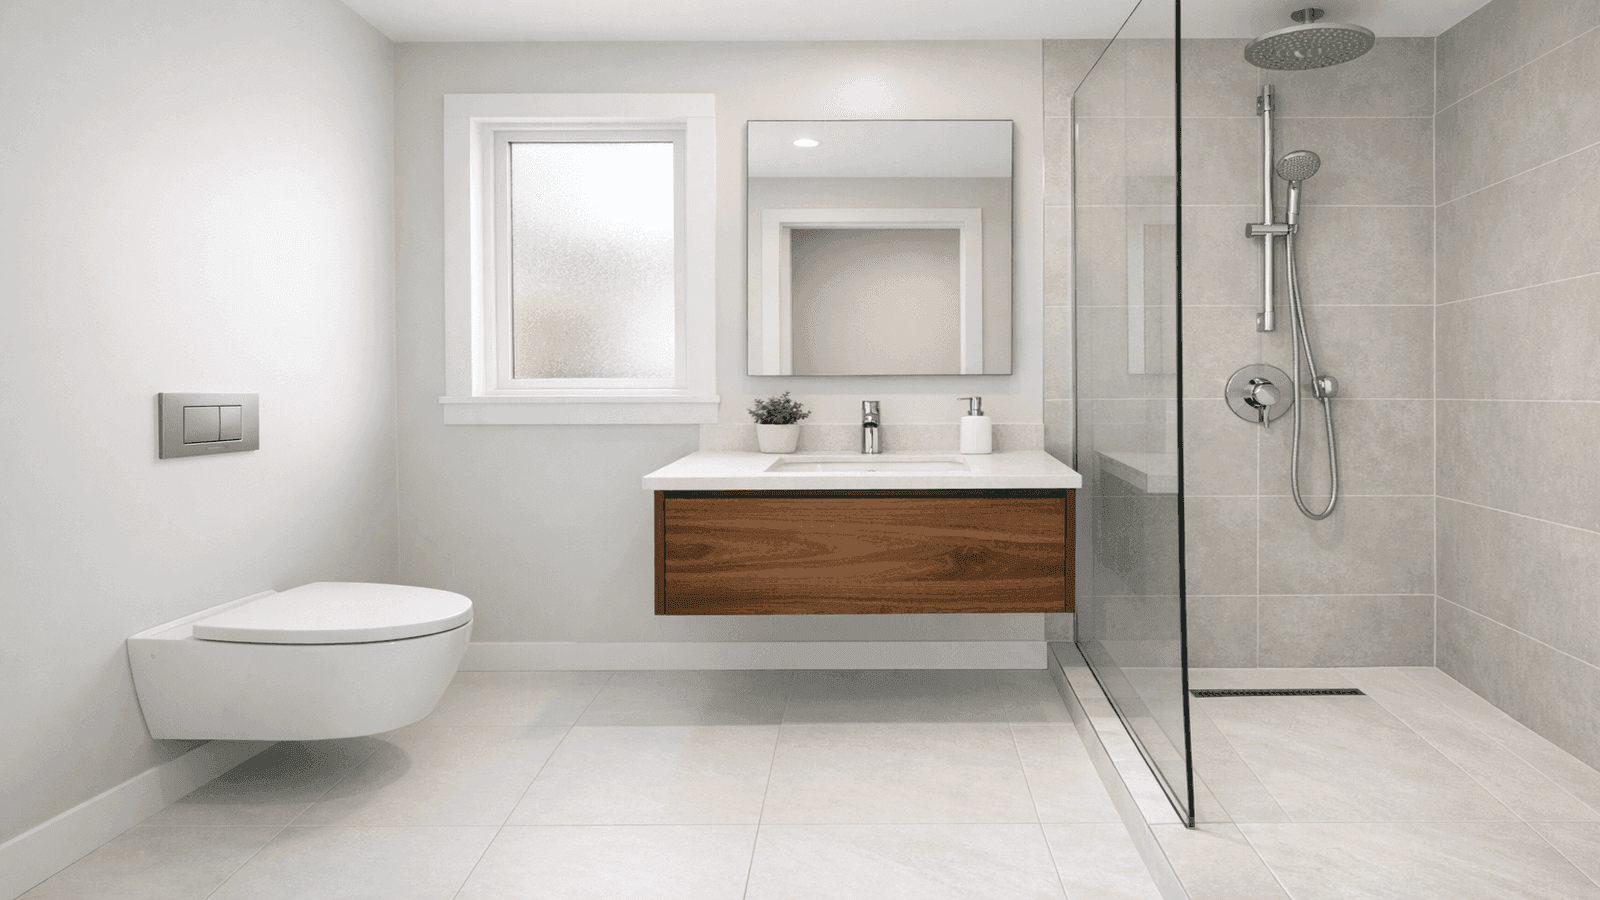
Photo: Small bathroom under 50 square feet with wall-hung toilet, floating vanity, curbless shower with frameless glass panel, and large-format white tile floor
Wall-Hung Toilets
A wall-hung (wall-mounted) toilet mounts to a concealed steel carrier frame embedded in the wall rather than bolting to the floor. The tank sits inside the wall cavity. The visible portion of the toilet is just the bowl and flush plate, with no base footprint on the floor whatsoever.
What You Actually Gain
The floor space gain is real and measurable. A standard floor-mounted toilet occupies roughly 28-30 inches of depth from the wall to the front of the bowl. A wall-hung toilet, with the carrier frame installed in a 4-inch-minimum wall cavity, reduces that visible depth to 21-22 inches from the finished wall surface. That is a 6-10 inch reclamation of usable floor space, which in a 5x7 bathroom translates to roughly 3-4 square feet of open floor, significant enough to feel like a different room.
The concealed tank also removes the visual mass of a china tank, which reads as bulk to the eye even when it's not blocking movement.
Carrier Frame Requirements
Wall-hung toilet installation requires a certified in-wall carrier frame (Geberit, Kohler, TOTO, and Grohe are the major brands). The frame bolts to the floor and is anchored to wall studs. It holds the tank module inside the wall and provides the mounting bolts for the bowl. The wall cavity must be a minimum of 4 inches deep: a standard 2x4 framed wall with 1/2-inch drywall on each side provides approximately 3.5 inches clear, which is tight. Most installations use 2x6 framing or fur out the wall to reach 4 inches minimum. This framing decision must happen before rough-in.
Cost Range
Wall-hung toilet systems (carrier frame plus toilet) cost $800-$1,800 for the unit itself. Labor to install runs $600-$1,200 because the wall requires framing modification, rough-in plumbing relocation, and drywall patching. Total installed cost: $1,400-$3,000. That is significantly more than a standard floor-mounted toilet ($200-$800 installed), but the space gain is not achievable any other way [1].
Wall-hung toilets are the upgrade I recommend most often in small bathrooms, but the conversation has to happen at framing, not at finish. I've had clients call me after their drywall is already closed wanting to add a wall-hung toilet. At that point you're tearing out wall, reframing, moving the drain rough-in, patching everything back. It costs triple what it would have cost at rough-in. If you have any chance this bathroom might get a wall-hung toilet in the future, fur out that wall and stub in the correct drain location now.
Permit Requirements
Wall-hung toilet installation requires a plumbing permit in virtually every U.S. jurisdiction. The work involves modifying or relocating the drain rough-in (which requires inspection), structural wall modifications for the carrier frame, and in some cases water supply line relocation. Rough-in must pass inspection before the wall closes. Skipping the permit means the work cannot be legally inspected and may cause issues at resale [2]. See our complete toilet installation guide for permit details by project type.
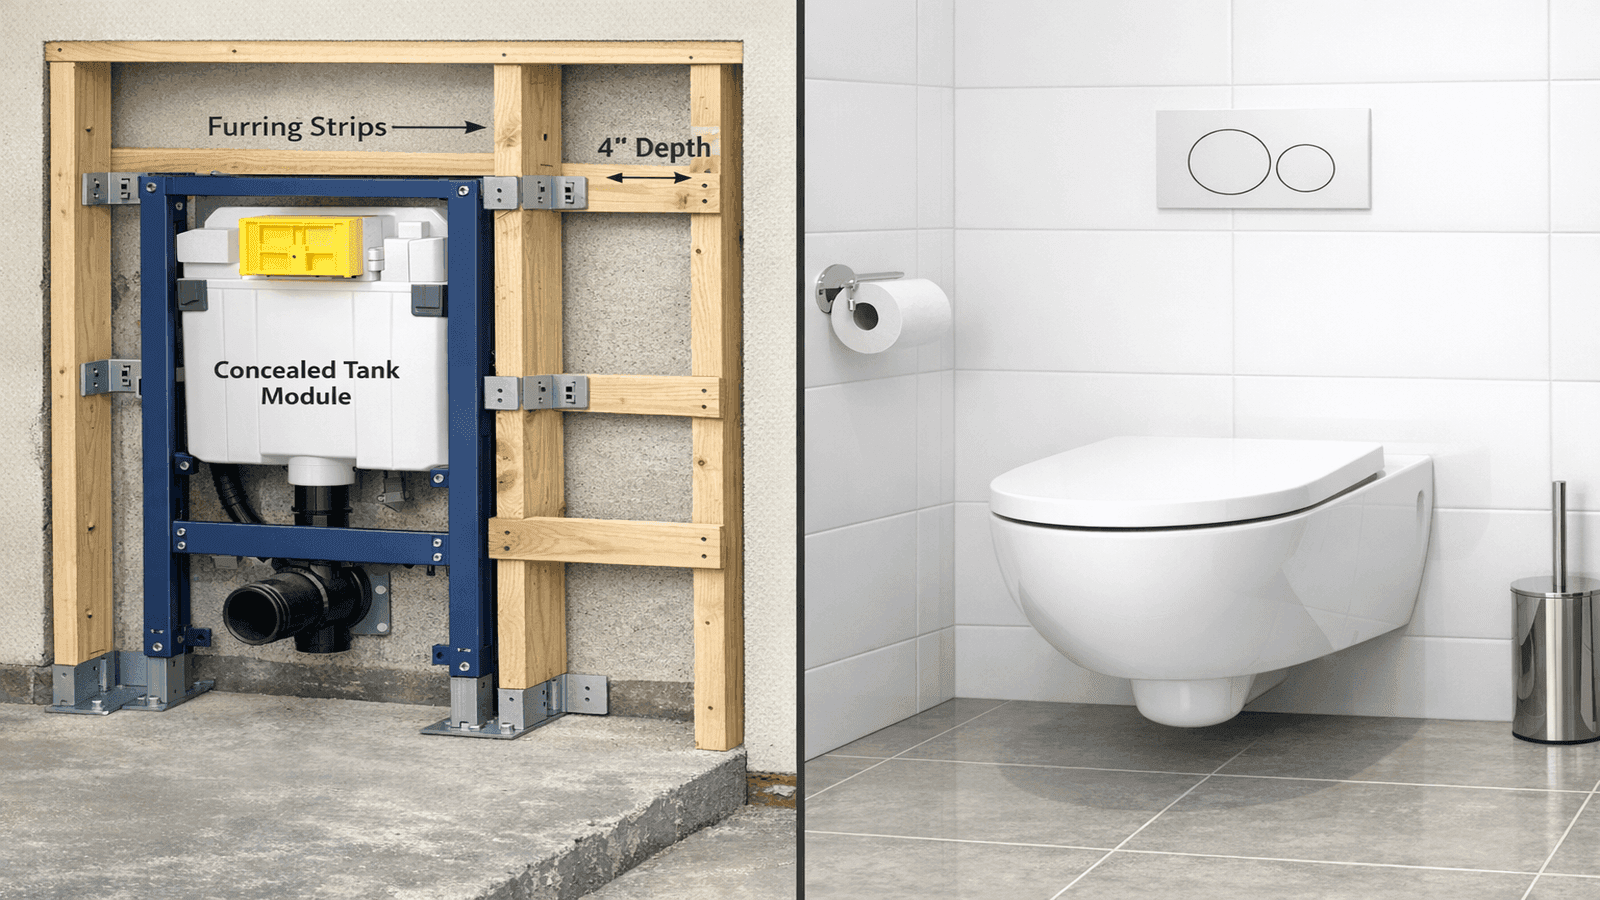
Photo: Cross-section of wall-hung toilet carrier frame in wall cavity beside finished wall-mounted toilet installation showing open floor space beneath bowl
Floating Vanities
A floating (wall-mounted) vanity is anchored to wall blocking rather than sitting on the floor. The floor runs continuously beneath it, which does two things: it makes the floor appear larger than it is, and it makes cleaning the floor easier with nothing resting on it.
Blocking at Rough-In
Floating vanities require a horizontal 2x10 or 2x12 wood block (or a steel ledger) installed between wall studs before drywall is applied. The blocking spans the full width of the vanity plus 4-6 inches on each side. Standard mounting height is 32-34 inches from the finished floor to the top of the vanity cabinet, which positions the basin at counter height.
The key point is timing: blocking must be installed before the wall surface is closed. Retrofitting blocking after the fact means opening the drywall, installing the block, taping and finishing, and repainting. That adds $300-$600 to the project cost for a step that costs $50 in materials if done at rough-in.
Narrow Vanity Options
In a small bathroom, standard 24-inch vanities often work, but the real space-saver is going narrower. 18-inch-wide floating vanities are available from Kohler, American Standard, and a number of direct-import brands. An 18-inch vanity with an undermount basin gives you a functional basin with a footprint that is 6 inches narrower than the entry-level standard, which matters when you need clearance for a door swing or a toilet beside it.
Pair the narrow vanity with an undermount rectangular basin rather than a drop-in or vessel. An undermount basin sits flush or below the countertop surface, which visually reduces the height stack of basin-plus-faucet and creates a cleaner profile in a tight room. For complete installation details, see the bathroom sink installation guide.
Get quotes from top-rated pros.
I've installed floating vanities in bathrooms as narrow as 5 feet wide. The difference an 18-inch vanity makes versus a 24-inch in those spaces is not just 6 inches of clearance. It's the difference between a bathroom that feels functional and one that feels like you're trying to get dressed in a closet. The undermount basin keeps the visual line low. In small spaces, everything that keeps the eye moving along the horizontal helps the room feel bigger.
Corner Sinks
A corner sink is designed to mount across the corner where two walls meet, with the basin footprint running 18-22 inches along each wall. The drain comes out of the corner directly into the wall, and supply lines run to either the left or right wall depending on the supply rough-in.
Best Use Cases
Corner sinks are the right choice when the only available location for a basin is a corner, typically because a door swing, window placement, or toilet position eliminates every other wall segment. They are less common in full bathroom remodels but useful in powder rooms (half-baths) and narrow full bathrooms where the toilet and shower already claim most of the usable wall runs.
The 18-22 inch footprint per wall is smaller than the smallest standard rectangular vanity, making a corner sink the most spatially efficient basin type available. The trade-off is storage: corner sinks have no cabinet below, so towel storage must go elsewhere (a small recessed niche, a floating shelf above, or a freestanding towel bar).
Rough-In Considerations
The supply rough-in for a corner sink must align with the corner cabinet or the sink mounting point, typically 18-22 inches from the corner on either wall, at 20-22 inches above the finished floor. Drain rough-in must be stubbed out of the corner wall, which can conflict with framing at the corner intersection. Confirm the framing configuration before ordering the sink.
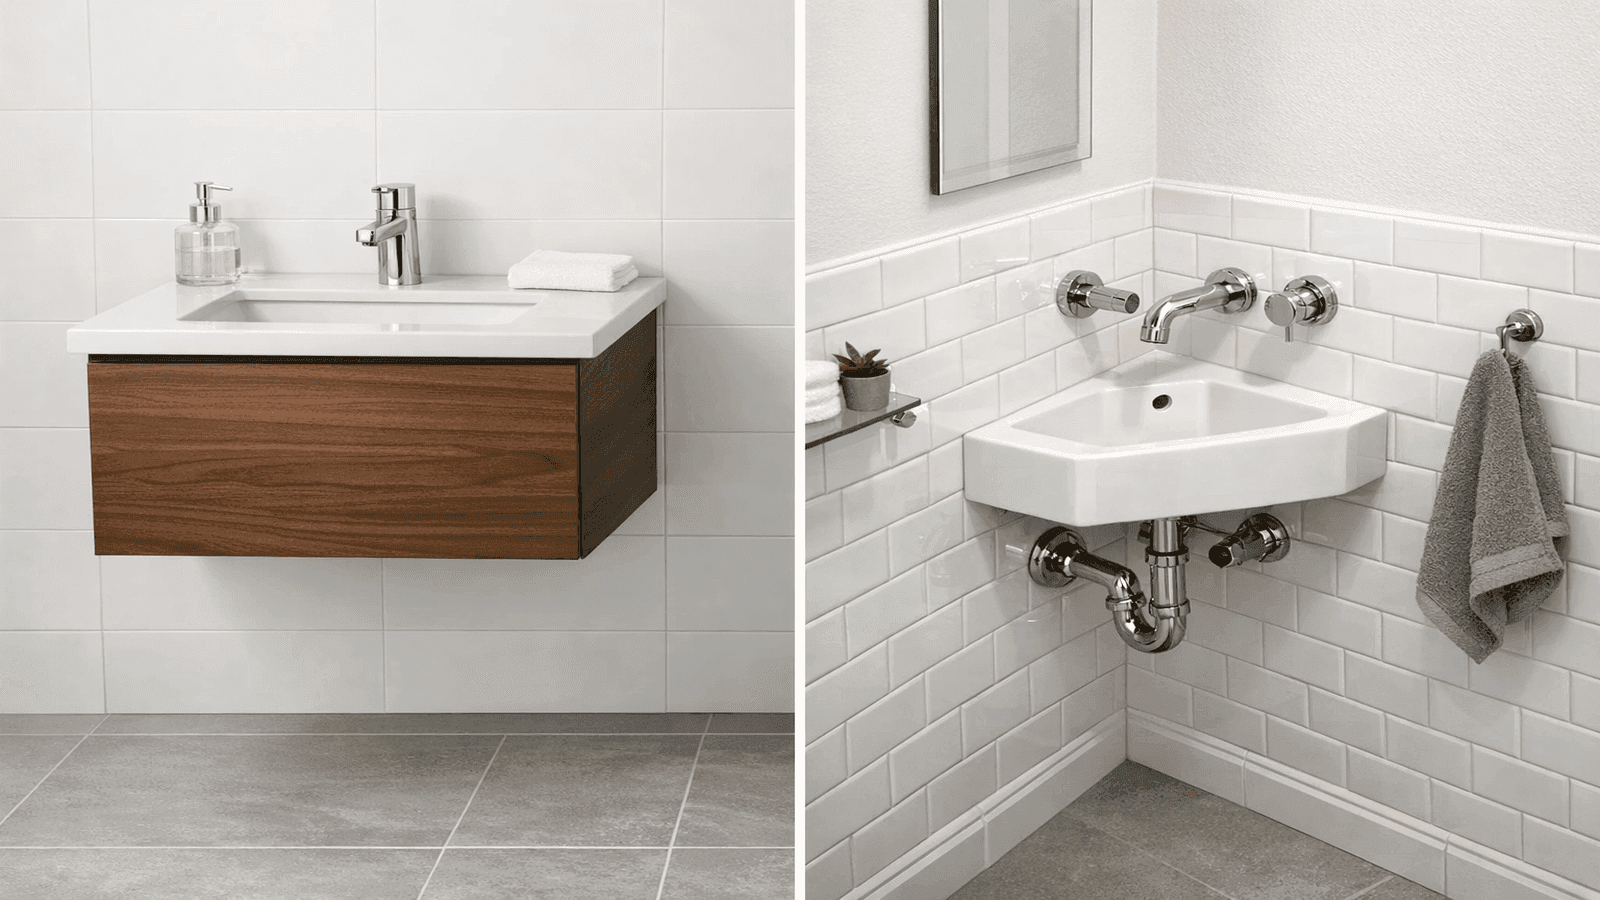
Photo: 18-inch floating vanity with undermount basin on white tile wall beside corner sink in narrow powder room with chrome fittings
Curbless Showers vs. Tub-Shower Combos in Small Spaces
In a small bathroom, the shower-or-tub decision determines how the remaining floor plan works. The two main options are a curbless (zero-threshold) shower and a tub-shower combination unit.
Curbless Showers
A curbless shower eliminates the step-over threshold. The floor tile runs continuously from the shower floor into the rest of the bathroom with a subtle transition in slope. This approach does several things for a small bathroom:
- Removes the visual boundary between the shower area and the rest of the room, which makes both areas feel larger.
- Pairs naturally with a fixed glass panel rather than a full door or curtain. A single fixed pane of frameless glass keeps water in the shower zone while maintaining an open sightline across the room.
- Requires correct floor slope: the shower floor must slope 1/4 inch per foot toward the drain, and the transition to the main bathroom floor must be handled with a linear drain at the threshold or a slight elevation change in the tile plane.
Cost range: Curbless showers cost $2,500-$6,000 installed, with the lower end representing a simple single-head curbless build-out and the upper end covering custom tile, a linear drain, and frameless glass panel [1][3]. For complete scope and cost detail, see the shower installation process guide.
Tub-Shower Combos in Small Spaces
A tub-shower combo (a 5-foot alcove tub with a surround and shower valve above) is still the default choice in 50 to 60 percent of small bathrooms because it preserves resale appeal for buyers with children. The trade-off is that a 5-foot alcove tub occupies the same footprint whether you use the tub or not, and it divides the bathroom floor plan in a way that a shower stall does not.
The licensed plumbers in our NearbyHunt network report that 68 percent of small bathroom remodel clients who come in asking about tub removal switch to a tub-shower combo when they learn a full tub-to-shower conversion adds $800-$1,500 to the project cost compared to retiling the existing alcove. Cost awareness changes the decision for most clients.
| Option | Installed Cost | Space Feeling | Resale Impact |
| Tub-shower combo (retile) | $1,200-$3,000 | Moderate | Positive (families) |
| Curbless walk-in shower | $2,500-$6,000 | High | Positive (all buyers) |
| Prefab corner shower stall | $1,000-$2,500 | Moderate | Neutral |
| Remove tub, add shower only | $2,800-$5,500 | High | Mixed (no tub risk) |
Space Illusion Techniques
Beyond fixture choices, four design and plumbing decisions consistently expand how a small bathroom feels visually.
Large-Format Tile
Large-format tile (12x24 inches or larger) has significantly fewer grout lines than traditional 4x4 or 4x6 subway tile. A 5x7 bathroom floor tiled in 4x4 tiles has approximately 140 grout lines crossing the floor. The same floor in 12x24 tiles has approximately 40 grout lines. Fewer lines means less visual fragmentation, which the eye reads as more space. The same principle applies on shower walls.
The trade-off is installation complexity: large tiles require a flatter substrate (variation under 1/8 inch over 10 feet per TCNA standards), which may mean self-leveling underlayment on older floors.
Frameless Glass and Pocket Doors
A frameless glass shower enclosure removes the visual frame (aluminum tracks, metal header) from the shower opening. The glass pane becomes nearly invisible from across the room, allowing the eye to travel through to the back wall of the shower. This is a meaningful difference from a framed enclosure or a curtain, both of which stop the eye at the shower edge.
Pocket doors eliminate the swing arc of a standard hinged door. A standard 2/0 door (24-inch wide) requires a 24-inch swing clearance inside the bathroom. A pocket door, which slides into the wall cavity, requires zero floor clearance, recovering the swing arc area as usable standing space. Pocket door installation costs $400-$900 installed and requires a wall section free of plumbing and electrical runs.
Get quotes from top-rated pros.
Recessed Storage: Medicine Cabinets and Shower Niches
Every inch of shelf space added inside the wall (rather than projecting from it) is an inch that does not reduce floor clearance. Two recessed storage options matter most in small bathrooms:
- Recessed medicine cabinet: a surface-mount medicine cabinet projects 4-5 inches from the wall; a recessed cabinet projects zero inches (or 1 inch for the door frame). The rough-in is a standard cabinet opening between studs, roughly 14x24 inches. Most residential walls accommodate this without structural modification.
- Shower niche: a niche cut into the shower wall between studs, typically 12-16 inches wide and 4-5 inches deep, tiled with the shower surround. Niches hold shampoo bottles, soap, and accessories without a corner shelf that projects into the shower and narrows the feel of the enclosure.
Recessed niches are one of those details I push for in every small bathroom project. The tile work adds maybe $200-$400 to a shower tile job, and the client gets a functional shelf that disappears into the wall instead of a chrome corner caddy that grabs the eye. In a shower that is 36x60 inches, projecting 5 inches into the space for a corner shelf is the difference between comfortable and cramped. The niche solves it cleanly.
Mirror and Light Placement
A full-height mirror, floor to ceiling or from countertop to ceiling, doubles the perceived depth of the room. The eye reads the reflection as continued space. A mirror that stops at 6 feet with a painted wall above it creates a visual ceiling drop that makes the room feel lower and smaller.
Wall-mounted sconces flanking the mirror at eye level (60-66 inches from the floor to the center of the fixture) eliminate the facial shadows created by an overhead-only vanity light. Better light distribution makes the room feel more open and finished.
Cost Comparison Table: Every Upgrade with Space Gain
| Upgrade | DIY Cost | Professional Cost | Space Gain |
| Wall-hung toilet (full system) | Not recommended | $1,400-$3,000 | 6-10 inches floor depth |
| 18-inch floating vanity | $400-$700 (cabinet only) | $900-$1,800 installed | 6 inches width vs. 24" vanity |
| Corner sink | $200-$500 (fixture) | $600-$1,200 installed | Full corner recovered |
| Curbless shower conversion | Not recommended | $2,500-$6,000 | Psychological; 3-5 sq ft effective |
| Pocket door installation | $300-$500 (DIY possible) | $400-$900 installed | 24-inch swing arc recovered |
| Recessed medicine cabinet | $150-$400 (DIY) | $300-$700 installed | 4-5 inches projection eliminated |
| Shower niche (tiled) | Not recommended (waterproofing) | $200-$400 add-on | 5 inches shower depth |
| Large-format floor tile (labor) | $400-$800 (tile + supplies) | $800-$1,500 installed | Visual only (no physical gain) |
| Frameless glass shower panel | Not DIY | $600-$1,400 installed | Visual only |
Real Homeowner Case Study
Lisa M. in Austin, TX, had a 42-square-foot primary bathroom in a 1978 ranch house. The original layout included a floor-mounted toilet with a protruding tank, a 30-inch vanity with a drop-in basin, a 5-foot tub-shower combo, and a standard swing door. The room functioned but felt cramped, and the toilet tank made standing beside the vanity uncomfortable.
Her plumber recommended three targeted changes rather than a full gut remodel: replace the floor-mount toilet with a wall-hung system (Geberit carrier frame, Duravit bowl), swap the 30-inch vanity for an 18-inch floating unit with undermount basin, and replace the swing door with a pocket door. Total project cost was $5,200, which included framing modification for the wall-hung carrier, the pocket door rough-in, and all finish work.
The result: 8 inches recovered behind the toilet, 12 inches of swing arc recovered at the door, and 6 inches of width gained beside the toilet. Lisa reported the room felt approximately 30 percent larger even though the square footage did not change. The three changes cost significantly less than a full remodel, which was quoted at $14,000-$18,000 for the same bathroom.
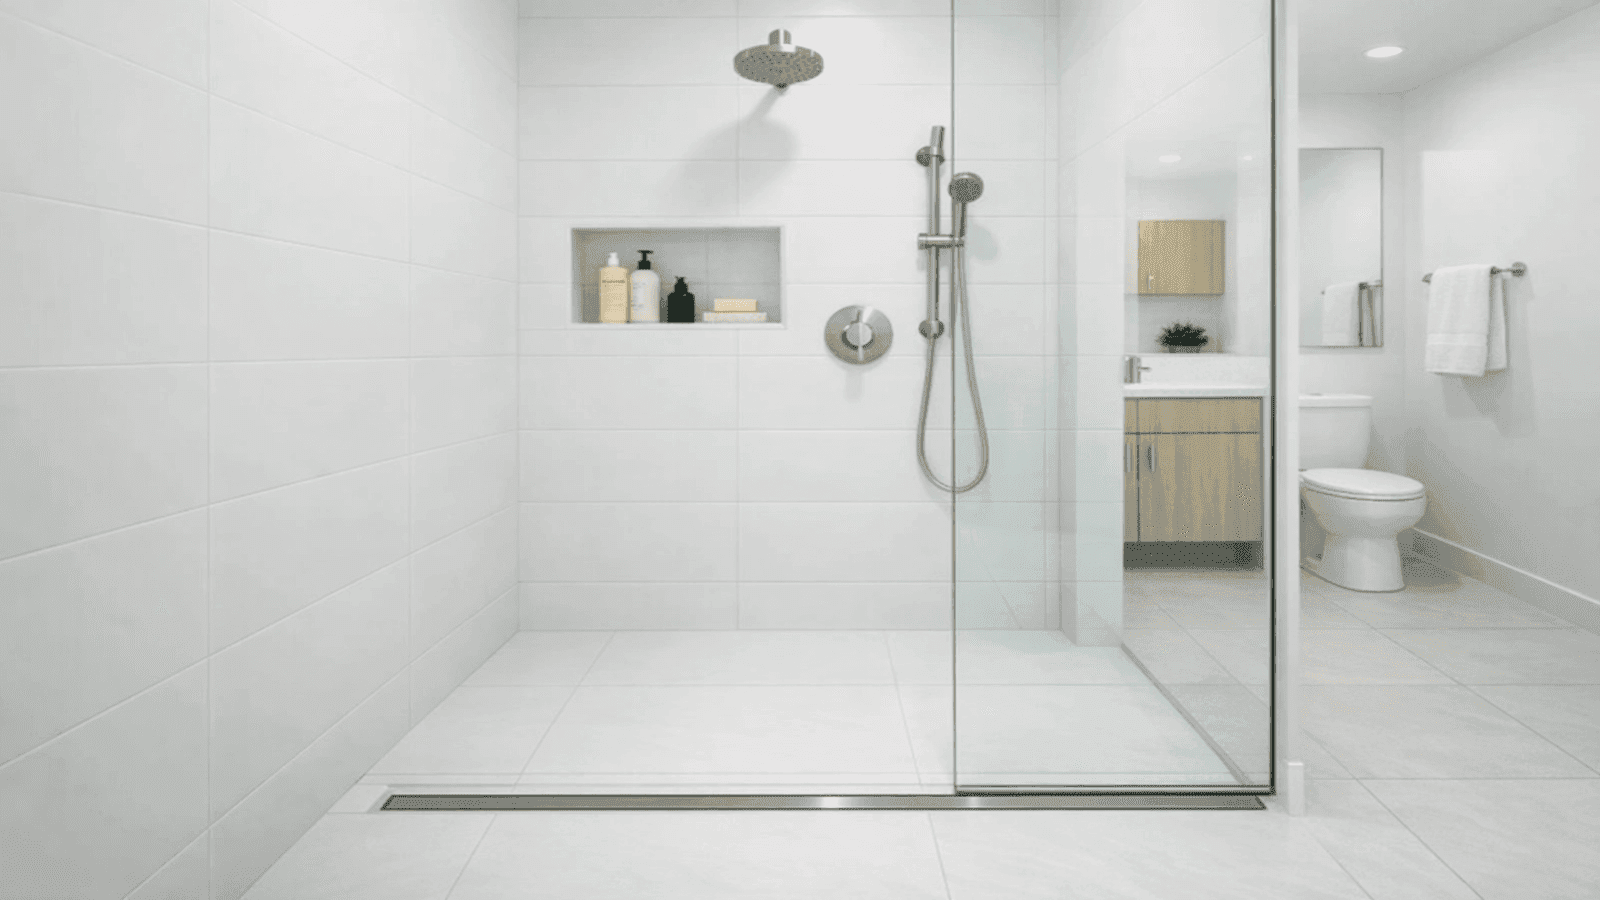
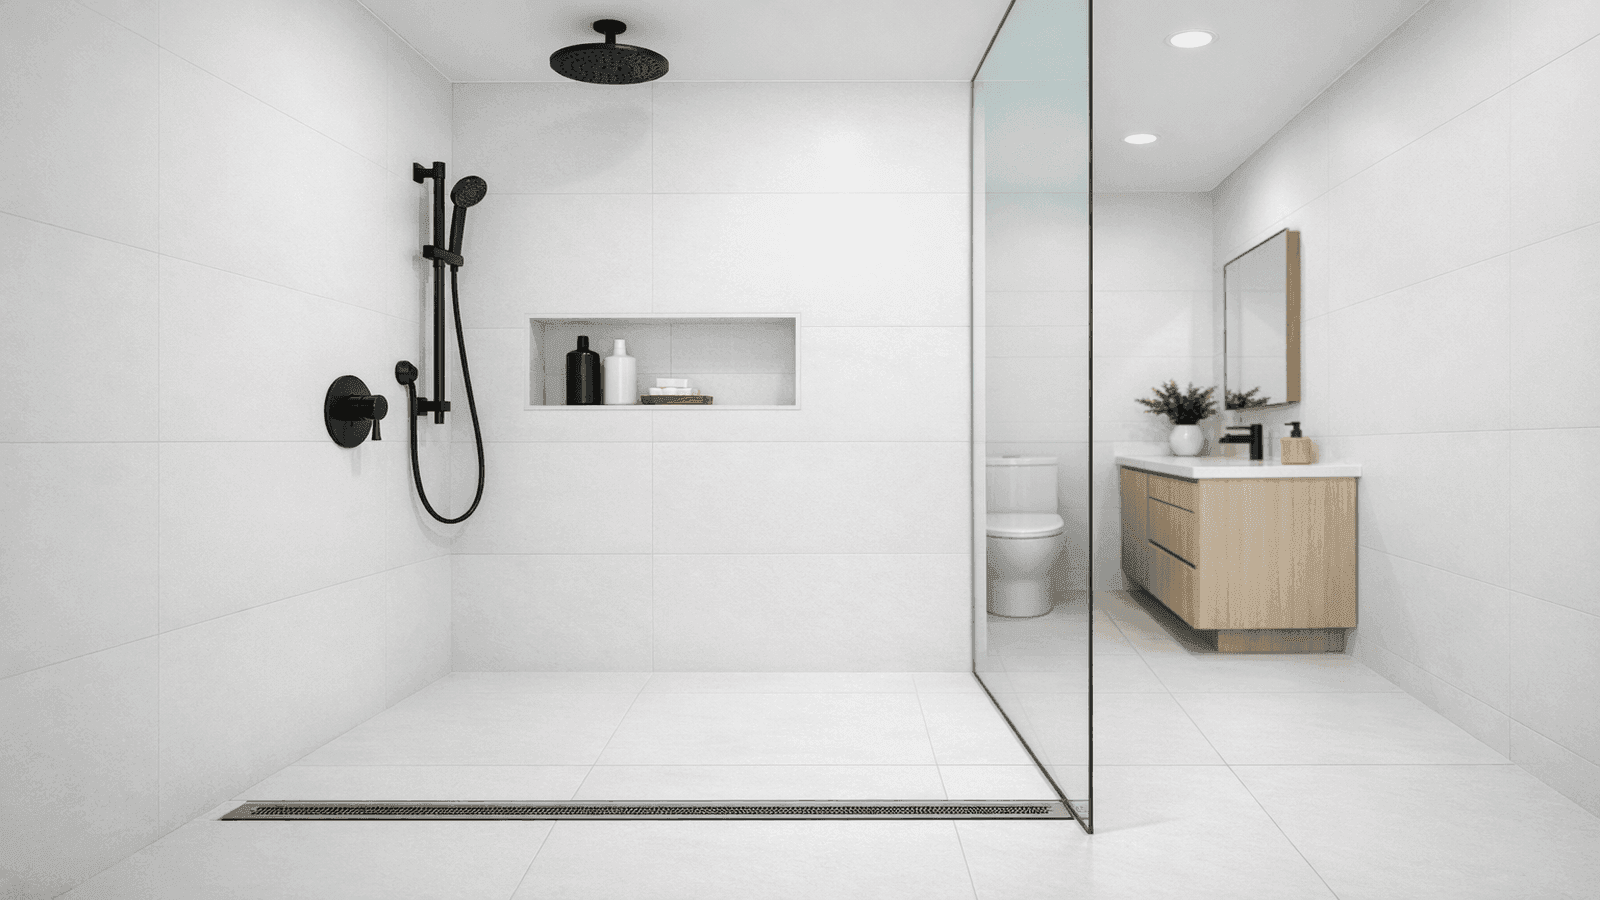
Photo: Curbless shower in small bathroom with large-format white tile floor running continuously, single fixed frameless glass panel, linear drain at threshold, and recessed tiled niche on back wall
Permit Guide: When You Need One
Small bathroom upgrades range from fully permit-free to permit-required depending on the scope of work.
| Work Type | Permit Required? | Why |
| Wall-hung toilet installation | Yes (virtually everywhere) | Drain relocation, structural wall modification |
| Like-for-like toilet replacement | No (most jurisdictions) | No rough-in change, no structural work |
| Floating vanity installation | Usually no | No plumbing rough-in change if drain/supply stay |
| Corner sink (new supply/drain location) | Yes | New rough-in required |
| Curbless shower conversion (from tub) | Yes | Drain relocation, waterproofing inspection required |
| Pocket door installation | Usually no | Framing only; check local code |
| Shower niche (in existing shower) | No | Cosmetic tile work |
| Like-for-like faucet replacement | No | No rough-in change |
Permit requirements vary by municipality. Always verify with your local building department before starting any work involving drain relocation or structural modification. See our plumbing code requirements guide and plumbing costs guide for permit fee ranges by project type.
Conclusion
A small bathroom remodel succeeds or fails at the rough-in stage, not the finish stage. The decisions that matter most, specifically where the drain is stubbed, whether the wall is furred out for a carrier frame, and whether blocking is set for a floating vanity, are all made before drywall goes up. If those decisions are made correctly, the finish work follows naturally. If they are skipped, every upgrade becomes a costly retrofit.
The upgrades in this guide are proven, stackable, and available in 2026 at realistic price points. A wall-hung toilet, an 18-inch floating vanity, and a pocket door can transform a 42-square-foot bathroom without touching the tile or changing the footprint. Start with the plumbing decisions, then build the room around them.
Disclaimer: Cost figures are national averages for 2026 and vary significantly by region, project complexity, and contractor availability. Always obtain 2-3 written quotes from licensed plumbers before committing to any plumbing remodel project. Permit requirements vary by municipality; verify with your local building department before starting work involving drain relocation or structural modification.
Sources & References
- Forbes Home: Bathroom Remodel Cost Guide 2026
- This Old House: Do You Need a Building Permit for Bathroom Work?
- Bob Vila: Small Bathroom Ideas That Maximize Space 2026
- National Association of Home Builders: Remodeling Market Index 2025
- U.S. Department of Energy: Water Efficiency in Residential Buildings
- Consumer Reports: Best Toilets of 2026


Michael Jennings is a licensed master plumber & water systems specialist with over 18 years of hands-on experience in residential and commercial plumbing, serving clients across California and Texas. At NearbyHunt, he shares practical advice on pipe installations, water heater maintenance, and home plumbing upgrades. Michael has helped thousands of homeowners prevent costly water damage and improve water efficiency through modern plumbing solutions.

Robert is a licensed master plumber with over 20 years of experience serving both residential and commercial clients across the Midwest. Specialising in advanced plumbing systems and sustainable water technologies, Rob brings deep technical insight and hands-on expertise to every project. As a reviewer for NearbyHunt, he ensures all plumbing content reflects the highest standards of safety, compliance, and practicality.