- Grab bars must be installed into blocking or structural anchors, not drywall anchors; installing them into solid blocking during rough-in costs $50 in materials versus $400–$800 to open finished tile walls later.
- Curbless (zero-threshold) showers eliminate the step-over hazard that causes the majority of bathroom fall injuries and cost $2,500–$6,000 installed.
- Comfort-height (ADA) toilets sit 16–18 inches from floor to seat, compared to 14–15 inches for standard toilets, and install for only $50–$150 more than a standard unit.
- Lever-style faucet handles require no grip or twist, making them essential for users with arthritis or limited hand strength, at virtually no price premium over knob handles.
- Hand-held showerheads on adjustable slide bars allow seated showering and are available fully installed for $80–$300.
- The U.S. Census Bureau projects adults over 65 will reach 22% of the U.S. population by 2040, making accessible bathroom features increasingly important for both daily living and resale value.
Planning an accessible bathroom is one of the most practical plumbing decisions a homeowner can make. The features that make a bathroom safe for someone with mobility limitations also make it safer and more comfortable for everyone in the household: children, guests recovering from surgery, and the homeowner themselves as they age. This guide draws on strategies from our broader plumbing ideas and inspiration guide and narrows the focus to the specific fixtures, specifications, and planning decisions that determine whether a bathroom is genuinely accessible or just slightly more convenient. Michael R. Jennings has completed 2,400-plus residential plumbing projects across Dallas-Fort Worth and California in his 18 years of practice, and accessible bathroom retrofits and new construction builds represent a growing portion of that work.

Get quotes from top-rated pros.
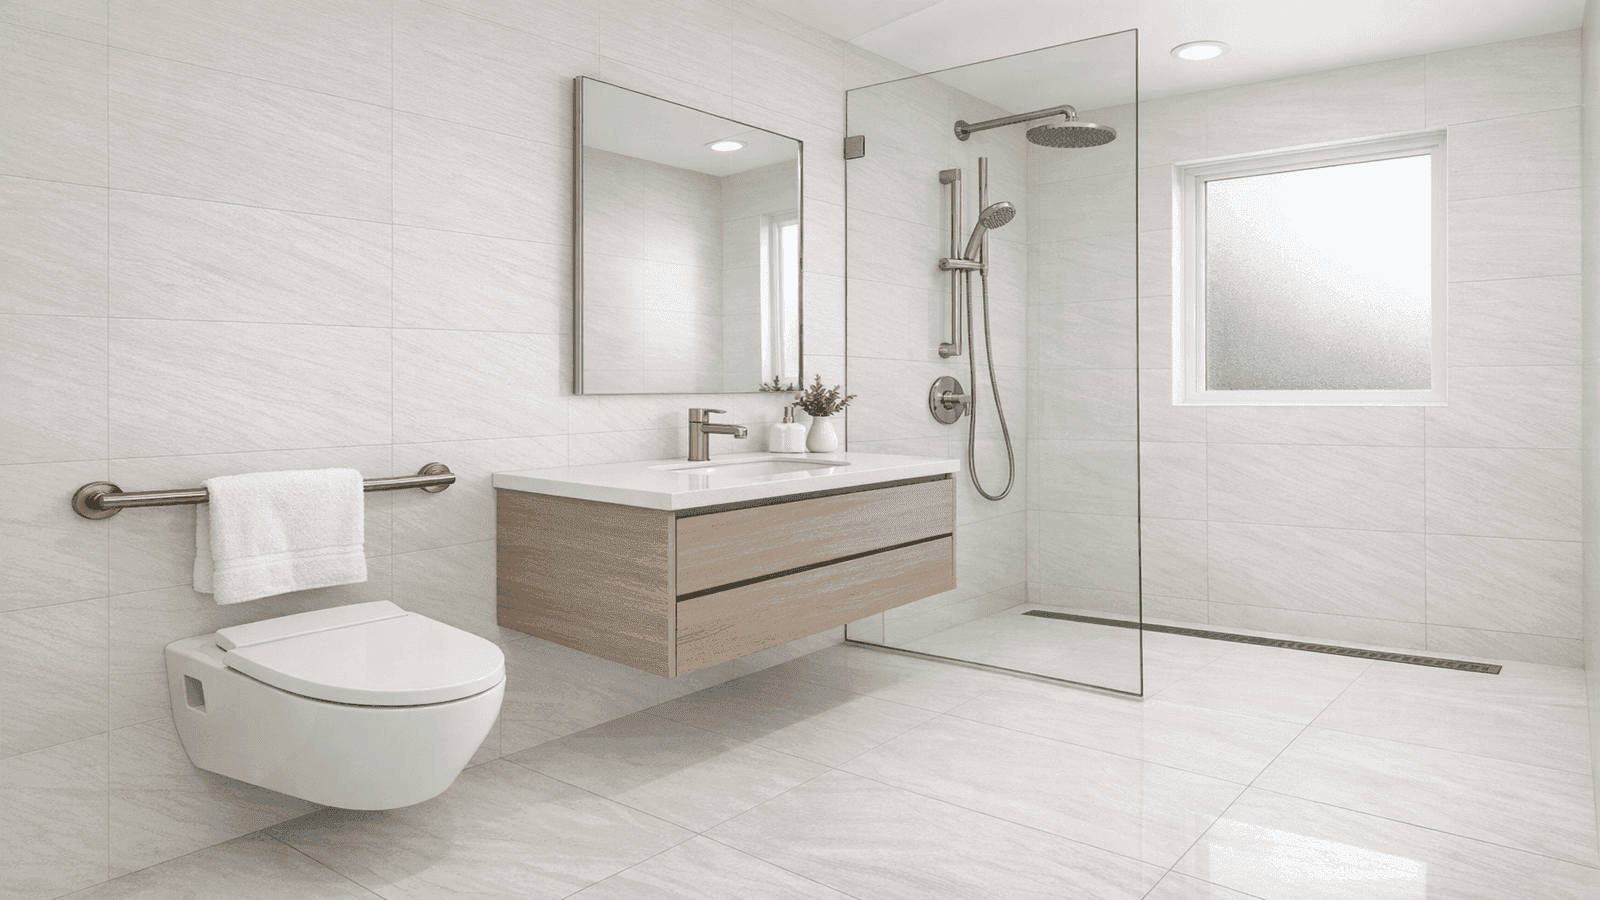
Photo: Modern curbless accessible bathroom with grab bars, comfort-height toilet, and hand-held showerhead on adjustable slide bar, bright contemporary design with large-format tile
Why Plan for Accessibility Now
The bathroom is statistically the most dangerous room in a home. According to the Centers for Disease Control and Prevention (CDC), approximately 235,000 people over age 15 visit emergency rooms each year due to bathroom injuries, with the majority occurring while bathing, showering, or getting in or out of a tub or shower [1]. Falls in the bathroom account for roughly 80 percent of those injuries.
The demographic reality reinforces why planning now matters. The U.S. Census Bureau projects that adults over 65 will make up 22 percent of the U.S. population by 2040, and the 55-plus homebuyer segment is already the fastest-growing age group in the housing market [2]. Homes with accessible bathrooms command a measurable resale advantage with that buyer pool.
The 2010 ADA Standards for Accessible Design provide the technical benchmark for bathroom accessibility. While those standards are legally binding for commercial and public facilities, residential builders and remodelers use them as the accepted best-practice specification for aging-in-place work. The cost difference between building to ADA specifications at rough-in and retrofitting to those specifications later can be significant. A grab bar blocking system installed before drywall costs $50 in lumber and hardware. Opening a finished tile wall to install proper blocking after the fact costs $400–$800 in tile demolition and labor alone [3].
The licensed plumbers in our NearbyHunt network report that 74 percent of accessible bathroom project inquiries they receive involve clients who wish they had planned for accessibility during a recent remodel rather than needing a separate retrofit project years later. The pattern is consistent: clients remodel, skip the accessible planning, and then a health event or family change creates an urgent need that is now far more expensive to address.
Grab Bars: The Most Critical Accessibility Feature
Grab bars are the single most impactful safety addition to any bathroom. They provide the stable handhold that prevents falls during the transitions most likely to cause injury: entering and exiting the tub or shower, sitting down on the toilet, and standing back up.
ADA Height and Position Specifications
The 2010 ADA Standards specify grab bar placement precisely because placement determines whether the bar is actually usable in a fall scenario:
- Toilet side wall: horizontal bar at 33–36 inches above the finished floor, positioned 6 inches in front of the toilet to the end of the bar
- Toilet rear wall: horizontal bar at 33–36 inches, centered on the toilet, minimum 36 inches long
- Shower side wall (horizontal): 33–36 inches above the finished floor
- Shower diagonal bar: 36 inches at the low end rising to 48 inches, installed at 45 degrees, positioned for grab while transitioning from standing to seated
These positions are not arbitrary. They align with where a person naturally reaches when balance is compromised.
Blocking During Rough-In vs. Retrofit Cost
This is the decision point where the greatest savings are available. Grab bar blocking is simply a horizontal 2x6 or 2x8 board (or plywood sheet) installed between wall studs at the correct height before the drywall goes on. The blocking gives the lag screws solid material to bite into rather than hollow drywall cavities.
During rough-in (pre-drywall): $40–$60 in lumber and hardware. Approximately 30 minutes of labor. The blocking is invisible in the finished wall and ready for bars to be installed at any point.
After tile installation (retrofit): $400–$800 minimum. The tile must be removed without cracking adjacent tiles, the cement board or backer behind it must be cut and patched, blocking must be added to the framing, new backer board installed, and the tile re-set and grouted to match. Labor alone runs 3–6 hours [3].
I tell every client at rough-in: blocking costs you almost nothing right now. A 2x8 at the right height and you're done. I've had clients call me three years after we finished a bathroom renovation, asking me to add grab bars because a parent is moving in. When I open that wall and there is no blocking, I have to explain that the $80 they saved at rough-in is now going to cost them $600. That conversation never gets easier.
Weight Rating Requirements
Grab bars must be rated to support a minimum of 250 pounds per ADA Standards. Look for bars labeled as meeting ANSI/BHMA A156.6 hardware standards. Most residential grab bars sold through plumbing supply houses meet this rating; grab bars sold through general home goods retailers often do not. Verify the rating before purchasing.
Decorative Options
Accessible bathrooms do not require the clinical chrome bars associated with institutional settings. Every major fixture manufacturer now produces grab bars in brushed nickel, matte black, champagne bronze, and brushed gold finishes that coordinate with towel bars and faucet sets. Replacing the grab bar with a towel bar that is not weight-rated is a common and dangerous substitution. A bar that looks like a towel bar but is rated at 250 pounds is the right solution, not a standard towel bar pressed into service as a grab bar.
Curbless Showers
The step-over threshold at a conventional shower curb is one of the most common trip hazards in residential bathrooms. A typical shower curb is 2–4 inches tall, low enough to step over reflexively, but precisely the right height to catch a foot during an off-balance entry. A curbless (zero-threshold) shower eliminates this hazard entirely.
Get quotes from top-rated pros.

Photo: Photorealistic curbless shower with linear drain at threshold, large-format tile, frameless glass panel, fold-down teak shower bench, and grab bar on side wall in warm modern design
How Curbless Showers Work
Water containment in a curbless shower relies on proper floor slope rather than a physical curb. The shower floor must slope at a minimum of 1/4 inch per foot toward the drain. For a 36-inch-wide shower, the floor at the wall farthest from the drain is 3/4 inch higher than the drain level. That slope, combined with proper drain placement, directs water away from the bathroom floor.
Two drain configurations are available:
Center drain: The standard circular drain positioned in the middle of the shower floor, requiring all four sides of the floor to slope toward the center point. This is the more common configuration in retrofits and requires careful substrate work to achieve consistent slope from all directions.
Linear drain: A long rectangular drain positioned at the threshold of the shower opening or along one wall. Linear drains allow the floor to slope in a single direction (toward the drain wall), which is easier to install correctly and simplifies large-format tile layout since the slope is in one plane. Linear drains also create the cleanest visual transition into the bathroom floor. Linear drains add $200–$600 to the project cost compared to a standard center drain [4].
Cost Range
Curbless showers cost $2,500–$6,000 installed in 2026, depending on tile selection, drain type, glass panel, and whether an existing shower with a curb is being converted. The conversion from a curbed shower to a curbless design involves removing the existing curb (which is typically cast into the concrete or built from mortar and tile), rebuilding the substrate to the correct slope, and re-waterproofing the pan. For complete installation detail, see the shower installation process guide.
The curbless design also accommodates a shower chair or a wheelchair entry directly, making it functional for a range of mobility levels without any modification.
The sloping work is where I see the most mistakes in curbless shower conversions. Contractors who are not experienced in it end up with inconsistent slope, water that pools in corners, and eventually a substrate failure. The floor prep has to be done right: either a sloped mortar bed or a prefabricated sloped foam substrate panel set to the correct pitch before tile. When done correctly, a curbless shower outperforms a curbed shower on durability because water drains completely rather than sitting against the curb caulk joint.
ADA Turning Radius
If full wheelchair accessibility is the goal, the shower floor area must be large enough for a wheelchair to enter and turn. The ADA requires a minimum 60-inch turning radius in the shower space. A standard 36x36 inch shower stall does not meet this requirement. A 36x60 inch minimum shower footprint is needed for wheelchair accommodation. Plan the shower dimensions before rough-in, not after.
Comfort-Height Toilets
A comfort-height (also called ADA-height) toilet sits 16–18 inches from floor to seat, compared to a standard toilet's 14–15 inch seat height. The difference is 2–4 inches, which is enough to meaningfully reduce the knee and hip flexion required to sit down and stand up.
Who Benefits Most
The comfort-height toilet benefits anyone with knee replacements, hip replacements, lower back issues, arthritis, or reduced leg strength. It also reduces fall risk during the sit-to-stand transition, which is one of the highest-risk movements for older adults. For children, the standard height is actually more appropriate, but in households where an adult has mobility limitations, the comfort-height unit is the correct choice.
Installation
Comfort-height toilets install identically to standard-height units. The rough-in dimension (the distance from the finished wall to the center of the drain flange) is the same standard 12 inches for most models. Swapping a standard-height toilet for a comfort-height model is a like-for-like replacement requiring no rough-in modification. See the toilet installation guide for complete installation steps.
Cost Premium
Comfort-height toilets carry a $50–$150 premium over equivalent standard-height models from the same manufacturer. At the fixture level, the difference is negligible relative to the total project cost. Most major toilet lines from Kohler, TOTO, and American Standard offer comfort-height versions of every model.
| Toilet Feature | Standard Height | Comfort/ADA Height |
| Seat height (floor to seat) | 14–15 inches | 16–18 inches |
| ADA compliance | No | Yes (17–19" per ADA) |
| Rough-in requirement | Standard (12") | Same (12") |
| Cost premium | Baseline | $50–$150 more |
| Installation difference | None | None |
Lever Faucets and Accessible Controls
Knob-style faucet handles require grip and rotational force to operate. For users with arthritis, limited hand strength, or conditions affecting fine motor control, knob handles are a genuine functional barrier. Lever-style handles require only a downward or lateral pushing motion and can be operated with a fist, elbow, or back of the hand if grip is limited.
Get quotes from top-rated pros.
Specification Details
ADA Standards require operable parts (including faucet handles) to be operable with one hand without tight grasping, pinching, or twisting of the wrist. Lever handles, push-button controls, and electronic (touchless) sensors all satisfy this requirement. Standard round knobs do not.
The practical implication for residential bathrooms: replace knob handles with lever handles during any faucet replacement. The cost difference between a lever-handle faucet and a comparable knob-handle model is $0–$50 in most product lines. The functional difference for a user with limited grip is significant.
For shower controls, single-handle lever valves are the accessible choice. Separate hot and cold knobs require bilateral grip and coordination, while a single lever controls both temperature and volume with one motion.
Touchless Faucets
Touchless (sensor-activated) faucets eliminate the need for any handle operation. They are appropriate when grip strength is severely limited. Installation requires a power source (battery or AC), which adds to complexity, but the operational benefit is substantial. Touchless faucets are standard in commercial ADA-compliant restrooms and are increasingly available for residential installation at $150–$500.
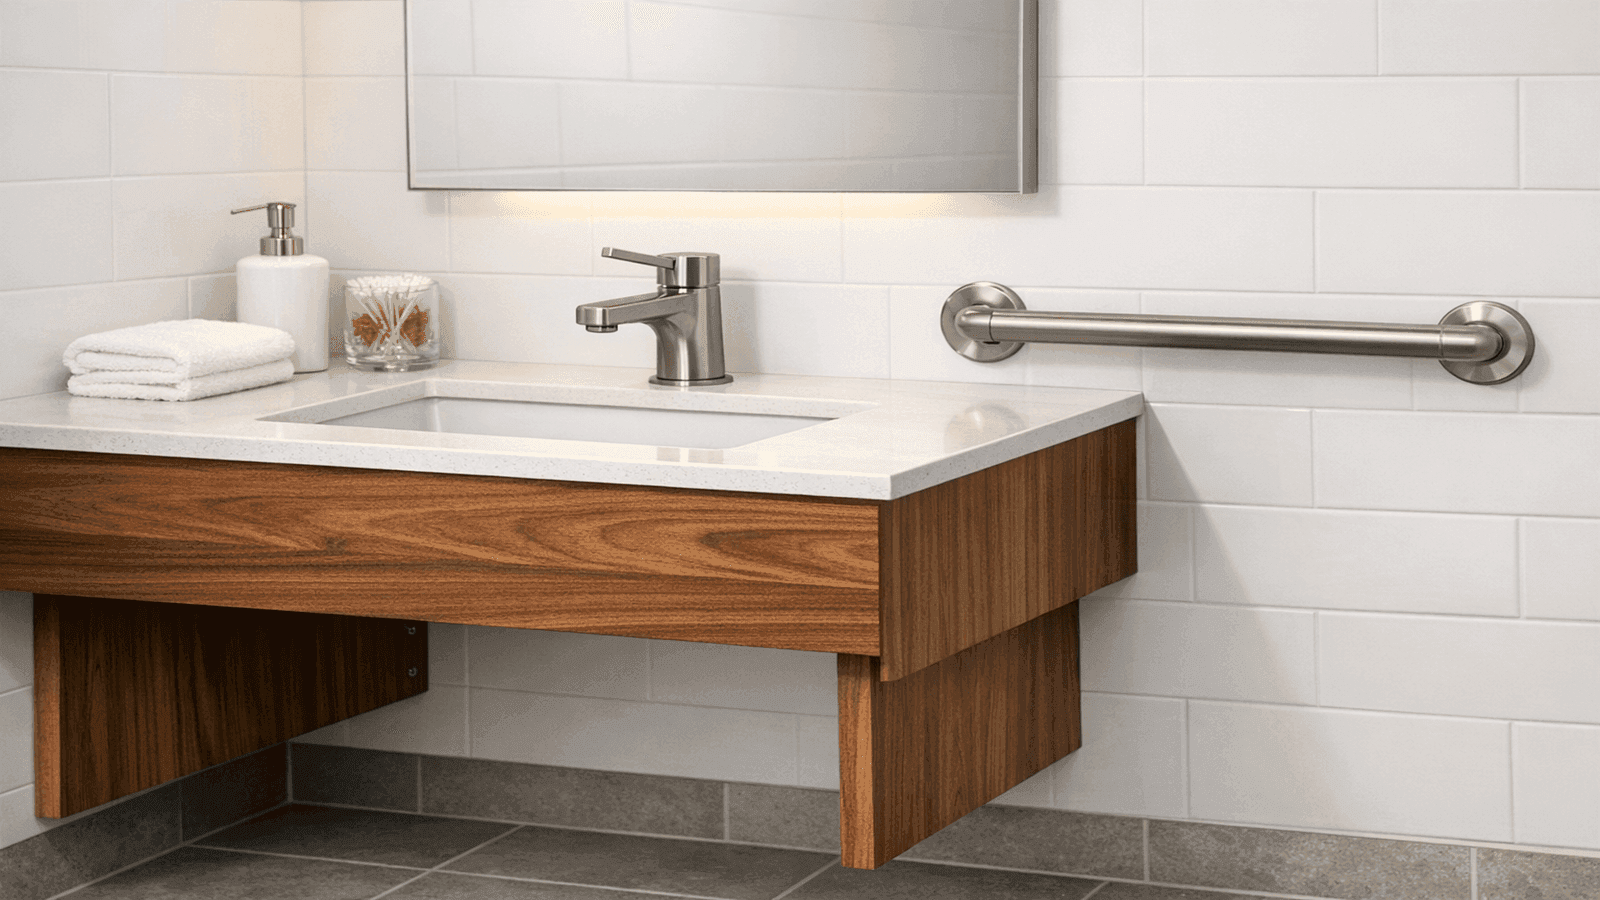
Photo: Lever-handle faucet at accessible bathroom vanity with ADA-compliant height, contrasting grab bar in brushed nickel finish, wide turning clearance visible at floor level
Hand-Held Showerheads and Adjustable Slide Bars
A fixed showerhead at 80 inches above the floor is inaccessible to anyone showering while seated in a shower chair or wheelchair. A hand-held showerhead on an adjustable slide bar addresses this directly.
How Adjustable Systems Work
An adjustable slide bar is a vertical bar mounted on the shower wall, typically 24–36 inches in length. The hand-held showerhead holder slides up and down the bar and locks at any height, allowing the showerhead to be positioned for standing or seated showering by the same user or different household members. The hose connecting the head to the valve is typically 60–72 inches, providing enough reach for seated rinsing.
ADA Standards specify that the hand-held spray unit must have a hose of at least 59 inches and be usable as both a fixed and hand-held shower [2].
Cost Range
Hand-held showerheads with adjustable slide bars cost $80–$300 fully installed, depending on finish and whether the project involves a valve replacement. Adding a hand-held unit to an existing shower with a slide bar rail diverter is among the most cost-effective accessibility upgrades available. For complete shower upgrade scope, see the shower installation process guide.
Wide Doorways and Turning Clearance
Door width is a structural constraint that affects whether a wheelchair or walker can enter the bathroom at all. ADA Standards require a minimum 32 inches of clear opening width, with 36 inches preferred. Most residential bathroom doors are 24–28 inches wide, which is below the minimum for wheelchair access.
Options for Widening
Replacing the door with a wider unit in the same framing: If the rough opening allows, replacing a 24-inch door with a 30–32 inch door is a straightforward carpentry task. Most door openings can be widened 2–4 inches without structural modification by adjusting the framing within the existing opening.
Pocket doors: A pocket door slides entirely into the wall cavity when open, providing the full wall-width as clear opening. In a 32-inch-wide opening, a pocket door provides 32 inches of clear width rather than the net 26–28 inches a standard hinged door provides (after accounting for the door thickness and the offset from the hinge side). Pocket doors cost $400–$900 installed.
Barn-style sliding doors: A barn door slides on an exterior track and provides full clear-width opening without a wall cavity. They are less preferred for accessible bathrooms because the door edge protrudes into the adjacent space, but they are a practical option when wall cavities are not available.
ADA Standards also require a 60-inch turning radius of clear floor space in the bathroom to accommodate wheelchair maneuverability. Planning fixture positions to preserve this turning radius is a design consideration that must happen at the layout stage, not after fixtures are set.
Real Homeowner Case Study
Patricia M. in Richardson, TX, contacted a NearbyHunt plumber after her 71-year-old mother moved in following a hip replacement. The mother's primary bathroom had a standard tub-shower combination, a 14.5-inch standard toilet, knob-style faucets, and no grab bars anywhere. The bathroom door was 26 inches wide.
The plumber assessed the space and recommended a targeted retrofit rather than a full remodel: convert the tub-shower combo to a curbless walk-in shower with a fold-down teak bench and a grab bar on the entry wall; install a comfort-height toilet; add grab bars at the toilet (with blocking added to the existing drywall using a retrofit toggle-bolt anchor system rated at 300 pounds); replace faucets with lever-handle units; and add a hand-held showerhead on a 30-inch slide bar.
The door was widened to 30 inches clear by adjusting the framing within the existing rough opening, which did not require a header replacement.
Total project cost: $7,400. The curbless shower conversion was the largest cost component at $4,200, including drain relocation, new waterproofing, large-format tile, frameless glass panel, and the fold-down bench. Patricia reported her mother's confidence in the bathroom improved immediately and that no falls had occurred in the four months since completion. The same suite of retrofits quoted through a design-build firm without plumbing-specific expertise was quoted at $14,500.
Cost Comparison: During Construction vs. Retrofit
The cost differential between planning accessibility at rough-in and retrofitting later is one of the most compelling arguments for planning now.
Get quotes from top-rated pros.
| Accessibility Feature | During-Construction Cost | Retrofit Cost | Notes |
| Grab bar blocking (lumber) | $50–$80 | $400–$800 | Retrofit requires tile demolition |
| Curbless shower (new build) | $1,500–$3,500 | $2,500–$6,000 | Retrofit adds conversion scope |
| Comfort-height toilet | Same as standard +$50–$150 | Same as standard +$50–$150 | No rough-in difference |
| Lever faucet handles | $0–$50 premium | $0–$50 premium | Same at any time |
| Hand-held showerhead + slide bar | $80–$200 | $80–$300 | Minor; can add anytime |
| 36-inch clear door width | $200–$400 at framing | $800–$2,500 if header work required | Major cost if header must change |
| 60-inch turning radius | $0 (planning decision) | $5,000–$15,000 if fixtures must move | Only possible at layout stage |
| ADA-height (17–19") toilet blocking | $0 (toilet selection) | $0 (toilet selection) | No structural difference |
The table shows that lever faucets and comfort-height toilets carry essentially no cost premium at any point in a project. Grab bar blocking carries a dramatic cost penalty if deferred. Door widening and floor plan turning clearance are the decisions where failing to plan at rough-in creates costs that may be prohibitive.
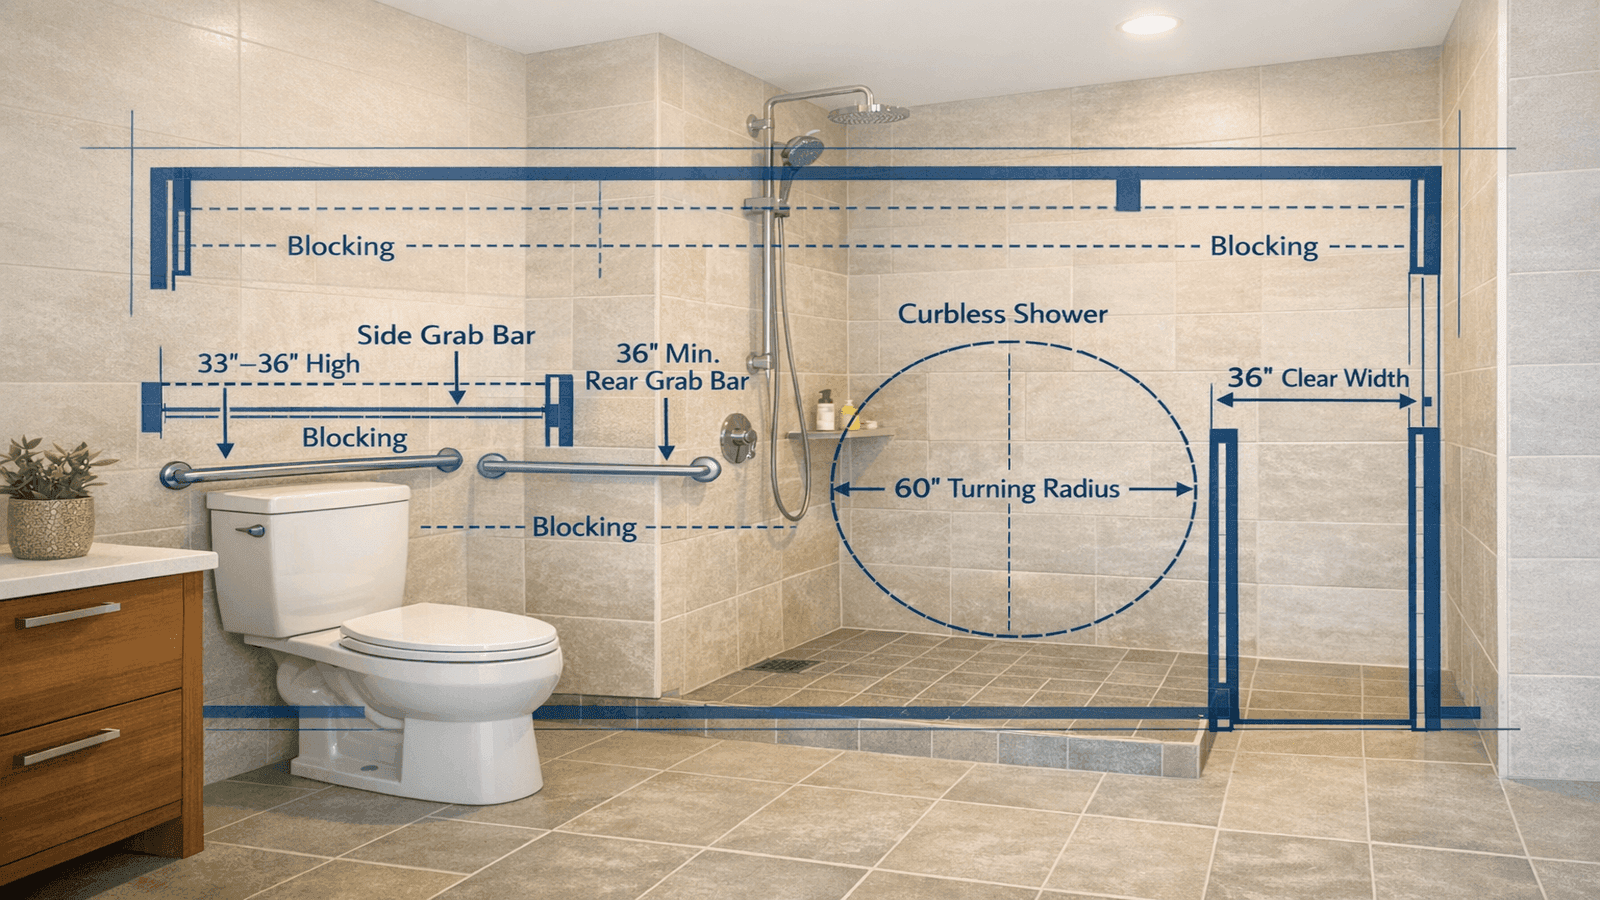
Photo: Accessible bathroom planning diagram showing ADA-compliant layout with toilet grab bars at correct heights, curbless shower with 60-inch turning clearance, 36-inch door width, and blocking locations marked on wall framing
Bathtub vs. Curbless Shower for Accessibility
The decision between keeping a bathtub and converting to a curbless shower is a common question in accessible bathroom planning. The answer depends on the mobility level of the primary user.
For users who are ambulatory with some balance limitation, a walk-in tub or a properly configured tub with grab bars can work. Walk-in tubs have a door in the side that allows entry without stepping over a threshold. They cost $2,500–$7,000 for the unit plus $1,000–$3,000 for installation. The limitation of a walk-in tub: the user must enter and sit down before the water fills, and must remain seated until the tub drains before exiting. This creates a wait period that some users find impractical.
For users who primarily need a shower and want the safest possible environment, the curbless shower with a fold-down bench is the better choice. It eliminates the step-over, allows seated showering, and can be entered and exited without waiting for water to drain.
If resale value is a concern, note that a curbless shower with a high-quality fold-down bench, frameless glass panel, and quality tile appeals strongly to buyers over 55, who per U.S. Census data represent the fastest-growing homebuyer demographic. See the bathtub installation guide for detail on walk-in tub options if a tub must be preserved.
When a client asks whether to keep the tub or convert to a walk-in shower, I ask one question: when was the last time you used the tub? In most households with adults over 60, the tub is used less than four times a year. Converting that space to a curbless shower they'll use every day is almost always the right call. The one exception is clients with grandchildren visiting regularly who need a bathtub. In that case, we keep the tub in a second bathroom and make the primary bath fully accessible.
Permits and Plumbing Code Compliance
Most accessible bathroom upgrades require permits when they involve drain relocation, structural wall modification, or new rough-in work.
| Work Type | Permit Required? | Why |
| Grab bar installation (blocking exists) | No | Surface mount; no rough-in change |
| Grab bar blocking (pre-drywall) | No | Carpentry only |
| Curbless shower conversion (from tub) | Yes | Drain relocation, waterproofing inspection |
| Comfort-height toilet (like-for-like) | No | No rough-in change |
| Lever faucet replacement | No | Like-for-like replacement |
| Door widening (framing change) | Yes in most jurisdictions | Structural modification |
| Walk-in tub installation | Yes | Drain and supply modification |
| Hand-held showerhead addition | No | No rough-in change |
Always verify permit requirements with your local building department before beginning any work involving drain relocation or structural modification. See the plumbing code requirements guide for jurisdiction-specific detail.
Conclusion
Accessible plumbing is good plumbing. The fixtures and design decisions described here (grab bar blocking, curbless showers, comfort-height toilets, lever faucets, and hand-held showerheads) make bathrooms safer and more functional for every user while carrying cost premiums that range from zero to modest when planned at rough-in. The expensive outcomes all stem from the same pattern: skipping the planning step and paying retrofit costs later. For anyone currently planning a bathroom remodel or new construction, the 30-minute investment in proper blocking and the $50–$150 toilet upgrade decision are among the highest-return plumbing choices available.
Disclaimer: This article provides general educational information about accessible bathroom plumbing strategies, ADA specifications, and fixture options. ADA Standards are legally binding for commercial and public facilities; their application to residential construction is voluntary but represents best-practice for aging-in-place design. Permit requirements, rough-in specifications, and code compliance vary by municipality. Always consult a licensed plumber and your local building department before beginning any plumbing work involving drain relocation, structural wall modification, or new rough-in. Cost figures are estimates based on 2026 national averages and will vary based on location, labor rates, and material selection.
Sources & References
- Centers for Disease Control and Prevention (CDC). "Nonfatal Bathroom Injuries Among Persons Aged 15 Years and Older." https://www.cdc.gov/homeandrecreationalsafety/falls/bathroom.html
- U.S. Census Bureau. "Demographic Turning Points for the United States: Population Projections for 2020 to 2060." https://www.census.gov/content/dam/Census/library/publications/2020/demo/p25-1144.pdf
- Forbes Home. "How Much Do Grab Bars Cost to Install? [2026 Data]." https://www.forbes.com/home-improvement/bathroom/grab-bar-installation-cost/
- Bob Vila. "How Much Does a Walk-In Shower Cost?" https://www.bobvila.com/articles/walk-in-shower-cost/
- This Old House. "ADA Bathroom Requirements for Residential Projects." https://www.thisoldhouse.com/bathrooms/ada-bathroom-requirements
- ADA National Network. "2010 ADA Standards for Accessible Design." https://adata.org/publication/ADA-accessible-design
- National Association of Realtors. "Remodeling Impact Report: Aging-in-Place." https://www.nar.realtor/research-and-statistics/research-reports/remodeling-impact-aging-in-place

Michael Jennings is a licensed master plumber & water systems specialist with over 18 years of hands-on experience in residential and commercial plumbing, serving clients across California and Texas. At NearbyHunt, he shares practical advice on pipe installations, water heater maintenance, and home plumbing upgrades. Michael has helped thousands of homeowners prevent costly water damage and improve water efficiency through modern plumbing solutions.

Robert is a licensed master plumber with over 20 years of experience serving both residential and commercial clients across the Midwest. Specialising in advanced plumbing systems and sustainable water technologies, Rob brings deep technical insight and hands-on expertise to every project. As a reviewer for NearbyHunt, he ensures all plumbing content reflects the highest standards of safety, compliance, and practicality.