- Proper attic ventilation requires 1 sq ft of net free area per 150 sq ft of attic floor space — most homes fall significantly short of this code minimum
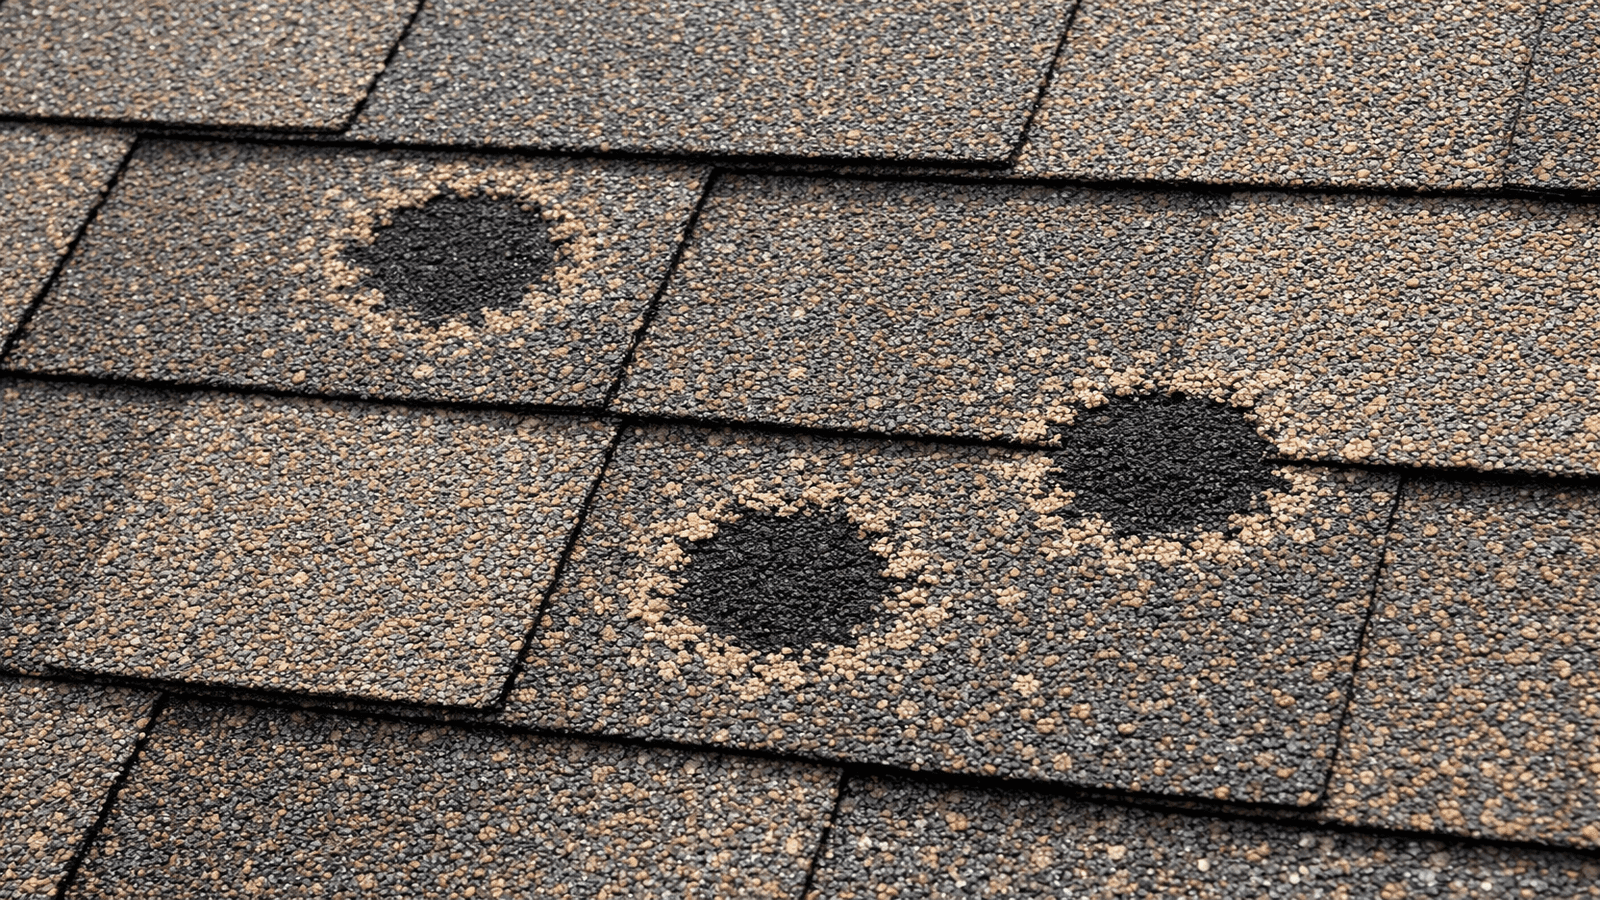
- Poor ventilation can cut shingle lifespan by 5-10 years by trapping heat that bakes shingles from below and causes premature granule loss
- Installing a box vent is a beginner-friendly DIY project for roofs with pitches under 6:12 — typically 2-3 hours including prep and cleanup
- Balanced ventilation (50% intake at soffits + 50% exhaust at ridge or vents) outperforms exhaust-only systems by 40% in heat removal efficiency
- James Carver has added ventilation to over 600 attic systems in his career — the most common issue he finds is homes with too many exhaust vents and blocked soffit intake
Your roof shingles can be perfectly installed and still fail 10 years early. If your attic reaches 150°F on a Texas summer day — and without proper ventilation, it will — the heat bakes the asphalt out of your shingles from below while the sun attacks from above. Your 25-year architectural shingles become 15-year shingles. The decking starts to warp. In winter, warm moist air from your living space rises into the cold attic and condenses on the underside of the decking, leading to rot and mold.
Adequate ventilation is one of the highest-return improvements a homeowner can make to their roof's lifespan. This complete guide is part of our DIY Roofing Guides: How-To Tutorials & Safety Tips, and it covers everything you need to calculate your ventilation needs, choose the right vent type, and install a box vent safely without a contractor.
The licensed roofers in our NearbyHunt network report that 70% of homes they inspect during re-roofing projects have less than half the recommended ventilation for their attic square footage [3]. Most homeowners don't know there's a problem until they see premature shingle granule loss or discover rotted decking.

Get quotes from top-rated pros.
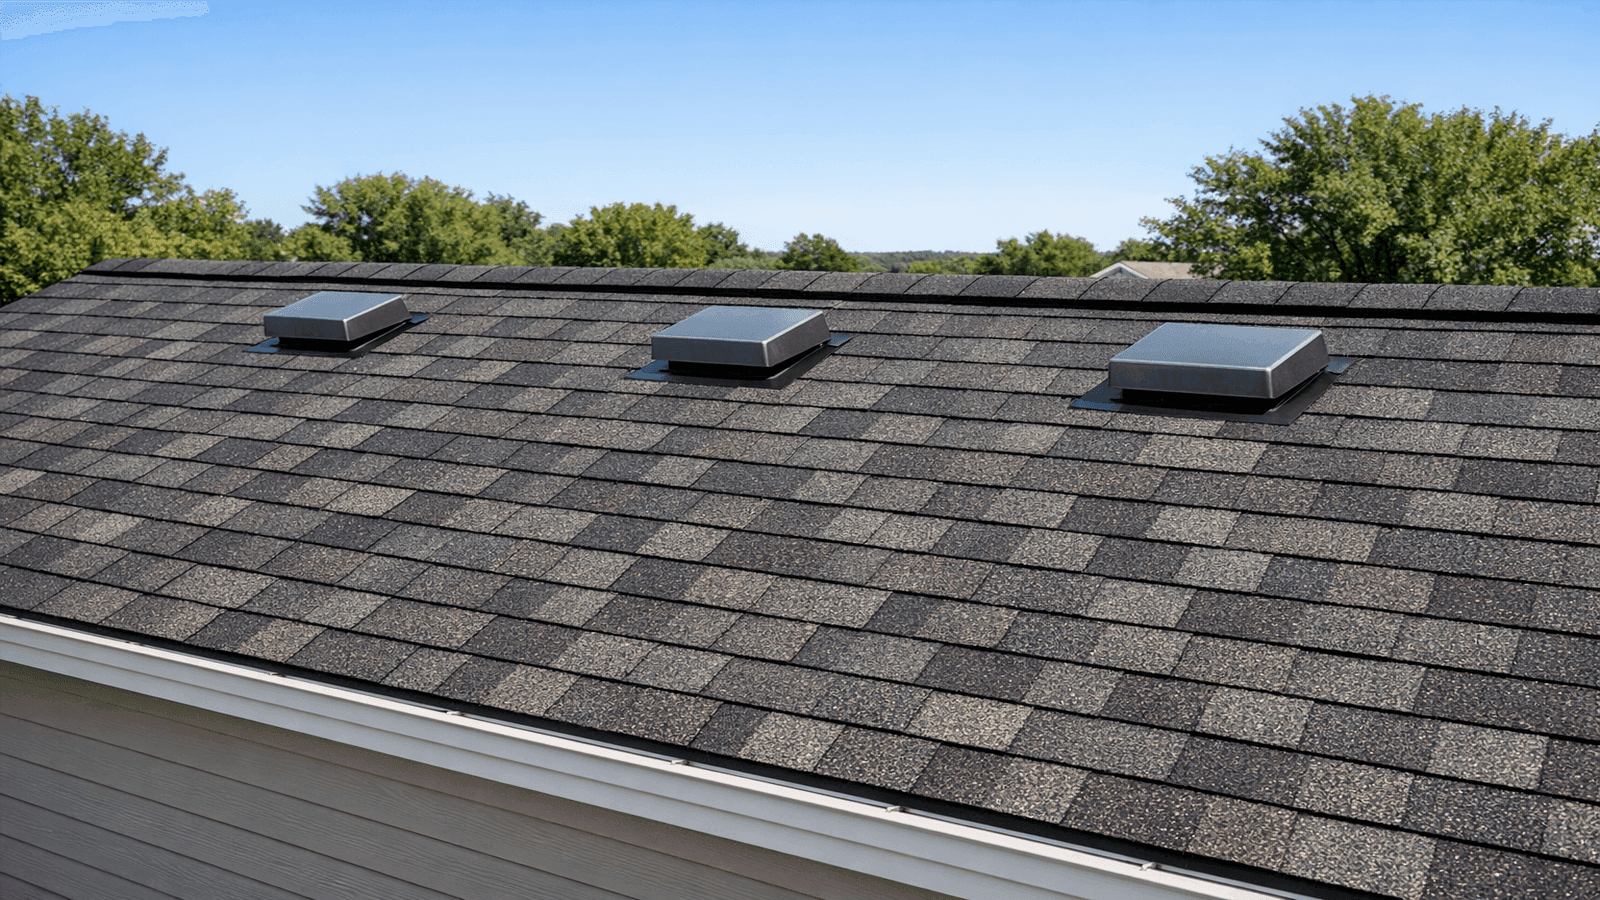
Photo: Roofer installing a box vent on a residential asphalt shingle roof showing proper flashing and placement near the ridge
Why Attic Ventilation Matters
Heat and moisture are the two forces that destroy roofing systems from the inside out. Proper ventilation manages both.
Summer heat: On a 95°F day with direct sun exposure, an unventilated attic reaches 140-160°F [2]. That heat radiates into your living space (increasing cooling costs 10-30%) and simultaneously bakes the asphalt binders in your shingles. Heat-damaged shingles lose granules faster, develop blisters, and crack earlier than properly ventilated shingles. Most shingle manufacturer warranties are voided if ventilation requirements aren't met.
Winter moisture: Warm moist air from cooking, bathing, and breathing rises through the home and enters the attic through gaps and penetrations. In a cold attic, that moisture condenses on the underside of the roof decking. OSB and plywood decking absorbs this condensation, swells, delaminate, and eventually develops mold and rot. James has replaced entire decking sections on homes where the shingles looked fine but the wood underneath had turned to sponge.
| Poor Ventilation Effect | Timeframe | Estimated Repair Cost |
| Premature granule loss | 5-10 years early failure | $8,000-$20,000 full replacement |
| Decking delamination | 10-15 years | $2,000-$8,000 deck replacement |
| Attic mold growth | 2-5 years | $1,500-$6,000 remediation |
| Ice dam formation | Every winter | $500-$3,000 per event |
| Cooling cost increase | Ongoing | $200-$600/year |
Types of Roof Vents: Choose Before You Buy
Not all vents are equal, and the right type depends on your existing ventilation system, roof pitch, and budget.
Box vent (static vent): A passive exhaust vent that mounts anywhere on the roof surface. No moving parts, no power. Works by allowing warm air to rise and escape naturally. Best for: roofs with 4:12-9:12 pitch where thermal stack effect is sufficient. Each unit provides 50-75 sq in of net free area (NFA). Cost: $15-$35 per unit installed.
Ridge vent: The most effective passive exhaust system. Runs along the full length of the ridge, allowing hot air to escape from the highest point continuously. Must be paired with adequate soffit intake to work correctly. NFA: 9-18 sq in per linear foot depending on product. Cost: $2-$5 per linear foot material, $400-$800 installed for average home.
Turbine vent (whirlybird): Wind-powered exhaust that spins to draw air out. Moves 400-600 CFM in moderate wind. Effective even with light breeze; less effective in calm weather. Requires periodic bearing maintenance (squeaking is the first sign). Cost: $20-$50 per unit.
Powered (electric) vent: Thermostat- and/or humidistat-controlled fan that actively pulls air out of the attic. Moves 1,000-1,500 CFM. Most effective in hot climates with limited natural airflow. Requires electrical connection. Cost: $100-$300 per unit plus wiring.
Soffit vent (intake): Located at the eaves under the roof overhang, these provide the intake side of the ventilation system. Without adequate soffit intake, exhaust vents create negative pressure and pull conditioned air from the living space rather than outside air. Never block soffit vents with insulation — use rafter baffles.
| Vent Type | CFM Capacity | Cost Per Unit | DIY Install Difficulty | Best For |
| Box vent | N/A (passive) | $15-$35 | Easy | General exhaust addition |
| Ridge vent | N/A (passive) | $2-$5/ft | Moderate | New construction or re-roof |
| Turbine vent | 400-600 CFM | $20-$50 | Easy | High-temperature climates |
| Powered vent | 1,000-1,500 CFM | $100-$300 | Moderate (needs wiring) | Extreme heat situations |
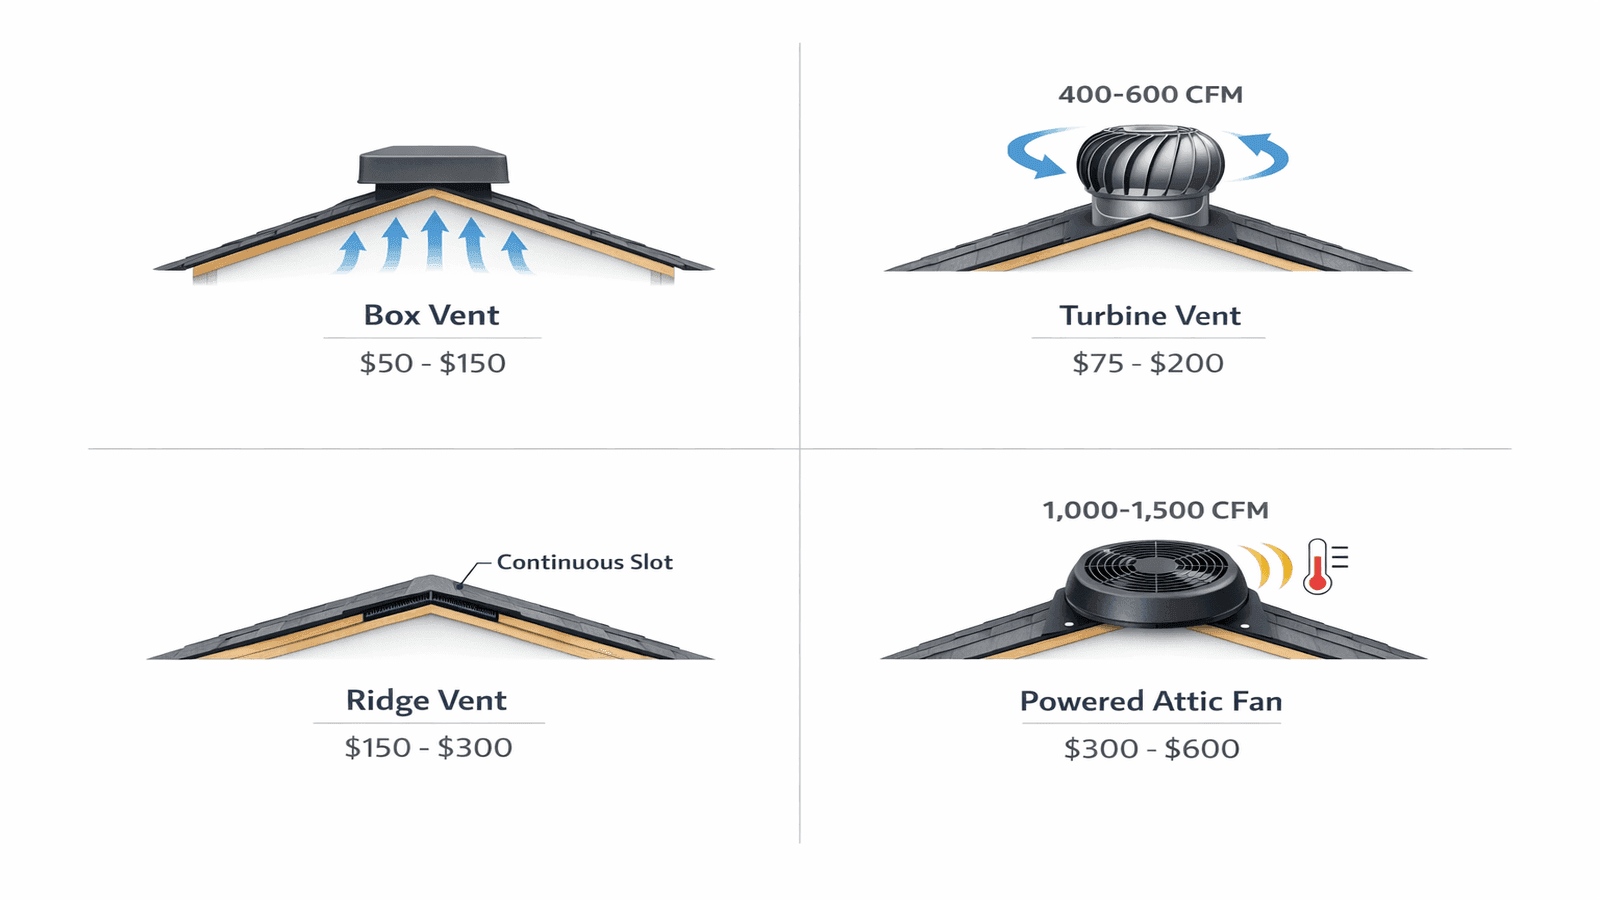
Photo: Diagram comparing four vent types side-by-side showing box vent, turbine vent, ridge vent cross-section, and powered vent with CFM ratings and installation position on a roof outline
Calculating How Many Vents You Need
Before buying anything, do the math. Under-ventilating is the most common mistake — adding two box vents to a 2,000 sq ft home and calling it done is almost always insufficient.
Step 1: Measure your attic floor area.
This is your home's footprint — length times width measured at the exterior walls. For a 40' x 50' home, that's 2,000 sq ft of attic.
Step 2: Calculate minimum net free area (NFA).
Divide attic sq ft by 150: 2,000 ÷ 150 = 13.3 sq ft of NFA required.
Convert to square inches: 13.3 × 144 = 1,915 sq in of NFA total.
Step 3: Split 50/50 intake and exhaust.
Half should be exhaust vents (at or near the ridge): 957 sq in.
Half should be intake vents (at soffits): 957 sq in.
Step 4: Divide by your vent's NFA rating.
A typical box vent provides 50-75 sq in NFA (check the package — it must be printed on the label per federal requirements) [4].
At 65 sq in per vent: 957 ÷ 65 = 14.7 → 15 exhaust vents needed.
For a 2,000 sq ft home, that's approximately 15 box vents for exhaust. Most homes have 3-6 box vents — which explains why 70% of homes James inspects are critically under-vented.
Get quotes from top-rated pros.
The builder code minimum of 1:150 is already the bare floor — I recommend 1:100 in Texas and other hot states. Most builders install 1:300 or worse because code inspection happens before the insulation goes in, and no one rechecks. When I pull permits for re-roofs, I always check ventilation first because it's a free upgrade to do it at the same time as the shingles.
Tools and Materials for Box Vent Installation
Box vent installation requires basic carpentry tools and comfortable roof work. It's an appropriate first roofing project for a capable DIYer.
Materials:
- Box vent (check NFA rating matches your calculation)
- Roofing nails (1.5" galvanized)
- Roofing cement (asphalt-based)
- Self-adhering roofing tape (for sealing lifted shingles)
Tools:
- Reciprocating saw or jigsaw (for cutting the deck opening)
- Drill with bit (for starting the saw cut)
- Pry bar (for lifting shingles)
- Chalk line and pencil (for marking cutout)
- Caulk gun
Safety:
- Roof harness anchored to the ridge
- Non-slip roofing boots
- Safety glasses (sawdust falls toward your face when cutting upward)
Step-by-Step Box Vent Installation
Work from inside the attic first, then from the roof surface. This sequence prevents cutting in the wrong location.
Step 1: Locate the installation point from the attic.
Position yourself between two rafters at least 12-24 inches below the ridge line. Drive a single nail up through the roof deck to mark the center of your installation location. Avoid existing nails and look for nail cluster patterns that indicate rafter edges.
Step 2: On the roof, find your marker nail.
The nail tip will be visible (or the slight tent in the shingle surface) on the roof surface. This is your center point.
Step 3: Mark the vent cutout.
Box vents come with a paper template. Trace the template centered on your marker point. Alternatively, measure the vent's net free area opening dimensions from the manufacturer instructions.
Step 4: Remove shingles from the installation area.
Use your pry bar to lift shingles back at least 2 inches beyond all edges of the vent flange. You're not removing them permanently — just lifting them to allow the flange to slide underneath.
Step 5: Cut the opening.
Drill a starter hole inside the marked outline. Cut along the line with your reciprocating saw. Make the cut slightly inside your line — you can enlarge it, but you can't shrink it.
Step 6: Install the vent.
Slide the vent flange under the upper courses of shingles. The lower edge of the flange sits on top of the course below — this is critical for water drainage. The upper and side flange edges go under the shingles.
Step 7: Nail the flange — NEVER nail the lower edge.
Nail the upper and side edges of the flange to the deck using roofing nails. Do not nail through the lower (downhill) edge — those nails would be exposed to water flow and create leak points.
Step 8: Seal nail heads.
Apply a dab of roofing cement over each nail head on the upper and side flange.
Step 9: Re-bed lifted shingles.
Lower the lifted shingles back over the flange edges and re-bed them with roofing cement if needed. They should lay flat with no lifted corners.
I've seen homeowners nail through the lower flange edge because it makes the vent feel more secure. That's where every leak from that vent will originate. The flange design is already correct — the lower edge relies on shingle overlap and gravity, not nails. Trust the design and nail only the upper and sides.
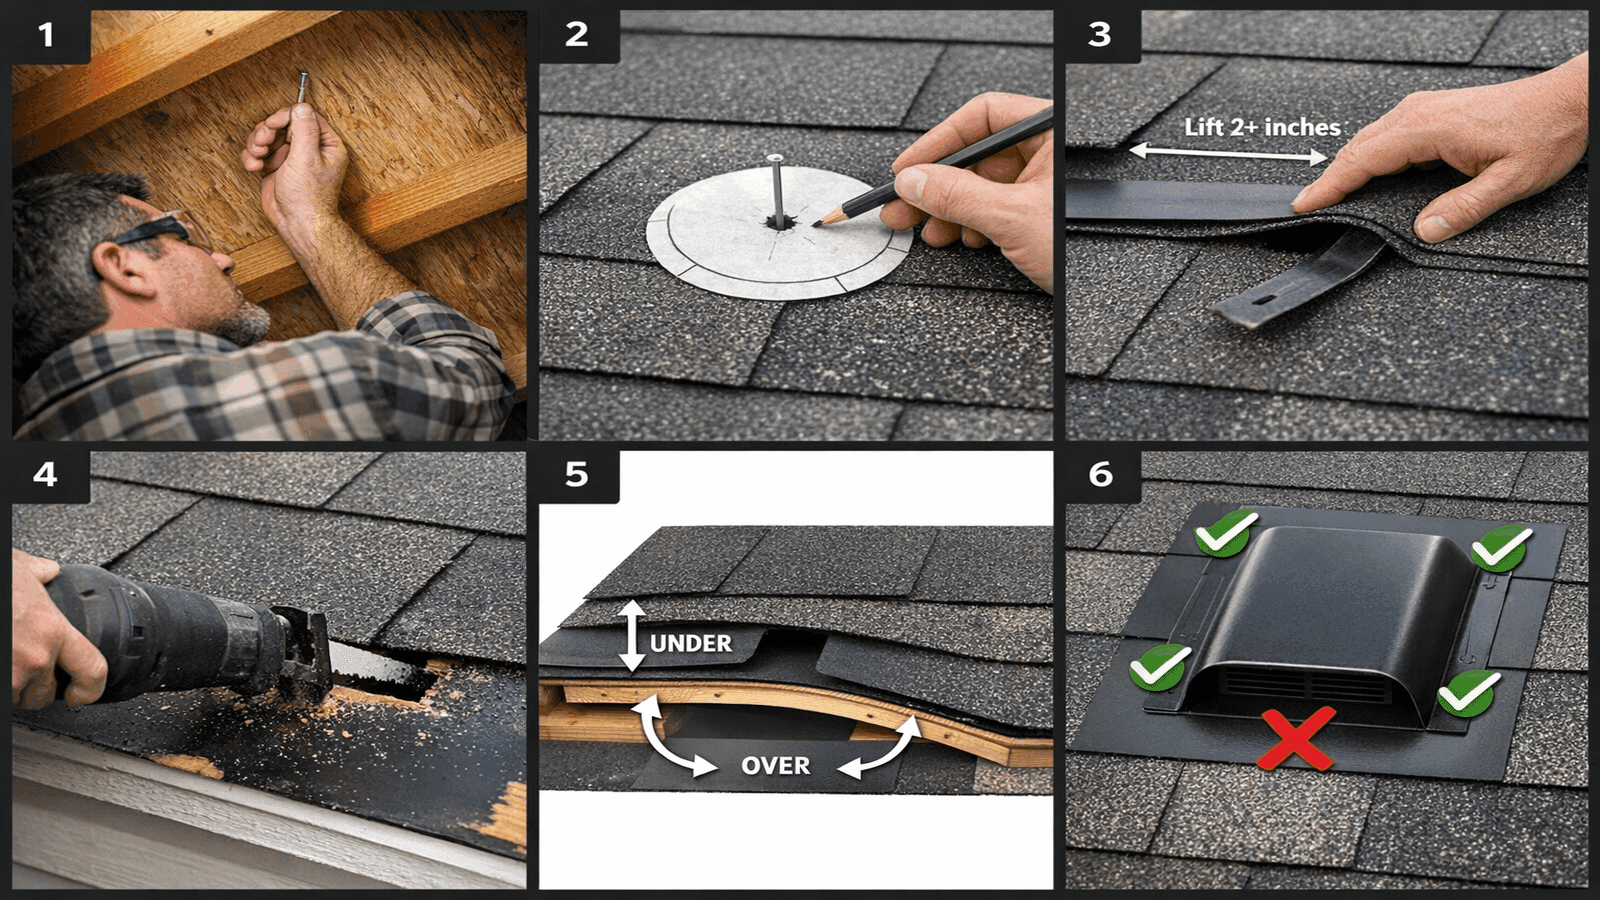
Photo: Step-by-step installation diagram showing: 1) attic nail marking, 2) template tracing on roof, 3) shingle lifting, 4) cutout, 5) flange positioning showing upper-under and lower-on-top relationship, 6) correct nailing pattern with red X on lower edge
Installing a Ridge Vent: Overview
Ridge vents are the most effective passive ventilation solution when paired with sufficient soffit intake. They're not a beginner DIY project — you're working at the absolute peak of the roof — but understanding the process helps you evaluate quotes and ask better contractor questions.
The process: A continuous slot is cut along the ridge line, typically 2 inches on each side of the ridge (leaving 3 inches uncut at each end to maintain structural integrity). The ridge vent material — a flexible mesh-backed product like Shingle-Vent II or GAF Cobra — is laid over the slot and covered by ridge cap shingles.
Why it works: Hot air rises to the peak and escapes continuously across the entire ridge length, rather than through isolated vent points. When combined with continuous soffit intake, it creates a true thermal stack effect that moves far more air than static box vents.
Cost if hiring a pro: $400-$800 for an average home including materials and labor. Best done during a re-roof when the ridge caps are already being replaced.
Ridge vent is the only system where the math always works perfectly — a uniform slot across the full ridge is always more effective than trying to calculate how many box vents to get equivalent performance. The challenge is that adding a ridge vent to an existing roof means tearing off the ridge cap, cutting the slot, and reinstalling new cap shingles. It's a half-day job at the peak of your roof, which is why I recommend waiting for a re-roof to add it rather than doing it as a standalone project.
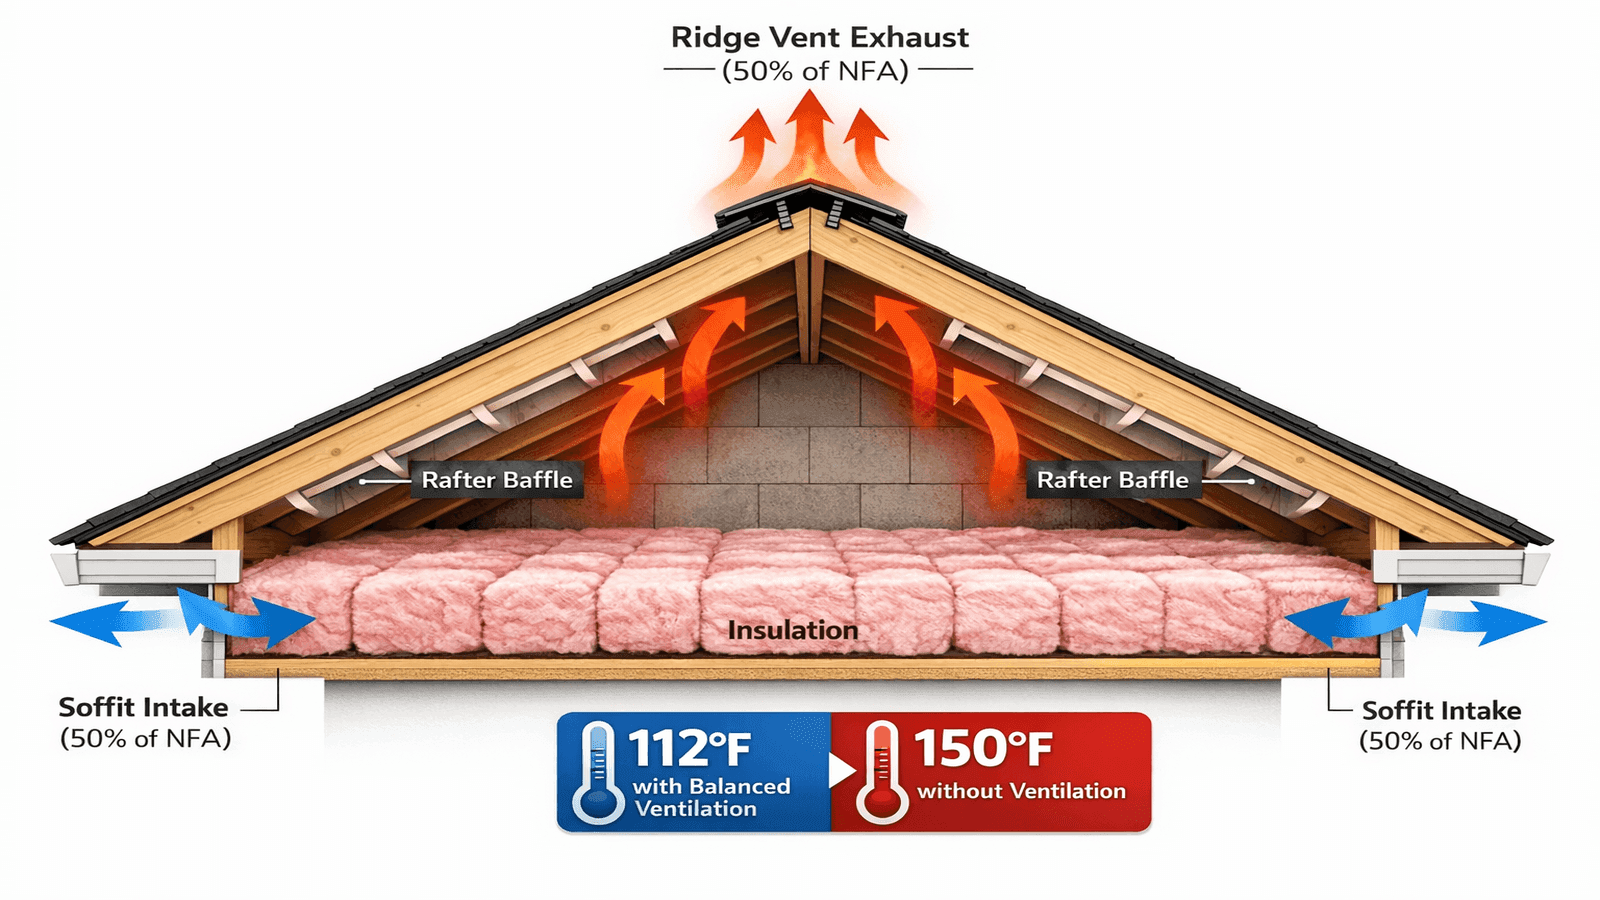
Photo: Balanced ventilation system cross-section diagram showing soffit intake vents at the eaves and ridge vent exhaust at the peak with arrows showing hot air movement (thermal stack effect) and cool air entry points
Don't Block Your Soffit Vents (Intake Balance)
Adding exhaust vents without adequate intake makes your ventilation system less effective, not more. This is counterintuitive but critical.
When exhaust vents pull more air than the soffit intake can supply, the system creates negative pressure in the attic. Instead of drawing cool outdoor air up through the soffits, it pulls conditioned air from your living space through gaps and penetrations — increasing cooling costs and reducing humidity control.
The most common cause: insulation blown or poured into the attic space covers the soffit vent openings at the eave. The solution is rafter baffles (also called wind baffles) — foam or cardboard channels stapled between rafters that create a clear air pathway from the soffit vent up to the attic above the insulation.
Checking your soffit vents: go into the attic with a flashlight and look toward the eaves. You should see daylight through soffit vents from the inside. If you see only insulation, your intake is blocked — install baffles before adding any exhaust vents.
Adding soffit vents: If your home lacks soffit vents entirely (common in homes built before 1980), adding them requires cutting through the soffit fascia — a structural project best left to a contractor. Expect $800-$2,000 for continuous soffit vent installation.
Get quotes from top-rated pros.
Real-World Case Study
Keith B. of Atlanta, Georgia noticed his 20-year architectural shingles were failing at just 12 years — granules were filling the gutters every rain, and two sections showed blistering. His shingle manufacturer's warranty required adequate ventilation, but an inspector found only three box vents for 1,800 square feet of attic — barely 20% of the required ventilation.
Using the calculation method above, James determined Keith needed 10 exhaust vents for his attic size. The existing three covered only 195 sq in of NFA; he needed 1,296 sq in total (648 exhaust + 648 intake).
Keith installed 7 additional box vents himself over a weekend, following the step-by-step process above. He also installed rafter baffles along the eaves where insulation had buried the existing soffit vents.
Results: the following summer's cooling bills dropped by $45-$50 per month. His homeowner's insurance inspector confirmed the ventilation was now code-compliant. The remaining shingles, which were showing accelerated wear, stabilized and have lasted three additional years without further deterioration.
Total DIY cost: $245 in materials (7 vents at $25 each + baffles + nails and cement). Contractor quote for the same work had been $1,100.
When to Call a Professional
Some ventilation projects go beyond a box vent installation.
Ridge vent installation: Working at the ridge peak with a saw requires scaffold or walk boards, a secure harness setup at the highest roof point, and experience cutting into structural components. Always hire for this.
Powered vent with electrical wiring: Running a circuit to an attic fan requires permits and a licensed electrician in most jurisdictions. The fan can be self-installed; the wiring should not.
Full ventilation system design: Complex hip roofs, cathedral ceilings, and multi-ridge structures need customized ventilation plans. A roofing engineer or experienced contractor should design the system.
| Task | DIY OK? | Why | Professional Cost |
| Box vent installation | Yes | Simple, low-risk | $100-$200/vent if hired |
| Turbine vent installation | Yes | Same as box vent | $150-$300/vent if hired |
| Ridge vent installation | No | Peak of roof, structural cutting | $400-$800 |
| Powered vent installation | Partial | Fan yes, wiring no | $300-$600 total |
| Soffit vent addition | No | Structural fascia cutting | $800-$2,000 |
Find licensed roofing contractors near you through NearbyHunt for ridge vent installation, powered vent wiring, and full ventilation system assessments.
Conclusion
Attic ventilation is one of the highest-ROI improvements you can make to your roofing system, and adding box vents is a legitimate DIY project that takes a weekend and costs $200-$400 in materials. The math is simple: measure your attic, calculate your NFA requirement, and install enough balanced intake and exhaust to meet the 1:150 minimum.
The payoff is immediate in summer cooling bills and long-term in shingle lifespan. A roof that runs at 112°F instead of 150°F simply lasts longer — and so does the decking underneath it.
Disclaimer: Ventilation requirements cited are based on IRC Section R806 and apply to most U.S. jurisdictions. Local codes may differ — check with your building department before starting any permitted work. DIY ventilation installation carries fall risk; use appropriate safety equipment on all roof slopes.
Sources & References
- [1] International Code Council. (2024). "IRC Section R806 — Attic Ventilation Requirements." https://www.iccsafe.org
- [2] U.S. Department of Energy. (2024). "Attic Ventilation and Air Sealing." https://www.energy.gov
- [3] National Roofing Contractors Association. (2025). "Ventilation Guide for Residential Roofing." https://www.nrca.net
- [4] Air Vent Inc. (2025). "Residential Ventilation Calculator and Guide." https://www.airvent.com
- [5] Forbes Home. (2026). "Attic Ventilation Guide: Types and Costs." https://www.forbes.com/home-improvement/roofing
- [6] This Old House. (2025). "How to Add Roof Vents." https://www.thisoldhouse.com
- [7] Bob Vila. (2025). "Attic Ventilation: What Every Homeowner Should Know." https://www.bobvila.com


James is a licensed roofing contractor with 20 years of experience in roof installation, inspection, and repair across the U.S. South and Midwest. He specialises in asphalt shingles, metal roofing, and storm damage restoration. On NearbyHunt, James offers practical advice on roof maintenance, insurance claims, and selecting the right materials for long-lasting protection.

Jacob is a licensed roofing contractor with over 18 years of experience in roof inspection, installation, and restoration. Based in Texas, he has led hundreds of successful roofing projects across residential and commercial properties. Jacob is also a certified storm damage specialist, ensuring that all NearbyHunt roofing content meets industry best practices and safety standards.