- Hard water affects 85% of U.S. homes [1] -- water above 7 grains per gallon (GPG) causes scale buildup, reduces appliance lifespan by up to 30%, and increases soap usage.
- Professional water softener installation costs $1,000 to $3,000 for a single-tank salt-based system, including the unit and labor; dual-tank systems run $2,500 to $6,000.
- The bypass valve is the most critical installation component -- every code-compliant installation requires a three-valve bypass or factory-built bypass port to allow service without shutting down the main water supply.
- Drain line placement must maintain a 1.5-inch air gap above the drain opening to satisfy plumbing code in all jurisdictions [2].
- First regeneration should run within 24 hours of installation to flush resin, remove shipping residues, and calibrate the control head to your actual hardness level.
- Annual salt and resin checks extend system life to 15 to 25 years -- the most common premature failure is salt bridges and resin fouling from iron-heavy water.
Hard water is one of the most damaging and least-discussed plumbing problems in American homes. Scale deposits from calcium and magnesium clog showerheads, coat water heater elements, and reduce pipe diameter over years of accumulation [1]. Installing a whole-house water softener stops this damage at the source. Drawing on more than 18 years and 2,400-plus residential projects across Dallas-Fort Worth and California, this guide covers every step of a correct installation. For a broader look at residential plumbing systems and upgrade options, see our complete plumbing installation guide.

Get quotes from top-rated pros.
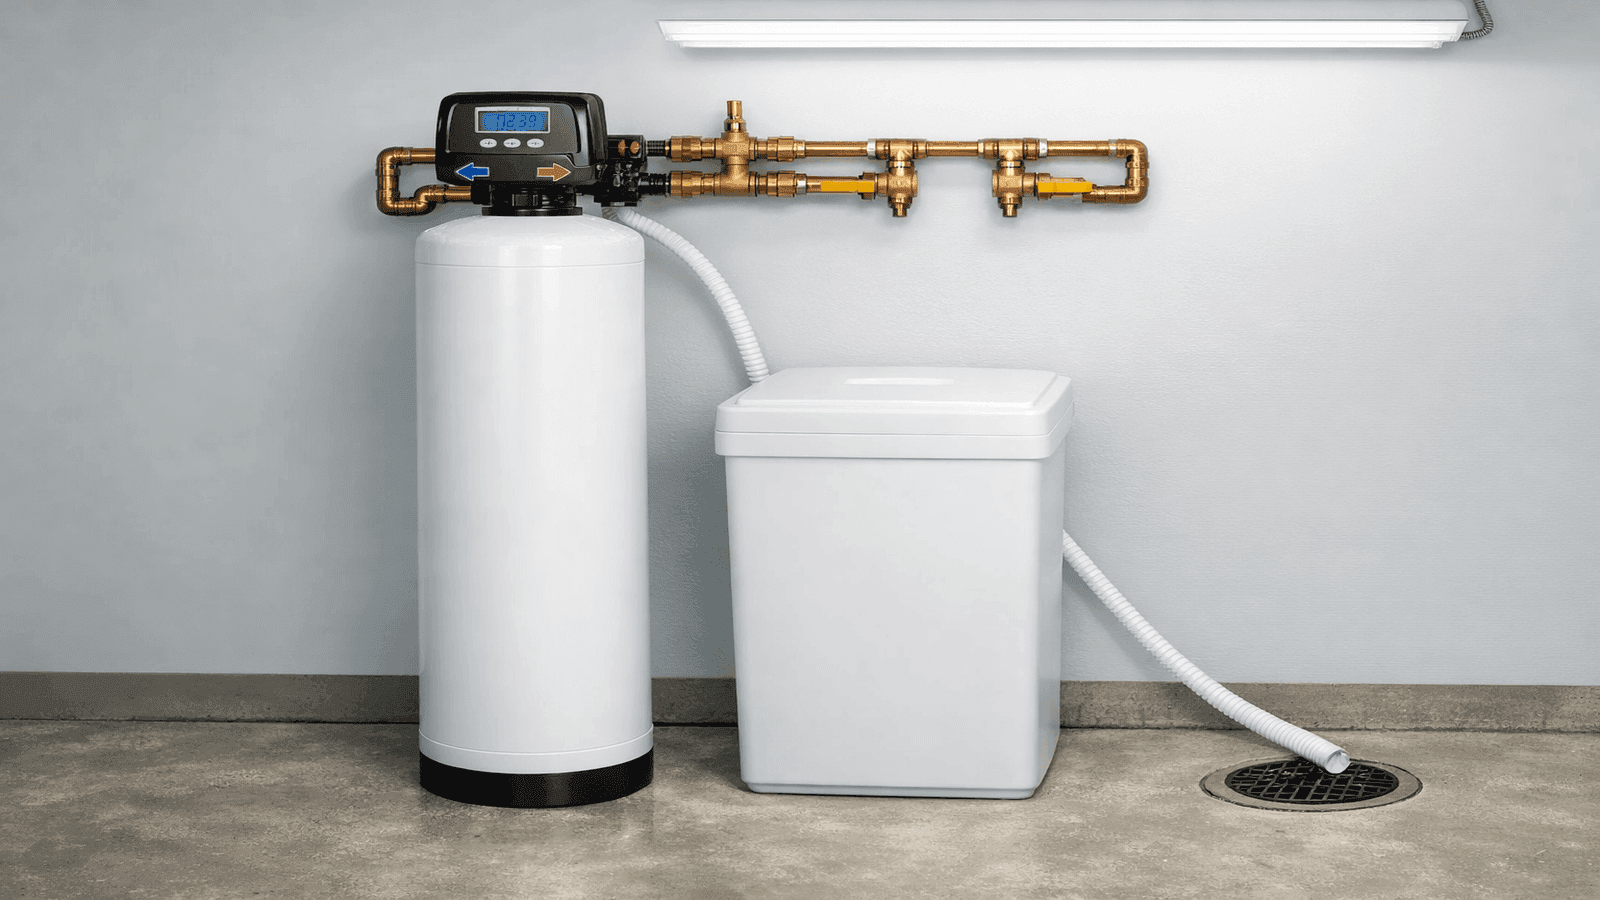
Photo: Whole-house water softener installed in a utility room, mineral tank and brine tank side by side, copper pipe connections visible with bypass valve assembly
Step 1: Test Your Water Hardness and Choose the Right System
Before purchasing any equipment, test your water hardness. Hard water is measured in grains per gallon (GPG) or parts per million (PPM, where 1 GPG = 17.1 PPM). You can use an inexpensive test kit from a hardware store or send a sample to a certified lab for a complete mineral analysis [1].
| Hardness Level | GPG Range | Impact |
| Soft | 0 to 1 GPG | No treatment needed |
| Slightly hard | 1 to 3.5 GPG | Minimal scale, marginal treatment benefit |
| Moderately hard | 3.5 to 7 GPG | Noticeable scale, softener beneficial |
| Hard | 7 to 10.5 GPG | Significant scale, appliance damage risk |
| Very hard | Over 10.5 GPG | Severe scale, softener required |
Also test for iron content. Ferrous iron above 0.3 PPM requires a softener rated for iron removal or a pre-filter -- standard resin beds foul quickly in high-iron water.
System types to consider:
- Salt-based ion exchange (most common): Replaces calcium and magnesium ions with sodium ions through a resin bed. Highly effective for all hardness levels. Requires salt replenishment every 6 to 8 weeks. Unit cost: $500 to $1,500.
- Salt-free conditioners (template-assisted crystallization): Changes mineral structure so scale does not form but does not remove hardness ions. No salt or drain line required. Best for 7 GPG and below. Unit cost: $1,500 to $3,000.
- Dual-tank systems: Two mineral tanks alternate so one is always in service during regeneration. Best for families of 4-plus or homes with hardness above 15 GPG. Unit cost: $1,500 to $3,000.
Homeowners often buy a softener sized for their water hardness alone and forget to account for iron. I've replaced resin beds at 3 years old because the water had 1.5 PPM ferrous iron that fouled the resin completely. Always test for iron and manganese before you buy.
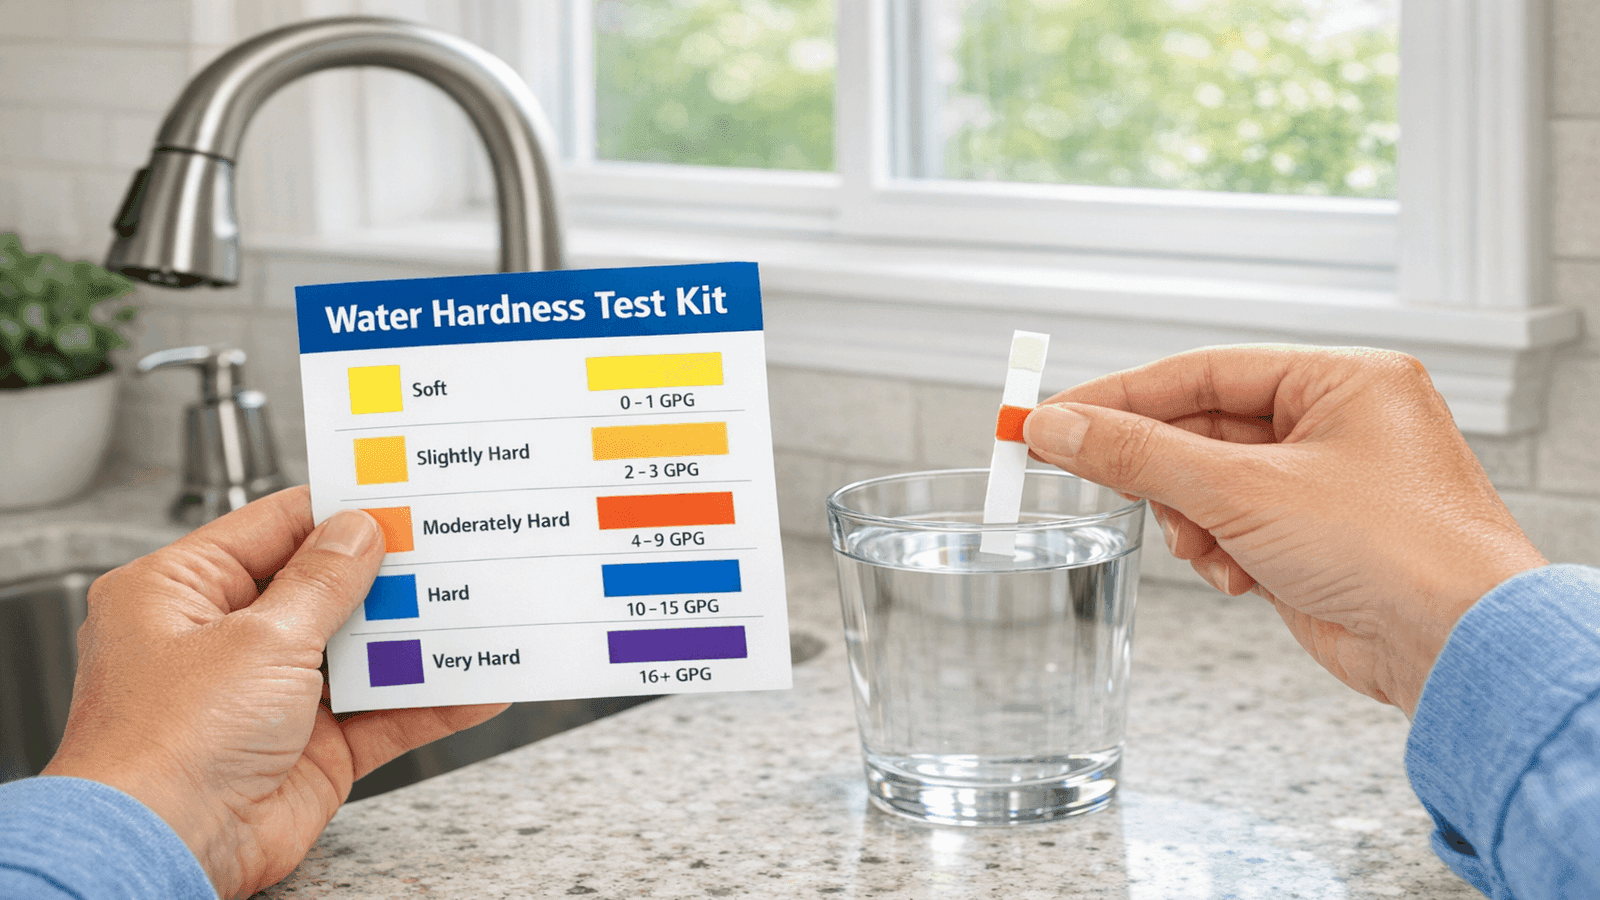
Photo: Homeowner using a water hardness test kit, test strip dipped into a glass of water, color comparison chart visible on the packaging
Step 2: Choose the Installation Location
Water softeners belong on the cold water main, before the water heater and before branch lines serving faucets and fixtures. Install it as close to where the main enters the home as possible.
Location requirements:
- Minimum 40 degrees F ambient temperature (freezing damages resin and control valves)
- Level concrete floor or platform rated for 200 to 500 pounds of combined unit and salt weight
- Within 10 feet of a drain for the regeneration discharge line [2]
- Access to a 120V outlet for the control head timer (most units)
- Clearance of at least 18 inches in front of the control head for maintenance access
For homes on well water, install a sediment pre-filter upstream of the softener. Sediment above 5 microns damages control valves and clogs resin.
Step 3: Install the Bypass Valve
The bypass valve allows you to isolate the softener for service, salt loading, and regeneration checks without shutting off water to the entire house. Most manufacturers include a factory bypass port on the control valve [3].
Three-valve manual bypass:
- Install an isolation valve on the inlet pipe feeding the softener
- Install an isolation valve on the outlet pipe leaving the softener
- Install a bypass valve between the inlet and outlet lines
- Label all three valves clearly: INLET, OUTLET, and BYPASS
Every installation I do gets a three-valve bypass, even when the manufacturer includes a built-in port. That factory bypass port is plastic and fails over time. Copper or brass ball valves on either side give you a fail-safe when the built-in bypass cracks at 3 a.m. and you need to get water running immediately.
Get quotes from top-rated pros.
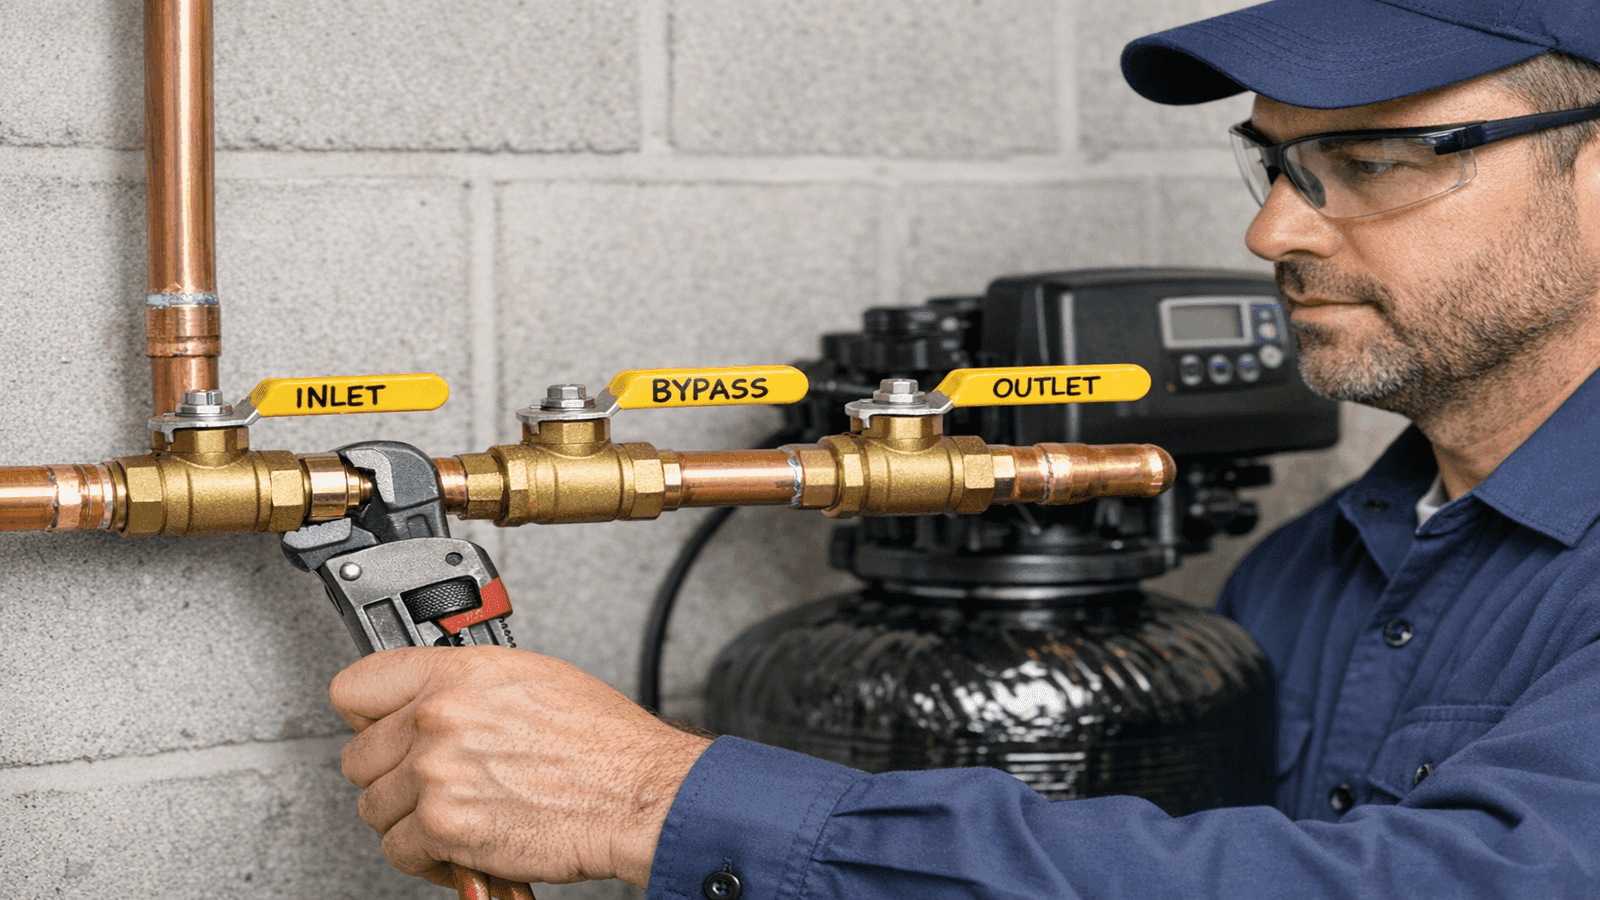
Photo: Plumber installing bypass valve assembly on water softener supply lines, three-handle brass valve configuration, copper pipe connections with compression fittings
Step 4: Connect the Inlet and Outlet Lines
With the main water supply shut off and the system depressurized, connect the softener to the water main.
Connection procedure:
- Cut into the main cold water line at the chosen location using a tubing cutter
- Install a shutoff valve on the inlet side
- Run inlet pipe to the softener's IN port (marked on the control valve)
- Run outlet pipe from the softener's OUT port to continue downstream
- Use Teflon tape or pipe dope on all threaded connections; use compression fittings or soldering on copper
Critical detail: Flow direction matters. The control valve is engineered for one-directional flow [3]. Installing inlet and outlet reversed causes immediate failure and may damage the resin bed. Confirm arrows on the control valve match your pipe flow direction before tightening anything.
For proper shutoff valve placement per local code, see our shut off water supply guide.
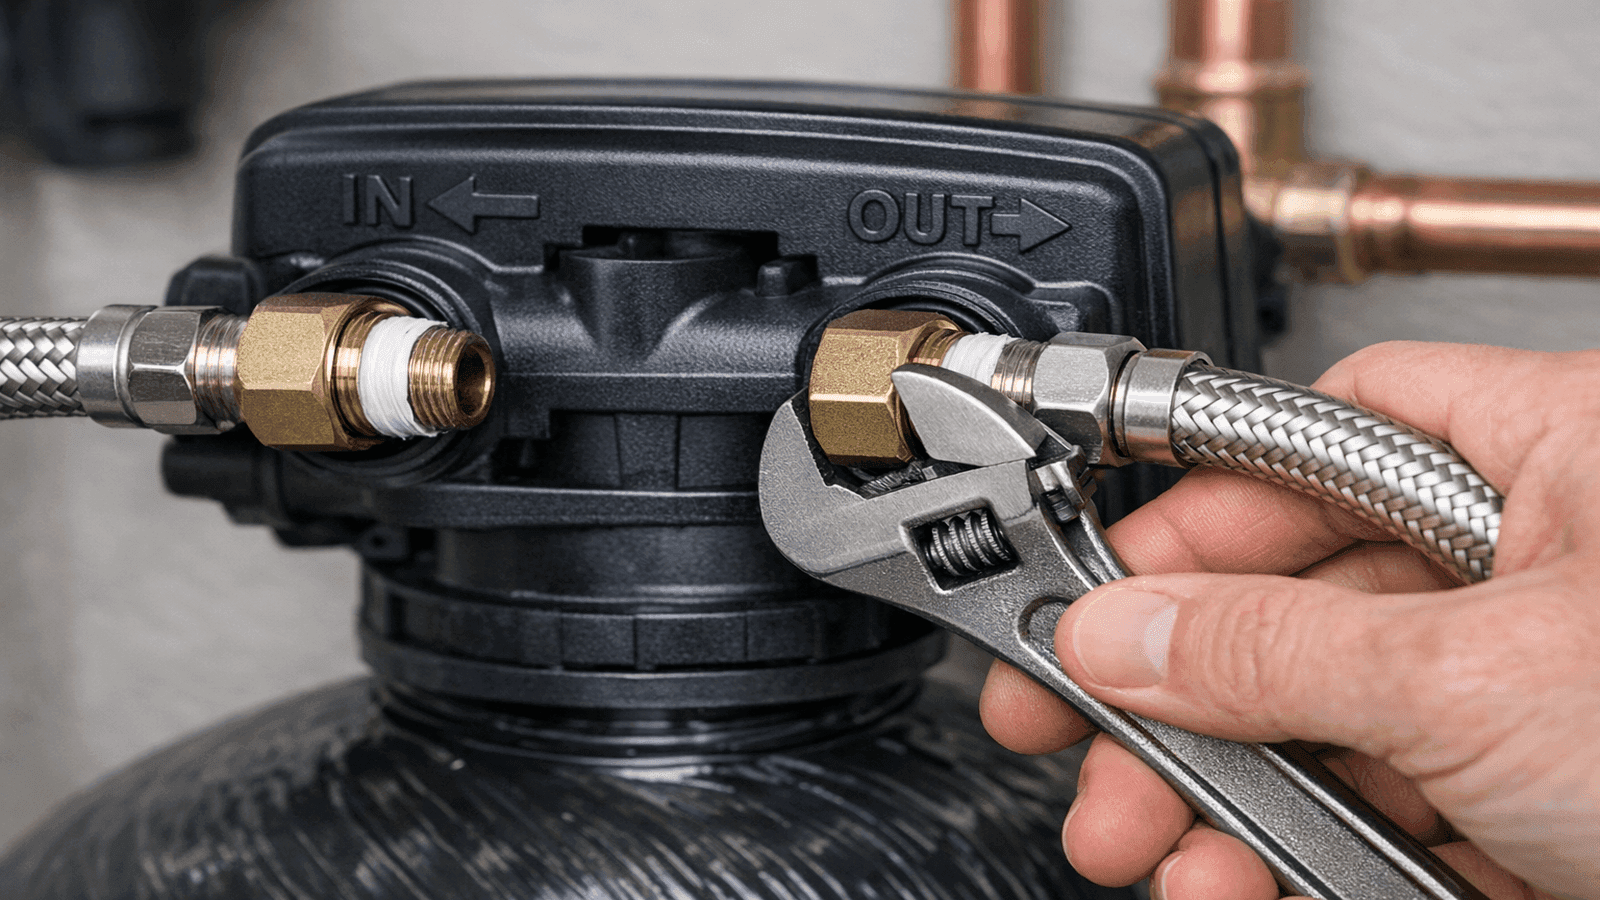
Photo: Close-up of inlet and outlet pipe connections on water softener control valve, flow direction arrows visible, flexible stainless connectors with compression fittings
Step 5: Install the Drain Line
During regeneration, the softener flushes brine and displaced minerals down a drain line. This line must meet plumbing code requirements [2].
Drain line specifications:
- Use 1/2-inch ID tubing or 1/2-inch Schedule 40 PVC
- Maximum horizontal run: 30 feet
- Maintain 1/4-inch slope per foot toward the drain
- Maintain a minimum 1.5-inch air gap above the drain rim (indirect waste connection)
- Never connect directly into drain pipe without an air gap -- backflow can contaminate the resin bed
Approved discharge locations: floor drain, laundry sink drain, properly trapped standpipe (2-inch minimum), or sump pit with pump.
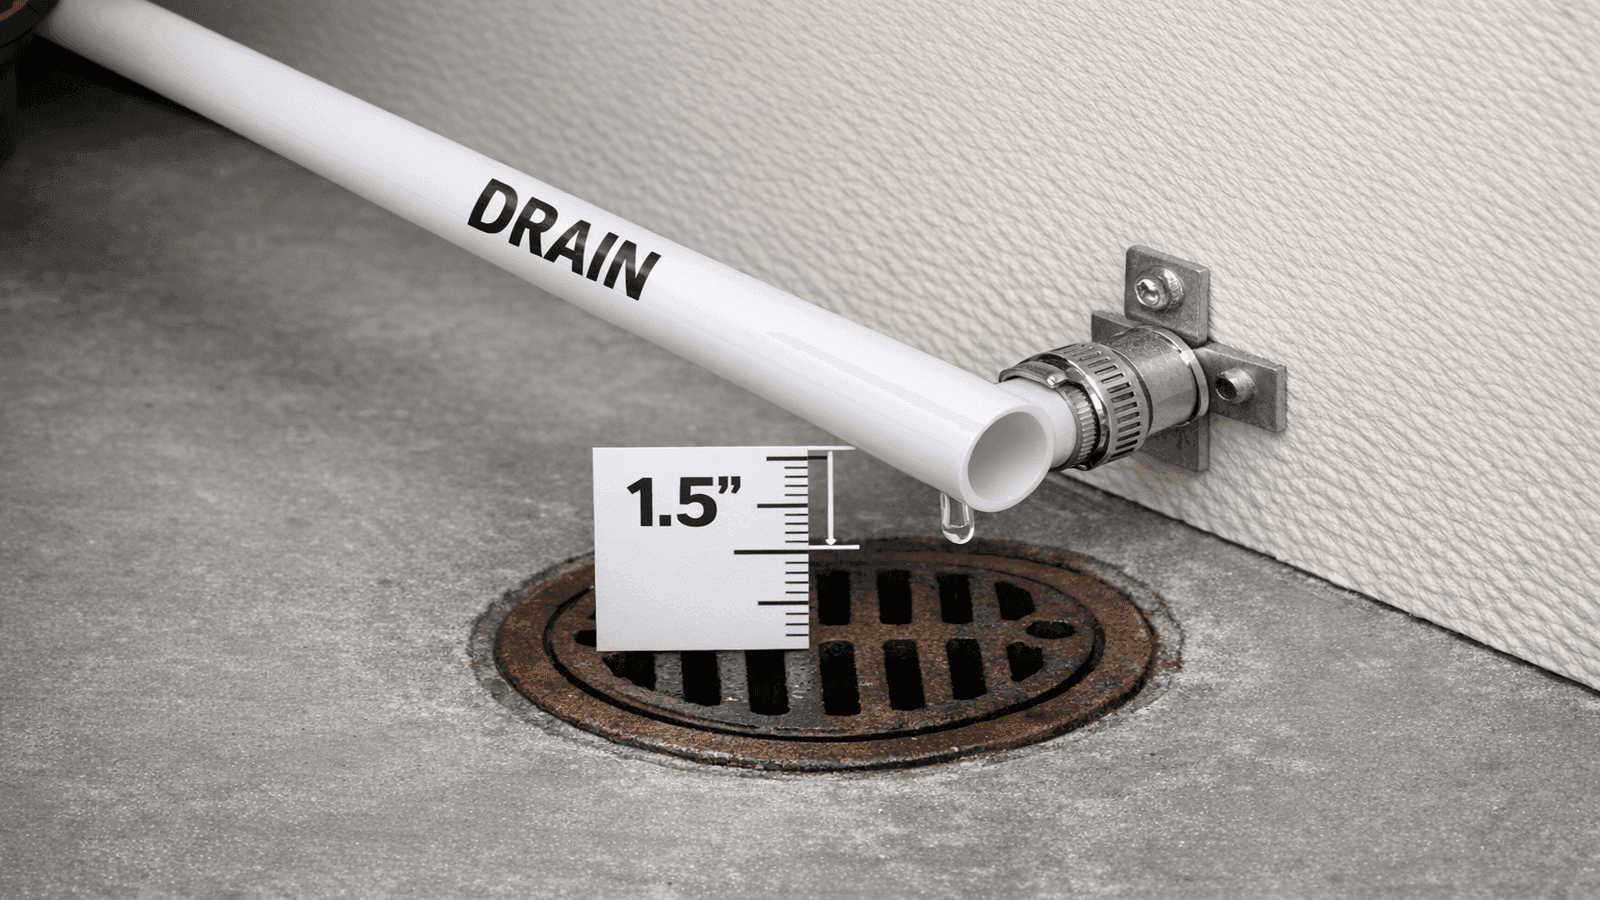
Photo: Drain line from water softener routed to a floor drain, PVC tube secured with hose clamp, 1.5-inch air gap visible above drain rim in utility room setting
Step 6: Set Up the Brine Tank
The brine tank holds the salt that recharges the resin bed during regeneration.
Brine tank setup:
- Position the brine tank beside the mineral tank and connect the brine line from the float valve to the control head brine port
- Add 40 to 60 pounds of salt for the first fill (standard 9x48-inch mineral tank)
- Pour 3 to 4 gallons of water into the brine tank before adding salt if the tank does not self-fill
Salt type selection:
- Solar salt crystals: 99.6% pure, lowest bridging risk, most common choice
- Evaporated salt pellets: 99.9% pure, best for high-iron water
- Potassium chloride: Sodium-free alternative for sodium-restricted diets; costs 2 to 3 times more
Keep the brine tank at least one-quarter full between fill cycles. Running it completely dry causes air to enter the brine line, which disrupts regeneration.
In Texas, we see a lot of municipal water with chloramines, and those eat through resin faster than almost anything else. If your municipal supply uses chloramines instead of chlorine, install a carbon pre-filter before the softener. It adds $150 to $300 to the project but doubles the life of your resin bed.
Real Installation Story
A homeowner in Frisco, Texas noticed white scale coating the inside of her dishwasher and a dramatic reduction in hot water pressure over two years. A plumber tested the water at 14.2 GPG, among the hardest in the region. The appliance damage had already affected the water heater elements (replaced at $350) and two showerheads. The plumber installed a dual-tank salt-based softener to handle the hardness without interruption during regeneration, added a carbon pre-filter for chloramines, and set a programmable control head calibrated to the household's usage. Total installed cost: $3,400. Within 30 days the homeowner reported soap lathering at half the previous quantity and no new scale forming on fixtures.

Photo: Brine tank being filled with white salt pellets, bags of water softener salt nearby, brine tank positioned next to mineral tank with connecting brine line visible
Step 7: Program the Control Head and Run First Regeneration
Modern digital control heads require three settings: water hardness level, time of day, and regeneration schedule.
Programming steps:
- Set current time -- regeneration defaults to 2:00 a.m. to minimize household disruption
- Enter your tested water hardness in GPG -- add 4 GPG for every 1 PPM of ferrous iron
- Set household size or average daily water usage
- Run a manual regeneration cycle immediately after programming
The first regeneration cycle takes 90 to 120 minutes. Do not use water during this cycle.
The licensed plumbers in our NearbyHunt network report that skipping the first manual regeneration is the single most common installation error they correct on service calls -- the factory resin ships with residues that must be flushed before the system delivers reliably soft water.
Get quotes from top-rated pros.
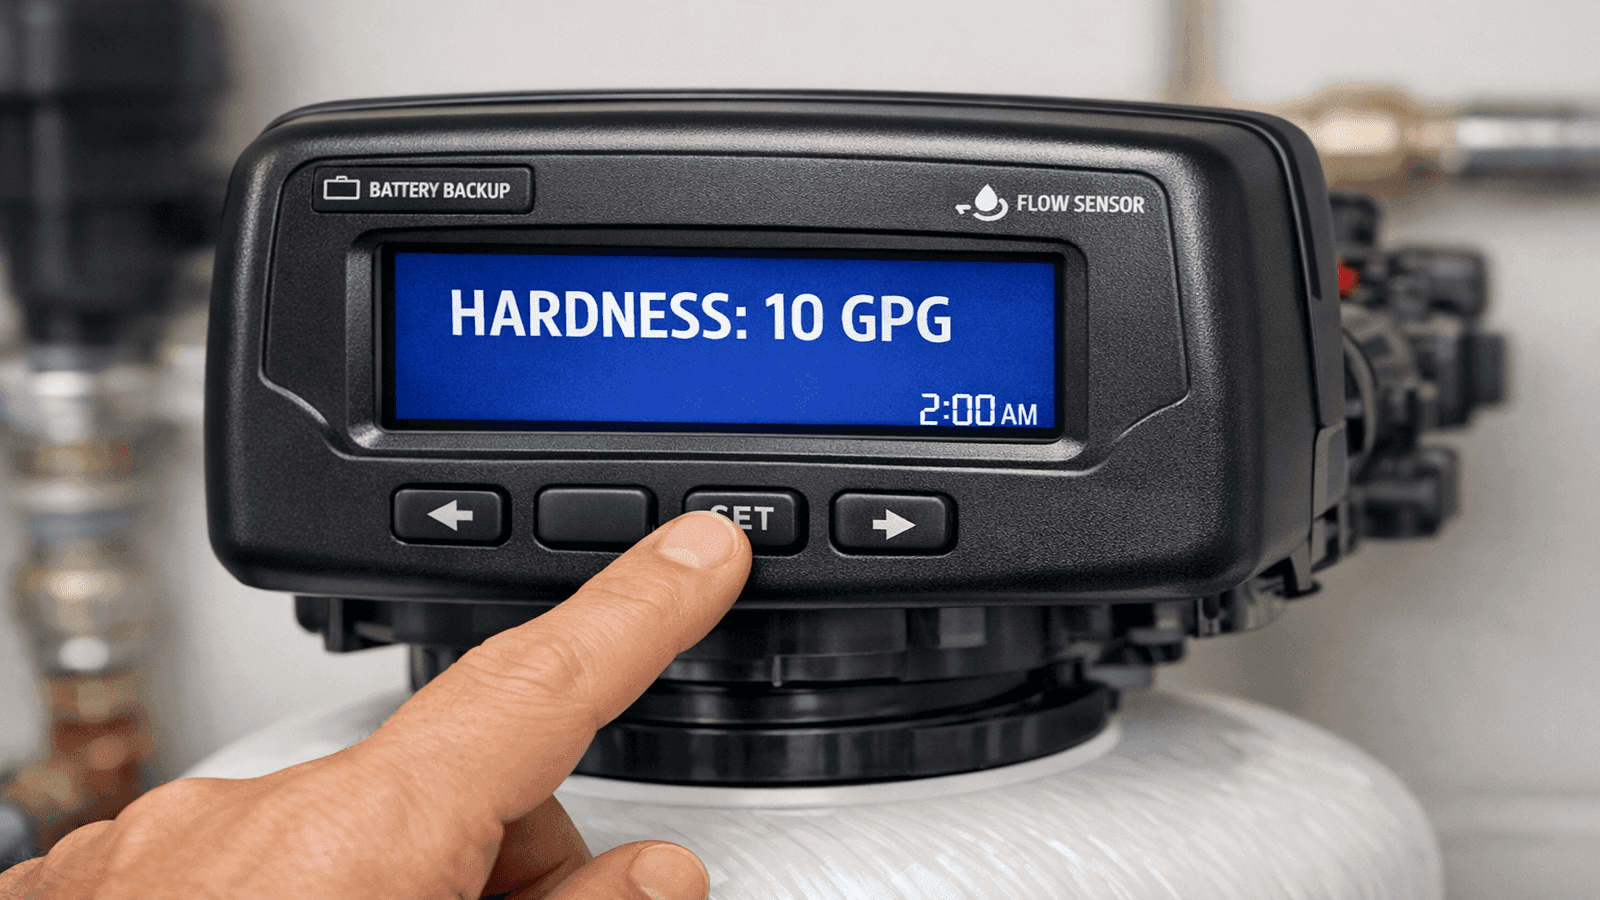
Photo: Digital control head on water softener being programmed, LCD display showing water hardness setting, homeowner's hand adjusting programming buttons
Water Softener Installation Cost in 2026
| System Type | Unit Cost | Installation Labor | Total Installed Cost |
| Single-tank salt-based | $500 to $1,500 | $500 to $700 | $1,000 to $2,200 |
| Dual-tank salt-based | $1,500 to $3,000 | $700 to $1,000 | $2,200 to $4,000 |
| Salt-free conditioner | $1,500 to $3,000 | $400 to $600 | $1,900 to $3,600 |
| High-capacity (commercial-grade residential) | $2,500 to $4,500 | $800 to $1,200 | $3,300 to $5,700 |
| Permit (where required) | -- | $50 to $200 | -- |
Labor runs $150 to $700 for standard installations [4]. DIY installation is feasible for homeowners with basic plumbing experience. Budget $500 to $1,500 for DIY (unit only). Improper installation voids most manufacturer warranties.
Maintenance Schedule
| Task | Frequency | Notes |
| Check salt level | Monthly | Refill when tank is less than one-quarter full |
| Break up salt bridges | Every 3 to 6 months | Use broom handle to probe for hollow crust above brine water |
| Clean brine tank | Annually | Remove old salt mush, rinse tank, refill with fresh salt |
| Inspect bypass valve and connections | Annually | Check for corrosion, mineral deposits, slow drips |
| Full system inspection by plumber | Every 5 years | Control valve seals, resin capacity test, full efficiency check |
I get calls every spring from homeowners whose softener stopped working over winter. They hadn't checked the salt in months, and a salt bridge formed -- a hardened crust over the brine solution that looks full but does nothing. Break it up with a broom handle and the system comes right back. Takes 30 seconds to prevent a $200 service call.
When to Call a Professional
DIY installation is practical for homeowners comfortable with basic plumbing. Call a licensed plumber for:
- Main line cut-in in finished spaces -- drywall repair, confined access, and pipe alignment all benefit from professional tools
- High iron or manganese content -- pre-filter selection and system sizing require a water analysis interpreted by an experienced plumber
- Well water systems -- pressure tank interaction, sediment levels, and variable flow rates require system-matched sizing
- Permit requirements -- some municipalities require licensed contractor installation; verify with your local building department per our plumbing code requirements guide
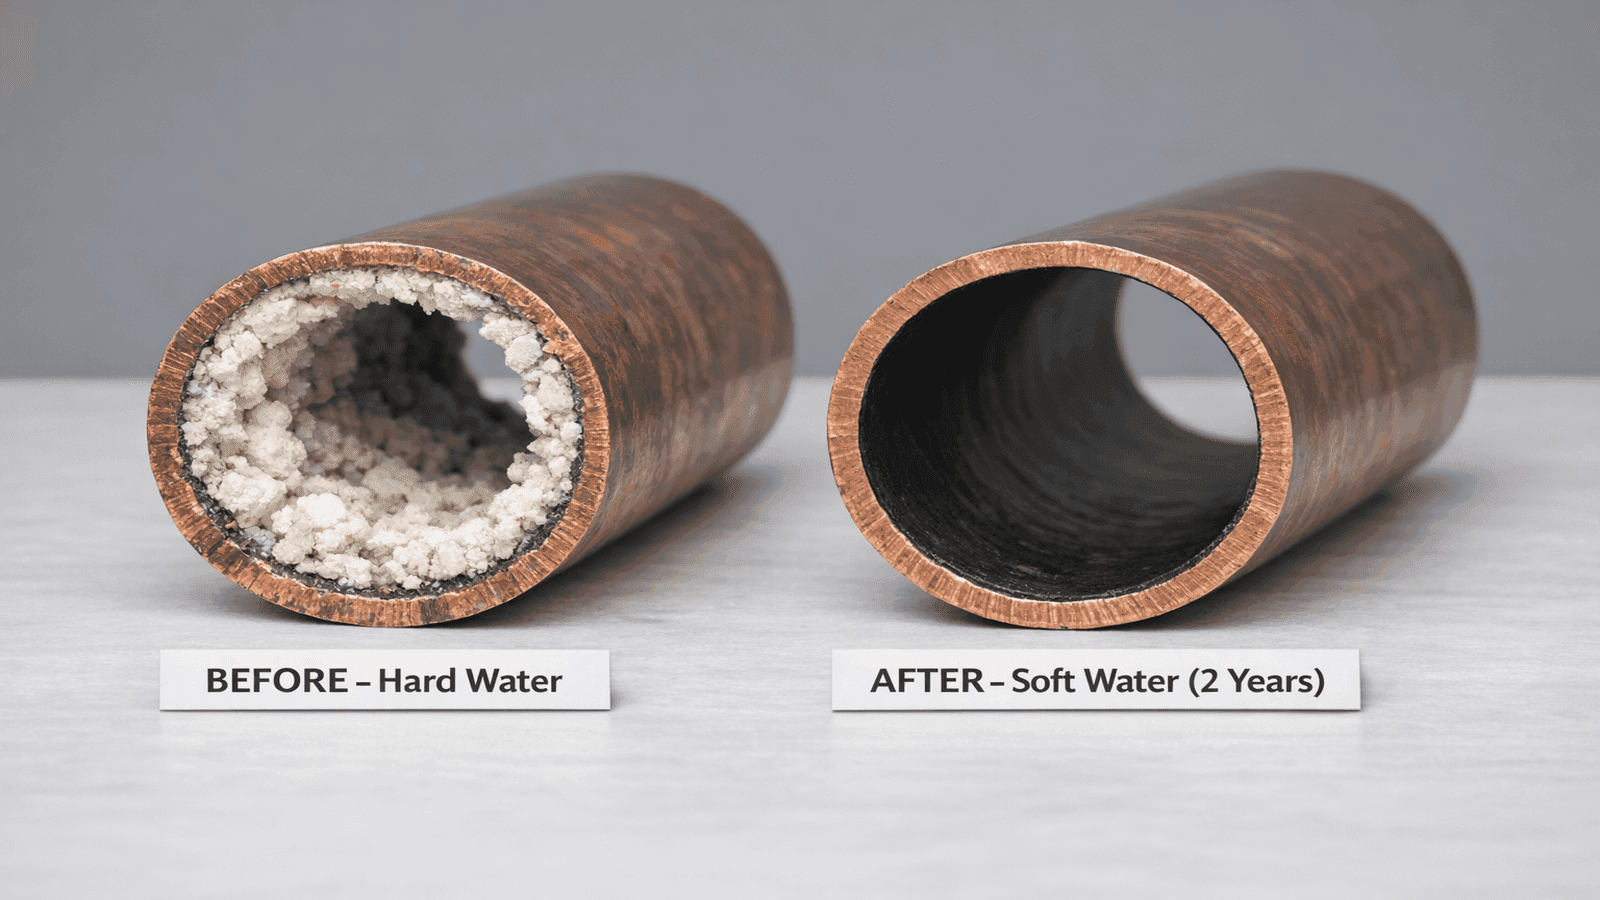
Photo: Before and after comparison of pipe cross-sections showing heavy scale buildup vs clean pipe after water softener installation
Conclusion
Water softener installation follows a clear sequence: test your water, size the right system, install the bypass valve, connect inlet and outlet lines, route the drain line with a proper air gap, set up the brine tank, and program the control head. The bypass valve and drain air gap are the two elements that most homeowners underestimate and most inspectors flag. For a standard single-tank installation in an accessible utility room, a professional plumber should complete the job in under 4 hours at a total cost of $1,000 to $2,200.
Disclaimer: Water softener installation costs and code requirements vary by region, municipality, and project scope. Prices cited reflect national averages for 2026 and may differ significantly in your area. Always verify permit requirements with your local building department before beginning any plumbing work. This guide is for informational purposes and does not substitute for the advice of a licensed plumbing professional.
Sources & References
- U.S. Geological Survey. "Hardness of Water." https://www.usgs.gov/special-topics/water-science-school/science/hardness-water
- Rheem Water Treatment. "Drain Hose Requirements." https://rheemwatertreatment.zendesk.com/hc/en-us/articles/360059505934-Drain-Hose-Requirements
- Quality Water Treatment. "Plumbing Requirements for Water Softeners (Jan 2026)." https://qualitywatertreatment.com/pages/plumbing-requirements-for-installing-water-softeners
- Bob Vila. "Water Softener Installation Cost 2026." https://www.bobvila.com/articles/water-softener-cost/
- This Old House. "Water Softener Cost Guide 2026." https://www.thisoldhouse.com/plumbing/water-softener-cost
- SoftPro Water Systems. "Bypass Valve Tricks: Water Softener Installs (Jan 2026)." https://www.softprowatersystems.com/pages/bypass-valve-tricks-water-softeners-installation-options

Michael Jennings is a licensed master plumber & water systems specialist with over 18 years of hands-on experience in residential and commercial plumbing, serving clients across California and Texas. At NearbyHunt, he shares practical advice on pipe installations, water heater maintenance, and home plumbing upgrades. Michael has helped thousands of homeowners prevent costly water damage and improve water efficiency through modern plumbing solutions.

Robert is a licensed master plumber with over 20 years of experience serving both residential and commercial clients across the Midwest. Specialising in advanced plumbing systems and sustainable water technologies, Rob brings deep technical insight and hands-on expertise to every project. As a reviewer for NearbyHunt, he ensures all plumbing content reflects the highest standards of safety, compliance, and practicality.