- 1 roofing square = 100 sq ft. Contractors price by the square, so you need to convert your measurements before comparing bids.
- Roof area is always larger than your home's footprint. The pitch multiplier ranges from 1.05 (2:12 pitch) to 1.56 (12:12 pitch) depending on slope.
- Ground-level estimation using your home's footprint is accurate to within 10%, sufficient for materials budgeting and initial bid comparison.
- Accurate measurement before getting quotes prevents over-ordering materials by 15-25% or under-buying and stalling the job mid-project.
- James Carver has measured 1,800-plus residential roofs over 20 years. The pitch multiplier is the single number homeowners always forget to apply.
Before a single shingle is priced, before a contractor quotes the job, the roof has to be measured. Homeowners who skip this step walk into bids without context, unable to tell whether a quote reflects 22 squares or 32. A difference of 10 squares at $450 per square is $4,500 in materials alone. That gap can come from a legitimate design difference, a contractor error, or padding. Without your own measurement, you cannot know which.
This guide shows you exactly how to measure your roof from the ground and, when greater accuracy is needed, from on top of it. You will learn the pitch multiplier system contractors use, how to count roofing squares for a material order, and how to verify whether a contractor's numbers add up. For a full overview of everything a roofing project involves from start to finish, including how to hire a contractor and what to expect during installation, see our complete guide on roofing how-to and DIY projects.

Get quotes from top-rated pros.
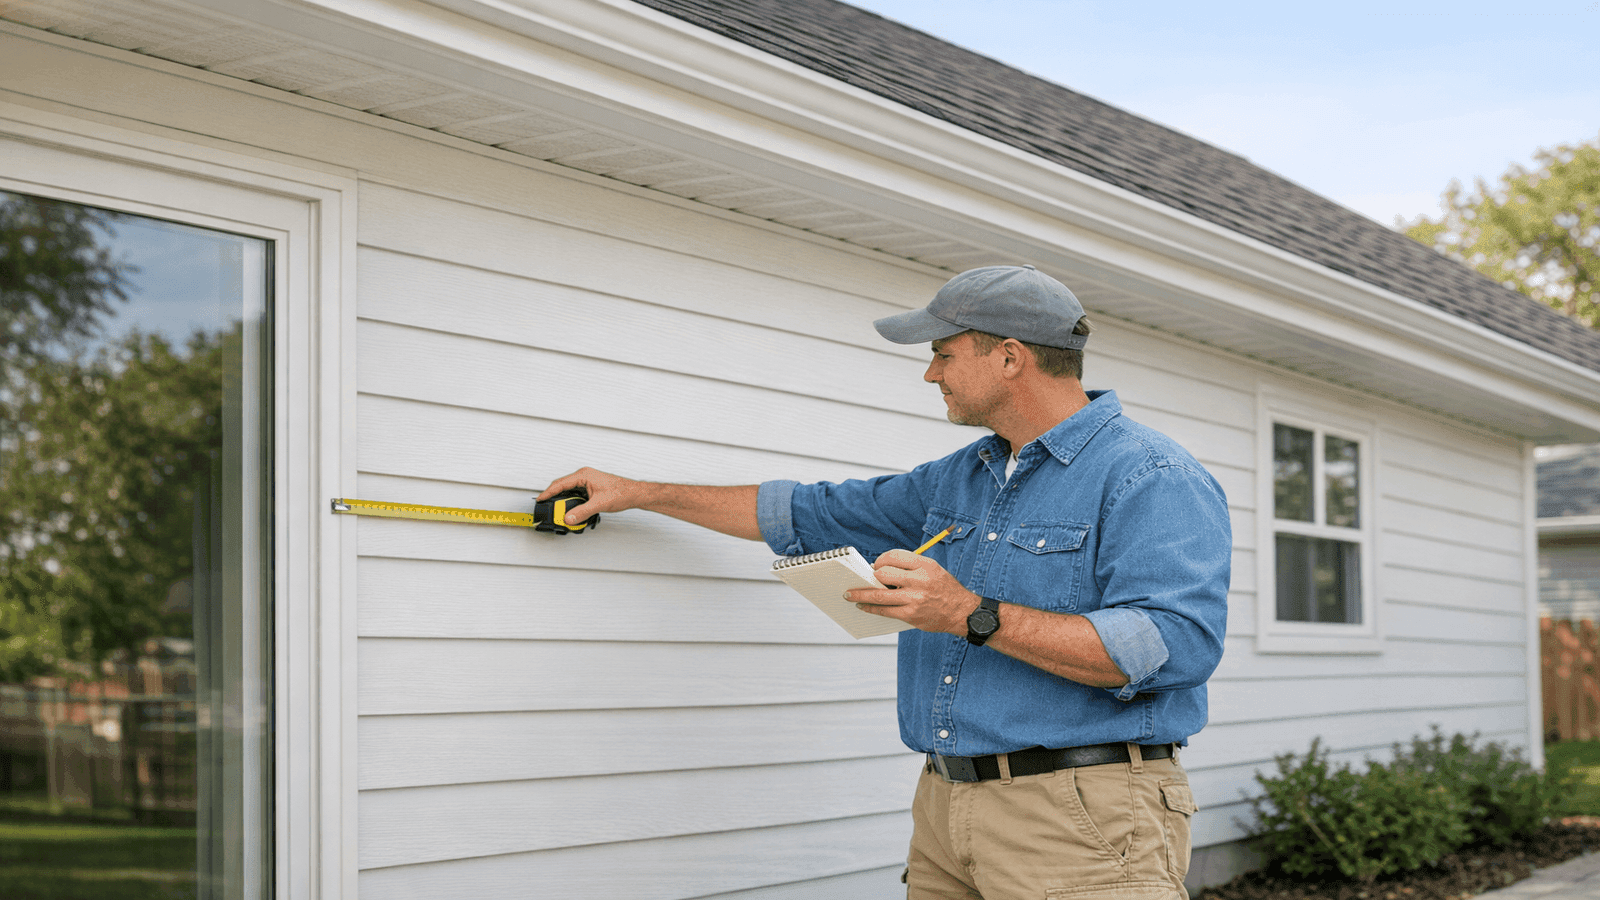
Photo: Homeowner measuring house exterior wall length with measuring tape, notepad in hand, reviewing ground-level footprint dimensions
Why You Need to Measure Your Roof
Measurement is not just a contractor task. Homeowners who know their roof's square footage walk into every phase of a roofing project with an advantage. Here are the five situations where your own measurement directly protects you:
Accurate materials estimates before the project starts. When you call a roofing supplier for ballpark pricing on shingles, they will ask how many squares you need. Without your own count, you are guessing. With it, you can price materials independently and evaluate whether a contractor's materials line item is reasonable.
Bid verification. If two contractors quote the same job at 22 and 30 squares respectively, one of them has the wrong number. Your own measurement tells you which quote is grounded in reality. A 25-percent difference in square count warrants a direct question before you sign anything.
DIY repair planning. Replacing a section of damaged shingles requires knowing how many bundles to buy. Three bundles equal one square for most standard 3-tab and architectural shingles. If you are patching 300 sq ft, that is 3 squares, or 9 bundles. Buying the right quantity on the first trip prevents project delays.
Insurance claims. After a hail or wind event, your insurance adjuster will calculate replacement cost based on the roof area. Knowing your square footage lets you cross-check their estimate and flag discrepancies before you agree to a settlement. [1]
Pre-sale inspections. Roof size appears in home inspection reports and replacement cost calculations. Having accurate figures ready saves time during the appraisal and inspection process.
Key Terms and Concepts
Understanding three terms makes every roofing measurement make sense.
Roofing square: 100 square feet. All roofing materials are sold and priced by the square. A 2,500 sq ft roof is 25 squares. This is the unit contractors use on every quote.
Pitch (slope): The steepness of a roof, expressed as rise over run. A 6:12 pitch rises 6 inches for every 12 inches of horizontal run. A 4:12 pitch is relatively low-slope. A 12:12 pitch is very steep, nearly a 45-degree angle.
| Pitch | Rise:Run | Pitch Multiplier | Area Increase Over Flat |
| 2:12 | 2 in / 12 in | 1.014 | +1.4% |
| 3:12 | 3 in / 12 in | 1.031 | +3.1% |
| 4:12 | 4 in / 12 in | 1.054 | +5.4% |
| 5:12 | 5 in / 12 in | 1.083 | +8.3% |
| 6:12 | 6 in / 12 in | 1.118 | +11.8% |
| 7:12 | 7 in / 12 in | 1.158 | +15.8% |
| 8:12 | 8 in / 12 in | 1.202 | +20.2% |
| 9:12 | 9 in / 12 in | 1.250 | +25.0% |
| 10:12 | 10 in / 12 in | 1.302 | +30.2% |
| 12:12 | 12 in / 12 in | 1.414 | +41.4% |
Bundle: One-third of a square for most 3-tab and architectural shingles. Three bundles equal one square. Heavy laminate or slate-profile shingles may use 4 or 5 bundles per square; confirm with the manufacturer's packaging.
Waste factor: An additional percentage added on top of the measured total to account for cuts, overlaps, starter strips, and damaged pieces. Simple gable roofs: add 10 percent. Complex roofs with multiple hips, valleys, and dormers: add 15-20 percent.
Method 1: Ground-Level Estimation (No Ladder Needed)
Ground-level measurement gives you a footprint area you then convert using the pitch multiplier. The result is accurate to within 10 percent of the actual roof area, which is sufficient for budgeting and bid comparison. [3]
Step 1: Measure the House Footprint
Walk the perimeter of your home and measure each exterior wall length. For a rectangular home, you need two measurements: length and width. For an L-shaped or irregular footprint, break the shape into rectangles and measure each section separately.
Include the garage if it has an attached roof that connects to the main structure. Measure to the outside of the exterior walls, not the interior.
Example: A rectangular home measures 40 feet wide by 60 feet long.
- Footprint area = 40 x 60 = 2,400 sq ft
Step 2: Add Roof Overhangs
Standard roof overhangs extend 12 to 24 inches beyond the exterior wall on all sides. Add 1 to 2 feet to each dimension to account for this extension, then recalculate.
Example continued: Adding 2 feet on each side to both dimensions:
- Adjusted length = 64 feet (60 + 2 + 2)
- Adjusted width = 44 feet (40 + 2 + 2)
- Adjusted footprint = 64 x 44 = 2,816 sq ft
For a quick estimate without overhang adjustment, many contractors simply use the floor plan area and accept the slight undercount.
Step 3: Apply the Pitch Multiplier
Estimate your roof's pitch visually or with a free pitch-gauge app (described in the next section). Look up the multiplier in the table above and multiply your footprint area.
Example continued: 6:12 pitch, multiplier 1.118
- 2,400 sq ft x 1.118 = 2,683 sq ft
- 2,683 sq ft / 100 = 26.8 squares
Step 4: Add the Waste Factor
Add 10 percent for a simple gable roof or 15 percent for a hip or complex roof.
Example continued: Simple gable, 10 percent waste
- 26.8 squares x 1.10 = 29.5 squares
- Round up: order 30 squares
Get quotes from top-rated pros.
For two-story homes where the footprint is hard to visualize from the street, I use Google Earth's satellite view to trace the roof outline directly. The tool gives you an area measurement in square feet. It reads the actual roof plane boundaries rather than the building footprint, so it saves the step of applying a pitch multiplier for simple gable roofs. I've confirmed Google Earth estimates within 3-5 percent of my physical tape measurements on simple two-story homes. It's a fast first check before I even get out of my truck.
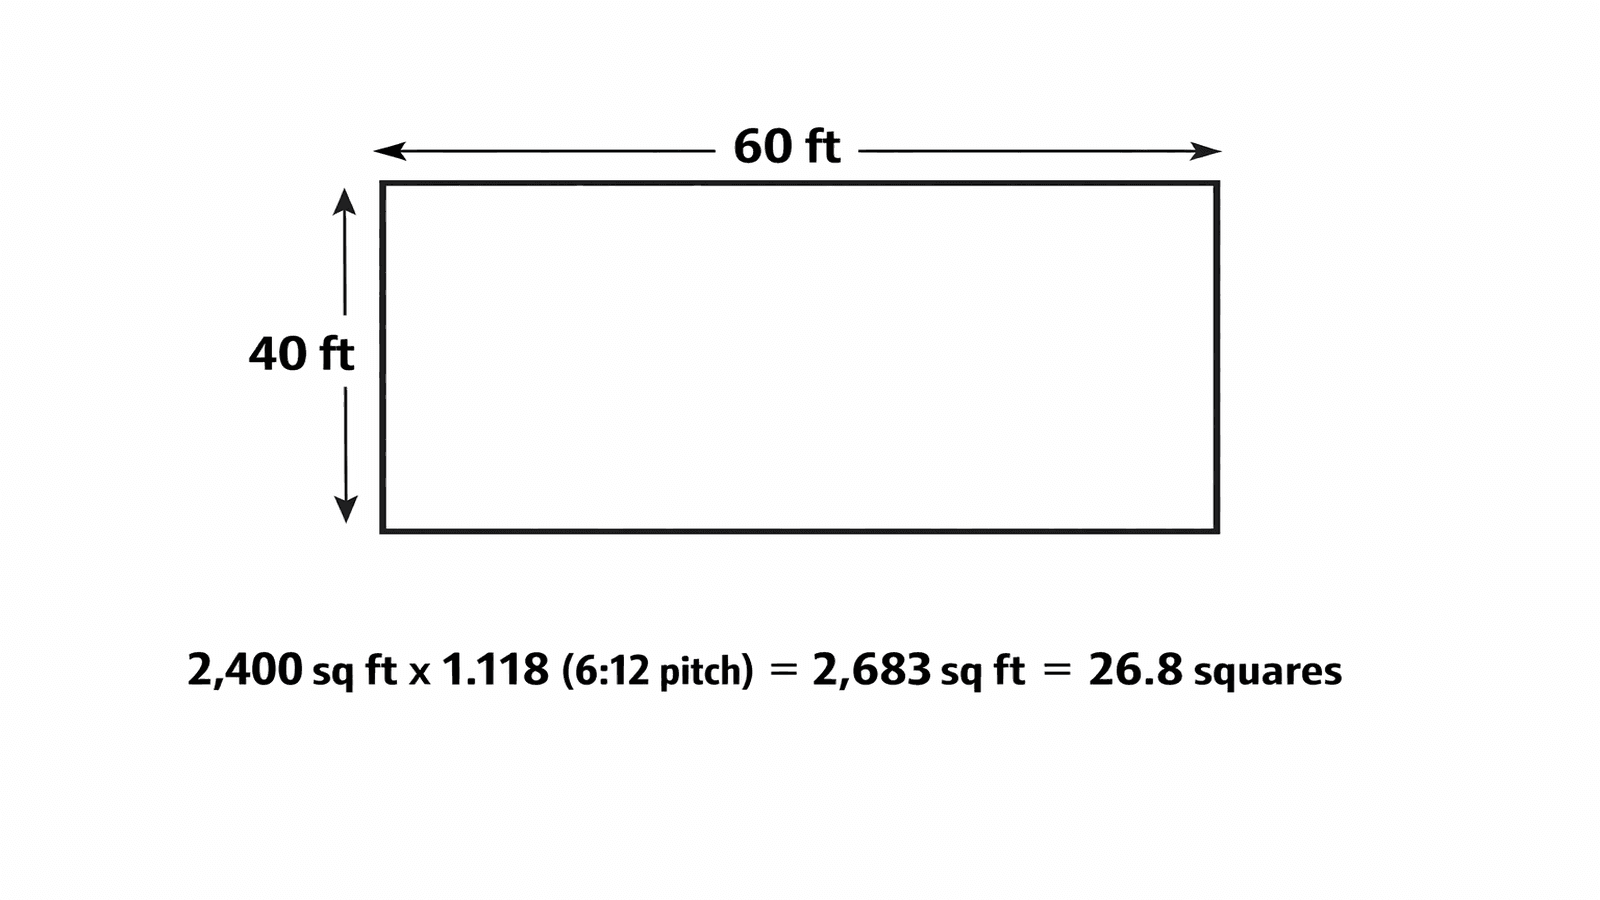
Photo: Diagram of a rectangular house footprint with labeled dimensions (40 ft x 60 ft), pitch multiplier calculation shown, and resulting roofing squares
Method 2: Direct On-Roof Measurement
When greater accuracy matters, such as verifying a contractor's bid on a complex roof or purchasing materials yourself, direct measurement is the right approach.
Safety first: Only perform on-roof measurements on pitches of 6:12 or less. Any steeper requires fall protection equipment, including a safety harness anchored to the ridge. Wet roofs are always off-limits. If you are not comfortable on a ladder or roof surface, the ground-level method is accurate enough for most purposes.
Step 1: Identify Each Roof Plane
A roof plane is any distinct flat (or sloped) surface. A simple gable roof has two planes. A hip roof has four. A home with dormers may have 8 to 12 or more distinct planes.
Walk the perimeter of the home and sketch a rough diagram identifying each plane before you go up.
Step 2: Measure Each Plane
For each rectangular plane, measure width (along the eave or ridge) and length (from eave to ridge, measured along the slope). Multiply them together.
For hip end sections, the plane is a triangle. Measure the base (the eave length at the end wall) and the vertical height of the triangle (from eave center to ridge). Divide by 2.
- Triangle area = (base x height) / 2
Step 3: Add All Planes Together
Sum every individual plane area to get total gross roof area in square feet.
Step 4: Divide by 100 and Apply Waste Factor
Divide total square footage by 100 for squares. Then apply your waste factor:
- 10 percent for simple roofs (standard gable, minimal cuts)
- 15 percent for complex roofs (multiple valleys, hip ends, dormers)
Every roof, no matter how complex, breaks down into rectangles and triangles. I've measured roofs with 14 planes on them and the process is always the same: sketch the shape, identify every surface, assign each one to a geometric formula. Hip end? Triangle. Dormer slope? Rectangle. Dormer face? Rectangle. When contractors say a roof is 'too complicated to give an itemized breakdown,' that's a flag. Every plane is measurable and documentable. Ask for the breakdown.
Estimating Pitch from the Ground
You do not need to climb a ladder to estimate pitch. Three approaches work reliably from street level.
Visual Comparison Method
A 4:12 pitch is a moderately gentle slope that looks like a gradual rise over a long horizontal run. A 6:12 pitch is the most common residential pitch in the U.S. South and Midwest. A 12:12 pitch looks nearly vertical from the ground.
| Pitch | Visual Description | How It Looks From the Street |
| 2:12 to 3:12 | Very low slope | Almost flat, barely noticeable rise |
| 4:12 to 5:12 | Low to moderate slope | Gentle incline, clearly sloped |
| 6:12 to 7:12 | Moderate slope | Standard residential pitch, obvious slope |
| 8:12 to 10:12 | Steep slope | Noticeably steep, angle visible clearly |
| 12:12 | Very steep | Looks nearly vertical from ground |
Pitch Gauge App
Free smartphone apps including Pitch Gauge (iOS/Android) let you hold your phone flat against a rake board, fascia board, or roofline edge and read a digital pitch measurement. Accuracy is within 0.5:12 for most phones. This is the fastest method available without climbing.
Get quotes from top-rated pros.
Measuring from the Attic
From inside your attic, hold a level horizontally against a rafter. Measure 12 inches along the level from the rafter, then measure straight down to the rafter surface at that 12-inch mark. That vertical measurement is your rise. A 7-inch measurement confirms a 7:12 pitch. [4]
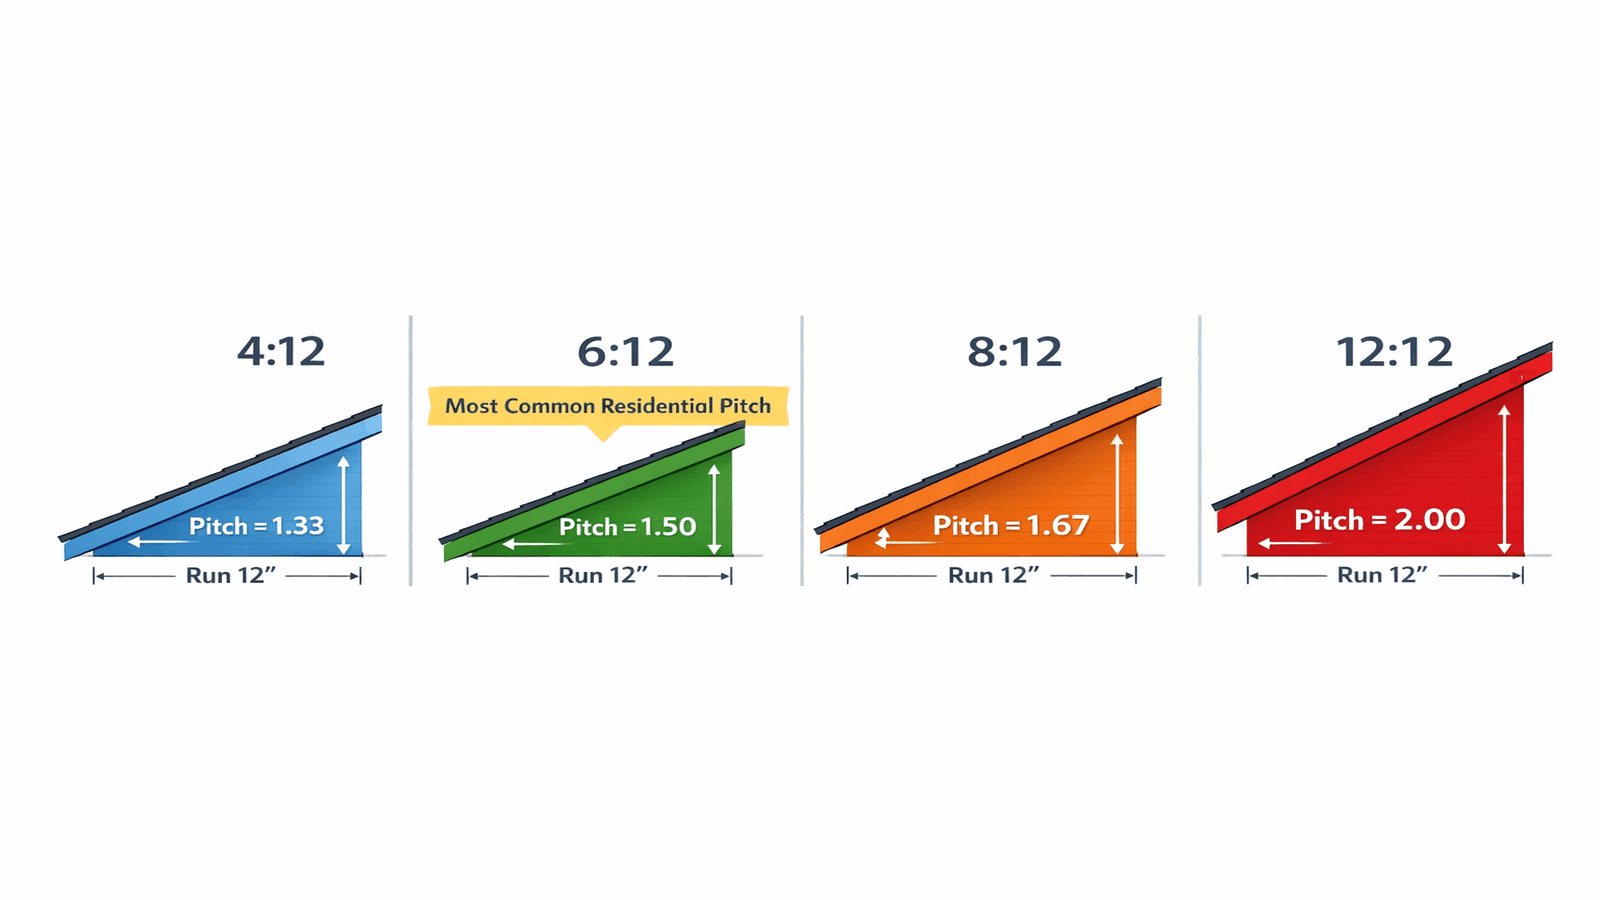
Photo: Side-view diagram showing four common roof pitch angles (4:12, 6:12, 8:12, 12:12) with visual appearance comparison and pitch multiplier labeled on each
How to Count Roofing Squares for a Material Order
Once you have your total roof area in square feet, converting to a material order is a four-step process.
The Complete Calculation
Step 1: Divide total square footage by 100 to get roofing squares.
Step 2: Multiply by your waste factor (1.10 or 1.15).
Step 3: Round up to the nearest whole square.
Step 4: Multiply by 3 to get the number of bundles (standard shingles only).
Full example for the 40x60 ft house with 6:12 pitch:
- Footprint: 2,400 sq ft
- Pitch-adjusted area: 2,400 x 1.118 = 2,683 sq ft
- Squares: 2,683 / 100 = 26.83 squares
- Plus 10% waste: 26.83 x 1.10 = 29.5 squares
- Round up: 30 squares
- Bundles: 30 x 3 = 90 bundles
The licensed roofing contractors in our NearbyHunt network report that professional crews typically add 12-15 percent waste on average for standard residential jobs, and increase to 20 percent on steep or complex roofs with multiple valleys and dormers. Adding the lower end of that range for a simple roof and the higher end for a complex one is how experienced estimators avoid callbacks for additional material deliveries mid-project.
Typical Square Counts by Home Size
| Footprint Size | Pitch | Est. Squares (no waste) | With 10% Waste |
| 1,200 sq ft | 4:12 (x1.054) | 12.6 | 13.9 (14) |
| 1,200 sq ft | 6:12 (x1.118) | 13.4 | 14.8 (15) |
| 1,800 sq ft | 4:12 (x1.054) | 19.0 | 20.9 (21) |
| 1,800 sq ft | 6:12 (x1.118) | 20.1 | 22.1 (23) |
| 2,400 sq ft | 4:12 (x1.054) | 25.3 | 27.8 (28) |
| 2,400 sq ft | 6:12 (x1.118) | 26.8 | 29.5 (30) |
| 3,000 sq ft | 4:12 (x1.054) | 31.6 | 34.8 (35) |
| 3,000 sq ft | 6:12 (x1.118) | 33.5 | 36.9 (37) |
Accounting for Dormers, Skylights, and Complex Features
Complex roof features require individual calculations added to the base measurement.
Dormers
A dormer adds five measurable surfaces: two side walls (triangular gable shapes), two sloped roof planes (one on each side of the dormer ridge), and one vertical face. For each dormer:
- Measure the two dormer roof slopes (length x width each, add together)
- Add the two triangular gable ends (base x height / 2, each)
- The vertical front face is typically siding, not roofing, unless it has a small shed roof
Add each dormer's total to your main roof calculation.
Valleys
Valleys are where two roof planes meet at an inward angle. Shingles in valleys are cut on a bias, which increases waste significantly. Add 10 percent to the area of each plane adjacent to a valley to account for the extra material consumed in valley cuts. [5]
Skylights
Subtract the skylight rough opening from the roof plane area. Then add back 10 percent of the opening perimeter to account for step flashing and trim cuts around the frame.
Hip Ends
Each hip end is a triangle. Measure the base (the eave length at the end wall) and the slant height from eave to ridge. Apply the triangle formula: base x height / 2.
Get quotes from top-rated pros.
| Feature | How to Measure | Material Adjustment |
| Dormer | Sum all planes individually | Add each to total |
| Valley | Adjacent plane area | Add 10% per adjacent plane |
| Skylight | Subtract opening, add perimeter | Net: minor reduction |
| Hip end | Triangle: base x height / 2 | Include in total area |
| Chimney | Subtract base footprint | Minor, often ignored on small chimney |
Using Online Roof Calculators and Apps
Online tools deliver budget-level accuracy without any physical measurement. Used correctly, they confirm whether your manual calculation is in the right range.
Google Earth / Satellite View: Search your address on Google Earth, switch to satellite view, and use the measurement tool to trace your roof's outer boundary. The tool reports area in square feet. This method reads the roof plane boundary directly, making it particularly useful for homes with complex footprints or attached wings that are hard to measure from the ground. Accuracy: within 5-10 percent of physical measurement. [6]
Pitch gauge apps: Free apps like Pitch Gauge (iOS/Android) use your phone's accelerometer to read roof pitch from any angled surface. Hold the phone against a gutter board or rake board for a digital reading accurate to within 0.5:12.
Roofing calculator websites: Several roofing supply websites offer square calculators. Enter your footprint dimensions and pitch, and they output squares and bundles. These are useful for quick verification but should not replace your own measurement for actual material orders.
I use apps and satellite tools to pre-check before every estimate, but I never order materials without physically confirming the measurement. For budgeting, figuring out if a project is in the $8,000 range or the $18,000 range, the app is perfectly fine. For actually buying 30 squares of shingles, you verify it in person. The 5-10 percent error in satellite tools translates to 2-3 squares on an average house. At $450 a square, that's $900-$1,350 in material cost variance. Worth 30 minutes on a ladder to get it right.
Real-World Case Study
Tom H. lives in Austin, TX and decided to replace his detached garage roof himself after storm damage left several sections of shingles lifted and cracked.
His garage measured 24 feet by 36 feet, with a 6:12 pitch.
Tom's ground-level calculation:
- Footprint: 24 x 36 = 864 sq ft
- Pitch multiplier (6:12): 864 x 1.118 = 965.95 sq ft
- Squares: 965.95 / 100 = 9.66 squares
- Plus 10% waste (simple gable): 9.66 x 1.10 = 10.6 squares
- Rounded up: 11 squares
- Bundles needed: 11 x 3 = 33 bundles
Tom then called a local roofing contractor for a quote on professional installation. The contractor came back with a material estimate of 30 bundles, or 10 squares. Tom's self-calculated estimate of 11 squares was within 10 percent of the professional count, well inside the expected variance for a ground-level method.
"What Tom did right was apply the pitch multiplier," says James Carver, who reviewed this calculation. "Most homeowners just multiply the footprint by 100 and think they're done. The 6:12 multiplier added almost 100 square feet to his calculation. Without it, he would have bought 25 bundles and been 5 bundles short of finishing the job."
Tom's 33-bundle estimate versus the contractor's 30-bundle figure was a difference of 3 bundles, roughly $120 in materials. Had Tom ordered based on footprint alone, skipping the pitch multiplier, he would have been 8 bundles short.
Verifying a Contractor's Square Count
After measuring your own roof, you have the single most useful tool for evaluating contractor bids: a number to compare against.
What to Ask For
Request a written measurement breakdown showing each roof plane, its dimensions, and its calculated area. A professional contractor on a standard residential roof should be able to provide this in 10 minutes. If they measured while on your roof, they have the numbers. Ask them to share the plane-by-plane list.
Red Flags
A quote that lists only a total square count without any plane breakdown is unverifiable. "Trust me" pricing on a $15,000 roofing job is not acceptable. If a contractor cannot or will not provide individual plane dimensions, move to the next bidder.
How to Use Your Estimate as a Sanity Check
If your estimate is 28 squares and a contractor quotes 35, ask specifically which planes account for the additional 7 squares. Sometimes the answer is legitimate: they included dormers you did not fully account for, or they are using a higher waste factor for a complex valley section. Sometimes the answer is silence, which tells you what you need to know. [7]
A variance of up to 15 percent between your ground-level estimate and a professional measurement is expected. A variance above 20 percent requires an explanation.
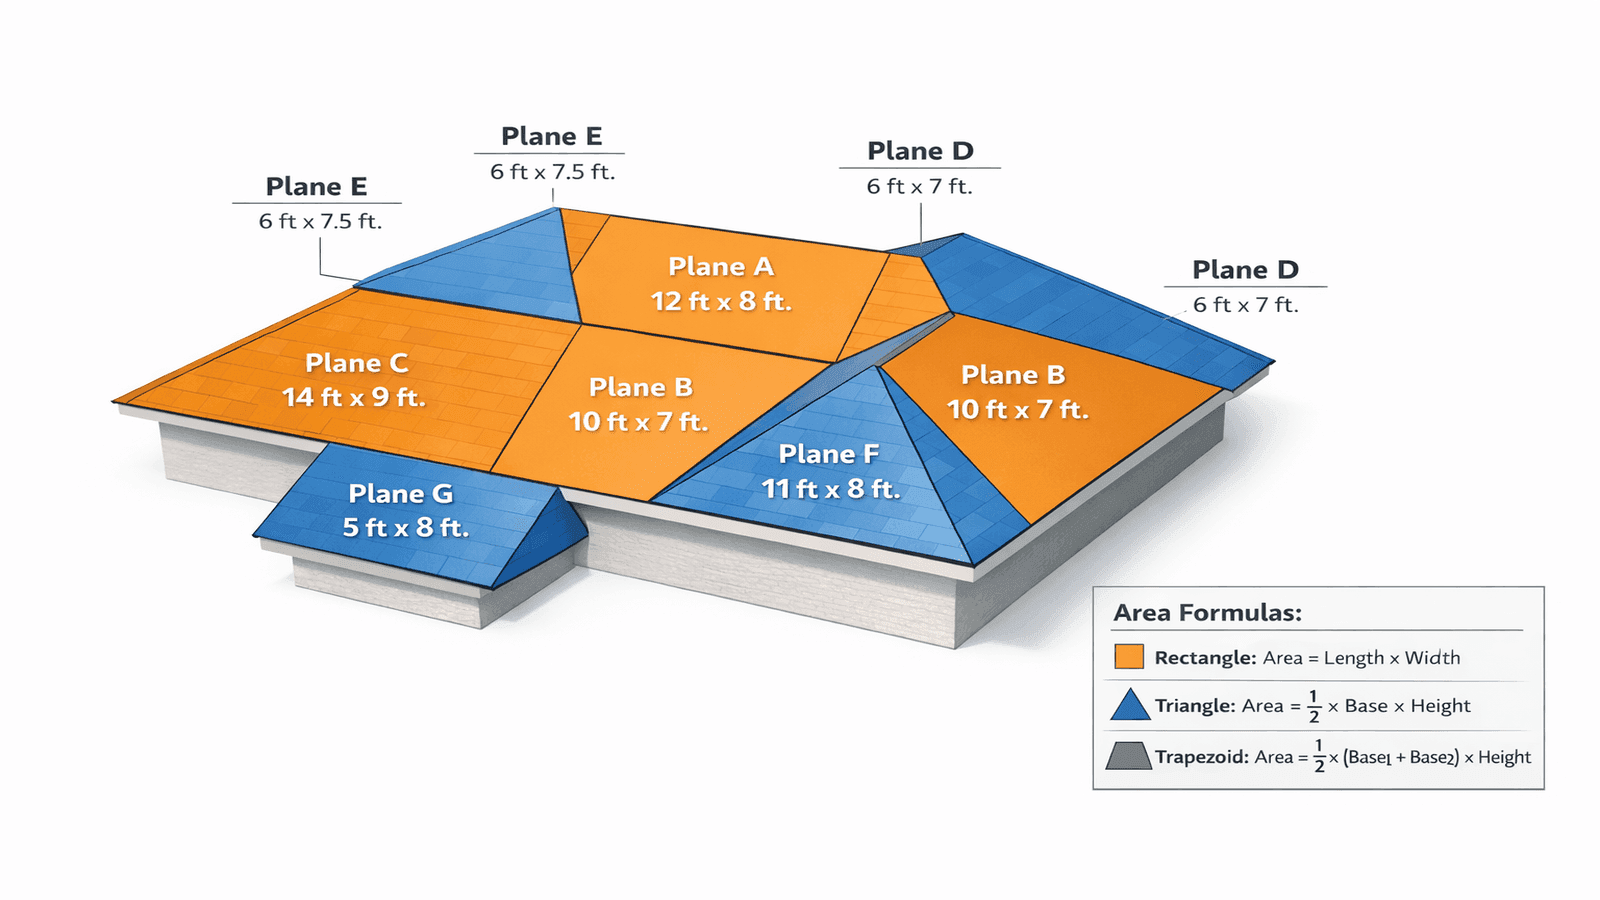
Photo: Complex hip roof diagram with labeled measurement planes, showing individual rectangle and triangle sections with dimensions marked
Conclusion
Measuring your roof is not a technically demanding task. The math involves multiplication and a lookup table. What it requires is the discipline to do it before you need the number, not after a contractor has already handed you a bid.
The core process is straightforward: measure the footprint, apply the pitch multiplier from the table in this guide, add a waste factor of 10-15 percent, and divide by 100 for squares. That calculation, which takes under 20 minutes from the ground, gives you enough accuracy to evaluate any quote, order materials, or plan an insurance claim.
James Carver has measured 1,800-plus residential roofing projects across the U.S. South and Midwest. In 20 years of field work, the most consistent mistake he sees is homeowners and inexperienced contractors skipping the pitch multiplier. On a 6:12 roof, that single omission understates the true area by nearly 12 percent, which translates to missing 3 squares on an average home and arriving at a project short on materials.
Use the methods in this guide for your initial estimate. If your project is large, complex, or involves significant storm damage, confirm with a direct measurement before ordering. And when a contractor provides their square count, ask for the plane-by-plane breakdown. The ones who have done the work can show it.
Ready to get accurate quotes from licensed roofing contractors in your area? Use your square footage calculation to evaluate bids with confidence. Find vetted roofing contractors near you on NearbyHunt.
Disclaimer: This article provides general guidance on measuring residential roof square footage. Actual roof areas vary based on design, pitch, and construction details. Always verify measurements with a licensed roofing professional before purchasing materials or signing contracts. Working on rooftops carries fall hazards; use appropriate safety equipment and follow all local safety codes. NearbyHunt.com does not guarantee the accuracy of third-party tools mentioned in this article.
Sources & References
- National Roofing Contractors Association — Residential Roofing Cost Data 2024
- GAF Roofing — Pitch Multiplier and Slope Reference Guide
- Insurance Institute for Business and Home Safety — Roof Measurement Methods
- Family Handyman — How to Measure Roof Pitch
- CertainTeed Shingle Application Manual — Valley Installation Requirements
- EagleView Technologies — Remote Measurement Accuracy Study 2023
- National Association of Home Inspectors — Roofing Inspection Standards
- Owens Corning Roofing — Bundle and Square Reference Chart

James is a licensed roofing contractor with 20 years of experience in roof installation, inspection, and repair across the U.S. South and Midwest. He specialises in asphalt shingles, metal roofing, and storm damage restoration. On NearbyHunt, James offers practical advice on roof maintenance, insurance claims, and selecting the right materials for long-lasting protection.

Jacob is a licensed roofing contractor with over 18 years of experience in roof inspection, installation, and restoration. Based in Texas, he has led hundreds of successful roofing projects across residential and commercial properties. Jacob is also a certified storm damage specialist, ensuring that all NearbyHunt roofing content meets industry best practices and safety standards.